Raible's Wiki
Raible Designs
Wiki Home
News
Recent Changes
AppFuse
Homepage- Korean
- Chinese
- Italian
- Japanese
QuickStart Guide
- Chinese
- French
- German
- Italian
- Korean
- Portuguese
- Spanish
- Japanese
User Guide
- Korean
- Chinese
Tutorials
- Chinese
- German
- Italian
- Korean
- Portuguese
- Spanish
Other Applications
Struts ResumeSecurity Example
Struts Menu
UserPreferences
Referenced by
AppFuseSupport_ko
![[RSS]](https://raibledesigns.com/wiki/images/xml.png "Aggregate the RSS feed")

Hide Menu
AppFuseEclipse_ko |
|
| Your trail: | |
This is version 2.
It is not the current version, and thus it cannot be edited.
[Back to current version]
[Restore this version]
AppFuse, 디폴트로, Eclipse
프로젝트가 되도록 설정되었다. 당신이 새로운 프로젝트를 생성하기 위해 ant new를 수행할 때, 당신은 프로젝트를 시작하기 위한 .project와 .classpath파일을 얻게 될 것이다. 어쨌든, 당신은 Eclipse내 몇몇 쉬운 셋팅을 할 필요가 있을것이다. 이 튜토리얼은 당신에게 AppFuse프로젝트를 개발하기 위해 Eclipse를 셋업하는 방법을 보여준다.
- 일반적으로, 나는 Eclipse를 사용하지 않고 이쁜 텍스트 편집기를 사용한다. 나는 명령창으로부터 컴파일, 테스팅, 개발을 수행한다. 이것은 빌드와 테스팅을 위해 Eclipse를 좀더 쉽게 사용하도록 만든 하우투 문서이다. 하지만, 이것이 당신에게는 작동하지 않는다면, 가장 좋은것은 Ant작업을 수행하기 위해 명령창을 사용하는 것이다. 물론, 당신이 Eclipse와의 통합에 대해서 더 잘 알고 있다면, 나에게 알려달라.
이 튜토리얼은 윈도우즈 XP와 Eclipse 3.0.1 그리고 어떠한 플랫폼에서도 잘 작동하도록 작성되었다. 당신은 Eclipse가 설치되어 있지 않다면, Eclipse 3.0.1 다운로드페이지에서 다운로드 가능하다. 나는 내가 생각하는 Eclipse용 플러그인 모음http://www.raibledesigns.com/page/rd/?anchor=eclipse_plugins_updated_for_31 No InterWiki reference defined in properties for Wiki called '내가 생각하는 Eclipse용 플러그인 모음http'!)이나 MyEclipse를 구매하길 추천한다. 내가 바라는 것은 MyEclipse/AppFuse프로젝트 생성을 사용하는 것이다. 하지만 이것은 AppFuse의 디렉토리 구조와 빌드 파일의 전체를 다시 쓰는것을 요구하고 나는 그런 시간이나 힘이 없다. 그 외에도, 당신이 Ant를 사용하는 것을 꺼리지 않는다면 시스템은 잘 작동할것이다.
목차
- [1] Eclipse내 새로운 프로젝트 생성하기
- [2] Eclipse내 Ant설정하기
- [3] Ant View에 build.xml추가하기
- [4] Ant 실행하기
- [5] Eclipse내 JUnit테스트 실행하기
- [6] 디버깅과 UI편집을 위한 팁
Create New Java Project in Eclipse [#1]
Open Eclipse (either with an existing or a new workspace) and to go File → New → Project. Then select "Java Project" and hit the Next button. In the Project Name field, enter the name of your project (i.e. appfuse) and the directory that your project lives (i.e. c:\source\appfuse) in the box below. If you're prompted to switch the Java Perspective, choose Yes.If you try to build the project at this point, you'll likely get numerous errors. Most of them involve the fact that the UserForm class can not be found. This is because all of the ActionForms in AppFuse (if you're using the Struts version) are generated from POJOs with XDoclet.
All of the tasks for XDoclet are configured in the Ant build.xml file so the easiest thing to do is to run "ant gen-forms" to generate the ActionForms. If you have Ant 1.6.2+ installed and in your path, you can do this from the command line. The next step shows you how configure Eclipse to run your AppFuse build.xml.
TIP: Here's a way to hide the JARs you see in Eclipse's Package Explorer.Configuring Ant in Eclipse [#2]
The easiest way to configure Eclipse for AppFuse is to install Ant on your hard drive (i.e. c:\Tools\apache-ant-1.6.2) and then point Eclipse's ANT_HOME to this directory. To do this, go to Window → Preferences → Ant → Runtime. Then click the "Ant Home" button and select the installation folder on your hard drive.
If you'd rather use Eclipse's built-in Ant, you'll need to add junit.jar to its classpath. To do this, go to Window → Preferences → Ant → Runtime. Then click the "Add JARs" button and select junit.jar from appfuse/lib/junit3.8.1/lib/junit.jar. Click OK until you arrive back at the workbench view.
Next, add the catalina-ant.jar (from $CATALINA_HOME/server/lib) to the ant classpath. Then in the property tab, add tomcatTasks.properties (in lib/ant-contrib) file as a global properties file.
Below is a screenshot of what your Ant Runtime classpath should look like after the above modifications:

Add build.xml to Ant View [#3]
Now we need to add the build.xml to Eclipse's Ant View. To do this, go to Window → Show View → Ant. Then click on the first icon in this view (screenshot below) to add AppFuse's build file.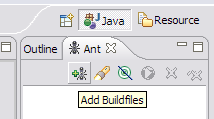
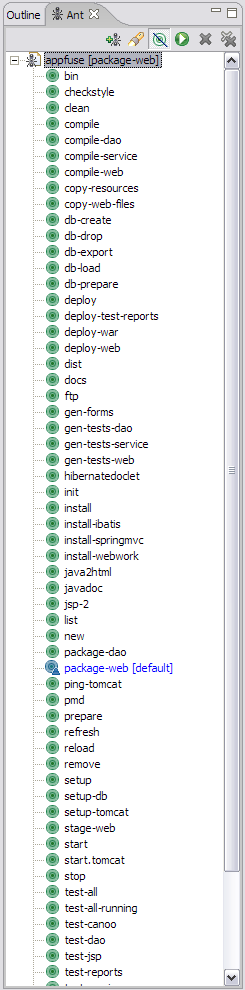
Run Ant [#4]
After adding the build.xml, you should be able to expand it in the Ant View and execute any of the targets. I usually do "test-all" to verify all the tests pass in my initial project. For a list of targets I use most often, see AppFuse Ant Targets.Now if you run the "compile" target and then refresh the project (right-click on project → Refresh) you shouldn't see any errors in the "Problems" pane. You should now be able to compile and create classes as you normally would. Sometimes when my imports aren't resolving correctly in Eclipse, I do have to run Project → Clean in Eclipse.
NOTE: If you're using the internal version of Ant, you may get an error message like the one below:BUILD FAILED: C:\source\appfuse\build.xml:802: The following error occurred while executing this line: C:\source\appfuse\build.xml:780: The following error occurred while executing this line: java.lang.NoClassDefFoundError: org/apache/xml/serialize/OutputFormat
This is because there are tasks that require Xerces to be in your Ant classpath [reference]. I added xercesImpl.jar and xml-apis.jar (from my self-installed version of Ant) to Eclipse's Ant classpath to solve this.
At this point, you should see something similar to the screenshot below.
Run JUnit Tests in Eclipse [#5]
It's also possible to run your JUnit tests in Eclipse. But before running them, you need to run the "war" target. After this target completes, refresh your project.After you have successfully done so, in Eclipse open a test you'd like to run (i.e. UserDaoTest) and go to Run → Debug As → JUnit Test. Note that you may have to run the "db-load" target before you run your tests every so often. I did have the following method in the Base*TestCase class for each layer, but this caused DBUnit to reload the database before every test in a Test class. Removing it reduces the execution time of "test-all" by more than 30 seconds.
|
If the instructions above don't work for running JUnit tests in Eclipse, I suggest just using the command line - i.e. ant test-dao -Dtestcase=UserDAO. Running tests from the command line always works. ;-)
Tips for Debugging and UI Editing [#6]
For debugging, I use the Tomcat Plugin in Eclipse and set breakpoints. To make the breakpoints work you will need to indicate your source-path using the Eclipse menu Window->Preferences, select Tomcat, then Source Path.
For little changes, I use "ant deploy-web" which only takes a couple of seconds. For truly minor tweaks, it's sometimes easier to edit the file in Tomcat's webapps folder. For major design changes, I usually run the app, view source on a page and save it to a "sandbox" folder in the same directory as my project. Then I do a find/replace and change all "/appfuse/" references to "../web/". This allows me to change CSS and JS files and just refresh the file in the sandbox.
Attachments:
| ant-targets.png |  |
28653 bytes |
| ant-runtime.png |  |
96096 bytes |
| ant-view.png |  |
6585 bytes |
|
Go to top
More info...
Attach file...
|
| This particular version was published on 06-Nov-2006 13:52:53 MST by DongGukLee. |