Raible's Wiki
Raible Designs
Wiki Home
News
Recent Changes
AppFuse
Homepage- Korean
- Chinese
- Italian
- Japanese
QuickStart Guide
- Chinese
- French
- German
- Italian
- Korean
- Portuguese
- Spanish
- Japanese
User Guide
- Korean
- Chinese
Tutorials
- Chinese
- German
- Italian
- Korean
- Portuguese
- Spanish
Other Applications
Struts ResumeSecurity Example
Struts Menu
UserPreferences
Referenced by
Articles
Articles_pt
CreateManager_pt
ValidationAndList_pt
![[RSS]](https://raibledesigns.com/wiki/images/xml.png "Aggregate the RSS feed")

Hide Menu
CreateActions_pt |
|
| Your trail: | |
This is version 3.
It is not the current version, and thus it cannot be edited.
[Back to current version]
[Restore this version]
Parte III: Criando Actions e JSPs - Um tutorial para a criação de Actions Struts
e JSPs na arquitetura AppFuse.
- Este tutorial depende da Parte II: Criando novos Managers.
Sobre este Tutorial
Este tutorial vai lhe mostrar como criar Actions Struts, um teste JUnit (utilizando StrutsTestCase), e um JSP para o formulário. A Action que criaremos se comunicará com o PersonManager criado no tutorial Criando Managers.
Por default, o AppFuse disponibiliza o Struts como seu framework web. Desde a versão 1.6+, podemos utilizar Spring ou WebWork como framework web. Na versão 1.7, foi adicionado suporte à utilização do JSF ou Tapestry.
Para instalar qualquer destes frameworks web ao invés de Struts, simplesmente devemos navegar para o diretório extras e entrar no diretório do framework que desejamos instalar. O arquivo README.txt deste diretório possui instruções mais detalhadas. Os tutoriais para estes frameworks estão listados abaixo.
- Spring: Criando Controladores Spring e JSPs
- WebWork: Criando Actions WebWork e JSPs
- JSF: Criando Beans JSF e JSPs
- Tapestry: Criando Páginas Tapestry e Templates
Vamos começar criando uma nova Action Struts e JSP para nosso projeto AppFuse.
- Vou dizer a vocês como faço as coisas no Mundo Real em textos como este.
Tabela de Conteúdo
- [1] Adicionar Tags XDoclet à classe Person para gerar PersonForm
- [2] Criar esqueletos JSPs usando XDoclet
- [3] Criar a classe PersonActionTest para testar PersonAction
- [4] Criar a classe PersonAction
- [5] Rodar PersonActionTest
- [6] Formatar o JSP para deixá-lo apresentável
- [7] Criar WebTests Canoo para testar ações baseadas no browser
Adicionar Tags XDoclet à classe Person para gerar PersonForm [#1]
Agora vamos gerar nosso objeto PersonForm para Struts e nossa camada web. Para fazê-lo, é necessário adicionar tags XDoclet à classe Person.java para criar nosso ActionForm Struts. No JavaDoc para o arquivo Person.java, adicione as seguintes tags @struts.form (verifique o arquivo User.java se necessita de exemplos):
|
- Estendemos org.appfuse.webapp.form.BaseForm porque ele possui um método toString() que nos permite chamar log.debug(formName) para nos mostrar um formato amigável do objeto Form em console.
- Se você ainda não renomeou os seus pacotes "org.appfuse" para "com.company" ou se você não possui sua classe de modelo no pacote default, você precisará de uma referência completa para org.appfuse.webapp.form.BaseForm na tag @struts.form.
Criar esqueletos JSPs usando XDoclet [#2]
Nesta parte, geraremos uma página JSP para mostrar informações de um objeto Person. Esta página deve conter tags JSP Struts para renderizar linhas de tabela para cada propriedade do arquivo Person.java. A ferramenta AppGen que é utilizada para isto, baseada na ferramenta StrutsGen - que foi originalmente escrita por Erik Hatcher. São basicamente algumas classes e alguns templates XDoclet. Todos estes arquivos estão localizados no diretório extras/appgen.
Aqui estão passos simples para gerar os JSPs e arquivos de propriedades que contém os rótulos para os elementos do Formulário:
- Da linha de comando, navegue para "extras/appgen"
- Execute ant -Dobject.name=Person -Dappgen.type=pojo para gerar os arquivos em extras/appgen/build/gen. Na verdade, serão gerados todos os arquivos que você precisa para completar o tutorial. Mas por enquanto, vamos pegar apenas os arquivos necessários.
- web/WEB-INF/classes/Person.properties (Rótulos para nossos elementos de formulário)
- web/pages/personForm.jsp (arquivo JSP de detalhamento de um único objeto Person)
- web/pages/personList.jsp (arquivo JSP para mostrar uma lista de objetos Person)
- Copie o conteúdo do arquivo Person.properties no arquivo web/WEB-INF/classes/ApplicationResources.properties. Estas são todas as chaves que precisaremos para títulos/cabeçalhos e propriedades de formulário. Aqui está um exemplo do que deve ser adicionado ao arquivo ApplicationResources.properties (no nosso caso, ApplicationResources_pt.properties):
# --  formulário person --
personForm.id=Id
personForm.firstName=Primeiro Nome
personForm.lastName=Sobrenome

person.added=Person foi adicionado com sucesso.
person.updated=Person foi alterado com sucesso.
person.deleted=Person foi removido com sucesso.

# -- página da lista de Person --
personList.title=Lista de Pessoas
personList.heading=Pessoas

# -- página de detalhamento de Person --
personDetail.title=Detalhamento da Pessoa
personDetail.heading=Informações da Pessoa
- Copie o arquivo personForm.jsp para web/pages/personForm.jsp. Copie o arquivo personList.jsp para web/pages/personList.jsp. Perceba que cada um dos novos nomes de arquivo são iniciados com caracteres minúsculos.
- Os arquivos no diretório "pages" terminarão em "WEB-INF/pages" em tempo de publicação. O container fornece segurança para todos os arquivos dentro de WEB-INF. Isto se aplica a requisições de cliente, mas não a envios para o ActionServlet do Struts. Deixando todos os JSPs dentro de WEB-INF assegura-se que eles serão acessados apenas por Actions, e não diretamente pelo cliente ou por outrém. Isto permite que a segurança seja movida para a Action, onde pode ser tratada com mais eficiência, e fora da base da camada de apresentação.
A segurança da aplicação web para o AppFuse especifica que todos os padrões *.html devem ser protegidos (exceto /signup.html e /passwordHint.html). Isto garante que o cliente deve acessar uma Action para receber um JSP (ou ao menos os JSPs em pages).
NOTA: Se você deseja customizar o CSS para uma página em particular, você pode adicionar <body id="nomeDaPagina"/> no início do arquivo. Isto será pego pelo SiteMesh e colocado ao final da página. Você pode então customizar seu CSS em uma base página-por-página utilizando algo assim:body#nomeDaPagina element.class { background-color: blue }
- Adicione chaves no arquivo ApplicationResources.properties (no nosso caso, ApplicationResources_pt.properties) para os títulos e cabeçalhos nos JSPs
Acima, nós adicionamos chaves "personForm.*" para este arquivo, então porque utilizar personDetail ao invés de personForm para os títulos e cabeçalhos? A melhor razão é porque isto nos dá uma boa separação entre rótulos de formulários e textos na página. Uma outra razão é que todos os *Form.* nos dão uma boa representação de todos os campos em nossa base de dados.
Eu recentemente tive um cliente que queria que todos os campos da base de dados fossem consultáveis. Isto foi razoavelmente fácil de fazer. Eu apenas procurei todas as chaves no arquivo ApplicationResources.properties que contém "Form." e então os coloquei em um drop-down(
Create PersonActionTest to test PersonAction [#3]
To create a StrutsTestCase Test for PersonAction, start by creating a PersonActionTest.java file in the test/web/**/action directory:
|
You will need to add PERSON_KEY as a variable to the src/dao/**/Constants.java class. The name, "personForm", matches the name given to the form in the struts-config.xml file.
|
If you try to run this test, you will get a number of NoSuchMethodErrors - so let's define the edit, save, and delete methods in the PersonAction class.
Create PersonAction [#4]
In src/web/**/action, create a PersonAction.java file with the following contents:
|
You'll notice in the code above that there are many calls to to convert a PersonForm or a Person object. The convert method is in BaseAction.java (which calls ConvertUtil.convert()) and
uses
BeanUtils.copyProperties
to convert POJOs → ActionForms and ActionForms → POJOs.
- If you are running Eclipse, you might have to "refresh" the project in order to see PersonForm. It lives in build/web/gen, which should be one of your project's source folders. This is the only way for Eclipse to see and import PersonForm, since it is generated by XDoclet and does not live in your regular source tree. You can find it at build/web/gen/org/appfuse/webapp/form/PersonForm.java.
- In BaseAction you can register additional Converters (i.e. DateConverter) so that BeanUtils.copyProperties knows how to convert Strings → Objects. If you have Lists on your POJOs (i.e. for parent-child relationships), you will need to manually convert those using the convertLists(java.lang.Object) method.
Now you need to add the edit forward and the savePerson action-mapping, both which are specified in in the PersonActionTest. To do this, add a couple more XDoclet tags to the top of the PersonAction.java file. Do this right above the class declaration. You should already have the XDoclet tag for the editPerson action-mapping, but I'm showing it here so you can see all the XDoclet tags at the top of this class.
|
The main difference between the editPerson and savePerson action-mappings is that savePerson has validation turned on (see validation="true") in the XDoclet tag above. Note that the "input" attribute must refer to a forward, and cannot be a path (i.e. /editPerson.html). If you'd prefer to use the save path for both edit and save, that's possible too. Just make sure validate="false", and then in your "save" method - you'll need to call form.validate() and handle errors appropriately.
You might notice that the code you're using to call the PersonManager is the same as the code used in the PersonManagerTest. Both PersonAction and PersonManagerTest are clients of PersonManagerImpl, so this makes perfect sense.
Everything is almost done for this tutorial, let's get to running the tests!
Run PersonActionTest [#5]
If you look at our PersonActionTest, all the tests depend on having a record with id=1 in the database (and testRemove depends on id=2), so add that to our sample data file (metadata/sql/sample-data.xml). I'd add it at the bottom - order is not important since it (currently) does not relate to any other tables.
  <table name='person'>
    <column>id</column>
    <column>first_name</column>
    <column>last_name</column>
    <row>
      <value>1</value>
      <value>Matt</value>
      <value>Raible</value>
    </row>
    <row>
      <value>2</value>
      <value>James</value>
      <value>Davidson</value>
    </row>
  </table>
DBUnit loads this file before we run any of our tests, so this record will be available to the PersonActionTest.
Now if you run ant test-web -Dtestcase=PersonAction - everything should work as planned. Make sure Tomcat isn't running before you try this.
BUILD SUCCESSFULTotal time: 1 minute 21 seconds
Clean up the JSP to make it presentable [#6]
Now let's clean up the generated personForm.jsp. Change the action of the <html:form> to be "savePerson" so validation will be turned on when saving. Also, change the focus attribute from focus="" to focus="firstName" so the cursor will be in the firstName field when the page loads (this is done with JavaScript).
Now if you execute ant db-load deploy, start Tomcat and point your browser to http://localhost:8080/appfuse/editPerson.html?id=1, you should see something like this:
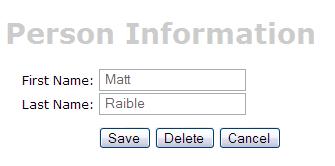
Finally, to make this page more user friendly, you may want to add a message for your users at the top of the form, which can easily be done by adding text (using <fmt:message>) at the top of the personForm.jsp page.
[Optional] Create a Canoo WebTest to test browser-like actions [#7]
The final (optional) step in this tutorial is to create a Canoo WebTest to test the JSPs.
- I say this step is optional, because you can run the same tests through your browser.
You can use the following URLs to test the different actions for adding, editing and saving a user.
- Add - http://localhost:8080/appfuse/editPerson.html.
- Edit - http://localhost:8080/appfuse/editPerson.html?id=1 (make sure and run ant db-load first).
- Delete - http://localhost:8080/appfuse/editPerson.html?method=Delete&id=1 (or edit and click on the Delete button).
- Save - Click edit and then click the Save button.
Canoo tests are pretty slick in that they're simply configured in an XML file. To add tests for add, edit, save and delete, open test/web/web-tests.xml and add the following XML. You'll notice that this fragment has a target named PersonTests that runs all the related tests.
- I use CamelCase target names (vs. the traditional lowercase, dash-separated) because when you're typing -Dtestcase=Name, I've found that I'm used to doing CamelCase for my JUnit Tests.
|
After adding this, you should be able to run ant test-canoo -Dtestcase=PersonTests with Tomcat running or ant test-jsp -Dtestcase=PersonTests if you want Ant to start/stop Tomcat for you. To include the PersonTests when all Canoo tests are run, add it as a dependency to the "run-all-tests" target.
You'll notice that there's no logging in the client-side window by Canoo. If you'd like to see what it's doing, you can add the following between </webtest> and </target> at the end of each target.
<loadfile property="web-tests.result"
    srcFile="${test.dir}/data/web-tests-result.xml"/>
<echo>${web-tests.result}</echo>
BUILD SUCCESSFULTotal time: 11 seconds
Next Up: Part IV: Adding Validation and List Screen - Adding validation logic to the personForm so that firstName and lastName are required fields and adding a list screen to display all person records in the database.
Attachments:
| personForm-final.png |  |
5640 bytes |
|
Go to top
More info...
Attach file...
|
| This particular version was published on 06-Nov-2006 13:52:49 MST by RafaelNami. |