Raible's Wiki
Raible Designs
Wiki Home
News
Recent Changes
AppFuse
Homepage- Korean
- Chinese
- Italian
- Japanese
QuickStart Guide
- Chinese
- French
- German
- Italian
- Korean
- Portuguese
- Spanish
- Japanese
User Guide
- Korean
- Chinese
Tutorials
- Chinese
- German
- Italian
- Korean
- Portuguese
- Spanish
Other Applications
Struts ResumeSecurity Example
Struts Menu
UserPreferences
Referenced by
Articles
Articles_ko
![[RSS]](https://raibledesigns.com/wiki/images/xml.png "Aggregate the RSS feed")

Hide Menu
ValidationAndListSpring_ko |
|
| Your trail: | |
Part V: Adding Validation and List Screen - Adding validation logic to the Person object so that firstName and lastName are required fields and adding a list screen to display all person records in the database.
- This tutorial depends on Part III: Creating Controllers and JSPs.
About this Tutorial
This tutorial will show you how to add Validation logic (client and server-side) to the Person object using Commons Validator. We'll also create a list screen using the Display Tag Library to display all the people in the database.
- I will tell you how I do stuff in the Real World in text like this.
Table of Contents
- [1] Add XDoclet Validator tags to Person.java
- [2] View JSP with validation added and test
- [3] Add testGetPeople methods to DAO and Manager Tests
- [4] Add getPeople methods to PersonDao and Manager
- [5] Create PersonControllerTest
- [6] Create PersonController
- [7] Create personList.jsp and Canoo test
- [8] Add link to menu
Add XDoclet Validator to Person.java [#1]
To use Commons Validator with Spring MVC, normally you have to write a validation.xml file by hand. However, thanks to XDoclet, it's much easier - you just need to add a couple of @spring.validator tags to our POJO (Person.java). Let's open it up (src/dao/**/dao/Person.java) and modify your setFirstName and setLastName methods to resemble the following:
|
I should mention that you can also add a msgkey attribute to this tag to override the default message key for this error.
|
The default key for type="required" is already errors.required, so I usually leave it to the default. This key is defined in web/WEB-INF/classes/ApplicationResources_*.properties.
Now if you save Person.java and run ant clean webdoclet, a validation.xml file will be generated in build/appfuse/WEB-INF/. It's contents should have now have an entry for "person".
|
To enable validation in personForm.jsp, you'll need to make sure your personForm.jsp has the following at the bottom:
<html:javascript formName="person" cdata="false"
      dynamicJavascript="true" staticJavascript="false"/>
<script type="text/javascript"
      src="<c:url value="/scripts/validator.jsp"/>"></script>
You'd also need to uncomment the "validator" property we commented out earlier. Make sure the "personFormController" <bean> in web/WEB-INF/action-servlet.xml has the following XML:
|
View JSP with validation added and test [#2]
Now that we have Validation configured for this form, let's make sure it works. Run ant db-load deploy, start Tomcat and go to http://localhost:8080/appfuse/editPerson.html?id=1. One thing you might notice is that the "First Name" and "Last Name" labels now have asterisks next to them - indicating required fields. This is achieved with a LabelTag that looks up the validation rules from Commons Validator.
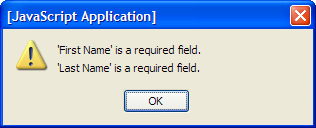
If you erase the values in the firstName and lastName fields and click the save button, you should get the following JavaScript alert.
To make sure things are really working as expected, you can turn off JavaScript and ensure the server-side validation is working. This is easy in Mozilla Firebird (my favorite browser), just go to Tools → Options → Web Features and uncheck "Enable JavaScript". Now if you clear the fields and save the form, you should see the following:
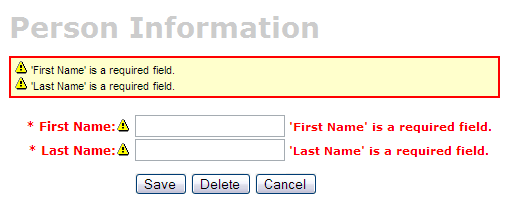
If you only want server-side validation (no JavaScript), you can remove the onsubmit attribute of <html:form> (in web/pages/personForm.jsp) as well as the Validator JavaScript tags at the bottom of the page.
|
Add testGetPeople methods to DAO and Manager Tests [#3]
To create a List screen (also called a master screen), we need to create methods that will return all the rows from our person table. Let's start by adding tests for these methods to our PersonDaoTest and PersonManagerTest classes. I usually name this method getEntities (i.e. getUsers), but you could also use getAll or search - it's really just a matter of personal preference.Open test/dao/**/dao/PersonDaoTest.java and add a testGetPeople method:
|
The reason I'm passing in a person object to the getPeople method is to allow for filtering (based on values in person) in the future. Adding this parameter in your getPeople() method signature is optional, but the rest of this tutorial assumes you have done this.
Now open test/service/**/service/PersonManagerTest.java and add a testGetPeople method:
|
In order for these tests to compile, you need to add the getPeople() method to the PersonDao and PersonManager interfaces, and their implementations.
Add getPeople() method to DAO and Manager [#4]
Open src/dao/**/dao/PersonDao.java and add the getPeople() method signature:
|
Now add the same method signature to src/service/**/service/PersonManager.java. Save all your files and adjust the imports in your tests. Next you need to implement the getPeople() method in your implementation classes. Open src/dao/**/dao/hibernate/PersonDaoHibernate.java and add the following method:
|
(HQL) or using Criteria Queries.
An example using a Criteria Query:
|
Now implement the getPeople() method in src/service/**/impl/PersonManagerImpl.java:
|
After saving all your changes, you should be able to run both tests by executing the following:
- ant test-dao -Dtestcase=PersonDao
- ant test-service -Dtestcase=PersonManager
If everything works - nice job! Now you need to add this retrieve all functionality to the web tier.
Create PersonControllerTest [#5]
In the last couple of tutorials, we've been working with the PersonFormController to interact with our HTML form. Now we need to create a new Controller that'll simply handle getting and displaying a list of people in the database.- You could also use a MultiActionController to handle all your List screens.
To begin, create test/web/**/action/PersonControllerTest.java (extends BaseControllerTestCase) and add the following method:
|
This class will not compile until you (1) create the PersonController class and (2) add the PERSON_LIST variable to the src/dao/**/Constants.java file. Some folks have suggested that this class be named PersonControllerList - the name choice is up to you. I prefer Controller and FormController because it tells me one implements Controller while the latter extends SimpleFormController.
- I usually copy a similar variable that already exists in this file - i.e. USER_LIST.
|
Now save all your changes. You won't be able to run ant test-web -Dtestcase=PersonController yet since PersonController does not exist (yet). Let's add it.
Create PersonController [#6]
Create src/web/**/action/PersonController.java. It should implement org.springframework.web.servlet.mvc.Controller and read as follows:
|
Now add a definition to web/WEB-INF/action-servlet.xml for this Controller.
|
Now if you run ant test-web -Dtestcase=PersonController, the test should pass. Next, create a URL mapping for this controller. To do this, search for the "urlMapping" bean in web/WEB-INF/action-servlet.xml and add the following line to the "mappings" property:
|
Create personList.jsp and Canoo test [#7]
Open the personList.jsp file in the web/pages folder of your project. One thing you'll probably want to change is the plural form of the items you're listing. The generated name in this example is "persons" and it should probably be people. At or near line 31, you should have the following line:<display:setProperty name="paging.banner.items_name" value="persons"/>
Change it to:
<display:setProperty name="paging.banner.items_name" value="people"/>
Finally, add the title and heading keys (personList.title and personList.heading) to web/WEB-INF/classes/ApplicationResources.properties. Open this file and add the following:
# -- person list page --
personList.title=Person List
personList.heading=All People
As a reminder, the personList.title is what ends up in the brower's title bar (the <title> tag) and
personList.heading will be put into an <h1> tag before any page content. At this point, you could be able to run "ant deploy", start Tomcat and open the list screen in your browser.
Now that we have a List Screen, let's change the pages that are displayed after adding and deleting a new Person. In web/WEB-INF/action-servlet.xml, change the personFormController's successView property to be "people.html".
|
You will also need to update the Canoo tests "AddPerson" and "DeletePerson". Open test/web/web-tests.xml and change the following line in the "AddPerson" target:
<verifytitle description="Main Menu appears if save successful"
    text=".*${mainMenu.title}.*" regex="true"/>
to:
<verifytitle description="Person List appears if save successful"
    text=".*${personList.title}.*" regex="true"/>
Then in the "DeletePerson" target, change the following line:
<verifytitle description="display Main Menu" text=".*$(mainMenu.title}.*" regex="true"/>
to:
<verifytitle description="display Person List" text=".*${personList.title}.*" regex="true"/>
To test that displaying this page works, you can create a new JSP test in test/web/web-tests.xml:
|
You'll also want to add the "SearchPeople" target to the "PersonTests" target so it will be executed along with all the other person-related tests.
|
Now you can run ant deploy test-canoo -Dtestcase=SearchPeople (or ant test-jsp if Tomcat isn't running) and hopefully it will result in "BUILD SUCCESSFUL". If so - nice work!
Add link to menu [#8]
The last step is to make the list, add, edit and delete functions visible to the user. The simplest way is to add a new link to the list of links in web/pages/mainMenu.jsp:
|
Where menu.viewPeople is an entry in web/WEB-INF/classes/ApplicationResources.properties.
menu.viewPeople=View People
The other (more likely) alternative is that you'll want to add it to the menu. To do this, add the following to web/WEB-INF/menu-config.xml:
|
Make sure the above XML is inside the <Menus> tag, but not within another <Menu>. Then add this new menu to web/common/menu.jsp - which should now looks as follows:
|
Now if you run ant clean deploy, start Tomcat and go to http://localhost:8080/appfuse/mainMenu.html, you should see something like the screenshot below.
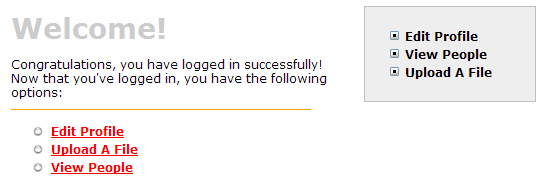
Notice that there is a new link on the left side (from mainMenu.jsp) and on the right in our menu (from menu.jsp).
That's it!
You've completed the full lifecycle of developing a set of master-detail pages with AppFuse and Spring's MVC framework - Congratulations! Now the real test is if you can run all the tests in your app without failure. To test, stop tomcat and run ant clean test-all. This will run all the unit tests within your project. As a reminder, it should be easy to setup and test AppFuse from scratch using ant setup-db setup-tomcat test-all. Also, if you're looking for more robust examples - checkout Struts Resume.Happy Day!
Total time: 4 minutes 21 seconds
|
Go to top
Edit this page
More info...
Attach file...
|
| This page last changed on 06-Nov-2006 13:53:00 MST by DongGukLee. |