Raible's Wiki
Raible Designs
Wiki Home
News
Recent Changes
AppFuse
Homepage- Korean
- Chinese
- Italian
- Japanese
QuickStart Guide
- Chinese
- French
- German
- Italian
- Korean
- Portuguese
- Spanish
- Japanese
User Guide
- Korean
- Chinese
Tutorials
- Chinese
- German
- Italian
- Korean
- Portuguese
- Spanish
Other Applications
Struts ResumeSecurity Example
Struts Menu
UserPreferences
Referenced by
Articles
Articles_pt
CreateActions_pt
![[RSS]](https://raibledesigns.com/wiki/images/xml.png "Aggregate the RSS feed")

Hide Menu
ValidationAndList_pt |
|
| Your trail: | |
This is version 4.
It is not the current version, and thus it cannot be edited.
[Back to current version]
[Restore this version]
Parte IV: Adicionando Validação e Tela de Listagem - Adicionando a lógica de validação para o PersonForm para que o firstName e o lastName sejam campos obrigatórios e adicionar uma tela de listagem para mostrar todas as tuplas de pessoas da base de dados.
- Este tutorial depende da Parte III: Criando Actions e JSPs.
Sobre este tutorial
Este tutorial nos mostrará como adicionar lógica de validação (tanto cliente quanto servidor) para o objeto PersonForm utilizando Struts Validator. Também criaremos uma tela de listagem utilizando a Display Tag Library para mostrar todas as pessoas da base de dados.
- Vou dizer a vocês como faço as coisas no Mundo Real em textos como este.
Tabela de Conteúdo
- [1] Adicionar as tags de validação XDoclet para o Person.java
- [2] Veja o JSP com a validação com a validação adicionada e teste
- [3] Adicione métodos testGetPeople nos testes DAO e Manager
- [4] Adicione métodos getPeople para PersonDao e PersonManager
- [5] Adicione o método testSearch ao teste da Action
- [6] Adicione o método search à Action
- [7] Crie personList.jsp e seu teste Canoo
- [8] Adicione o link ao menu
Adicionar as tags de validação XDoclet para o Person.java [#1]
Para utilizar o Struts Validator, normalmente teríamos que escrever um arquivo validation.xml na mão. Se não utilizarmos AppFuse, teremos que configurar o Validator Plugin e as chaves de erro em nosso ApplicationResources.properties (ApplicationResources_pt.properties). Para maiores informações, veja o Tutorial Validations Made Easy (há também um rico conjunto de tutoriais para Struts).
Graças ao XDoclet, isto é muito mais fácil - só precisamos adicionar algumas tags @struts.validator à classe Person. Devemos abrir esta classe (src/dao/**/model/Person.java) e modificar os comentários dos métodos getFirstName() e getLastName(), adicionando as tags @struts.validator type="required".
|
Podemos também adicionar um atributo msgkey a esta tag para sobreescrever a chave padrão de mensagem para este erro.
|
A chave padrão para type="required" já é errors.required, então eu comumente deixo como o padrão. Esta chave é definida em web/WEB-INF/classes/ApplicationResources_*.properties. Perceberemos que incluimos estas tags nos métodos de acesso (getters) da classe, mesmo quando a documentação XDoclet diz que devemos colocar as tags nos métodos de modificação (setters). Isto é porque geraremos nossa classe PersonForm.java - o arquivo de template (metadata/template/struts_form.xdt) se encarrega de incluir estas tags nos métodos de modificação (setters) do arquivo gerado.
Agora se salvarmos Person.java e rodarmos ant clean webdoclet, um arquivo validation.xml será gerado em build/appfuse/WEB-INF/. Seu conteúdo deve conter uma entrada para "personForm".
|
Para ativar validação cliente (client-side) em nosso personForm.jsp, uma tag javascript JSP e um script são obrigatórios na parte inferior do personForm.jsp. O seguinte código já deverá existir (graças ao appgen) - só necessitamos retirar os comentários dele. A razão pela qual este código está comentada é porque o Validator dispara uma exceção se um nome de formulário for especificado e nenhuma validação existir para ele.
- Pessoalmente, eu considero isto um bug, mas a equipe de desenvolvedores do Struts não concorda.
<html:javascript formName="personForm" cdata="false"
    dynamicJavascript="true" staticJavascript="false"/>
<script type="text/javascript"
    src="<html:rewrite page="/scripts/validator.jsp"/>"></script>
NOTA: Se possuírmos objetos aninhados com regras de validação, estas regras serão pegas e colocadas no arquivo validation.xml. Isto porque uma tag @struts.validator é adicionada ao método de modificação (setter) do objeto aninhado quando o formulário é gerado (utilizando metadata/templates/struts_form.xdt). Se temos um relacionamento bidirecional muitos para muitos entre objetos, este relacionamento pode nos causar transtornos. Existem duas soluções para consertar isto. A primeira é removermos a tag @struts.validator do template struts_form.xdt e adicionar manualmente no método de modificação (setter) do nosso POJO. A segunda solução é descrita aqui.
Veja o JSP com a validação com a validação adicionada e teste [#2]
Agora que possuímos a validação configurada para este formulário, estas regras serão aplicadas toda vez que este formulário for utilizado em um action-mapping com validate="true". No tutorial anterior, adicionamos o action-mapping "savePerson" para a classe PersonAction. As tags XDoclet para este action-mapping eram:
|
Então agora, contanto que nosso web/pages/personForm.jsp possua um <html:form action="savePerson">, a validação deve ser realizada quando tentarmos salvar este formulário. Rodaremos ant db-load deploy, inicie o Tomcat (ou ant db-load deploy start.tomcat para simplificar) e vá para http://localhost:8080/appfuse/editPerson.html?id=1.
Se apagarmos os valores nos campos firstName e lastName, e clicarmos o botão Salvar, devemos receber o seguinte alerta Javascript:
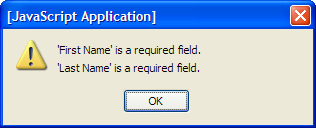
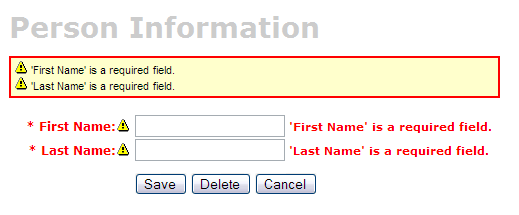
Para nos certificarmos que tudo está realmente executando como esperamos, podemos desligar Javascript para provar que a validação do lado do servidor está funcionando. Isto é relativamente simples no Mozilla Firebird (meu browser favorito), apenas vá em Ferramentas(Tools) → Opções (Options) → Facilidades (Web Features) and uncheck "Permitir Javascript" ("Enable JavaScript"). Agora se limparmos os campos e salvarmos formulário, devemos ver o seguinte:
Se não forem mostrados os erros de validação, podem haver algumas possibilidades:
- O formulário salva com a mensagem de sucesso, mas os campos firstName e lastName estão em branco.
- Isto é porque o <html:form> na página web/pages/personForm.jsp possui action="editPerson" - certifique-se que ele contenha action="savePerson".
- Clicamos em "Salvar", mas uma página em branco apareceu.
- A página em branco indica que o atributo de "entrada" de nosso envio "savePerson" está configurada erroneamente. Devemos nos certificar que ele esteja relacionado com um action-forward local ou global. Neste exemplo, ele deve ser input="edit", que aponta para a definição de .personDetail. Por experiência própria, um valor de entrada deve ser um envio, não um caminho para uma action.
|
Adicione métodos testGetPeople nos testes DAO e Manager [#3]
Para criarmos uma tela de listagem (também chamada uma tela mestre), devemos criar métodos que retornarão todas as tuplas de nossa tabela person. Vamos começar adicionando os métodos de teste às nossas classes PersonDaoTest e PersonManagerTest. Geralmente nomeio este método getEntidades (i.e. getUsers), mas podemos também utilizar getAll ou search - isto é realmente uma questão de preferência pessoal.Abra o arquivo test/dao/**/dao/PersonDaoTest.java e adicione o método testGetPeople:
|
A razão pela qual passamos um objeto person ao método getPeople é para permitir filtragem (baseado nos atributos do person) no futuro. Adicionando este parâmetro na assinatura de nosso método getPeople() é opcional, mas o resto do tutorial assume que fizemos isto.
Agora abra o arquivo test/service/**/service/PersonManagerTest.java e adicione um método testGetPeople:
|
Para estes testes compilarem, devemos adicionar o método getPeople() às interfaces PersonDao e PersonManager, assim como a suas implementações.
Adicione métodos getPeople para PersonDao e PersonManager [#4]
Abra o arquivo src/dao/**/dao/PersonDao.java e adicione a assinatura do método getPeople():
|
Now add the same method signature to src/service/**/service/PersonManager.java. Save all your files and adjust the imports in your tests. Next you need to implement the getPeople() method in your implementation classes. Open src/dao/**/dao/hibernate/PersonDaoHibernate.java and add the following method:
|
(HQL) or using Criteria Queries.
An example using a Criteria Query:
|
Now implement the getPeople() method in src/service/**/impl/PersonManagerImpl.java:
|
After saving all your changes, you should be able to run both tests by executing the following:
- ant test-dao -Dtestcase=PersonDao
- ant test-service -Dtestcase=PersonManager
If everything works - nice job! Now you need to add this retrieve all functionality to the web tier.
Adicione o método testSearch ao teste da Action [#5]
Open test/web/**/action/PersonActionTest.java and add the following method:
|
This class will not compile until you add the PERSON_LIST variable to the src/dao/**/Constants.java file.
- I usually copy a similar variable that already exists in this file - i.e. USER_LIST.
|
Now save all your changes. You won't be able to run ant test-web -Dtestcase=PersonAction yet since PersonAction.search() does not exist (yet).
Adicione o método search à Action [#6]
Open src/web/**/action/PersonAction.java and add the following XDoclet tag at the top - to forward to our list screen.
|
Now add the search method to the body of the PersonAction class.
- I used UserAction.search() as a template for this method.
|
Run ant test-web -Dtestcase=PersonAction.
Nice!
BUILD SUCCESSFUL
Total time: 1 minute 26 seconds
Crie personList.jsp e seu teste Canoo [#7]
Open the personList.jsp file in web/pages. At the top of the file is a <bean:struts> tags that exposes the edit screen's forward as a page-scoped variable. This should already have a value of "editPerson".
|
Add this to the metadata/web/global-forwards.xml, as well as one for viewing the list. This way, they will get included in our struts-config.xml file.
|
Another thing you'll probably want to change is the plural form of the items you're listing. The generated name in this example is "persons" and it should probably be people. At or near line 31, you should have the following line:
<display:setProperty name="paging.banner.items_name" value="persons"/>
Change it to:
<display:setProperty name="paging.banner.items_name" value="people"/>
Finally, add the title and heading keys (personList.title and personList.heading) to web/WEB-INF/classes/ApplicationResources.properties. Open this file and add the following:
# -- person list page --
personList.title=Person List
personList.heading=All People
As a reminder, the personList.title is what ends up in the brower's title bar (the <title> tag) and personList.heading will be put into an <h1> tag before any page content.
At this point, you should be able to run ant clean deploy, start Tomcat and view this page in your browser at http://localhost:8080/appfuse/editPerson.html?method=Search.
Now that we have a List Screen, let's change the pages that are displayed after adding and deleting a new Person. In src/web/**/action/PersonAction.java, change the mapping.findForward("mainMenu") in the save, delete and cancel methods to be:
|
You will also need to change verifyForward("mainMenu") to be verifyForward("viewPeople") in the testRemove method of test/web/**/action/PersonActionTest.java. Lastly, the Canoo tests "AddPerson" and "DeletePerson" need to be updated. Open test/web/web-tests.xml and change the following line in the "AddPerson" target:
<verifytitle description="Main Menu appears if save successful"
    text=".*${mainMenu.title}.*" regex="true"/>
to:
<verifytitle description="Person List appears if save successful"
    text=".*${personList.title}.*" regex="true"/>
Then in the "DeletePerson" target, change the following line:
<verifytitle description="display Main Menu"
    text=".*$(mainMenu.title}.*" regex="true"/>
to:
<verifytitle description="display Person List" text=".*${personList.title}.*" regex="true"/>
We use "viewPeople" instead of "list" so that the search method will be executed, rather than simply forwarding to the personForm.jsp (which the "list" forward points to).
To test that displaying this page works, create a new JSP test in test/web/web-tests.xml:
|
You'll also want to add the "SearchPeople" target to the "PersonTests" target so it will be executed along with all the other person-related tests.
|
Now you can run ant test-canoo -Dtestcase=SearchPeople (or ant test-jsp if Tomcat isn't running) and hopefully it will result in "BUILD SUCCESSFUL". If so - nice work!
Adicione o link ao menu [#8]
The last step is to make the list, add, edit and delete functions visible to the user. The simplest way is to add a new link to the list of links in web/pages/mainMenu.jsp: NOTE: The other links in mainMenu.jsp don't use
|
Where menu.viewPeople is an entry in web/WEB-INF/classes/ApplicationResources.properties.
menu.viewPeople=View People
The other (more likely) alternative is that you'll want to add it to the menu. To do this, add the following to web/WEB-INF/menu-config.xml:
|
Make sure the above XML is inside the <Menus> tag, but not within another <Menu>. Then add this new menu to web/common/menu.jsp - which should now look as follows:
|
Now if you run ant clean deploy start Tomcat and go to http://localhost:8080/appfuse/mainMenu.html, you should see something like the screenshot below.
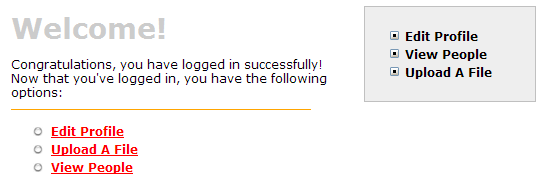
Notice that there is a new link on the left side (from mainMenu.jsp) and on the right in our menu (from menu.jsp).
That's it!
You've completed the full lifecycle of developing a set of master-detail pages with AppFuse and Struts - Congratulations! Now the real test is if you can run all the tests in your app without failure. To test, stop tomcat and run ant clean test-all. This will run all the unit tests within your project. As a reminder, it should be easy to setup and test AppFuse from scratch using ant setup-db setup-tomcat test-all. Also, if you're looking for more robust examples - checkout Struts Resume.Happy Day!
Total time: 2 minutes 31 seconds
Attachments:
| new-menu-item.png |  |
9138 bytes |
| validation-required.png |  |
10049 bytes |
| validation-required-nojs.png |  |
9277 bytes |
|
Go to top
More info...
Attach file...
|
| This particular version was published on 06-Nov-2006 13:52:49 MST by RafaelNami. |