Raible's Wiki
Raible Designs
Wiki Home
News
Recent Changes
AppFuse
Homepage- Korean
- Chinese
- Italian
- Japanese
QuickStart Guide
- Chinese
- French
- German
- Italian
- Korean
- Portuguese
- Spanish
- Japanese
User Guide
- Korean
- Chinese
Tutorials
- Chinese
- German
- Italian
- Korean
- Portuguese
- Spanish
Other Applications
Struts ResumeSecurity Example
Struts Menu
UserPreferences
Referenced by
AppFuseDebug
AppFuseSupport
Articles
Articles_cn
Articles_de
Articles_ko
Articles_pt
Articles_zh
DevelopmentEnvironme...
DevelopmentEnvironme...
...and 1 more
![[RSS]](https://raibledesigns.com/wiki/images/xml.png "Aggregate the RSS feed")

Hide Menu
AppFuseEclipse |
|
| Your trail: | |
AppFuse, by default, is configured to be an Eclipse project. When you run ant new to create a new project, you will get the .project and .classpath files to start your project with. However, you will need to make a few easy setting changes in Eclipse (particularly to run Ant). This tutorial shows you how to setup Eclipse to develop your AppFuse project.
- In general, I don't use Eclipse for much more than a fancy text editor. I do most of my compiling, testing and deployment from the command line. This howto will hopefully make it easier for you to use Eclipse for building and testing, but if it doesn't work for you - the best fallback is to use the command line for running the Ant tasks. Of course, if you figure out ways to make the Eclipse integration better - please let me know.
This tutorial is based on Windows XP and Eclipse 3.0.1 and should work on any platform. You can download Eclipse 3.0.1 if you don't already have it installed. I also recommend downloading my Eclipse plugins bundle or purchasing MyEclipse. A pipe dream of mine is to be able to use create a MyEclipse/AppFuse project - but that would likely require an entire rewrite of AppFuse's directory structure and build file and I just don't have the time or energy. Besides, the current system works pretty well if you don't mind using Ant.
Table of Contents
- [1] Create New Java Project in Eclipse
- [2] Configuring Ant in Eclipse
- [3] Add build.xml to Ant View
- [4] Run Ant
- [5] Run JUnit Tests in Eclipse
- [6] Tips for Debugging and UI Editing
Create New Java Project in Eclipse [#1]
Open Eclipse (either with an existing or a new workspace) and to go File → New → Project. Then select "Java Project" and hit the Next button. In the Project Name field, enter the name of your project (i.e. appfuse) and the directory that your project lives (i.e. c:\source\appfuse) in the box below. If you're prompted to switch the Java Perspective, choose Yes.If you try to build the project at this point, you'll likely get numerous errors. Most of them involve the fact that the UserForm class can not be found. This is because all of the ActionForms in AppFuse (if you're using the Struts version) are generated from POJOs with XDoclet.
All of the tasks for XDoclet are configured in the Ant build.xml file so the easiest thing to do is to run "ant gen-forms" to generate the ActionForms. If you have Ant 1.6.2+ installed and in your path, you can do this from the command line. The next step shows you how configure Eclipse to run your AppFuse build.xml.
TIP: Here's a way to hide the JARs you see in Eclipse's Package Explorer.Configuring Ant in Eclipse [#2]
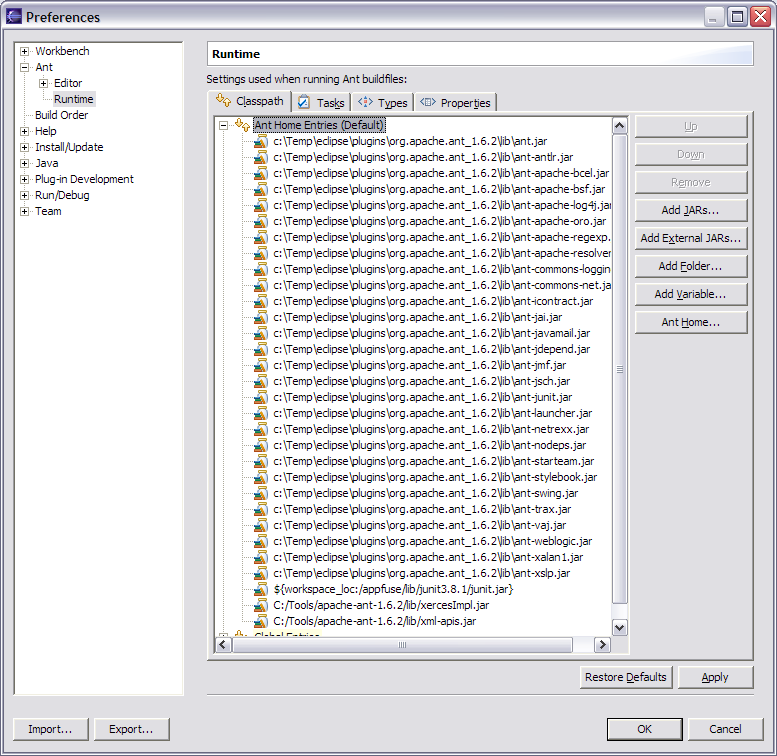
The easiest way to configure Eclipse for AppFuse is to install Ant on your hard drive (i.e. c:\Tools\apache-ant-1.6.2) and then point Eclipse's ANT_HOME to this directory. To do this, go to Window → Preferences → Ant → Runtime. Then click the "Ant Home" button and select the installation folder on your hard drive.
If you'd rather use Eclipse's built-in Ant, you'll need to add junit.jar to its classpath. To do this, go to Window → Preferences → Ant → Runtime. Then click the "Add JARs" button and select junit.jar from appfuse/lib/junit3.8.1/lib/junit.jar. Click OK until you arrive back at the workbench view.
Next, add the catalina-ant.jar (from $CATALINA_HOME/server/lib) to the ant classpath. Then in the property tab, add tomcatTasks.properties (in lib/ant-contrib) file as a global properties file.
Lastly, still in Ant - Runtime - Properties tab, add the global property "tomcat.home" with a value of your CATALINA_HOME environment variable.
Below is a screenshot of what your Ant Runtime classpath should look like after the above modifications:
Add build.xml to Ant View [#3]
Now we need to add the build.xml to Eclipse's Ant View. To do this, go to Window → Show View → Ant. Then click on the first icon in this view (screenshot below) to add AppFuse's build file.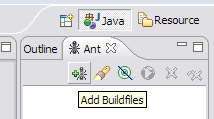
Run Ant [#4]
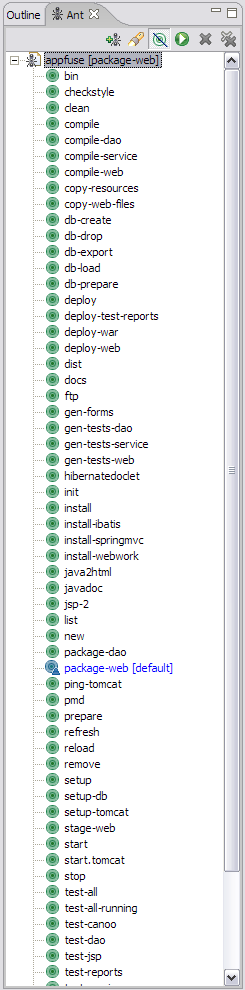
After adding the build.xml, you should be able to expand it in the Ant View and execute any of the targets. I usually do "test-all" to verify all the tests pass in my initial project. For a list of targets I use most often, see AppFuse Ant Targets.Now if you run the "compile" target and then refresh the project (right-click on project → Refresh) you shouldn't see any errors in the "Problems" pane. You should now be able to compile and create classes as you normally would. Sometimes when my imports aren't resolving correctly in Eclipse, I do have to run Project → Clean in Eclipse.
NOTE: If you're using the internal version of Ant, you may get an error message like the one below:BUILD FAILED: C:\source\appfuse\build.xml:802: The following error occurred while executing this line: C:\source\appfuse\build.xml:780: The following error occurred while executing this line: java.lang.NoClassDefFoundError: org/apache/xml/serialize/OutputFormat
This is because there are tasks that require Xerces to be in your Ant classpath [reference]. I added xercesImpl.jar and xml-apis.jar (from my self-installed version of Ant) to Eclipse's Ant classpath to solve this.
At this point, you should see something similar to the screenshot below.
Run JUnit Tests in Eclipse [#5]
It's also possible to run your JUnit tests in Eclipse. But before running them, you need to run the "war" target. After this target completes, refresh your project.After you have successfully done so, in Eclipse open a test you'd like to run (i.e. UserDaoTest) and go to Run → Debug As → JUnit Test. Note that you may have to run the "db-load" target before you run your tests every so often. I did have the following method in the Base*TestCase class for each layer, but this caused DBUnit to reload the database before every test in a Test class. Removing it reduces the execution time of "test-all" by more than 30 seconds.
|
If the instructions above don't work for running JUnit tests in Eclipse, I suggest just using the command line - i.e. ant test-dao -Dtestcase=UserDAO. Running tests from the command line always works. ;-)
Tips for Debugging and UI Editing [#6]
For debugging, I use the Tomcat Plugin in Eclipse and set breakpoints. To make the breakpoints work you will need to indicate your source-path using the Eclipse menu Window->Preferences, select Tomcat, then Source Path.
For little changes, I use "ant deploy-web" which only takes a couple of seconds. For truly minor tweaks, it's sometimes easier to edit the file in Tomcat's webapps folder. For major design changes, I usually run the app, view source on a page and save it to a "sandbox" folder in the same directory as my project. Then I do a find/replace and change all "/appfuse/" references to "../web/". This allows me to change CSS and JS files and just refresh the file in the sandbox.
Attachments:
| ant-targets.png |  |
28653 bytes |
| ant-runtime.png |  |
96096 bytes |
| ant-view.png |  |
6585 bytes |
|
Go to top
Edit this page
More info...
Attach file...
|
| This page last changed on 06-Nov-2006 13:52:58 MST by MattRaible. |