Raible's Wiki
Raible Designs
Wiki Home
News
Recent Changes
AppFuse
Homepage- Korean
- Chinese
- Italian
- Japanese
QuickStart Guide
- Chinese
- French
- German
- Italian
- Korean
- Portuguese
- Spanish
- Japanese
User Guide
- Korean
- Chinese
Tutorials
- Chinese
- German
- Italian
- Korean
- Portuguese
- Spanish
Other Applications
Struts ResumeSecurity Example
Struts Menu
UserPreferences
Referenced by
Articles
Articles_cn
Articles_pt
Articles_zh
CreateActions_zh
![[RSS]](https://raibledesigns.com/wiki/images/xml.png "Aggregate the RSS feed")

Hide Menu
ValidationAndList_zh |
|
| Your trail: | |
Part IV: 增加校验功能和列表页面 - 给personForm的firstName和lastName字段添加必添的验证逻辑和显示person所有记录的页面。
- 本教程依赖于Part III: 创建 Struts Actions和JSPs.
关于本教程
本教程将向你展示如何用Struts的Validator为PersonForm添加验证逻辑(客户端和服务器端),我们也要使用Display Tag Library创建一个列表页来显示数据库中所有的人。
- 我在真实世界中实际操作的方式用蓝色斜体表示。
目录
- [1] Person.java添加XDoclet的验证标签
- [2] 察看和测试添加了验证的JSP
- [3] DAO和Manager的测试添加testGetPeople方法
- [4] PersonDao和Manager添加getPeople方法
- [5] Action添加testSearch方法
- [6] Action添加search方法
- [7] 创建personList.jsp和Canoo测试
- [8] 菜单添加链接
Person.java添加XDoclet的验证标签[#1]
为了使用Struts的Validator,通常情况下你需要手工写validation.xml,如果你不使用AppFuse,你还需要配置Validator插件和在ApplicationResources.properties写错误关键字,可以到Validation Made Easy Tutorial(Struts本身也有一套rich set of tutorials)察看更多的信息。
由于XDoclet,事情简单多了 - 只需要给Person类添加一些@struts.validator标签,打开文件(src/dao/**/model/Person.java)修改getFirstName()和getLastName()方法使之包括@struts.validator type="required"标签。
|
你也可以修改msgkey属性来覆盖这个错误的默认属性。
|
type="required"的属性的默认关键字是errors.required,所以我通常会保留默认值。这个默认值定义在web/WEB-INF/classes/ApplicationResources_*.properties,你一定会注意到我们把标签放到getters方法前,而不是XDoclet 文档里说的放到setters前,这是因为我们生成PersonForm.java的模版文件(metadata/template/struts_form.xdt)会把标签加到生成的文件里。
如果你现在保存Person.java并且运行ant clean webdoclet,就会在build/appfuse/WEB-INF/生成一个validation.xml文件,它的内容一定保存了一条关于"personForm"的条目。
|
为了给personForm.jsp开启客户端的验证,一个javascript的JSP标签和一段脚本需要添加到personForm.jsp的底端,它们一定已经存在了(幸亏了appgen)- 你只需要去掉注释符号。我们去掉注释是因为,如果我们指定了formName而没有对应的验证规则存在,就会有exception抛出。
- 从个人角度讲,我认为这是一个bug,但是Struts开发者不这么认为。
<html:javascript formName="personForm" cdata="false"
    dynamicJavascript="true" staticJavascript="false"/>
<script type="text/javascript"
    src="<html:rewrite page="/scripts/validator.jsp"/>"></script>
注意: 如果你绑定验证规则到对象,它将会被收集起来添加到validation.xml,这是因为当一个Form建立的时候,一个@struts.validator会添加到关联对象的Setter上(通过metadata/templates/struts_form.xdt)。如果你使用多对多的双向关联,这会引起一个问题,有两个解决方案,第一个是在struts_form.xdt中去掉@struts.validator标签,并且手动的修改POJO的setter,第二种方案在这里有阐述。
察看和测试添加了验证的JSP[#2]
你现在有了这个form的验证配置,无论何时这个form在被调用时,如果action-mapping中的validate="true",这些规则就会被应用,在前一篇指南里,我们为PersonAction添加了"savePerson"的action-mapping,对应的XDoclet标签如下:
|
所以现在只要你的web/pages/personForm.jsp包括了<html:form action="savePerson">,当你保存这个form时就会调用验证,运行ant db-load deploy,启动Tomcat,浏览到http://localhost:8080/appfuse/editPerson.html?id=1。
如果你清除firstName和lastName的值,你就会得到如下的JavaScript错误警告。
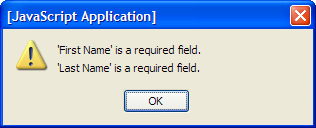
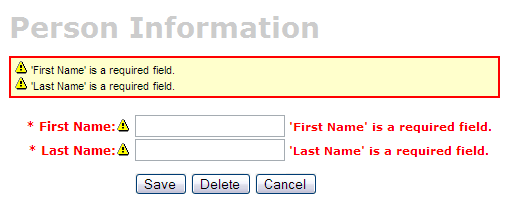
为了保证事情确实按照所想的工作,你可以关闭JavaScript来确定服务器端的验证正在工作,这对Mozilla Firebird(我最喜欢的浏览器)来说非常简单,只需要到Tools → Options → Web Features去掉"Enable JavaScript",现在如果你清除字段的值并且保存form,你会看到如下信息:
如果你没有见到这些验证错误,有以下几个可能:
- 保存form返回成功信息,但是firstName和lastName字段是空白的。
- 这是因为web/pages/personForm.jsp的<html:form>有action="editPerson" - 确定存在action="savePerson"。
- 点击保存,显示一个空白页。
- 空白页标明你的"savePerson" forward的"input"属性配置不正确,确定它是和一个local或者global的action-forward关联,在这个例子里,它一定是input="edit",指向到.personDetail的tiles定义,根据我的经验,input的值应该是一个forward,而不应该是到一个action的路径。
如果你只希望服务器端的验证(没有JavaScript),你可以删除<html:form>(在web/pages/personForm.jsp)的onsubmit属性,还有就是此页底端的JavaScript验证标签。
|
DAO和Manager的测试添加testGetPeople方法[#3]
为了创建一个List页面(也被称作master screen),我们需要创建返回person表所有行的方法,首先我们要给PersonDaoTest和PersonManagerTest添加这些测试方法,我通常会命名为getEntities(例如getUsers),但是你也可以使用getAll或者search - 这仅仅是一个个人爱好。打开test/dao/**/dao/PersonDaoTest.java添加testGetPeople方法:
|
我传递给getPeople方法的person对象是为了以后用来过滤(根据person对象中的值),在你的getPeople()方法添加参数是可选的,但余下的教程假定你是这样做的。
打开test/service/**/service/PersonManagerTest.java添加testGetPeople方法:
|
为了编译通过,你必须给PersonDao和PersonManager添加getPeople()方法和方法的实现。
PersonDao和Manager添加getPeople方法[#4]
打开src/dao/**/dao/PersonDao.java添加getPeople()方法的签名:
|
添加同样的方法签名到src/service/**/service/PersonManager.java,保存所有的文件并且调整测试的imports,然后需要在实现类里实现getPeople()方法,打开src/dao/**/dao/hibernate/PersonDaoHibernate.java添加如下代码:
|
(HQL)或者Criteria Queries来过滤查询。
一个Criteria Query的例子:
|
现在实现src/service/**/impl/PersonManagerImpl.java里的getPeople()方法:
|
保存以上的修改,你应当可以运行如下的测试:
- ant test-dao -Dtestcase=PersonDao
- ant test-service -Dtestcase=PersonManager
如果所有的事工作正常- nice job!,现在需要在web层添加retrieve all功能。
Action添加testSearch方法[#5]
打开test/web/**/action/PersonActionTest.java并且添加如下代码:
|
这个类在对src/dao/**/Constants.java添加PERSON_LIST变量PERSON_LIST之前不可以编译。
- 我通常会拷贝一个已经存在的类似变量 - 如USER_LIST。
|
现在保存所有的修改,你还不可以运行ant test-web -Dtestcase=PersonAction,因为PersonAction.search()还不存在。
Action添加search方法[#6]
打开src/web/**/action/PersonAction.java然后在我们列表页面的顶端添加如下XDoclet标签。
|
现在给PersonAction类添加查询方法。
- 我通常会用UserAction.search()作为此方法的模版。
|
运行ant test-web -Dtestcase=PersonAction.
Nice!
BUILD SUCCESSFUL
Total time: 1 minute 26 seconds
创建personList.jsp和Canoo测试[#7]
打开web/pages中的personList.jsp文件,文件的顶端是一个<bean:struts>标签,把编辑界面的forward暴露为page-scoped的一个变量,这个的值现在一定是"editPerson"。
|
添加这些到metadata/web/global-forwards.xml,类似于list中的那些代码,如此,它们就会被包含在struts-config.xml文件中。
|
另一件你希望修改的事是改变列表中的项目为复数形式,例子里生成的名字是"persons",它应该为people,在31行或者附近,你会看到如下的代码:
<display:setProperty name="paging.banner.items_name" value="persons"/>
修改为:
<display:setProperty name="paging.banner.items_name" value="people"/>
最后,web/WEB-INF/classes/ApplicationResources.properties里添加标题和题目关键字(personList.title和personList.heading),打开文件添加如下内容:
# -- person list page --
personList.title=Person List
personList.heading=All People
提醒一下,personList.title将会出现在浏览器的标题栏(<title>标签),而personList.heading会作为<h1>标签在页面正文内容前面。
此刻,你一定可以运行ant clean deploy,启动Tomcat,在浏览器里查看http://localhost:8080/appfuse/editPerson.html?method=Search。
现在你有了个列表页面,让我们修改添加和删除一个Person后转向的页面,在src/web/**/action/PersonAction.java修改方法save、 delete和cancel的mapping.findForward("mainMenu")为如下内容:
|
你也需要修改test/web/**/action/PersonActionTest.java中testRemove方法的verifyForward("mainMenu")为verifyForward("viewPeople"),最后,需要修改Canoo测试的"AddPerson"和"DeletePerson",打开test/web/web-tests.xml并且修改"AddPerson"目标为如下代码:
<verifytitle description="Main Menu appears if save successful"
    text=".*${mainMenu.title}.*" regex="true"/>
改为:
<verifytitle description="Person List appears if save successful"
    text=".*${personList.title}.*" regex="true"/>
然后对于"DeletePerson",修改如下:
<verifytitle description="display Main Menu"
    text=".*$(mainMenu.title}.*" regex="true"/>
改为:
<verifytitle description="display Person List" text=".*${personList.title}.*" regex="true"/>
我们使用"viewPeople"而不是"list",是因为查询方法是要被执行的,而不是简单的转向到personForm.jsp。
为了测试这个页面已经工作了,在test/web/web-tests.xml创建一个新的JSP测试:
|
你将会希望添加"PersonTests"目标添加"SearchPeople"目标,这样这个测试就会和所有person相关的测试一起执行。
|
现在你可以运行ant test-canoo -Dtestcase=SearchPeople (如果Tomcat没有运行,可以运行ant test-jsp),很有希望的结果是"BUILD SUCCESSFUL",如果如此 - 干得好!
菜单添加链接[#8]
最后一步是创建列表的add、edit和delete功能,最简单的方式是给web/pages/mainMenu.jsp添加一个新的链接: 注意: mainMenu.jsp中的其他链接没有使用
|
menu.viewPeople是web/WEB-INF/classes/ApplicationResources.properties中的一个条目。
menu.viewPeople=View People
另一个选择(很可能的)是你会添加到菜单,为此,添加如下代码到web/WEB-INF/menu-config.xml:
|
确定以上的XML代码在<Menus>标签中,而不存在于另外一个<Menu>中,然后给web/common/menu.jsp添加新的菜单 - 结果看起来如下:
|
现在如果你运行ant clean deploy来启动Tomcat并且到http://localhost:8080/appfuse/mainMenu.html,你一定会看到如下的抓图。
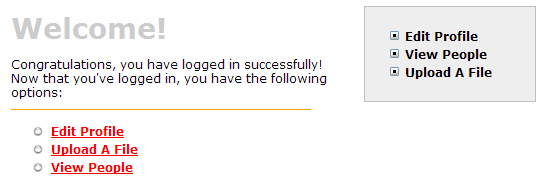
注意在左边(来自mainMenu.jsp)和右边(来自menu.jsp)有了一个新的链接
就这样了!
你已经完成了使用AppFuse和Struts开发一组主控页面的整个生命周期 - 恭喜!现在是真正的测试你的应用没有错误的时候了,为了测试,停止tomcat然后运行ant clean test-all,这会运行项目里所有的测试,作为提醒,我们应该很容易的在琐碎代码中通过运行ant setup-db setup-tomcat test-all的设置和测试AppFuse,同样,如果你期望找到更稳定的例子 - 取出Struts Resume。
Happy Day!
Total time: 2 minutes 31 seconds
|
Go to top
Edit this page
More info...
Attach file...
|
| This page last changed on 06-Nov-2006 13:52:59 MST by DuanYongming. |