Raible's Wiki
Raible Designs
Wiki Home
News
Recent Changes
AppFuse
Homepage- Korean
- Chinese
- Italian
- Japanese
QuickStart Guide
- Chinese
- French
- German
- Italian
- Korean
- Portuguese
- Spanish
- Japanese
User Guide
- Korean
- Chinese
Tutorials
- Chinese
- German
- Italian
- Korean
- Portuguese
- Spanish
Other Applications
Struts ResumeSecurity Example
Struts Menu
UserPreferences
Referenced by
Articles
CreateActions_it
ValidationAndListSpr...
![[RSS]](https://raibledesigns.com/wiki/images/xml.png "Aggregate the RSS feed")

Hide Menu
SpringControllers_it |
|
| Your trail: SecurityExample > AppFuseAddLibrary > SpringControllers_pt > SecurityExample > MultipleDatabases > SpringControllers_pt > SecurityExample > SpringControllers_pt > SecurityExample > AppFuseAddLibrary | |
This is version 6.
It is not the current version, and thus it cannot be edited.
[Back to current version]
[Restore this version]
Part III: Creazione Controller e JSP - Una guida per la creazione di Controller Spring
e JSP in un progetto AppFuse.
- Questo tutorial dipende da Parte II: Creazione nuovi Manager.
Info su questo Tutorial
Questo tutorial mostra come creare Controller Spring e JSP. Dimostra anche come scrivere i test JUnit per i Controller. Il Controller che andremo a creare parlerà con il PersonManager creato nel tutoral Creazione Manager.- Ti dirò come si fanno le cose nel Mondo Reale in un testo come questo.
Iniziano con il creare un nuovo Controller e JSP nell'architettura di AppFuse. Se non hai ancora installato il modulo Spring MVC, puoi farlo lanciando ant install-springmvc.
Indice
- [1] Crea JSP scheletro usando XDoclet
- [2] Crea il PersonFormControllerTest per il test del PersonFormController
- [3] Crea il PersonFormController
- [4] Esegui PersonFormControllerTest
- [5] Ripulisci la JSP per renderla presentabile
- [6] Crea i WebTest Canoo per il test delle azioni stile browser
Crea JSP scheletro usando XDoclet [#1]
In questo passo verrà generata un pagina JSP per visualizzare le informazioni contenute nell'oggetto Person. Conterrà il tag JSP di Spring per stampare righe di tabella per ogni proprietà in Person.java. Lo strumento AppGen utilizzato per farlo è basato su uno strumento StrutsGen - che è stato scritto in origine da Erik Hatcher. Si tratta banalmente di giusto un paio di classi ed un po' di template XDoclet. Tutti questi file si trovano in extras/appgen.
Ecco i semplici passi per generare la JSP ed un file di properties contenente le label per gli elementi nel form:
- Da linea di comando, naviga in "extras/appgen"
- Esegui ant -Dobject.name=Person -Dappgen.type=pojo -Dapp.module="" per generare un po' di file in extras/appgen/build/gen. Di fatto, saranno generati tutti i file di cui hai bisogno per completare questo tutorial. In ogni caso prendi solo quelli necessari.
- web/WEB-INF/classes/Person.properties (label per gli elementi del tuo form)
- web/pages/personForm.jsp (file JSP per la visualizzazione di una singola Person)
- web/pages/personList.jsp (file JSP per la visualizzazione di un elenco di Person)
- Copia il contenuto di Person.properties in web/WEB-INF/classes/ApplicationResources.properties. Queste sono tutte le chiavi necessarie per titoli/intestazioni e proprietà del form. Ecco un esempio di cosa dovresti aggiungere ad ApplicationResources.properties:
# -- person form --
person.id=Id
person.firstName=First Name
person.lastName=Last Name

person.added=Person has been added successfully.
person.updated=Person has been updated successfully.
person.deleted=Person has been deleted successfully.

# -- person list page --
personList.title=Person List
personList.heading=Persons

# -- person detail page --
personDetail.title=Person Detail
personDetail.heading=Person Information
- Copia personForm.jsp in web/pages/personForm.jsp. Copia personList.jsp in web/pages/personList.jsp.
- I files nella directory "pages" finiranno in "WEB-INF/pages" a deployment time. Il container fornisce protezione per tutti i file sotto WEB-INF. Ciò si applica a tutte le richieste da client, ma non ai forward da DispatchServlet. Mettere tutte le JSP sotto WEB-INF assicura che vengano accedute solo tramite Controller, e non direttamente dal client o l'una con l'altra. Ciò permette di spostare la security in alto sul Controller, dove può essere gestita in modo più efficiente, e fuori dallo strato di presentazione di base.
La security della web application per AppFuse specifica che tutti gli url-pattern *.html debbano essere protetti (eccetto /signup.html e /passwordHint.html). Ciò garantisce che i client passino da una Action per arrivare ad una JSP (o almeno a quelle sotto pages).
NOTA: Se vuoi personalizzare i CSS per una data pagina, puoi aggiungere <body id="pageName"/> in cima al file. Questo verrà assimilato da SiteMesh e messo nella pagina finale. Puoi poi personalizzare il tuo CSS pagina per pagina usando qualcosa del tipo:body#pageName element.class { background-color: blue }
- Aggiungi chiavi in ApplicationResources.properties per titoli ed intestazioni nelle JSP
# -- person detail page --
personDetail.title=Person Detail
personDetail.heading=Person Information
- Just above, we added "personForm.*" keys to this file, so why do I use personForm and personDetail? The best reason is because it gives a nice separation between form labels and text on the page. Another reason is because all the *Form.* give you a nice representation of all the fields in your database.
I recently had a client who wanted all fields in the database searchable. This was fairly easy to do. I just looked up all the keys in ApplicationResources.properties which contained "Form." and then put them into a drop-down. On the UI, the user was able to enter a search term and select the column they wanted to search. I was glad I followed this Form vs. Detail distinction on that project!
Crea il PersonFormControllerTest per il test del PersonFormController [#2]
Per creare un test JUnit per il PersonFormController, inizia a creare un file PersonFormControllerTest.java nella directory test/web/**/action.
|
A questo punto non compila nulla (con ant compile) perché devi creare il PersonFormController cui questo test si riferisce.
Crea il PersonFormController [#3]
In src/web/**/action, crea un file PersonFormController.java file con il seguente contenuto:
|
Nella classe sopra ci sono alcuni metodi con i quali potresti non essere familiare. Il metodo formBackingObject() viene usato per fronire l'oggetto sul quale opera questo Controller. Il metodo processFormSubmission() viene usato per rilevare il bottone cancel, ed onSubmit() viene chiamate sulle richieste POST e gestisce il delete/add/update di un utente.
Ci sono alcune chiavi che dovresti (eventualmente) aggiungere ad ApplicationResources.properties per visualizzare i messaggi di successo. Questo file si trova in web/WEB-INF/classes - aprilo ed aggiungi quanto segue:
- Di solito li aggiungo sotto il commento # -- success messages --.
person.added=Person has been added successfully.
person.updated=Person has been updated successfully.
person.deleted=Person has been deleted successfully.
Potresti usare anche dei messaggi generici di added, deleted ed updated, qualsiasi cosa funzioni per te. Va bene avere messaggi separati nel caso sia necessario modificarli per entità.
Come puoi notare il codice per chiamare il PersonManager è lo stesso utilizzato nel PersonManagerTest. Sia PersonFormController che PersonManagerTest sono client di PersonManagerImpl, pertanto ciò ha perfettamente senso.
Ora devi aggiungere una url-mapping per questo controller nel file web/WEB-INF/action-servlet.xml. Nel blocco sotto la nuova riga è alla fine, con <prop key="/editPerson.html">:
|
Devi anche aggiungere la definizione <bean> per il personFormController nello stesso file:
|
- La proprietà "validator" è commentate nel blocco XML sopra in quanto non abbiamo ancora definito alcuna regola di validazione per l'oggetto Person. Decommenteremo questo valora quando aggiungiamo la validazione.
Esegui il PersonFormControllerTest [#4]
Se osservi il PersonFormControllerTest, tutti i test dipendono dall'avere un record con id=1 nel database (e testRemove depende da uno con id=2), pertanto aggiungiamo tali record al nostro file di dati di esempio (metadata/sql/sample-data.xml). Lo aggiungerei giusto alla fine - l'ordine non è importante in quanto (al momento) non ci sono relazioni con altre tabelle.
  <table name='person'>
    <column>id</column>
    <column>first_name</column>
    <column>last_name</column>
    <row>
      <value>1</value>
      <value>Matt</value>
      <value>Raible</value>
    </row>
    <row>
      <value>2</value>
      <value>James</value>
      <value>Davidson</value>
    </row>
  </table>
DBUnit carica questo file prima di eseguire un qualsiasi test, pertanto questo record sarà disponibile per il test del tuo Controller.
Controlla di essere nella directory base del progetto. Se esegui ant test-web -Dtestcase=PersonFormController - tutto dovrebbe funzionare come previsto.
BUILD SUCCESSFULTotal time: 21 seconds
Ripulisci la JSP per renderla presentabile [#5]
If you want to add a usability enhancement to your form, you can set the cursor to focus on the first field when the page loads. Simply add the following JavaScript at the bottom of your form:
<script type="text/javascript">
    Form.focusFirstElement($('personForm'));
</script>
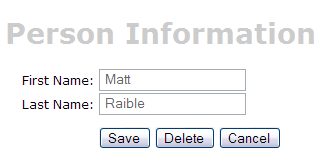
Ora se esegui ant db-load deploy, avvii Tomcat e punti il browser su http://localhost:8080/appfuse/editPerson.html?id=1, dovresti vedere qualcosa del genere:
Infine, per rendere questa pagina più user friendly, puoi aggiungere un messaggio per i tuoi utenti ad inizion form, ciò può essere fatto facilmente aggiungendo del testo (usando <fmt:message>) all'inizio della pagina personForm.jsp.
[Optional] Create a Canoo WebTest to test browser-like actions [#6]
The final (optional) step in this tutorial is to create a Canoo WebTest to test the JSPs.
- I say this step is optional, because you can run the same tests through your browser.
You can use the following URLs to test the different actions for adding, editing and saving a user.
- Add - http://localhost:8080/appfuse/editPerson.html.
- Edit - http://localhost:8080/appfuse/editPerson.html?id=1 (make sure and run ant db-load first).
- Delete - http://localhost:8080/appfuse/editPerson.html?method=Delete&id=1 (or edit and click on the Delete button).
- Save - Click edit and then click the Save button.
Canoo tests are pretty slick in that they're simply configured in an XML file. To add tests for add, edit, save and delete, open test/web/web-tests.xml and add the following XML. You'll notice that this fragment has a target named PersonTests that runs all the related tests.
- I use CamelCase target names (vs. the traditional lowercase, dash-separated) because when you're typing -Dtestcase=Name, I've found that I'm used to doing CamelCase for my JUnit Tests.
|
After adding this, you should be able to run ant test-canoo -Dtestcase=PersonTests with Tomcat running or ant test-jsp -Dtestcase=PersonTests if you want Ant to start/stop Tomcat for you. To include the PersonTests when all Canoo tests are run, add it as a dependency to the "run-all-tests" target.
You'll notice that there's no logging in the client-side window by Canoo. If you'd like to see what it's doing, you can add the following between </webtest> and </target> at the end of each target.
<loadfile property="web-tests.result"
    srcFile="${test.dir}/data/web-tests-result.xml"/>
<echo>${web-tests.result}</echo>
BUILD SUCCESSFULTotal time: 10 seconds
Prossimo: Parte IV: Aggiungere Validazione e Schermata Elenco - Aggiungere logica di convalida al personForm in modo che firstName e lastName siano campi obbligatori ed aggiungere una schermata elenco per visualizzare tutti i record nel database.
|
Go to top
More info...
Attach file...
|
| This particular version was published on 16-Jul-2008 08:47:26 MDT by MarcelloTeodori. |