Raible's Wiki
Raible Designs
Wiki Home
News
Recent Changes
AppFuse
Homepage- Korean
- Chinese
- Italian
- Japanese
QuickStart Guide
- Chinese
- French
- German
- Italian
- Korean
- Portuguese
- Spanish
- Japanese
User Guide
- Korean
- Chinese
Tutorials
- Chinese
- German
- Italian
- Korean
- Portuguese
- Spanish
Other Applications
Struts ResumeSecurity Example
Struts Menu
UserPreferences
Referenced by
SpringControllers_it
Hide Menu
ValidationAndListSpring_it |
|
| Your trail: | |
This is version 4.
It is not the current version, and thus it cannot be edited.
[Back to current version]
[Restore this version]
Parte IV: Aggiungere Validazione e Schermata Elenco - Aggiungere logica di convalida all'oggetto Person in modo che firstName e lastName siano campi obbligatori ed aggiungere una schermata elenco per visualizzare tutti i record nel database.
- Questo tutorial dipende da Parte III: Creazione Controller e JSP.
Info su questo Tutorial
Questo tutorial mostra come aggiungere la logica di validazione (sia client che server-side) all'oggetto Person usando Commons Validator. Verrà creata anche una schermata di elenco usando la Display Tag Library per visualizzare tutte le persone nel database.
- Ti dirò come faccio le cose nel Mondo Reale in un testo come questo.
Indice
- [1] Aggiungi i tag XDoclet per il Validator a Person.java
- [2] Vedi JSP con la validazione aggiunta e verifica
- [3] Aggiungi i metodi testGetPeople ai test di DAO e Manager
- [4] Aggiungi i metodi getPeople a PersonDao e Manager
- [5] Crea il PersonControllerTest
- [6] Crea il PersonController
- [7] Crea personList.jsp ed il test Canoo
- [8] Aggiungi un collegamento al menu
Aggiungi i tag XDoclet per il Validator a Person.java [#1]
Per usare Commons Validator con Spring MVC normalmente devi scrivere un file validation.xml a mano. Tuttavia, grazie a XDoclet, è molto più semplice - devi solo aggiungere un paio di tag @spring.validator al tuo POJO (Person.java). Apriamo il file (src/dao/**/dao/Person.java) e modifichiamo i metodi setFirstName e setLastName come segue:
|
Va inoltre menzionato che puoi anche aggiungere un attributo msgkey a questo tag per effettuare l'override della chiave messaggio predefinita per questo errore.
|
La chiave predefinita per type="required" è già errors.required, per cui io di solito la lascio al default. Questa chiave è definita in web/WEB-INF/classes/ApplicationResources_*.properties.
Ora se registri Person.java ed esegui ant clean webdoclet, verrà generato un file validation.xml in build/appfuse/WEB-INF/. Il contenuto dovrebbe avere un elemento per "person".
|
Infine, per attivare la validazione in personForm.jsp, devi assicurarti che personForm.jsp contenga quanto segue:
<html:javascript formName="person" cdata="false"
      dynamicJavascript="true" staticJavascript="false"/>
<script type="text/javascript"
      src="<c:url value="/scripts/validator.jsp"/>"></script>
Devi anche decommentare la property "validator" che abbiamo commentato prima. Controlla che il <bean> "personFormController" in web/WEB-INF/action-servlet.xml abbia il seguente XML:
|
Vedi JSP con la validazione aggiunta e verifica [#2]
Ora che abbiamo la validazione configurata su questo form, assicuriamoci che funzioni. Esegui ant db-load deploy, avvia Tomcat e vai su http://localhost:8080/appfuse/editPerson.html?id=1 . Un'altra cosa che potresti notare è che le label "First Name" e "Last Name" ora hanno degli asterischi vicino - che indicano i campi come obbligatori. Ciò è ottenuto tramite un LabelTag che legge le regole di validazione da Commons Validator.
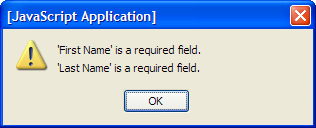
Se cancelli i valori nei campi firstName e lastName e fai clic sul bottone registra, dovresti avere il seguente JavaScript.

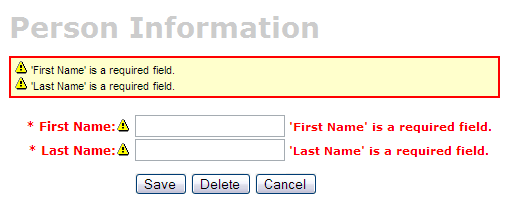
Per esser sicuro che tutto funzioni davvero come atteso, puoi provare a spegnere il JavaScript e controllare che la validazione server-side stia funzionando. Ciò è semplice in Mozilla Firefox (il mio browser preferito), basta che vai in Strumenti → Opzioni → Contenuti e deselezioni "Attiva JavaScript". Ora se azzeri i campi e invii il form, dovresti vedere quanto segue:

Se vuoi solo la validazione lato server (senza JavaScript), puoi eliminare l'attributo onsubmit da <html:form> (in web/pages/personForm.jsp) ed anche i tag del Validator JavaScript a fine pagina.
|
Aggiungi i metodi testGetPeople ai Test di DAO e Manager [#3]
Per creare una schermata elenco (chiamata anche schermata master), dobbiamo creare i metodi che restituiranno tutte le righe dalla nostra tabella person. Iniziamo aggiungendo i test oer questi metodi alle nostre classi PersonDaoTest e PersonManagerTest. Di solito io chiamo questi metodi getEntities (i.e. getUsers), ma potresti usare anche getAll o search - si tratta davvero solo di una questione di preferenze personali.Apri test/dao/**/dao/PersonDaoTest.java ed aggiungi un metodo testGetPeople:
|
Il motivo per cui sto passando un oggetto person al metodo getPeople è per permettere di filtrare (basandomi sui valori in person) in futuro. Aggiungendo questo parametro alla firma del tuo metodo getPeople() è opzionale, ma il resto di questo tutorial assume che tu lo abbia fatto.
Ora apri test/service/**/service/PersonManagerTest.java ed aggiungi un metodo testGetPeople:
|
Affinché questi test possano compilare, devi aggiungere il metodo getPeople() alle interfacce PersonDao e PersonManager, e la relativa implementazione.
Aggiungi il metodo getPeople() a DAO e Manager [#4]
Apri src/dao/**/dao/PersonDao.java ed aggiungi la firma del metodo getPeople():
|
Now add the same method signature to src/service/**/service/PersonManager.java. Save all your files and adjust the imports in your tests. Next you need to implement the getPeople() method in your implementation classes. Open src/dao/**/dao/hibernate/PersonDaoHibernate.java and add the following method:
|
 (HQL) or using Criteria Queries
 .
.
An example using a Criteria Query:
|
Now implement the getPeople() method in src/service/**/impl/PersonManagerImpl.java:
|
After saving all your changes, you should be able to run both tests by executing the following:
- ant test-dao -Dtestcase=PersonDao
- ant test-service -Dtestcase=PersonManager
If everything works - nice job! Now you need to add this retrieve all functionality to the web tier.
Crea il PersonControllerTest [#5]
In the last couple of tutorials, we've been working with the PersonFormController to interact with our HTML form. Now we need to create a new Controller that'll simply handle getting and displaying a list of people in the database.- You could also use a MultiActionController
 to handle all your List screens.
To begin, create test/web/**/action/PersonControllerTest.java (extends BaseControllerTestCase) and add the following method:
|
This class will not compile until you (1) create the PersonController class and (2) add the PERSON_LIST variable to the src/dao/**/Constants.java file. Some folks have suggested that this class be named PersonControllerList - the name choice is up to you. I prefer Controller and FormController because it tells me one implements Controller while the latter extends SimpleFormController
 .
.
- I usually copy a similar variable that already exists in this file - i.e. USER_LIST.
|
Now save all your changes. You won't be able to run ant test-web -Dtestcase=PersonController yet since PersonController does not exist (yet). Let's add it.
Crea il PersonController [#6]
Crea il file src/web/**/action/PersonController.java. Dovrebbe implementare org.springframework.web.servlet.mvc.Controller e leggersi come segue:
|
Ora aggiungi una definizione a web/WEB-INF/action-servlet.xml per questo Controller.
|
Ora se esegui ant test-web -Dtestcase=PersonController, il test dovrebbe passare. Successivamente, crea il mapping su URL per questo controller. Per fare ciò, cerca il bean "urlMapping" in web/WEB-INF/action-servlet.xml ed aggiungi la riga seguente alla proprietà "mappings":
|
Crea personList.jsp ed il test Canoo [#7]
Apri il file personList.jsp nella cartella web/pages del tuo progetto. Una cosa che vorrai probabilmente modificare è la forma plurale degli elementi che stai elencando. Il nome generati in questo esempio è "persons" è probabilmente dovrebbe essere people. At or near line 31, you should have the following line:<display:setProperty name="paging.banner.items_name" value="persons"/>
Change it to:
<display:setProperty name="paging.banner.items_name" value="people"/>
Finally, add the title and heading keys (personList.title and personList.heading) to web/WEB-INF/classes/ApplicationResources.properties. Open this file and add the following:
# -- person list page --
personList.title=Person List
personList.heading=All People
As a reminder, the personList.title is what ends up in the brower's title bar (the <title> tag) and
personList.heading will be put into an <h1> tag before any page content. At this point, you could be able to run "ant deploy", start Tomcat and open the list screen in your browser .
.
Now that we have a List Screen, let's change the pages that are displayed after adding and deleting a new Person. In web/WEB-INF/action-servlet.xml, change the personFormController's successView property to be "people.html".
|
You will also need to update the Canoo tests "AddPerson" and "DeletePerson". Open test/web/web-tests.xml and change the following line in the "AddPerson" target:
<verifytitle description="Main Menu appears if save successful"
    text=".*${mainMenu.title}.*" regex="true"/>
to:
<verifytitle description="Person List appears if save successful"
    text=".*${personList.title}.*" regex="true"/>
Then in the "DeletePerson" target, change the following line:
<verifytitle description="display Main Menu" text=".*$(mainMenu.title}.*" regex="true"/>
to:
<verifytitle description="display Person List" text=".*${personList.title}.*" regex="true"/>
To test that displaying this page works, you can create a new JSP test in test/web/web-tests.xml:
|
You'll also want to add the "SearchPeople" target to the "PersonTests" target so it will be executed along with all the other person-related tests.
|
Now you can run ant deploy test-canoo -Dtestcase=SearchPeople (or ant test-jsp if Tomcat isn't running) and hopefully it will result in "BUILD SUCCESSFUL". If so - nice work!
Add link to menu [#8]
The last step is to make the list, add, edit and delete functions visible to the user. The simplest way is to add a new link to the list of links in web/pages/mainMenu.jsp:
|
Where menu.viewPeople is an entry in web/WEB-INF/classes/ApplicationResources.properties.
menu.viewPeople=View People
The other (more likely) alternative is that you'll want to add it to the menu. To do this, add the following to web/WEB-INF/menu-config.xml:
|
Make sure the above XML is inside the <Menus> tag, but not within another <Menu>. Then add this new menu to web/common/menu.jsp - which should now looks as follows:
|
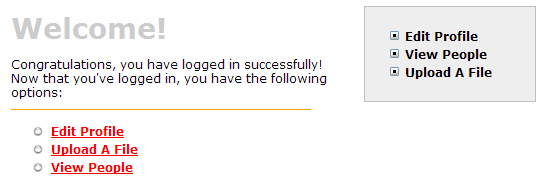
Now if you run ant clean deploy, start Tomcat and go to http://localhost:8080/appfuse/mainMenu.html , you should see something like the screenshot below.

Notice that there is a new link on the left side (from mainMenu.jsp) and on the right in our menu (from menu.jsp).
That's it!
You've completed the full lifecycle of developing a set of master-detail pages with AppFuse and Spring's MVC framework - Congratulations! Now the real test is if you can run all the tests in your app without failure. To test, stop tomcat and run ant clean test-all. This will run all the unit tests within your project. As a reminder, it should be easy to setup and test AppFuse from scratch using ant setup-db setup-tomcat test-all. Also, if you're looking for more robust examples - checkout Struts Resume.Happy Day!
Total time: 4 minutes 21 seconds
|
Go to top
More info...
Attach file...
|
| This particular version was published on 16-Jul-2008 02:27:32 MDT by MarcelloTeodori. |
![Aggregate the RSS feed [RSS]](https://raibledesigns.com/wiki/images/xml.png)
