Raible's Wiki
Raible Designs
Wiki Home
News
Recent Changes
AppFuse
Homepage- Korean
- Chinese
- Italian
- Japanese
QuickStart Guide
- Chinese
- French
- German
- Italian
- Korean
- Portuguese
- Spanish
- Japanese
User Guide
- Korean
- Chinese
Tutorials
- Chinese
- German
- Italian
- Korean
- Portuguese
- Spanish
Other Applications
Struts ResumeSecurity Example
Struts Menu
UserPreferences
Referenced by
Articles
CreateActions_it
![[RSS]](https://raibledesigns.com/wiki/images/xml.png "Aggregate the RSS feed")

Hide Menu
ValidationAndList_it |
|
| Your trail: | |
This is version 4.
It is not the current version, and thus it cannot be edited.
[Back to current version]
[Restore this version]
Parte IV: Aggiungere Validazione e Schermata Elenco - Aggiungere un logica di validazione al PersonForm in modo che firstName e lastName siano campi obbligatori ed aggiungere una schermata di elenco per visualizzare tutti i record di tipo person nel database.
- Questo tutorial dipende da Parte III: Creare Action e JSP.
Informazioni su questo Tutorial
Questo tutorial ti mostrerà come aggiungere una logica di Validazione (sia lato client che server) all'oggetto PersonForm usando il Validator di Struts. Creeremo anche una schermata di elenco usando la Display Tag Library per visualizzare tutte le persone nel database.
- Ti dirò come fare le cose nel Mondo Reale in un testo come questo.
Indice
- [1] Aggiungi i tag Validator di XDoclet a Person.java
- [2] Visualizza la JSP con la validazione aggiunta ed effettua un test
- [3] Aggiungi i metodi testGetPeople ai Test di DAO e Manager
- [4] Aggiungi i metodi getPeople a PersonDao e Manager
- [5] Aggiungi il metodo testSearch al Test della Action
- [6] Aggiungi il metodo search alla Action
- [7] Crea personList.jsp ed il test Canoo
- [8] Aggiungi un collegamento al menu
Aggiungi i tag Validator di XDoclet a Person.java [#1]
Per usare il Validator di Struts, normalmente devi scrivere un file validation.xml a mano. Se non stai usando AppFuse, devi anche configurare il Plugin Validator e le chiavi degli errori nel tuo ApplicationResources.properties. Per ulteriori informazioni sull'argomento, vedi il Tutorial Validation Made Easy (c'è anche un ricco insieme di tutorial per Struts da solo).
Grazie ad XDoclet, è molto più semplice - devi solo aggiungere un paio di tag @struts.validator alla classe Person. Apri (src/dao/**/model/Person.java) e modifica i metodi getFirstName() e getLastName() in modo da includere i tag @struts.validator type="required".
|
Puoi anche aggiungere un attributo msgkey a questo tag per fare l'override della chiave di default relativa al messaggio associato a questo errore.
|
La chiave di default per type="required" è già errors.required, pertanto io di solito la lascio al valore di default. Questa chiave viene specificata in web/WEB-INF/classes/ApplicationResources_*.properties. Come avrai notato, stiamo mettendo questi tag nei getter di questa classe per quanto la documentazione di XDoclet dica di metterli nei setter. Questo perché stiamo generando il nostro PersonForm.java - il file del modello (metadata/template/struts_form.xdt) si preoccupa di mettere questi tag sui setter nel file generato.
Ora se registru Person.java ed esegui ant clean webdoclet, verrà generato un file validation.xml in build/appfuse/WEB-INF/. Il suo contenuto dovrebbe includere una voce per "personForm".
|
La validazione lato-client è attivata per default in personForm.jsp. C'è un tag JSP <html:javascript> ed uno script in fondo alla pagina che lo attiva. Ciò che segue dovrebbe esser già presente (grazie ad AppGen) - ma potresti aver bisogno di rimuovere il commento se avevi commentato il blocco nel file nel tutorial precedente.
<html:javascript formName="personForm" cdata="false"
    dynamicJavascript="true" staticJavascript="false"/>
<script type="text/javascript"
    src="<html:rewrite page="/scripts/validator.jsp"/>"></script>
NOTA: Se hai oggetti innestati con regole di validazione, verrano presi e messi nel validation.xml. Ciò avviene in quanto un tag @struts.validator viene aggiunto al setter dell'oggetto innestato quando viene generato il form (usando metadata/templates/struts_form.xdt). Se hai relazioni molti-a-molti bidirezionali fra oggetti, ciò potrebbe essere un problema. Ci sono due soluzioni per risolvere la questione. La prima è eliminare il tag @struts.validator tag da struts_form.xdt e posizionarlo a mano sul setter nel tuo POJO. La seconda viene descritta qui.
Visualizza la JSP con la validazione aggiunta ed effettua un test [#2]
Ora che hai configurato la Validazione per questo form, ogni volta che questo form viene usato in un action-mapping con validate="true", verranno applicate queste regole. Nell'ultimo tutorial, abbiamo aggiunto l'action-mapping "savePerson" per la PersonAction. I tag XDoclet per questo action-mapping erano:
|
Pertanto ora, se la tua web/pages/personForm.jsp ha un <html:form action="savePerson">, dovrebbe intervenire la validazione ogni volta che proviamo ad inviare questo form. Esegui ant db-load deploy, avvia Tomcat e vai a http://localhost:8080/appfuse/editPerson.html?id=1.
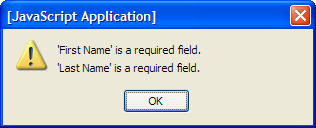
Se cancelli i valori nei campi firstName e lastName e fai clic sul pulsante registra, dovresti ottenere il seguente alert JavaScript.
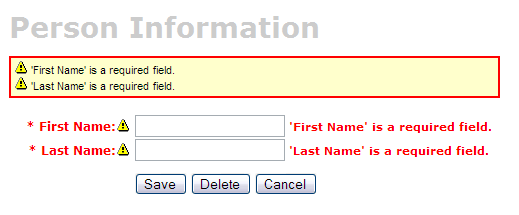
Per assicurarti che le cose funzionino davvero come previsto, puoi spegnere JavaScript e verificare se la validazione lato-server sta funzionando. Ciò è semplice in Firefox (il mio browser preferito), basta che vai in Strumenti → Preferenxe → Contenuto e deselezioni "Abilita JavaScript". Ora se cancelli i campi e invii il form, dovresti vedere il messaggio seguente:
se non vedi questi errori di validazione, ci sono un paio di possibilità:
- Il form registra cin un messaggio di successo, ma i campi firstName e lastName sono ora vuoti.
- Questo perché l'<html:form> in web/pages/personForm.jsp ha action="editPerson" - controlla che abbia action="savePerson".
- Fai clic su registra, ma compare una pagina vuota.
- La pagina vuota indica che l'attributo "input" del tuo forward "savePerson" non è stato configurato correttamente. Controlla se si riferisca ad un action-forward locale o globale. In questo esempio, dovrebbe essre input="edit", che punta alla definizione del tile .personDetail. Dalla mia esperienza, il valore di input dovrebbe essere un forward, non un path ad una action.
|
Aggiungi i metodi testGetPeople ai Test di DAO e Manager [#3]
Per creare una schermata di Elenco (chiamata anche schermata master), dobbiamo creare dei metodi che restituiscano tutte le righe dall nostra tabella person. Iniziamo con l'aggiungere i test per questi metodi alle nostre classi PersonDaoTest e PersonManagerTest. Di solito io chiamo questi metodi getEntities (i.e. getUsers), ma potresti usare anche getAll o search - è solo questione di preferenze personali.Apri test/dao/**/dao/PersonDaoTest.java ed agiungi un metodo testGetPeople:
|
Il motivo per cui sto passando un oggetto person al metodo getPeople è per permettere in futuro di filtrare il risultato (basandomi come criterio sui valori presenti in person). Aggiungere questo parametro alla firma del tuo metodo getPeople() è opzionale, ma il resto di questo tutorial assume tu lo abbia fatto.
Ora apri test/service/**/service/PersonManagerTest.java ed aggiungi un metodo testGetPeople:
|
Affinché questi test compilino, devi aggiungere il metodo getPeople() alle interfacce PersonDao e PersonManager, nonché alle relative implementazioni.
Aggiungi i metodi getPeople a PersonDao e Manager [#4]
Apri src/dao/**/dao/PersonDao.java ed aggiungi la firma del metodo getPeople():
|
Now add the same method signature to src/service/**/service/PersonManager.java. Save all your files and adjust the imports in your tests. Next you need to implement the getPeople() method in your implementation classes. Open src/dao/**/dao/hibernate/PersonDaoHibernate.java and add the following method:
|
(HQL) or using Criteria Queries.
An example using a Criteria Query:
|
Now implement the getPeople() method in src/service/**/impl/PersonManagerImpl.java:
|
After saving all your changes, you should be able to run both tests by executing the following:
- ant test-dao -Dtestcase=PersonDao
- ant test-service -Dtestcase=PersonManager
If everything works - nice job! Now you need to add this retrieve all functionality to the web tier.
Aggiungi il metodo testSearch al Test della Action [#5]
Open test/web/**/action/PersonActionTest.java and add the following method:
|
This class will not compile until you add the PERSON_LIST variable to the src/dao/**/Constants.java file.
- I usually copy a similar variable that already exists in this file - i.e. USER_LIST.
|
Now save all your changes. You won't be able to run ant test-web -Dtestcase=PersonAction yet since PersonAction.search() does not exist (yet).
Aggiungi il metodo search alla Action [#6]
Open src/web/**/action/PersonAction.java and add the following XDoclet tag at the top - to forward to our list screen.
|
Now add the search method to the body of the PersonAction class.
- I used UserAction.search() as a template for this method.
|
Run ant test-web -Dtestcase=PersonAction.
Nice!
BUILD SUCCESSFUL
Total time: 1 minute 26 seconds
Crea personList.jsp ed il test Canoo [#7]
Open the personList.jsp file in web/pages. You'll probably want to change the code to show the plural form of the items you're listing. The generated name in this example is "persons" and it should probably be people. At or near line 31, you should have the following line:<display:setProperty name="paging.banner.items_name" value="persons"/>
Change it to:
<display:setProperty name="paging.banner.items_name" value="people"/>
Finally, add the title and heading keys (personList.title and personList.heading) to web/WEB-INF/classes/ApplicationResources.properties. Open this file and add the following:
# -- person list page --
personList.title=Person List
personList.heading=All People
As a reminder, the personList.title is what ends up in the brower's title bar (the <title> tag) and personList.heading will be put into an <h1> tag before any page content.
At this point, you should be able to run ant clean deploy, start Tomcat and view this page in your browser at http://localhost:8080/appfuse/editPerson.html?method=Search.
Now that we have a List Screen, let's change the pages that are displayed after adding and deleting a new Person. In src/web/**/action/PersonAction.java, change the mapping.findForward("mainMenu") in the save, delete and cancel methods to be:
|
You will also need to change verifyForward("mainMenu") to be verifyForward("viewPeople") in the testRemove method of test/web/**/action/PersonActionTest.java. Lastly, the Canoo tests "AddPerson" and "DeletePerson" need to be updated. Open test/web/web-tests.xml and change the following line in the "AddPerson" target:
<verifytitle description="Main Menu appears if save successful"
    text=".*${mainMenu.title}.*" regex="true"/>
to:
<verifytitle description="Person List appears if save successful"
    text=".*${personList.title}.*" regex="true"/>
Then in the "DeletePerson" target, change the following line:
<verifytitle description="display Main Menu"
    text=".*$(mainMenu.title}.*" regex="true"/>
to:
<verifytitle description="display Person List" text=".*${personList.title}.*" regex="true"/>
Finally, declare the viewPeople forward in metadata/web/global-forwards.xml after viewUsers as below:
<forward name="viewPeople" path="/editPerson.html?method=Search"/>
The name "viewPeople" is used instead of "list" so that the search method will be executed, rather than simply forwarding to the personForm.jsp (which the "list" forward points to).
To test that displaying this page works, create a new JSP test in test/web/web-tests.xml:
|
You'll also want to add the "SearchPeople" target to the "PersonTests" target so it will be executed along with all the other person-related tests.
|
Now you can run ant test-canoo -Dtestcase=SearchPeople (or ant test-jsp if Tomcat isn't running) and hopefully it will result in "BUILD SUCCESSFUL". If so - nice work!
Aggiungi un collegamento al menu [#8]
The last step is to make the list, add, edit and delete functions visible to the user. The simplest way is to add a new link to the list of links in web/pages/mainMenu.jsp: NOTE: The other links in mainMenu.jsp don't use
|
Where menu.viewPeople is an entry in web/WEB-INF/classes/ApplicationResources.properties.
menu.viewPeople=View People
The other (more likely) alternative is that you'll want to add it to the menu. To do this, add the following to web/WEB-INF/menu-config.xml:
|
Make sure the above XML is inside the <Menus> tag, but not within another <Menu>. Then add this new menu to web/common/menu.jsp - which should now look as follows:
|
Now if you run ant clean deploy start Tomcat and go to http://localhost:8080/appfuse/mainMenu.html, you should see something like the screenshot below.
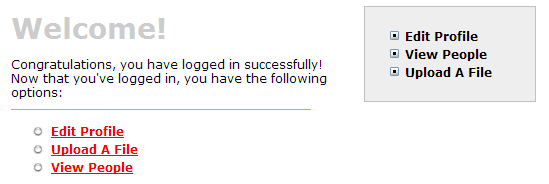
Notice that there is a new link on the left side (from mainMenu.jsp) and on the right in our menu (from menu.jsp).
That's it!
You've completed the full lifecycle of developing a set of master-detail pages with AppFuse and Struts - Congratulations! Now the real test is if you can run all the tests in your app without failure. To test, stop tomcat and run ant clean test-all. This will run all the unit tests within your project. As a reminder, it should be easy to setup and test AppFuse from scratch using ant setup-db setup-tomcat test-all. Also, if you're looking for more robust examples - checkout Struts Resume.Happy Day!
Total time: 2 minutes 31 seconds
Attachments:
| new-menu-item.png |  |
9138 bytes |
| validation-required.png |  |
10049 bytes |
| validation-required-nojs.png |  |
9277 bytes |
|
Go to top
More info...
Attach file...
|
| This particular version was published on 06-Nov-2006 13:52:57 MST by MarcelloTeodori. |