Raible's Wiki
Raible Designs
Wiki Home
News
Recent Changes
AppFuse
Homepage- Korean
- Chinese
- Italian
- Japanese
QuickStart Guide
- Chinese
- French
- German
- Italian
- Korean
- Portuguese
- Spanish
- Japanese
User Guide
- Korean
- Chinese
Tutorials
- Chinese
- German
- Italian
- Korean
- Portuguese
- Spanish
Other Applications
Struts ResumeSecurity Example
Struts Menu
UserPreferences
Referenced by
Articles_zh
ValidationAndListWeb...
Hide Menu
WebWorkActions_zh |
|
| Your trail: | |
第三部分 创建Action和JSP - 讲述如何在你的AppFuse工程里创建 WebWork Action和JSP。
- 阅读本部分指南请先阅读 第二部分 创建新的Manager对象.
内容提要
这个部分将会展现给你如何创建Webwork框架的Action和JSP,同样会编写JUnit测试来测试PersonAction对象。- 我会用这种格式说明我在 实际过程 中的操作。
接下来我们开始在AppFuse的构架下创建一个新的Acetion和JSP。如果还没有安装WebWork模块,先运行ant install-webwork任务。
目录
- [1] 使用XDoclet创建JSP
- [2] 创建PersonActionTest以便测试
- [3] 创建PersonAction对象
- [4] 运行PersonActionTest
- [5] 清理JSP文件并进行发布
- [6] 创建Canoo WebTests模拟测试浏览器行为进行单元测试
使用XDoclet创建JSP [#1]
在这一步,我们要创建JSP文件显示Person对象的信息。 这个JSP将使用Webwork的JSP Tag为Person.java中的每个属性在表单的表格产生一行。这个AppGen工具是基于StrutsGen工具实现的 - 我们使用的这个工具是由Erik Hatcher 开发的。他由一个类(FormTagsHandler.java) 和一对XDoclet模版(FormKeys.xdt and Form_jsp.xdt组成)。这些文件都在extras/viewgen目录下。
产生一个表单元素和对应的标签属性文件只需经过下面几个基本步骤:
- 命令行下面切换到"extras/viewgen"目录下
- 执行ant -Dform.name=Person任务 在extras/viewgen/build 目录下产生下面三个文件:
- Person.properties (表单元素的标签)
- personForm.jsp (显示一个Person信息的JSP文件)
- personList.jsp (显示People列表的JSP文件)
- 把Person.properties文件中的内容拷贝到web/WEB-INF/classes/ApplicationResources_en.properties文件中,这是所有form中需要的标题和属性键值。下面是一个具体的Person.properties文件例子:
# -- person form --
person.id=Id
person.firstName=First Name
person.lastName=Last Name

person.added=Person has been added successfully.
person.updated=Person has been updated successfully.
person.deleted=Person has been deleted successfully.

# -- person list page --
personList.title=Person List
personList.heading=Persons

# -- person detail page --
personDetail.title=Person Detail
personDetail.heading=Person Information
- 把personForm.jsp文件拷贝到web/pages/personForm.jsp目录下。把personList.jsp拷贝到web/pages/personList.jsp目录下。 注意每个文件名的名字第一个字符是小写字符。
- "pages"目录下的文件在发布时将发布到"WEB-INF/pages"目录下。容器提供了WEB_INF目录下的所有文件的安全控制。这意味着来自客户端的请求,而不是由发过来的请求将不被相应。把所有的JSP文件放到WEB-INF目录下可以保证用户只能通过Actions来访问这些页面。这样就把系统安全性要求全部转移到Actions上,那里可以得到更高效的处理并且在基本的表示层外面。
AppFuse架构的web应用程序安全性保证了所有*.html文件得到了保护(除了/signup.html和/passwordHint.html文件)。这就保证了客户端必须通过Action才能访问JSP文件(至少所有在pages目录下的JSP是这样)。
注意: 如果自定义了CSS特殊页面,那么需要在文件的最上面加上。这样就可以被 SiteMesh 识别并且放到最终的页面中去。你也可以使用下面的语句一个一个页面的使用自定义CSS:body#pageName element.class { background-color: blue }
- 在ApplicationResources_en.properties文件中加入对应JSP文件的titles和headings键值。
# -- person detail page --
personDetail.title=Person Detail
personDetail.heading=Person Information
- 在这上面我们要在文件中加入"personForm.*"键,为什么我们要使用personForm和personDetail这样的表示形式?最主要的原因是能够明显区别页面的输入框标签和普通文本信息。另外一个原因是因为*Form.*这种形式可以为数据库中的提供很好的表现形式。
最近我有个客户希望所有数据库中的字段都可以查询。这个相当容易实现。我在ApplicationResources.properties 检查所有的包含"Form."的键并且把它放到下拉列表框中。在用户界面上,用户可以输入查询项并且选择想要查询的列。I was glad I followed this Form vs. Detail distinction on that project!
创建PersonActionTest类测试PersonAction类 [#2]
为PersonAction创建一个JUnit测试类, 首先在test/web/**/action目录下创建PersonActionTest.java文件。
|
由于没有创建PersonAction类这个对象无法通过编译。
创建PersonAction类 [#3]
在src/web/**/action目录下,创建PersonAction.java文件:
|
有一些键值(Key)需要加到ApplicationResources_en.properties文件中用来显示给用户看的操作成功的提示信息打开web/WEB-INF/classes目录下的ApplicationResources_en.properties并且加入如下内容:
- 我通常把这些内容加在# -- success messages --注释下面。
person.added=Person has been added successfully.
person.updated=Person has been updated successfully.
person.deleted=Person has been deleted successfully.
当然你可以加入一般的added, deleted和updated提示信息,这取决于你的需要。为每个实体使用独立的信息可以在特别情况下改变它。
你可能注意到了我们以和PersonManager类类似的方式调用了TestPersonManager对象。PersonAction和PersonManagerTest都是PersonManagerImpl的客户,这是个很好的结构。
现在你需要告诉Spring和WebWork这个action的存在。首先在web/WEB-INF/action-servlet.xml文件中加入如下的PersonAction定义信息:
|
然后在web/WEB-INF/classes/xwork.xml中加入引用信息说明:
|
- 在上面的说明中"validationStack" 拦截器引用被注释掉了,因为你没有为Person对象定义任何的validation规则.。我们会在下一章中加入校验规则并且去掉注释。
运行PersonActionTest [#4]
如果你看了我们的PersonActionTest, 所有的测试依赖一条id为1的纪录(testRemove依赖一套id为2的纪录),所以让我们在示例数据文件metadata/sql/sample-data.xml中加入这些纪录(原来已经添加了一条,现添加第二条)。如下所示(顺序并不重要)
  <table name='person'>
    <column>id</column>
    <column>first_name</column>
    <column>last_name</column>
    <row>
      <value>1</value>
      <value>Matt</value>
      <value>Raible</value>
    </row>
    <row>
      <value>2</value>
      <value>James</value>
      <value>Davidson</value>
    </row>
  </table>
当我们运行任何测试时,DBUnit都会加载这个文件,因此当你运行Action test时这些纪录肯定是有效的。
确定你在project目录下并且所有文件都正确保存,运行ant test-web -Dtestcase=PersonAction任务,结果正如我们期望的那样。
BUILD SUCCESSFULTotal time: 21 seconds
清理JSP以便正常显示Person信息 [#5]
现在清理自动产生的personForm.jsp文件隐藏"id"属性。把下面的代码从 web/pages/personForm.jsp文件中移除掉:
|
在<table>标签后加入下面的代码:
|
如果希望提高界面的易用性,你可以把焦点设置在第一个字段的文本框上。这需要加入下面的JavaScript代码:
<script type="text/javascript">
    document.forms["person"].elements["firstName"].focus();
</script>
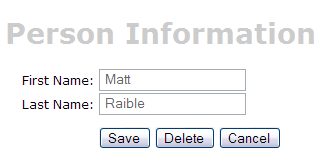
现在执行 ant db-load deploy, 任务, 启动Tomcat并且在浏览器中指向http://localhost:8080/appfuse/editPerson.html?id=1 , 你可以看到下面的界面:

最后,为了增加页面的用户友好性,你可以在表单的最上面加入标题信息,这个很容易实现只需要在personForm.jsp页面的最上方加入"<fmt:message>"就可以了。
[可选部分] 创建Canoo WebTest模拟浏览器行为进行单元测试 [#6]
最后一步可(可选)以创建一个Canoo WebTest 测试Jsp页面。
- 之所以说这一步是可选的,因为可以手工通过浏览器进行完成同样的测试。
可以通过下面的URLs测试adding,editing和saving一个Person的操作。
- Add - http://localhost:8080/appfuse/editPerson.html
 .
.
- Edit - http://localhost:8080/appfuse/editPerson.html?id=1
 (make sure and run ant db-load first).
- Delete - Use the edit link above and click on the Delete button.
- Save - Click edit
 and then click the Save button.
Canoo测试非常灵活,只需要简单在XML文件增加配置项就可以完成。为了测试add、edit、save和delete操作,打开test/web/web-tests.xml文件并且加入下面的XML代码。你可以注意到这个代码片断有一个PersonTests目标任务运行所有的相关测试。
- 我使用了CamelCase任务命名方式(不同于传统的小写下划线分割的命名方式) 因为你可以采用-Dtestcase=Name的键入方式, 我已经习惯了在采用CamelCase命名规则运行JUit测试。
|
完成上面的工作后,可以在Tomcat启动的情况下运行 ant test-canoo -Dtestcase=PersonTests 或者在Tomcat没有启动的情况下运行 ant test-jsp -Dtestcase=PersonTests(如果你希望由Ant来启动/停止 tomcat)。为了在所有的Canoo测试中包括PersonTests,在"run-all-tests"依赖任务中增加这个任务。
此时Cacoo在客户端没有纪录日至。如果你想加入日志你可以在</canoo> 和 </target>之间在目标任务的底部加入下面的内容。
<loadfile property="web-tests.result"
    srcFile="${test.dir}/data/web-tests-result.xml"/>
<echo>${web-tests.result}</echo>
BUILD SUCCESSFULTotal time: 10 seconds
下一部分 第四部分: 增加校验功能和列表页面 - 增加一个验证personForm的firstName和lastName为必填项的校验逻辑,并且增加一个列表面显示数据库中所有的person记录。
|
Go to top
Edit this page
More info...
Attach file...
|
| This page last changed on 06-Nov-2006 13:52:59 MST by MichaelDuan. |
![Aggregate the RSS feed [RSS]](https://raibledesigns.com/wiki/images/xml.png)
