Raible's Wiki
Raible Designs
Wiki Home
News
Recent Changes
AppFuse
Homepage- Korean
- Chinese
- Italian
- Japanese
QuickStart Guide
- Chinese
- French
- German
- Italian
- Korean
- Portuguese
- Spanish
- Japanese
User Guide
- Korean
- Chinese
Tutorials
- Chinese
- German
- Italian
- Korean
- Portuguese
- Spanish
Other Applications
Struts ResumeSecurity Example
Struts Menu
UserPreferences
Referenced by
Articles
Articles_de
Articles_pt
DevelopmentEnvironme...
![[RSS]](https://raibledesigns.com/wiki/images/xml.png "Aggregate the RSS feed")

Hide Menu
AppFuseEclipse_pt |
|
| Your trail: | |
This is version 2.
It is not the current version, and thus it cannot be edited.
[Back to current version]
[Restore this version]
AppFuse, por padrão, é configurado para ser um projeto Eclipse
. Quando você roda ant new para criar um novo projeto, você receberá os arquivos .project e .classpath para iniciar seu projeto. Entretanto, você terá que fazer algumas modificações fáceis de configuração no Eclipse (particularmente para rodar o Ant). Este tutorial mostra como instalar o Eclipse para desenvolver seu projeto com o AppFuse.
- Em geral, eu não uso o Eclipse para mais que um editor de texto. Eu faço a maioria de minha compilação, teste e publicação da linha de comando. Este tutorial vai demonstrar como facilitar a utilização do Eclipse para construção e testes, mas se isto não funcionar para você - a melhor opção é utilizar a linha de comando para rodar tasks Ant. É claro, se você souber de uma maneira melhor de integrar o Eclipse - por favor, nos deixe saber.
Este tutorial é baseado no Windows XP e Eclipse 3.0.1 e deve funcionar em qualquer plataforma. Você pode baixar o Eclipse 3.0.1 se você ainda não o tem instalado. Eu ainda recomendo você baixar meus plugins Eclipse ou comprar MyEclipse. Um sonho meu é poder criar um projeto MyEclipse/AppFuse - mas isto necessitaria de uma completa reconstrução da estrutura de diretórios do AppFuse e do arquivo de construção e eu simplesmente não tenho o tempo o energia para fazê-lo. Além do mais, o sistema atual funciona bem se você não se importa em utilizar o Ant.
Tabela de Conteúdo
- [1] Crie um Novo Projeto Java no Eclipse
- [2] Configure o Ant no Eclipse
- [3] Adicione o arquivo build.xml para o Ant View
- [4] Rode o Ant
- [5] Rode os testes JUnit no Eclipse
- [6] Dicas para Depuração e edição de Interface ao Usuário (UI)
Crie um Novo Projeto Java no Eclipse [#1]
Abra o Eclipse (pode ser tanto com uma área de trabalho existente ou com uma nova) e vá para File → New → Project. Então selecione "Java Project" e aperte o botão Next. No campo Project Name, entre com o nome do seu projeto (i.e. appfuse) e o diretório que seu projeto reside (i.e. c:\Source\appfuse) na caixa abaixo. Se aparecer um aviso para mudar para a perspectiva Java (Java Perspective), escolha Yes.Se você tentar construir o projeto neste ponto, aparecerão muitos erros. A maioria deles involve o fato de que a classe UserForm não pode ser encontrada. Isto é porque todos os ActionForms no AppFuse (se você está utilizando a versão Struts) são gerados do POJOs com XDoclet.
Todas as task XDoclet são configuradas no arquivo Ant build.xml então a coisa mais fácil a fazer é rodar "ant gen-forms" para gerar os ActionForms. Se você tiver o Ant 1.6.2+ instalado, você pode fazer isto da linha de comando. O próximo passo mostra como você configura o Eclipse para rodar seu AppFuse build.xml.
DICA: Aqui tem uma maneira de esconder os JARs que se vêem no Package Explorer do Eclipse.Configure o Ant no Eclipse [#2]
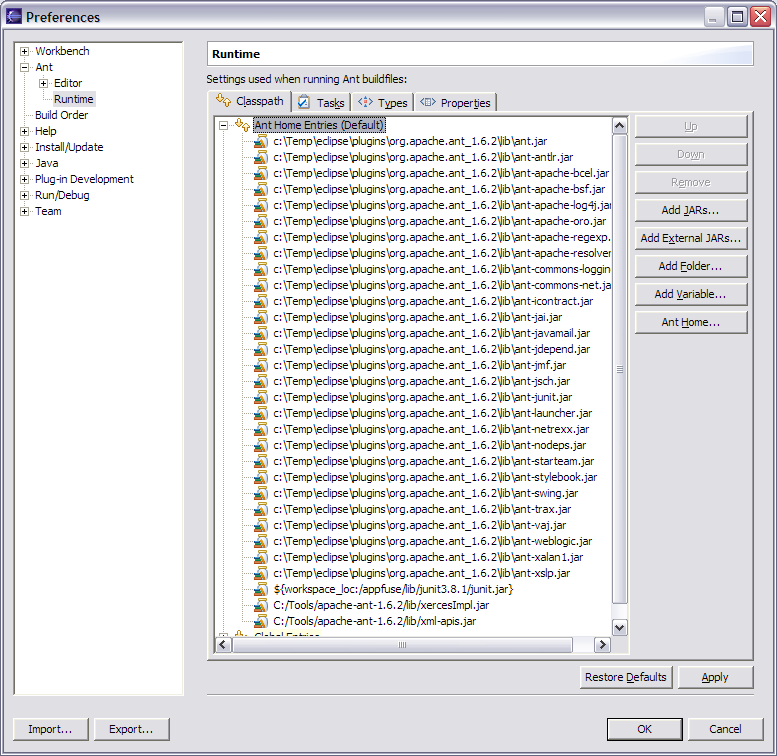
A maneira mais fácil de configurar o Eclipse para o Appfuse é instalar o Ant no seu disco rígido (i.e. c:\Tools\apache-ant-1.6.2) e apontar o ANT_HOME do Eclipse para este directory. Para fazer isto, vá para Window → Preferences → Ant → Runtime. Então clique no botão "Ant Home" e selecione a pasta de instalação no seu disco rígido.
Se você preferir utilizar o Ant que já vem com o Eclipse, você deve adicionar o junit.jar para o seu classpath. Para fazer isto, vá em Window → Preferences → Ant → Runtime. Então clique no botão "Add JARs" e selecione o junit.jar do appfuse/lib/junit3.8.1/lib/junit.jar. Clique em OK até você voltar para a visão do workbench.
Depois, adicione o catalina-ant.jar (em $CATALINA_HOME/server/lib) para o classpath ant. Então na tab property, adicione o arquivo tomcatTasks.properties (em lib/ant-contrib) como um arquivo de propriedades global.
Abaixo está o screenshot de como o Ant Runtime classpath deve estar após as modificações acima:
Add build.xml to Ant View [#3]
Now we need to add the build.xml to Eclipse's Ant View. To do this, go to Window → Show View → Ant. Then click on the first icon in this view (screenshot below) to add AppFuse's build file.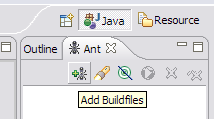
Adicione o arquivo build.xml para o Ant View [#4]
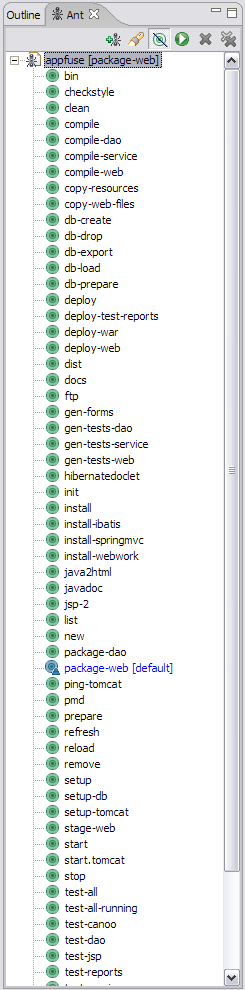
Após adicionar o build.xml, você deve ser capaz de expandir ele na Ant View e executar qualquer um de seus alvos (targets). Eu geralmente faço "test-all" para verificar todos os testes passando em meu projeto inicial. Para uma lista de alvos que utilizo regularmente, veja AppFuse Ant Targets.Now if you run the "compile" target and then refresh the project (right-click on project → Refresh) you shouldn't see any errors in the "Problems" pane. You should now be able to compile and create classes as you normally would. Sometimes when my imports aren't resolving correctly in Eclipse, I do have to run Project → Clean in Eclipse.
NOTE: If you're using the internal version of Ant, you may get an error message like the one below:BUILD FAILED: C:\source\appfuse\build.xml:802: The following error occurred while executing this line: C:\source\appfuse\build.xml:780: The following error occurred while executing this line: java.lang.NoClassDefFoundError: org/apache/xml/serialize/OutputFormat
This is because there are tasks that require Xerces to be in your Ant classpath [reference]. I added xercesImpl.jar and xml-apis.jar (from my self-installed version of Ant) to Eclipse's Ant classpath to solve this.
At this point, you should see something similar to the screenshot below.
Run JUnit Tests in Eclipse [#5]
It's also possible to run your JUnit tests in Eclipse. But before running them, you need to run the "war" target. After this target completes, refresh your project.After you have successfully done so, in Eclipse open a test you'd like to run (i.e. UserDaoTest) and go to Run → Debug As → JUnit Test. Note that you may have to run the "db-load" target before you run your tests every so often. I did have the following method in the Base*TestCase class for each layer, but this caused DBUnit to reload the database before every test in a Test class. Removing it reduces the execution time of "test-all" by more than 30 seconds.
|
If the instructions above don't work for running JUnit tests in Eclipse, I suggest just using the command line - i.e. ant test-dao -Dtestcase=UserDAO. Running tests from the command line always works. ;-)
Tips for Debugging and UI Editing [#6]
For debugging, I use the Tomcat Plugin in Eclipse and set breakpoints. To make the breakpoints work you will need to indicate your source-path using the Eclipse menu Window->Preferences, select Tomcat, then Source Path.
For little changes, I use "ant deploy-web" which only takes a couple of seconds. For truly minor tweaks, it's sometimes easier to edit the file in Tomcat's webapps folder. For major design changes, I usually run the app, view source on a page and save it to a "sandbox" folder in the same directory as my project. Then I do a find/replace and change all "/appfuse/" references to "../web/". This allows me to change CSS and JS files and just refresh the file in the sandbox.
Attachments:
| ant-targets.png |  |
28653 bytes |
| ant-runtime.png |  |
96096 bytes |
| ant-view.png |  |
6585 bytes |
|
Go to top
More info...
Attach file...
|
| This particular version was published on 06-Nov-2006 13:52:49 MST by RafaelNami. |