Raible's Wiki
Raible Designs
Wiki Home
News
Recent Changes
AppFuse
Homepage- Korean
- Chinese
- Italian
- Japanese
QuickStart Guide
- Chinese
- French
- German
- Italian
- Korean
- Portuguese
- Spanish
- Japanese
User Guide
- Korean
- Chinese
Tutorials
- Chinese
- German
- Italian
- Korean
- Portuguese
- Spanish
Other Applications
Struts ResumeSecurity Example
Struts Menu
UserPreferences
Referenced by
Articles
![[RSS]](https://raibledesigns.com/wiki/images/xml.png "Aggregate the RSS feed")

Hide Menu
CreateAnAJAXBasedFileuploadProgressbarDialog |
|
| Your trail: | |
This is version 93.
It is not the current version, and thus it cannot be edited.
[Back to current version]
[Restore this version]
Table of Contents
How to Create an AJAX based file upload progress-bar dialog
This HOWTO shows how i combined AJAX Struts File Upload Progress Meter with a custom tweaked version of Lightbox Gone Wild! to create a user friendly upload progress bar dialog with the web page below faded out. This means that users are unable to click on any links on the website and shows a the visual indication of how much is left of the file transfer. Its easy to customize the content of the dialog.
Create a struts based Appfuse project
For newcomers to appfuse see QuickStart Guide
C:\projects\appfuse-1.9.3-src\appfuse>ant new
Buildfile: build.xml

clean:
     [echo] Cleaning build and distribution directories

init:

new:
     [echo]
     [echo] +-------------------------------------------------------------+
     [echo] |    -- Welcome to the AppFuse New Application Wizard! --     |
     [echo] |                                                             |
     [echo] | To create a new application, please answer the following    |
     [echo] | questions.                                                  |
     [echo] +-------------------------------------------------------------+

    [input] What would you like to name your application [myapp]?
progressbar
    [input] What would you like to name your database [mydb]?
progressbar
    [input] What package name would you like to use [org.appfuse]?

    [input] What web framework would you like to use [webwork,tapestry,spring,jsf,struts]?
struts
     [echo] Creating new application named 'progressbar'...
     [copy] Copying 356 files to C:\projects\appfuse-1.9.3-src\progressbar
     [copy] Copying 81 files to C:\projects\appfuse-1.9.3-src\progressbar\extras
     [copy] Copying 1 file to C:\projects\appfuse-1.9.3-src\progressbar
     [copy] Copying 1 file to C:\projects\appfuse-1.9.3-src\progressbar

init:

fixcrlf:
     [echo] Running fixcrlf....
     [echo]
     [echo] +-------------------------------------------------------------+
     [echo] |           -- Application created successfully! --           |
     [echo] |                                                             |
     [echo] | Now you should be able to cd to your application and run:   |
     [echo] | > ant setup test-all                                        |
     [echo] +-------------------------------------------------------------+

BUILD SUCCESSFUL
Total time: 38 seconds
C:\projects\appfuse-1.9.3-src\appfuse>

C:\projects\appfuse-1.9.3-src\appfuse>cd ..

C:\projects\appfuse-1.9.3-src>cd progressbar

C:\projects\appfuse-1.9.3-src\progressbar>

C:\projects\appfuse-1.9.3-src\progressbar>ant setup-tomcat (if not done before. Only needed once)

C:\projects\appfuse-1.9.3-src\progressbar>ant setup-db

C:\projects\appfuse-1.9.3-src\progressbar>ant deploy
Start tomcat and see if it works. Create a user that you can use to login and test the functionality we are going to add.
Install the serverside classes
Extract the attached fileupload.zip (see bottom of this page) to < Your project folder >\src\web\org\appfuse\webapp\action
Listing the action folder must be like:
helge@duke /cygdrive/c/projects/appfuse-1.9.3-src/progressbar/src/web/org/appfuse/webapp/action
$ find .
.
./ActionExceptionHandler.java
./BaseAction.java
./fileupload
./fileupload/ExtendedMultiPartRequestHandler.java
./fileupload/FileUploadAction.java
./fileupload/upload
./fileupload/upload/MonitoredDiskFileItem.java
./fileupload/upload/MonitoredDiskFileItemFactory.java
./fileupload/upload/MonitoredOutputStream.java
./fileupload/upload/OutputStreamListener.java
./fileupload/upload/UploadInfo.java
./fileupload/upload/UploadListener.java
./fileupload/upload/UploadMonitor.java
./fileupload/util
./fileupload/util/UploadUtil.java
./PasswordHintAction.java
./ReloadAction.java
./SignupAction.java
./UploadAction.java
./UserAction.java

helge@duke /cygdrive/c/projects/appfuse-1.9.3-src/progressbar/src/web/org/appfuse/webapp/action
$
Create the formbean
Copy the attached file FileUploadForm.java (see bottom of this page) to the folder < Your project folder >\src\web\org\appfuse\webapp\Edit web.compile.classpath
- Open the file < Your project folder >\properties.xml and find the element <path id="web.compile.classpath">
- Add <pathelement location="${commons-fileupload.jar}"/> and <pathelement location="${dwr.jar}"/>
The reult should be
    <!-- Web -->
    <path id="web.compile.classpath">
        <pathelement location="${dist.dir}/${webapp.name}-dao.jar"/>
        <pathelement location="${dist.dir}/${webapp.name}-service.jar"/>
        <pathelement location="${struts.jar}"/>
        <pathelement location="${strutsmenu.jar}"/>
        <pathelement location="${displaytag.jar}"/>
        <pathelement location="${jakarta-oro.jar}"/>
        <pathelement location="${commons-digester.jar}"/>
        <pathelement location="${commons-logging.jar}"/>
        <pathelement location="${commons-beanutils.jar}"/>
        <pathelement location="${commons-collections.jar}"/>
        <pathelement location="${commons-fileupload.jar}"/>
        <pathelement location="${commons-lang.jar}"/>
        <pathelement location="${commons-validator.jar}"/>
        <pathelement location="${servletapi.jar}"/>
        <pathelement location="${commons-fileupload.jar}"/>
        <pathelement location="${dwr.jar}"/>
        <fileset dir="${javamail.dir}" includes="*.jar"/>
        <fileset dir="${spring.dir}" includes="*.jar"/>
        <fileset dir="${jstl.dir}/lib" includes="jstl.jar"/>
    </path>
Configure decorators
Update the file < Your project folder >\web\WEB-INF\decorators.xml with excludes for '/dwr/*' and '/engine.jsp*'. The content should now be:
<decorators defaultdir="/decorators">
    <excludes>
        <pattern>/resources/*</pattern>
        <pattern>/dwr/*</pattern>
        <pattern>/scripts/engine.jsp*</pattern>
    </excludes>
    <decorator name="default" page="default.jsp">
        <pattern>/*</pattern>
    </decorator>
</decorators>
Configure DWR
Edit the file < Your project folder >\web\WEB-INF\dwr.xml so the content becomes:
<!DOCTYPE dwr PUBLIC
    "-//GetAhead Limited//DTD Direct Web Remoting 1.0//EN"
    "http://www.getahead.ltd.uk/dwr/dwr10.dtd">
<dwr>
  <!-- enable/disable dwr debug in web.xml where the servlet is mapped as 'dwr-invoker' -->
  <allow>
        <!--create creator="spring" javascript="UserManager">
            <param name="beanName" value="userManager"/>
            <include method="getUsers"/>
        </create>
        <convert converter="bean" match="org.appfuse.model.User"/-->
        <create creator="new" javascript="UploadMonitor">
            <param name="class" value="org.appfuse.webapp.action.fileupload.upload.UploadMonitor"/>
        </create>
        <convert converter="bean" match="org.appfuse.webapp.action.fileupload.upload.UploadInfo"/>
    </allow>
</dwr>
Redeploy the changes with the command:
C:\projects\appfuse-1.9.3-src\progressbar>ant deployRestart tomcat
Test DWR
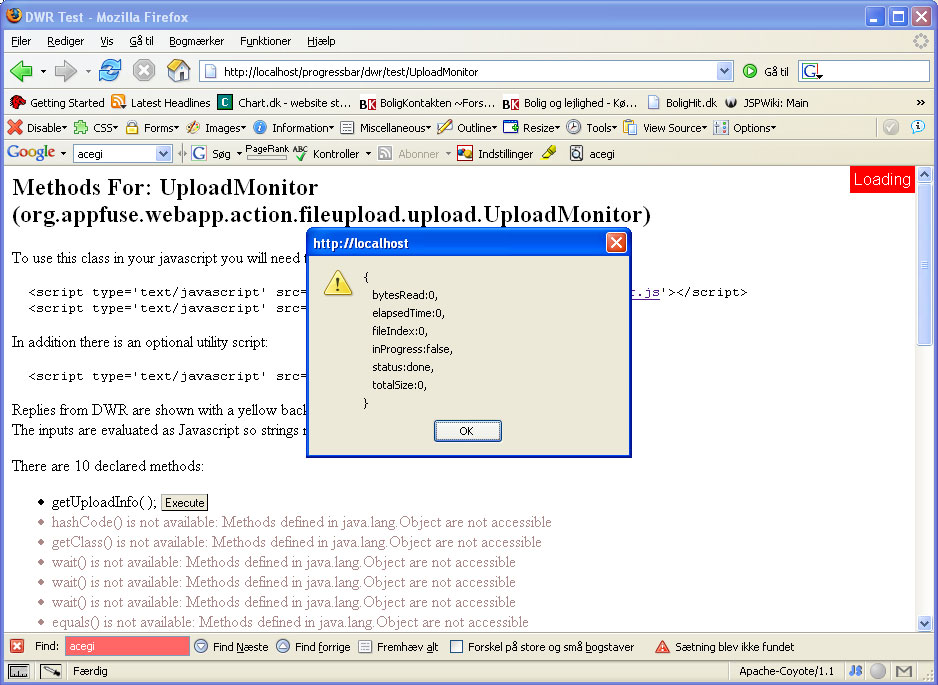
In a browser open the url http://< your host>:8080/progressbar/dwr/ (8080 is the default tomcat port, you may have changed this to 80 or something else)You will need to login (the default admin username/pw is: mraible/tomcat). And gets to the DWR test page. Click the UploadMonitor link. That page click on the Execute button.
The test should look like this image:
Change the struts controller
Update the file < Your project folder >\metadata\web\struts-controller.xml to use the new ExtendedMultiPartRequestHandler controler. The controler was added in the step Install the serverside classes. We also change the max upload size to 100M bytes. The content should now be:<controller nocache="true" inputForward="true" maxFileSize="100M" multipartClass="org.appfuse.webapp.action.fileupload.ExtendedMultiPartRequestHandler"/>
Configure Acegi
Update the file < Your project folder >\web\WEB-INF\security.xml to allow annonymous access to the file /scrips/engine.jsp. Find the element starting with <bean id="filterInvocationInterceptor" ... > and add the line /scripts/engine.jsp*=ROLE_ANONYMOUS,admin,user as the last line of the <value> descendent tag. The content should now be:
    <bean id="filterInvocationInterceptor" class="org.acegisecurity.intercept.web.FilterSecurityInterceptor">
        <property name="authenticationManager" ref="authenticationManager"/>
        <property name="accessDecisionManager" ref="accessDecisionManager"/>
        <property name="objectDefinitionSource">
            <value>
                PATTERN_TYPE_APACHE_ANT
                /clickstreams.jsp*=admin
                /flushCache.*=admin
                /passwordHint.html*=ROLE_ANONYMOUS,admin,user
                /reload.*=admin
                /signup.html*=ROLE_ANONYMOUS,admin,user
                /users.html*=admin
                /**/*.html*=admin,user
                /scripts/engine.jsp*=ROLE_ANONYMOUS,admin,user
            </value>
        </property>
    </bean>
Redeploy the changes with the command:
C:\projects\appfuse-1.9.3-src\progressbar>ant deployRestart tomcat
Check that you can access the engine.jsp in a browser by opening the url http://< your host >:8080/scripts/engine.jsp (8080 is the default tomcat port, you may have changed this to 80 or somthing else)
You should see the javascript content of the engine.jsp in the browser
Create the form jsp, javascript and css files
Extract the attached fileupload-js.zip (see bottom of this page) to < Your project folder >\web\. You should now have following files (and the exsisting ones) in your < Your project folder >\web\ folder:
$ find .
.
./images
./images/ajax
./images/ajax/activity.gif
./images/ajax/indicator.gif
./images/ajax/Thumbs.db
./images/Thumbs.db
./pages
./pages/fileupload
./pages/fileupload/fileUploadForm.jsp
./scripts
./scripts/dwrupload
./scripts/dwrupload/dwrUpload.js
./scripts/dwrupload/lightboxDwrUpload.js
./scripts/engine.jsp
./styles
./styles/dwrupload
./styles/dwrupload/dwrUpload.css
./styles/dwrupload/lightboxDwrUpload.css
Redeploy the changes with the command:
C:\projects\appfuse-1.9.3-src\progressbar>ant deploy-webNo need to restart tomcat this time
Final test
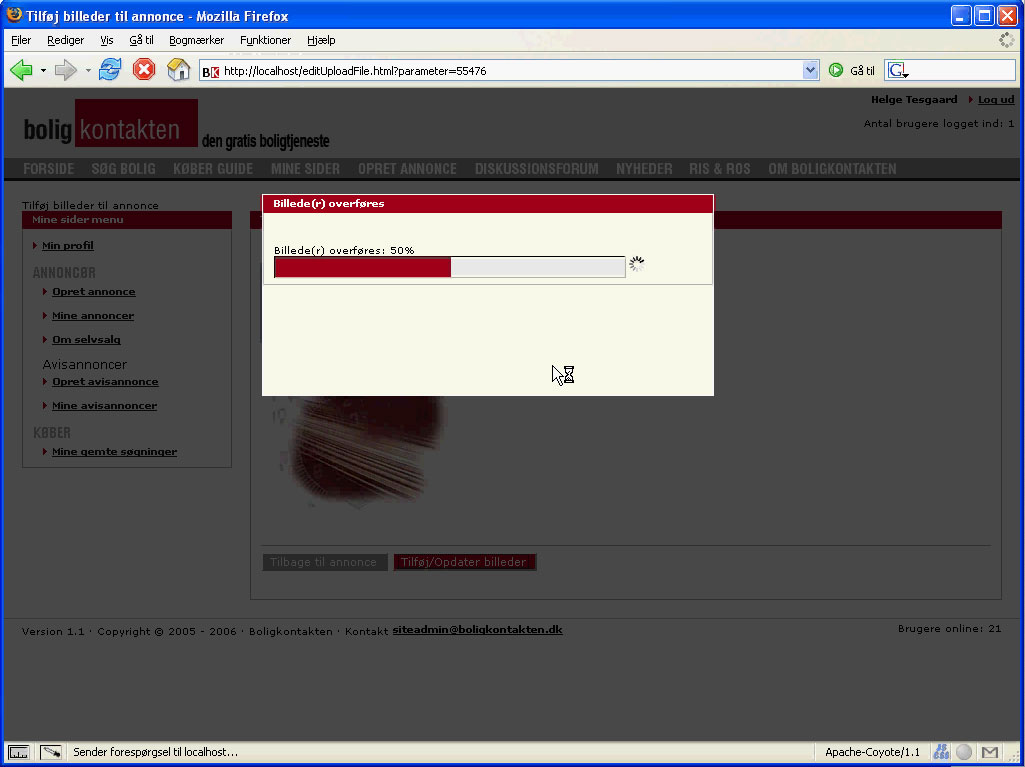
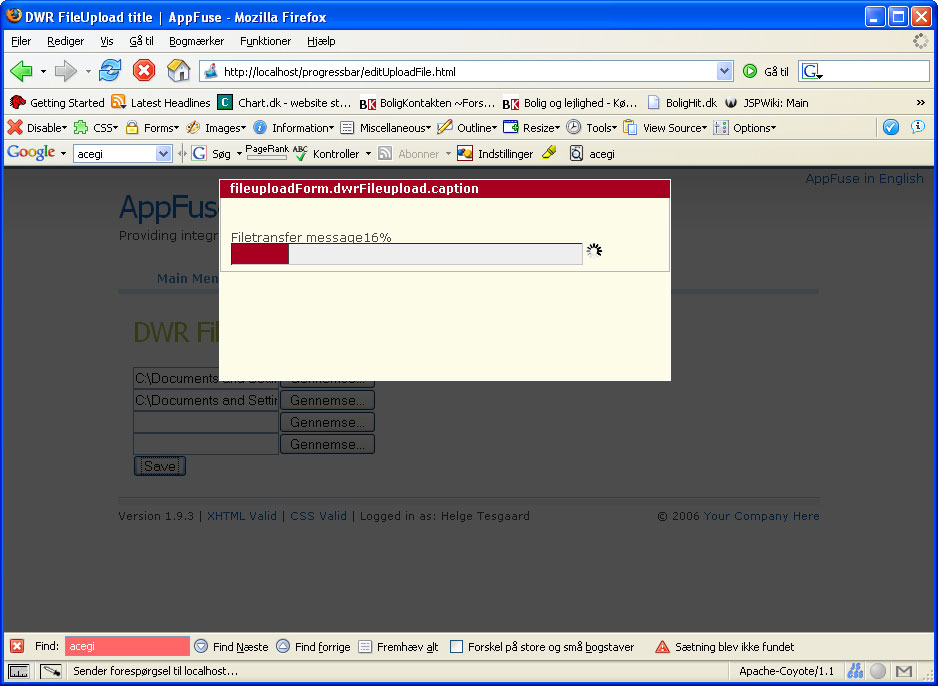
Now point your browser to http://< your host >:8080/editUploadFile.html login and test that it works. (you may have to reload the browser to ensure it loads the css and js files (Ctrl + r in FireFox and IE) ). Remember to pick a file of a certain size if you are uploading to localhost. You should now see this image:
Comments and tips
- Central files in this solution
- FileUploadAction.java - the struts Action responsible for reciving the uploaded files and save them to disk
- lightboxDwrUpload.js - The modified Lightbox Gone Wild! script used to fade the contend outside the upload dialog. This script looks copies the .innerHtml() from the div tag with id lbContent to the dialog. See next bullet.
- fileUploadForm.jsp and lbContent - the jsp page containing the struts form. It contains a lbContent div tag which represent the html code inserted in the upload dialog. It also contains an embedded javascript with the function function upload(form) This script only trigger the upload mechanism if one or more files has been selected.
- dwrUpload.js - This script is the Ajax functions that updates the content of the upload dialog. You can tweak the dialog refresh rate here.
- ExtendedMultiPartRequestHandler.java - a slightly changed Struts controller (change marked by "Changed this section of code, that is it."). There is one important line here UploadListener listener = new UploadListener(request, 1); The '1' here means delay to 1 millisecond. By increasing this value uploads will take longer time but will also be less CPU intensive.
- engine.jsp - is actually engine.js extracted from dwr1.x and tweaked to ensure dwr also works with cookies disabled. For details see "Support for DWR without cookies" http://getahead.ltd.uk/dwr/fixes. This issue is solved in version 2 of dwr.
- lightboxDwrUpload.css - Here the opacity can be specified.
- dwrUpload.css - Here the progress bar can be styled.
Change log4j to see whats going on.
In the file log4j.properties change the line log4j.rootCategory=DEBUG, mail to log4j.rootCategory=DEBUG, R to get the log log messages written into a log file.Additional thoughts
I hope that this tutorial can serve as basis for integration into later Appfuse versions. It may also serve as a basis for similar tutorials for the other web frameworks that Appfuse provides. Actually it could be implemented in a servlet (See the original AJAX Upload progress monitor for Commons-FileUpload Example) instead of using the struts action and that servlet could be included in all the Appfuse versions to provide this functionality across the frameworks.
Productivity
This page was created using one of Matt's productivity tips "I've found that cracking open a beer at 11 when I start helps me focus and quit worrying about all the other computer-related tasks I need to do." - but I must say I needed to extended tip with a Whiskey.
Related articles
Final note
This tutorial is created by merging existing code into a new Appfuse project so I expect that the stuff work. In case of problems you can write to me at helge.tesgaard(a)gmail.com. Also write if you find typos or anything that can be explained better.Enjoy file transfers!
Regards Helge
Attachments:
| productivity.jpg |  |
18309 bytes |
| FileUploadForm.java |  |
2933 bytes |
| fileupload-js.zip | |
40613 bytes |
| fileupload.zip | |
14762 bytes |
| dwrLightboxFileupload.jpg |  |
112283 bytes |
| DWRTest.jpg |  |
155595 bytes |
| AjaxFileTransfer.jpg |  |
93101 bytes |
|
Go to top
More info...
Attach file...
|
| This particular version was published on 06-Nov-2006 13:52:57 MST by HelgeTesgaard. |