Raible's Wiki
Raible Designs
Wiki Home
News
Recent Changes
AppFuse
Homepage- Korean
- Chinese
- Italian
- Japanese
QuickStart Guide
- Chinese
- French
- German
- Italian
- Korean
- Portuguese
- Spanish
- Japanese
User Guide
- Korean
- Chinese
Tutorials
- Chinese
- German
- Italian
- Korean
- Portuguese
- Spanish
Other Applications
Struts ResumeSecurity Example
Struts Menu
UserPreferences
Referenced by
Articles
Articles_ko
CreateActions_ko
![[RSS]](https://raibledesigns.com/wiki/images/xml.png "Aggregate the RSS feed")

Hide Menu
ValidationAndList_ko |
|
| Your trail: | |
This is version 1.
It is not the current version, and thus it cannot be edited.
[Back to current version]
[Restore this version]
Part V: Validation 과 List 페이지 추가하기 - personForm 에 firstName 과 lastName 필드를 필수 요소로 하는 validation logic(검증 로직)을 추가하고 database에 있는 모든 person 레코드를 보여주는 list 페이지를 만듭니다.
- 이 tutorial 은 Part III: Actions 클래스 들과 JSP 작성하기에 의존 되어 있습니다.
About this Tutorial
이 튜토리얼에서는 PersonForm object 에 Struts Validator 를 사용해서 Valication logic(client and server-side) 을 작성하는 방법을 알려줍니다. 그리고 Display Tab Library 를 이용해서 database에 있는 모든 사람들 정보를 보여주는 list screen 을 만들것입니다.
Table of Contents
- [1] Person.java 에 XDoclet 태그(@struts.validator)를 추가합니다.
- [2] validation 이 추가된 JSP 페이지를 확인하고 테스트 합니다.
- [3] DAO 와 Manager 테스트에 testGetPeople 메소드를 추가합니다.
- [4] PersonDao 와 Manager 에 getPeople 메소드를 추가합니다.
- [5] Action 테스트에 testSearch 메소드를 추가합니다.
- [6] Action 클래스에 search 메소드를 추가합니다.
- [7] personList.jsp 을 만들고 Canoo 테스트를 합니다.
- [8] 메뉴에 링크를 추가 합니다.
Person.java 에 XDoclet 태그(@struts.validator)를 추가합니다 [#1]
일반적으로 Struts Validator 를 사용 하려면 validation.xml 을 직접 작성해야 합니다. 만약 AppFuse 를 사용하지 않는다면, Validator Plugin 설정과 ApplicationResources.properties 에 error key 들을 작성해야 합니다. 이에 대한 더 자세한 정보를 원하면 Validation Made Easy Tutorial를 참조해 보세요.
XDoclet 을 사용하면 훨씬 쉽습니다 - 우리는 우리가 작성한 POJO (Person.java) 에 @struts.validator 태그만을 작성하면 됩니다.
(src/dao/**/model/Person.java) 파일을 열고 getFirstName 와 getLastName 에 @struts.validator type="required" 를 추가 합니다.
|
이 태그에 msgkey 속성을 추가 하면 이 에러에 대한 기본 message key 를 override 해서 사용 할 수 있습니다.
|
type="required" 에 대한 기본 메세지 키는 errors.required 이므로 나는 대부분 이것을 default 로 놔둡니다.
이 키 정의는 web/WEB-INF/classes/ApplicationResources_*.properties 에 정의되어있습니다.
XDoclet documentation 에서는 setters 에다 이 태그를 작성하라고 하는데 우리는 이 태그를 getters 에 작성한 것을 당신은 아마 알아차렸을겁니다. 그 이유는 PersonForm.java 파일을 만들때 template file (metadata/template/struts_form.xdt) 에서 이 태그를 setters 에 옮겨서 작성하게 되어있기 때문입니다.
이제 Person.java 를 저장하고 ant clean webdoclet 을 실행하면 build/appfuse/WEB-INF/ 에 validation.xml 파일이 만들어 질겁니다. 이 파일에는 "personForm" 을 위한 entry 가 포함되어 있을겁니다.
|
personForm.jsp 에 client-side validation(자바스크립트를 이용한 폼 유효성 체크) 를 사용하려면 javascript JSP tag(html:javascript) 와 script 태그를 personForm.jsp 의 하단에 작성 해야 합니다.
이것은 이미 작성되어 있고(viewgen에 의해서) 단지 여러분은 코멘트 처리를 없애기만 하면 됩니다.
이것이 코멘트 처리되어 있는 이유는 formName 은 정의되었으나 거기에 아무런 validation 규칙이 없다면 Validator 가 예외를 던지기 때문입니다.
- 개인적으로 저는 이게 버그라고 생각하나 Struts Committer 들은 아니라고 하네요..
<html:javascript formName="personForm" cdata="false"
    dynamicJavascript="true" staticJavascript="false"/>
<script type="text/javascript"
    src="<html:rewrite page="/scripts/validator.jsp"/>"></script>
(User 클래스와 Address 라는 클래스가 있다면 User.address 에 대해 address의 내부 벨리데이션 까지도 User validation 에 포함되게 된다는 뜻 같음)
이것은 metadata/templates/struts_form.xdt에 의해서 form 이 만들어 질때 nested object 의 setter 메소드에 @struts.validator 가 추가되기 때문입니다.
만약 nested-object 와 many-to-many bi-directional 관계라면 문제가 생깁니다.(무한루프에 의한 메모리 오버?)
여기에 두가지 해결책이 있습니다. 하나는 struts_form.xdt 에 @struts.validator 를 없애고 필요에 따라서 수동적으로 POJO 에 setter 에 넣는 방법이고 또하나는 여기
를 참조하세요.
validation 이 추가된 JSP 페이지를 확인하고 테스트 합니다 [#2]
이 form 에 Validation 을 구성하였고 이 폼이 validate="true" 속성을 가진 action-mapping 에 의해 사용 된다면 이 validation rule 는 적용 될겁니다. 지난 튜토리얼에서, 우리는 PersonAction 에 대한 "savePerson" action-mapping 을 추가했었습니다. 이 action-mapping 에 대한 XDoclet tag 는 다음과 같습니다.
|
web/pages/personForm.jsp 가 으로 가보세요.
firstName 과 lastName 필드의 내용을 없애고 save 버튼을 클릭하면 다음과 같은 JavaScript alert 창을 보게될 것입니다.
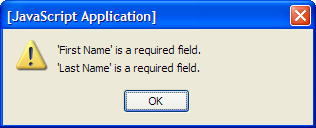
모든것이 정말로 잘 작동되는지 확인하세요. JavaScript 를 끄고 server-side validation 이 잘 작동하는지 확인해보세요. (내가 가장 즐겨쓰는)Mozilla Firebird 브라우저에서는 쉽게 할 수 있습니다. Tools → Options → Web 으로 가서 "Enable JavaScript" 의 체크를 없애면 됩니다.
자 이제 다시 폼의 내용들을 지우고 save 버튼을 눌러보세요. 다음과 같은 화면을 볼 수 있을겁니다.
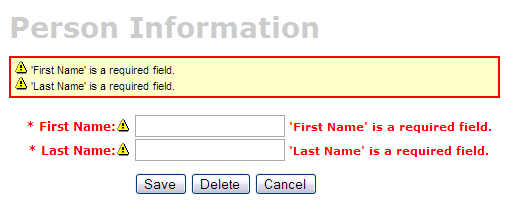
다음과 같은 validation 에러를 볼 수 없다면. 다음과 같은 이유일 수 있습니다.
- firstName 과 lastName 필드가 비어있지만 정상적으로 저장됬다는 메세지가 나온다면.
- web/pages/personForm.jsp 의 <html:form> 태그가 action="editPerson" 으로 되있기 때문일 겁니다. action="savePerson"으로 되있는지 확인해 보세요.
- save 를 클릭했는데 빈페이지가 나온다.
- 빈 페이지는 "savePerson" 의 "input" 속성이 잘못 구성되어있다는 뜻입니다. "input" 속성이 local 혹은 global 영역의 action-forward 를 가리키고 있는지 확인해 보세요. 이 예제에서는 tile's definitaion 의 .personDetail 를 가리키는 input="edit" 으로 되어있어야 합니다. 내 경험에 의하면 input 의 값은 반드시 ㅁaction 이 아닌 forward 이어야 합니다.
|
DAO 와 Manager 테스트에 testGetPersons 메소드를 추가합니다 [#3]
List screen(master screen 이라고도 부름) 을 만들려면, person 테이블의 모든 row 들을 반환하는 메소드를 만들어야 합니다.이러한 메소드에 대한 테스트를 PersonDaoTest 와 PersonManagerTest 클래스에 추가해 봅시다.
나는 주로 이런 메소드를 getEntities (즉, getPersons) 으로 이름 짓습니다. 그러나 getAll 또는 search 등의 이름을 사용할 수도 있습니다. 이것은 전적으로 여러분의 취향에 달려 있는겁니다.
test/dao/**/dao/PersonDaoTest.java 를 열고 testGetPeople 메소드를 추가 합니다:
|
내가 person 오브젝트를 getPeople 메소드에 전달한 이유는 앞으로 필터링(person 내의 값들에 의한) 기능을 사용하기 위해서 입니다. 이 파라미터를 getPeople() 메소드에 사용하는 것은 선택적이지만 이 튜토리얼의 나머지 부분에서는 이 파라미터를 전달하는것으로 간주하고 진행됩니다.
이제 test/service/**/service/PersonManagerTest.java 을 열고 testGetPeople 메소드를 추가합니다:
|
이 테스트들을 컴파일 하려면 PersonDao 와 PersonManager 인터페이스 그리고 그 구현클래스들에 getPeople() 메소드를 추가해야 합니다.
PersonDao 와 Manager 에 getPeople 메소드를 추가합니다 [#4]
src/dao/**/dao/PersonDao.java 을 열고 getPeople()를 추가합니다:
|
이제 src/service/**/service/PersonManager.java 에 같은 모양의 메소드를 작성합니다. 모든 파일을 저장하고 이 파일들을 기존의 작성한 test 들에 import 합니다.
이제 이 인터페이스의 구현클래스들에서 getPeople()를 구현해야 합니다.
src/dao/**/dao/hibernate/PersonDaoHibernate.java 을 열고 다음 메소드를 추가합니다.
|
- 보다시피 여기서는 person 파라미터 가지고 하는 일이 아무것도 없습니다. 현재 위 예의 person 파라미터는 단지 placeholder 의 역할을 하고 있는겁니다. 차후에 위 파라미터(person)의 속성값들을 통해 필터 기능을 원할 수도 있습니다(Hibernate's Query Language (HQL) 나 Criteria Query를 이용해서).
Criteria Query 를 사용한 예입니다:
    Example example = Example.create(person)

                             .excludeZeroes()    // exclude zero valued properties

                             .ignoreCase();      // perform case insensitive string comparisons

    try {

        return getSession().createCriteria(Person.class)

                           .add(example)

                           .list();

    } catch (Exception e) {

        throw new DataAccessException(e.getMessage());

    }

    return new ArrayList();
이제 src/service/**/impl/PersonManagerImpl.java 에 getPeople() 메소드를 구현합니다:
    public List getPeople(Person person) {

        return dao.getPeople(person);

    }
수정한 모든 것들을 저장하고, 다음의 명령으로 두 테스트를 실행합니다.
- ant test-dao -Dtestcase=PersonDao
- ant test-service -Dtestcase=PersonManager
모든 것이 작동한다면 잘한겁니다! 이제 이 모든 기능들을 web tier(웹 계층) 에 추가해야 합니다.
Action 테스트에 testSearch 메소드를 추가합니다 [#5]
test/web/**/action/PersonActionTest.java 를 열고 다음 메소드를 추가합니다:
    public void testSearch() {

        setRequestPathInfo("/editPerson");

        addRequestParameter("method", "Search");

        actionPerform();


        verifyForward("list");


        assertNotNull(getRequest().getAttribute(Constants.PERSON_LIST));

        verifyNoActionErrors();

    }
src/dao/**/Constants.java 파일에 PERSON_LIST 를 추가할때까지 이 클래스는 컴파일이 안될겁니다.
- 나는 주로 이 파일에 들어있는 비슷한 변수를 복사해서 사용합니다 - i.e. USER_LIST.
    /**

     * The request scope attribute that holds the person list

     */

    public static final String PERSON_LIST = "personList";
작업한 모든 것을 저장합니다. 아직 PersonAction.search() 메소드를 작성하지 않았기 때문에 ant test-web -Dtestcase=PersonAction 는 작동하지 않을겁니다.
Action 클래스에 search 메소드를 추가합니다 [#6]
src/web/**/action/PersonAction.java 를 열고 리스트 스크린으로 forward 하기 위한 아래의 XDoclet 태그를 파일 상단에 추가 합니다
* @struts.action-forward name="list" path="/WEB-INF/pages/personList.jsp"이제 PersonAction 클래스에 search 메소드를 추가합니다.
- 나는 UserAction.search() 를 이 메소드를 위한 template 으로 사용합니다.
    public ActionForward search(ActionMapping mapping, ActionForm form,

                                HttpServletRequest request,

                                HttpServletResponse response)

            throws Exception {

        if (log.isDebugEnabled()) {

            log.debug("Entering 'search' method");

        }


        PersonManager mgr = (PersonManager) getBean("personManager");

        List people = mgr.getPeople(null);

        request.setAttribute(Constants.PERSON_LIST, people);


        // return a forward to the person list definition

        return mapping.findForward("list");

    }
ant test-web -Dtestcase=PersonAction 을 실행합니다.
Nice! BUILD SUCCESSFUL
Total time: 1 minute 26 secondspersonList.jsp 을 만들고 Canoo 테스트를 합니다 [#7]
web/pages 에 personList.jsp 가 있을겁니다. 만약 없다면 viewgen 을 사용해서 만들면 됩니다. extras/viewgen 으로 이동한후 ant -Dform.name=PersonForm 을 실행합니다. 이것을 extras/viewgen/build 에 PersonFormList.jsp 를 만들겁니다.web/pages 에 personList.jsp 을 복사한뒤 이를 열어 수정합니다.
파일 상단에 보면 수정 페이지의 forward 를 page-scope 변수에 담게 하는
<%-- For linking to edit screen --%>

<bean:struts id="editURL" forward="editPerson"/>
위 forward 와 리스트를 보여주는 forward 를 metadata/web/global-forwards.xml 에 추가합니다. 이렇게 하면 이 내용이 struts-config.xml 에 포함되게 됩니다.
        <forward name="editPerson" path="/editPerson.html"/>

        <forward name="viewPeople" path="/editPerson.html?method=Search"/>
The template you used to create this JSP has the column for the id property hard-coded, so XDoclet adds it twice. To remove this from personList.jsp, delete the following from this file:
    <display:column property="id" sort="true" headerClass="sortable"

titleKey="personForm.id"/>- If anyone knows of a way to modify the extras/viewgen/src/List_jsp.xdt to not include this column tag, please let me know.
Another thing you'll probably want to change is the plural form of the items you're listing. The generated name in this example is "persons" and it should probably be people. At or near line 31, you should have the following line:
<display:setProperty name="paging.banner.items_name" value="persons"/>
Change it to:
<display:setProperty name="paging.banner.items_name" value="people"/>
Finally, add the title and heading keys (personList.title and personList.heading) to web/WEB-INF/classes/ApplicationResources_en.properties. Open this file and add the following:
# -- person list page --
personList.title=Person List
personList.heading=All People
As a reminder, the personList.title is what ends up in the brower's title bar (the <title> tag) and personList.heading will be put into an <h1> tag before any page content.
At this point, you should be able to run ant clean deploy, start Tomcat and view this page in your browser at http://localhost:8080/appfuse/editPerson.html?method=Search.
Now that we have a List Screen, let's change the pages that are displayed after adding and deleting a new Person. In src/web/**/action/PersonAction.java, change the mapping.findForward("mainMenu") in the save, delete and cancel methods to be:
return mapping.findForward("viewPeople");You will also need to change verifyForward("mainMenu") to be verifyForward("viewPeople") in the testRemove method of test/web/**/action/PersonActionTest.java. Lastly, the Canoo tests "AddPerson" and "DeletePerson" need to be updated. Open test/web/web-tests.xml and change the following line in the "AddPerson" target:
<verifytitle description="Main Menu appears if save successful"
    text=".*${mainMenu.title}.*" regex="true"/>
to:
<verifytitle description="Person List appears if save successful"
    text=".*${personList.title}.*" regex="true"/>
Then in the "DeletePerson" target, change the following line:
<verifytitle description="display Main Menu"
    text=".*$(mainMenu.title}.*" regex="true"/>
to:
<verifytitle description="display Person List" text=".*${personList.title}.*" regex="true"/>We use "viewPeople" instead of "list" so that the search method will be executed, rather than simply forwarding to the personForm.jsp (which the "list" forward points to).
To test that displaying this page works, create a new JSP test in test/web/web-tests.xml:
    <!-- Verify the people list screen displays without errors -->

    <target name="SearchPeople"

        description="Tests search for and displaying all people">

        <webtest name="searchPeople">

            &config;

            <steps>

                &login;


                <invoke description="click View People link" url="/editPerson.html?method=Search"/>

                <verifytitle description="we should see the personList title"

                    text=".*${personList.title}.*" regex="true"/>

            </steps>

        </webtest>

    </target>
You'll also want to add the "SearchPeople" target to the "PersonTests" target so it will be executed along with all the other person-related tests.
    <!-- runs person-related tests -->

    <target name="PersonTests"

        depends="SearchPeople,EditPerson,SavePerson,AddPerson,DeletePerson"

        description="Call and executes all person test cases (targets)">

        <echo>Successfully ran all Person JSP tests!</echo>

    </target>
Now you can run ant test-canoo -Dtestcase=SearchPeople (or ant test-jsp if Tomcat isn't running) and hopefully it will result in "BUILD SUCCESSFUL". If so - nice work!
Add link to menu [#8]
The last step is to make the list, add, edit and delete functions visible to the user. The simplest way is to add a new link to the list of links in web/pages/mainMenu.jsp:NOTE: The other links in mainMenu.jsp don't use so this JSP can be shared among the various web framework implementations in AppFuse (i.e. Spring MVC and WebWork).
    <li>

        <html:link forward="viewPeople">

            <fmt:message key="menu.viewPeople"/>

        </html:link>

    </li>
Where menu.viewPeople is an entry in web/WEB-INF/classes/ApplicationResources_en.properties.
menu.viewPeople=View People
The other (more likely) alternative is that you'll want to add it to the menu. To do this, add the following to web/WEB-INF/menu-config.xml:
<Menu name="PeopleMenu" title="menu.viewPeople" forward="viewPeople"/>Make sure the above XML is inside the
tag, but not within another
<%@ include file="/common/taglibs.jsp"%>


<div id="menu">

<menu:useMenuDisplayer name="ListMenu" permissions="rolesAdapter">

    <menu:displayMenu name="AdminMenu"/>

    <menu:displayMenu name="UserMenu"/>

    <menu:displayMenu name="PeopleMenu"/>

    <menu:displayMenu name="FileUpload"/>

    <menu:displayMenu name="FlushCache"/>

    <menu:displayMenu name="Clickstream"/>

</menu:useMenuDisplayer>

</div>
Now if you run ant clean deploy start Tomcat and go to http://localhost:8080/appfuse/mainMenu.html, you should see something like the screenshot below.
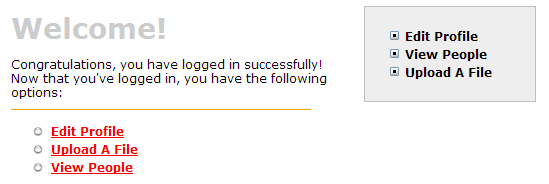
Notice that there is a new link on the left side (from mainMenu.jsp) and on the right in our menu (from menu.jsp).
That's it!
You've completed the full lifecycle of developing a set of master-detail pages with AppFuse and Struts - Congratulations! Now the real test is if you can run all the tests in your app without failure. To test, stop tomcat and run ant clean test-all. This will run all the unit tests within your project. As a reminder, it should be easy to setup and test AppFuse from scratch using ant setup-db setup-tomcat test-all. Also, if you're looking for more robust examples - checkout Struts Resume.Happy Day! BUILD SUCCESSFUL
Total time: 2 minutes 31 seconds If you'd like, you can download the files created in this tutorial.
Attachments:new-menu-item.png 
9138 bytes validation-required.png 10049 bytes validation-required-nojs.png 9277 bytes
Go to top More info... Attach file...
This particular version was published on 06-Nov-2006 13:52:53 MST by DongGukLee.


