Raible's Wiki
Raible Designs
Wiki Home
News
Recent Changes
AppFuse
Homepage- Korean
- Chinese
- Italian
- Japanese
QuickStart Guide
- Chinese
- French
- German
- Italian
- Korean
- Portuguese
- Spanish
- Japanese
User Guide
- Korean
- Chinese
Tutorials
- Chinese
- German
- Italian
- Korean
- Portuguese
- Spanish
Other Applications
Struts ResumeSecurity Example
Struts Menu
UserPreferences
Referenced by
Articles
Articles_cn
Articles_de
Articles_pt
CreateActions
CreateActions_de
CreateActions_it
CreateActions_pt
CreateActions_zh
SpringControllers_ko
...and 2 more
![[RSS]](https://raibledesigns.com/wiki/images/xml.png "Aggregate the RSS feed")

Hide Menu
WebWorkActions |
|
| Your trail: | |
This is version 9.
It is not the current version, and thus it cannot be edited.
[Back to current version]
[Restore this version]
Part III: Creating Actions and JSPs - A HowTo for creating WebWork
Actions and JSPs in an AppFuse project.
- This tutorial depends on Part II: Creating new Managers.
About this Tutorial
This tutorial will show you how to create WebWork Actions and JSPs. It'll also demonstrate writing a JUnit Test to test PersonAction. The Action we create will talk to the PersonManager we created in the Creating Managers tutorial.- I will tell you how I do stuff in the Real World in text like this.
Let's get started by creating a new Action and JSP in AppFuse's architecture. If you haven't installed the WebWork module at this point, do so by running ant install-webwork.
Table of Contents
- [1] Create skeleton JSPs using XDoclet
- [2] Create PersonActionTest to test PersonAction
- [3] Create PersonAction
- [4] Run PersonActionTest
- [5] Clean up the JSP to make it presentable
- [6] Create Canoo WebTests to test browser-like actions
Create a skeleton JSP using XDoclet [#1]
In this step, you'll generate a JSP page to display information from the Person object. It will contain WebWork's JSP tags that render table rows for each property in Person.java. The AppGen tool that's used to do this is based off a StrutsGen tool - which was originally written by Erik Hatcher. It's basically just a couple of classes and a bunch of XDoclet templates. All these files are located in extras/appgen.
Here are the simple steps to generating the JSP and a properties file containing the labels for the form elements:
- From the command-line, navigate to "extras/appgen"
- Execute ant -Dobject.name=Person -Dappgen.type=pojo to generate a bunch of files in extras/appgen/build/gen. In fact, it'll generate all the files you need to complete this tutorial. However, let's just grab the ones you need.
- web/WEB-INF/classes/Person.properties (labels for your form elements)
- web/personForm.jsp (JSP file for viewing a single Person)
- web/personList.jsp (JSP file for viewing a list of People)
- Copy the contents of Person.properties into web/WEB-INF/classes/ApplicationResources_en.properties. These are all the keys you will need for titles/headings and form properties. Here is an example of what you should add to ApplicationResources_en.properties:
# -- person form --
personForm.id=Id
personForm.firstName=First Name
personForm.lastName=Last Name

person.added=Person has been added successfully.
person.updated=Person has been updated successfully.
person.deleted=Person has been deleted successfully.

# -- person list page --
personList.title=Person List
personList.heading=Persons

# -- person detail page --
personDetail.title=Person Detail
personDetail.heading=Person Information
- Copy personForm.jsp to web/pages/personForm.jsp. Copy personList.jsp to web/pages/personList.jsp.
- The files in the "pages" directory will end up in "WEB-INF/pages" at deployment time. The container provides security for all files below WEB-INF. This applies to client requests, but not to forwards from the ServletDispatcher. Placing all JSPs below WEB-INF ensures they are only accessed through Actions, and not directly by the client or each other. This allows security to be moved up into the Actions, where it can be handled more efficiently, and out of the base presentation layer.
The web application security for AppFuse specifies that all *.html url-patterns should be protected (except for /signup.html and /passwordHint.html). This guarantees that clients must go through an Action to get to a JSP (or at least the ones in pages).
NOTE: If you want to customize the CSS for a particular page, you can add <body id="pageName"/> to the top of the file. This will be slurped up by SiteMesh and put into the final page. You can then customize your CSS on a page-by-page basis using something like the following:body#pageName element.class { background-color: blue }
- Add keys in ApplicationResources_en.properties the titles and headings in the JSPs
# -- person detail page --
personDetail.title=Person Detail
personDetail.heading=Person Information
- Just above, we added "personForm.*" keys to this file, so why do I use personForm and personDetail? The best reason is because it gives a nice separation between form labels and text on the page. Another reason is because all the *Form.* give you a nice representation of all the fields in your database.
I recently had a client who wanted all fields in the database searchable. This was fairly easy to do. I just looked up all the keys in ApplicationResources.properties which contained "Form." and then put them into a drop-down. On the UI, the user was able to enter a search term and select the column they wanted to search. I was glad I followed this Form vs. Detail distinction on that project!
Create PersonActionTest to test PersonAction [#2]
To create a JUnit Test for PersonAction, start by creating a PersonActionTest.java file in the test/web/**/action directory.
|
Nothing will compile at this point because you need to create the PersonAction that you're referring to in this test.
Create PersonAction [#3]
In src/web/**/action, create a PersonAction.java file with the following contents:
|
There are a few keys you need to add to ApplicationResources_en.properties to display the success messages. This file is located in web/WEB-INF/classes - open it and add the following:
- I usually add these under the # -- success messages -- comment.
person.added=Information for <strong>{0}</strong> has been added successfully.
person.deleted=Information for <strong>{0}</strong> has been deleted successfully.
person.updated=Information for <strong>{0}</strong> has been updated successfully.
You could use generic added, deleted and updated messages, whatever works for you. It's nice to have separate messages in case these need to change on a per-entity basis.
You might notice that the code we're using to call the PersonManager is the same as the code we used in our PersonManagerTest. Both PersonAction and PersonManagerTest are clients of PersonManagerImpl, so this makes perfect sense.
Now you need to tell Spring and WebWork that this action exists. First, add a bean definition for PersonAction to web/WEB-INF/action-servlet.xml:
|
Then add an entry that refers to this bean in web/WEB-INF/classes/xwork.xml:
|
- The "validationStack" interceptor-ref is commented out in the above XML block because you haven't defined any validation rules for the Person object. We'll uncomment this value when we add validation in the next tutorial.
Run the PersonActionTest [#4]
If you look at our PersonActionTest, all the tests depend on having a record with id=1 in the database (and testRemove depends on id=2), so let's add those records to our sample data file (metadata/sql/sample-data.xml). I'd just add it at the bottom - order is not important since it (currently) does not relate to any other tables.
  <table name='person'>
    <column>id</column>
    <column>first_name</column>
    <column>last_name</column>
    <row>
      <value>1</value>
      <value>Matt</value>
      <value>Raible</value>
    </row>
    <row>
      <value>2</value>
      <value>James</value>
      <value>Davidson</value>
    </row>
  </table>
DBUnit loads this file before we running any of the tests, so this record will be available to your Action test.
Make sure are in the base directory of your project and all files are saved. If you run ant test-web -Dtestcase=PersonAction - everything should work as planned.
BUILD SUCCESSFULTotal time: 21 seconds
Clean up the JSP to make it presentable [#5]
Now let's clean up the generated personForm.jsp by making the "id" property a hidden field. Remove the following code block from web/pages/personForm.jsp:
|
And add the following before the <table> tag:
|
If you want to add a usability enhancement to your form, you can set the cursor to focus on the first field when the page loads. Simply add the following JavaScript at the bottom of your form:
<script type="text/javascript">
    document.forms["person"].elements["firstName"].focus();
</script>
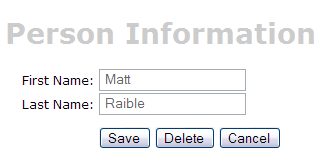
Now if you execute ant db-load deploy, start Tomcat and point your browser to http://localhost:8080/appfuse/editPerson.html?id=1, you should see something like this:
Finally, to make this page more user friendly, you may want to add a message for your users at the top of the form, but this can easily be done by adding text (using <fmt:message>) at the top of the personForm.jsp page.
[Optional] Create a Canoo WebTest to test browser-like actions [#6]
The final (optional) step in this tutorial is to create a Canoo WebTest to test the JSPs.
- I say this step is optional, because you can run the same tests through your browser.
You can use the following URLs to test the different actions for adding, editing and saving a user.
- Add - http://localhost:8080/appfuse/editPerson.html.
- Edit - http://localhost:8080/appfuse/editPerson.html?id=1 (make sure and run ant db-load first).
- Delete - Use the edit link above and click on the Delete button.
- Save - Click edit and then click the Save button.
Canoo tests are pretty slick in that they're simply configured in an XML file. To add tests for add, edit, save and delete, open test/web/web-tests.xml and add the following XML. You'll notice that this fragment has a target named PersonTests that runs all the related tests.
- I use CamelCase target names (vs. the traditional lowercase, dash-separated) because when you're typing -Dtestcase=Name, I've found that I'm used to doing CamelCase for my JUnit Tests.
|
After adding this, you should be able to run ant test-canoo -Dtestcase=PersonTests with Tomcat running or ant test-jsp -Dtestcase=PersonTests if you want Ant to start/stop Tomcat for you. To include the PersonTests when all Canoo tests are run, add it as a dependency to the "run-all-tests" target.
You'll notice that there's no logging in the client-side window by Canoo. If you'd like to see what it's doing, you can add the following between </webtest> and </target> at the end of each target.
<loadfile property="web-tests.result"
    srcFile="${test.dir}/data/web-tests-result.xml"/>
<echo>${web-tests.result}</echo>
BUILD SUCCESSFULTotal time: 10 seconds
Next Up: Part IV: Adding Validation and List Screen - Adding validation logic to the personForm so that firstName and lastName are required fields and adding a list screen to display all person records in the database.
|
Go to top
More info...
Attach file...
|
| This particular version was published on 06-Nov-2006 13:52:39 MST by MattRaible. |