Raible's Wiki
Raible Designs
Wiki Home
News
Recent Changes
AppFuse
Homepage- Korean
- Chinese
- Italian
- Japanese
QuickStart Guide
- Chinese
- French
- German
- Italian
- Korean
- Portuguese
- Spanish
- Japanese
User Guide
- Korean
- Chinese
Tutorials
- Chinese
- German
- Italian
- Korean
- Portuguese
- Spanish
Other Applications
Struts ResumeSecurity Example
Struts Menu
UserPreferences
Referenced by
Articles
Articles_cn
Articles_de
Articles_pt
Articles_zh
JSFBeans
![[RSS]](https://raibledesigns.com/wiki/images/xml.png "Aggregate the RSS feed")

Hide Menu
ValidationAndListJSF |
|
| Your trail: | |
Part IV: Adding Validation and List Screen - Explains validation logic that makes the firstName and lastName required fields. Also shows how to add a list screen to display all person records in the database.
- This tutorial depends on Part III: Creating JSF Pages and JSPs.
About this Tutorial
This tutorial will show you how to add Validation logic to the Person object using JSF's Validation framework. You'll also create a list screen using the Display Tag Library to display all the people in the database.
- I will tell you how I do stuff in the Real World in text like this.
Table of Contents
- [1] View validation settings in personForm.xhtml
- [2] View JSP with validation added and test
- [3] Add testGetPeople methods to DAO and Manager Tests
- [4] Add getPeople methods to PersonDao and Manager
- [5] Create PersonListTest
- [6] Create PersonForm
- [7] Create people.xhtml and Canoo test
- [8] Add link to menu
View validation logic in personForm.page [#1]
Implementing validation with JSF is quite simple. For server-side validation, all you need to do is add required="true" to your <h:inputText> tags. For client-side validation, you'll need to add a nested <v:commonsValidator> tag. Other validations (besides required) can be specified by nested validation tags in your inputText tags.The validation integration for the form page is already done by AppGen in the personForm.xhtml. If you open web/personForm.xhtml, you should see the following JSP Tags. I've highlighted the portions that are relevant to validation.
    <h:inputText id="firstName" value="#{personForm.person.firstName}" required="true">
        <v:commonsValidator type="required" arg="#{text['person.firstName']}"/>
    </h:inputText>
The commonsValidator tag was found in David Geary's Core JSF book. AppFuse also contains a custom LabelRenderer for the <h:outputLabel> tag. This render will add asterisks for required fields.
There are a number of different validators you can use, this example just shows a way to validate Strings are entered. The userForm.xhtml contains examples of validation e-mail and validating with regular expressions. All input fields generated by AppGen are required by default. You can change this by modifying the extras/appgen/src/**/Form_xhtml.xdt file.
View JSP with validation added and test [#2]
To test the current validation configuration for the person form, run ant db-load deploy, and start Tomcat. Then go to http://localhost:8080/appfuse, login and click on the "Edit Person" link on the Main Menu.
If you erase the values in the firstName and lastName fields and click the save button, you should get the following JavaScript alert.
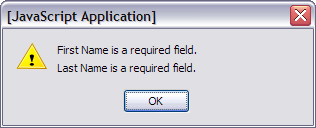
JSF does not seem to allow injecting the field label into the error message for server-side validation errors. For more information see this mailing list thread.
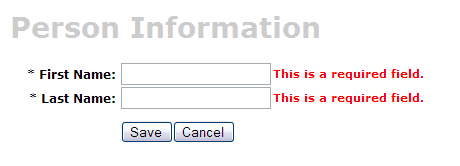
To make sure things are really working as expected, you can turn off JavaScript and ensure the server-side validation is working. This is easy in Mozilla Firefox (my favorite browser), just go to Tools → Options → Web Features and uncheck "Enable JavaScript". Now if you clear the fields and save the form, you should see the following:
Add testGetPeople methods to DAO and Manager Tests [#3]
To create a List screen (also called a master screen), we need to create methods that will return all the rows from our person table. Let's start by adding tests for these methods to our PersonDaoTest and PersonManagerTest classes. I usually name this method getEntities (i.e. getUsers), but you could also use getAll or search - it's really just a matter of personal preference.Open test/dao/**/dao/PersonDaoTest.java and add a testGetPeople method:
|
The reason I'm passing in a person object to the getPeople method is to allow for filtering (based on values in person) in the future. Adding this parameter in your getPeople() method signature is optional, but the rest of this tutorial assumes you have done this.
Now open test/service/**/service/PersonManagerTest.java and add a testGetPeople method:
|
In order for these tests to compile, you need to add the getPeople() method to the PersonDao and PersonManager interfaces, and their implementations.
Add getPeople() method to DAO and Manager [#4]
Open src/dao/**/dao/PersonDao.java and add the getPeople() method signature:
|
Now add the same method signature to src/service/**/service/PersonManager.java. Save all your files and adjust the imports in your tests. Next you need to implement the getPeople() method in your implementation classes. Open src/dao/**/dao/hibernate/PersonDaoHibernate.java and add the following method:
|
(HQL) or using Criteria Queries.
An example using a Criteria Query:
|
Now implement the getPeople() method in src/service/**/impl/PersonManagerImpl.java:
|
After saving all your changes, you should be able to run both tests by executing the following:
- ant test-dao -Dtestcase=PersonDao
- ant test-service -Dtestcase=PersonManager
If everything works - nice job! Now you need to add this retrieve all functionality to the web tier.
Create PersonListTest [#5]
In the last couple of tutorials, you've been working with the PersonForm to interact with your form view page. Now you need to create a new Managed Bean that'll simply handle getting and displaying a list of people in the database.To begin, create test/web/**/action/PersonListTest.java add a test method for searching.
|
This class will not compile until you create the PersonList class.
Create PersonList [#6]
Create src/web/**/action/PersonList.java. It should read as follows:
|
Now you need to add the managed-bean definition for the PersonList class. Open web/WEB-INF/faces-config.xml and add the following managed-bean definition:
|
If you run ant test-web -Dtestcase=PersonList, the test should pass.
Nice!
BUILD SUCCESSFUL
Total time: 14 seconds
Create people.jsp and Canoo test [#7]
There should already be a persons.xhtml file in your web directory. If not, you can create it using AppGen. From the command-line, navigate to extras/appgen and run ant -Dobject.name=Person -Dappgen.type=pojo. This will generate a personList.xhtml file in extras/appgen/build/gen/web.Copy personList.xhtml to web and rename it to people.xhtml. Open it for for editing. There are two references to "personList.persons". Change those to be "personList.people".
<h:dataTable var="person" value="#{personList.people}" style="display:none"/>

<display:table name="${personList.people}" cellspacing="0" cellpadding="0"
    id="persons" pagesize="25" styleClass="list"
    export="true" requestURI="">
You can also change the table's "id" and the associated JavaScript that refers to it. This change is not as important as the previous one.
You should already have the title and heading keys (personList.title and personList.heading) for the personList.html page in web/WEB-INF/classes/ApplicationResources.properties. You should've added these keys in the previous tutorial.
Now you need to add the navigation-rules for this page (near the top of web/WEB-INF/faces-config.xml):
|
At this point, you should be able to run ant clean deploy, start Tomcat and view this page in your browser at http://localhost:8080/appfuse/people.html.
Now that you have a List Screen, let's change the pages that are displayed after adding and deleting a new Person. In the faces-config.xml file, change the references for the personForm.xhtml from "mainMenu" to "people".
|
In the last tutorial, the Canoo tests verify that the user sees the Main Menu after saving/editing a person. Since you've changed that navigation-rule you need to update the tests. Open test/web/web-tests.xml and change any "mainMenu" references in the "PersonsTests" to be go to the people list.
<verifytitle description="display Main Menu" text=".*${mainMenu.title}.*" regex="true"/>
Should become:
<verifytitle description="Person List appears if save successful" text=".*${personList.title}.*" regex="true"/>
You will also need to change the Canoo tests to use the list screen for editing, rather than the Main Menu's "Edit Person" link. Change the <clicklink> in "EditPerson", "SavePerson" and "DeletePerson" from
<clicklink label="Edit Person"/>
to:
<invoke description="View People" url="/people.html"/>
<clicklink description="edit first record in list" label="1"/>
To test that displaying this page works, create a new HTML test in test/web/web-tests.xml:
|
You'll also want to add the "SearchPeople" target to the "PersonTests" target so it will be executed along with all the other person-related tests.
|
Now you can run ant test-canoo -Dtestcase=SearchPeople (or ant test-jsp if Tomcat isn't running) and hopefully it will result in "BUILD SUCCESSFUL". If so - nice work!
Add link to menu [#8]
The last step is to make the list, add, edit and delete functions visible to the user. The simplest way is to add a new link to the list of links in web/pages/mainMenu.html:
|
Where menu.viewPeople is an entry in web/WEB-INF/classes/ApplicationResources.properties.
menu.viewPeople=View People
The other (more likely) alternative is that you'll want to add it to the menu. To do this, add the following to web/WEB-INF/menu-config.xml:
|
Make sure the above XML is inside the <Menus> tag, but not within another <Menu>. Then add this new menu to web/common/menu.jsp - which should now look as follows:
|
Now if you run ant clean deploy start Tomcat and go to http://localhost:8080/appfuse/mainMenu.html, you should see something like the screenshot below.
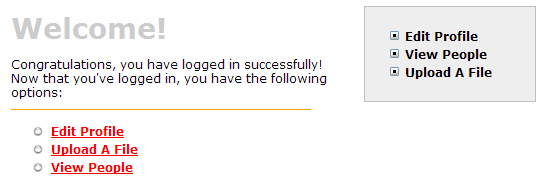
Notice that there is a new link on the left side (from mainMenu.jsp) and on the right in our menu (from menu.jsp).
That's it!
You've completed the full lifecycle of developing a set of master-detail pages with AppFuse and JSF - Congratulations! Now the real test is if you can run all the tests in your app without failure. To test, stop tomcat and run ant clean test-all. This will run all the unit tests within your project. As a reminder, it should be easy to setup and test AppFuse from scratch using ant setup.Happy Day!
BUILD SUCCESSFUL
Total time: 2 minutes 40 seconds
Attachments:
| validation-required.png |  |
8694 bytes |
| validation-required-nojs.png |  |
6652 bytes |
|
Go to top
Edit this page
More info...
Attach file...
|
| This page last changed on 31-Jan-2007 01:28:27 MST by MattRaible. |