Raible's Wiki
Raible Designs
Wiki Home
News
Recent Changes
AppFuse
Homepage- Korean
- Chinese
- Italian
- Japanese
QuickStart Guide
- Chinese
- French
- German
- Italian
- Korean
- Portuguese
- Spanish
- Japanese
User Guide
- Korean
- Chinese
Tutorials
- Chinese
- German
- Italian
- Korean
- Portuguese
- Spanish
Other Applications
Struts ResumeSecurity Example
Struts Menu
UserPreferences
Referenced by
AppFuseDebug
AppFuseSupport
Articles
Articles_cn
Articles_de
Articles_ko
Articles_pt
Articles_zh
DevelopmentEnvironme...
DevelopmentEnvironme...
...and 1 more
![[RSS]](https://raibledesigns.com/wiki/images/xml.png "Aggregate the RSS feed")

Hide Menu
AppFuseEclipse |
|
| Your trail: | |
This is version 41.
It is not the current version, and thus it cannot be edited.
[Back to current version]
[Restore this version]
AppFuse, by default, is configured to be an Eclipse
project. When you run ant new -Dapp.name=yourApp -Ddb.name=yourDatabase you will get the .project and .classpath files to start your project with. However, you will need to make a few easy setting changes in Eclipse (particularly to run Ant). This tutorial shows you how to use Eclipse with AppFuse, but should be applicable to any application based on AppFuse.
- This tutorial is based on Windows XP and Eclipse 3.0 M4 and should work on any platform.
Table of Contents
- [1] Import the project into an Eclipse workspace
- [2] Add J2EE_HOME to Classpath Variables
- [3] Add junit.jar to Ant's classpath
- [4] Add build.xml to Ant View
- [5] Run Ant
- [6] Run JUnit Tests in Eclipse
- [7] Tips for Debugging and UI Editing
Import the project into an Eclipse workspace [#1]
Open Eclipse (either with an existing or a new workspace) and to go File → Import..., select Existing Project into Workspace and click Next >. Enter the pathname to the directory of your project or click the Browse... button and select the directory. Click the Finish button. Eclipse will load and build the project. At this point you'll probably have 2 Problems complaining that it can't build your project due to an Unbound classpath variable. You'll correct this in the next step. TIP: Here's a way to hide the JARs you see in Eclipse's Package Explorer.Add J2EE_HOME to Classpath Variables [#2]
Go to Window → Preferences. Navigate to Java → Classpath Variables. Click the New... button and enter J2EE_HOME for the name field. In the path field enter the pathname to the directory of your J2EE JDK or click the Folder.. button and select the directory. Click on OK one or more times to return to the main Eclipse window. Eclipse will now rebuild your project and the Unbound class variable problem should be gone.
Add JUnit to Ant's classpath [#3]
Adding junit.jar to Ant's classpath is pretty easy. Open Eclipse and go to Window → Preferences. Navigate to Ant → Runtime and you should a window similar to the one below.Note - in Eclipse 3.0 the dialog has changed. I found you had to add junit.jar to the "Ant Home Entries" as it didn't work under "Global Entries".
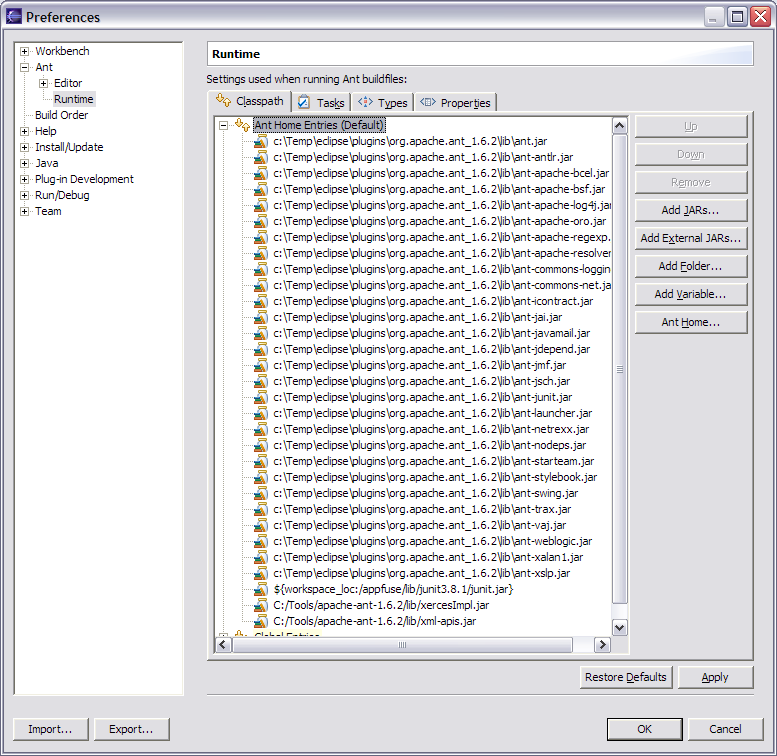
You will need to add junit.jar to the additional classpath entry in the bottom pane. If you have Ant installed, and junit.jar in it's lib directory, I'd use that. Otherwise, you can use the junit.jar file in the lib/junit3.8.1 directory.
Note: Sometime between M4 and M7, the layout of the Runtime properties page has changed. Be sure to add junit.jar to the Ant Home Entries rather than the Global Entries.
Add build.xml to Ant View [#4]
Now we need to add the build.xml to Eclipse's Ant View. To do this, go to Window → Show View → Ant. Then click on the first icon in this view (screenshot below) to add AppFuse's build file.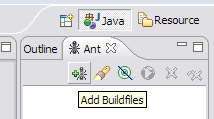
Run Ant [#5]
After adding the build.xml, you should be able to expand it in the Ant View and execute any of the targets. You should make sure that your $J2EE_HOME environment variable is set (not just the Classpath Variables you configured above), since AppFuse relies on this. At this point, you should see something similar to the screenshot below.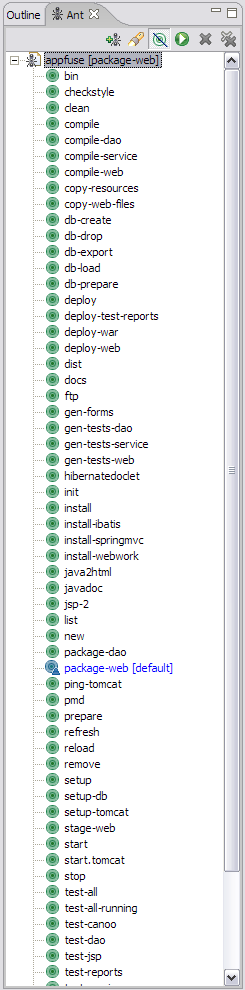
Run JUnit Tests in Eclipse [#6]
It's also possible to run your JUnit tests in Eclipse. I should note that if you're running an ActionTest, you'll need to execute "ant deploy-test-war" and then start Tomcat before running them. To configure Eclipse to run AppFuse's JUnit Tests, all you need to do is define a J2EE_HOME variable. To do this, go to Window → Preferences → Java → Classpath Variables. Add a new variable called J2EE_HOME and point it to the location where you have the J2EE SDK installed. AppFuse already has its classpath configured (in the .classpath file) to include J2EE_HOME/lib/j2ee.jar.
Also, before running any JUnit Tests in Eclipse, you need to run "ant test-all" from the command line. After you have successfully done so, in Eclipse open a test you'd like to run (i.e. UserDaoTest) and go to Run → Debug As → JUnit Test. If this doesn't work, make sure you have AppFuse 1.0.1+
Tips for Debugging and UI Editing [#7]
For debugging, I use the Tomcat Plugin in Eclipse and set breakpoints. For little changes, I use "ant deploy-web" which only takes a couple of seconds. For truly minor tweaks, it's sometimes easier to edit the file in Tomcat's webapps folder. For major design changes, I usually run the app, view source on a page and save it to a "sandbox" folder in the same directory as my project. Then I do a find/replace and change all "/appfuse/" references to "../web/". This allows me to change CSS and JS files and just refresh the file in the sandbox.
Attachments:
| ant-targets.png |  |
28653 bytes |
| ant-runtime.png |  |
96096 bytes |
| ant-view.png |  |
6585 bytes |
|
Go to top
More info...
Attach file...
|
| This particular version was published on 06-Nov-2006 13:52:23 MST by MattRaible. |