Matt RaibleMatt Raible is a writer with a passion for software. Connect with him on LinkedIn.

The Angular Mini-Book The Angular Mini-Book is a guide to getting started with Angular. You'll learn how to develop a bare-bones application, test it, and deploy it. Then you'll move on to adding Bootstrap, Angular Material, continuous integration, and authentication.

Spring Boot is a popular framework for building REST APIs. You'll learn how to integrate Angular with Spring Boot and use security best practices like HTTPS and a content security policy.

For book updates, follow @angular_book on Twitter.

The JHipster Mini-Book The JHipster Mini-Book is a guide to getting started with hip technologies today: Angular, Bootstrap, and Spring Boot. All of these frameworks are wrapped up in an easy-to-use project called JHipster.

This book shows you how to build an app with JHipster, and guides you through the plethora of tools, techniques and options you can use. Furthermore, it explains the UI and API building blocks so you understand the underpinnings of your great application.

For book updates, follow @jhipster-book on Twitter.

10+ YEARS


Over 10 years ago, I wrote my first blog post. Since then, I've authored books, had kids, traveled the world, found Trish and blogged about it all.
You searched this site for "matt". 663 entries found.

You can also try this same search on Google.

Developing with HTML5, CoffeeScript and Twitter's Bootstrap

HTML5 Logo This article is the fourth in a series about my adventures developing a Fitness Tracking application with HTML5, Play Scala, CoffeeScript and Jade. Previous articles can be found at:

  1. Integrating Scalate and Jade with Play 1.2.3
  2. Trying to make CoffeeScript work with Scalate and Play
  3. Integrating HTML5 Boilerplate with Scalate and Play

Developing Features
After getting my desired infrastructure setup, I started coding like a madman. The first feature I needed was a stopwatch to track the duration of a workout, so I started writing one with CoffeeScript. After spending 20 minutes playing with dates and setTimeout, I searched and found a stopwatch jQuery plug-in. I added this to my app, deployed it to Heroku, brought up the app on my iPhone 3G, clicked Start and started riding my bike to work.

When I arrived, I unlocked my phone and discovered that the time had stopped. At first, I thought this was a major setback. My disappointed disappeared when I found a Super Neat JavaScript Stopwatch and Kåre Byberg's version that worked just fine. This stopwatch used setTimeout, so by keeping the start time, the app on the phone would catch up as soon as you unlocked it. I ported Kåre's script to CoffeeScript and rejoiced in my working stopwatch.

# Created by Kåre Byberg © 21.01.2005. Please acknowledge if used 
# on other domains than http://www.timpelen.com.
# Ported to CoffeeScript by Matt Raible. Also added hours support.
flagClock = 0
flagStop = 0
stopTime = 0
refresh = null
clock = null

start = (button, display) ->
  clock = display
  startDate = new Date()
  startTime = startDate.getTime()
  if flagClock == 0
    $(button).html("Stop")
    flagClock = 1
    counter startTime, display
  else
    $(button).html("Start")
    flagClock = 0
    flagStop = 1

counter = (startTime) ->
  currentTime = new Date()
  timeDiff = currentTime.getTime() - startTime
  timeDiff = timeDiff + stopTime  if flagStop == 1
  if flagClock == 1
    $(clock).val formatTime timeDiff, ""
    callback = -> counter startTime
    refresh = setTimeout callback, 10
  else
    window.clearTimeout refresh
    stopTime = timeDiff

formatTime = (rawTime, roundType) ->
  if roundType == "round"
    ds = Math.round(rawTime / 100) + ""
  else
    ds = Math.floor(rawTime / 100) + ""
  sec = Math.floor(rawTime / 1000)
  min = Math.floor(rawTime / 60000)
  hour = Math.floor(rawTime / 3600000)
  ds = ds.charAt(ds.length - 1)
  start() if hour >= 24
  sec = sec - 60 * min + ""
  sec = prependZeroCheck sec
  min = min - 60 * hour + ""
  min = prependZeroCheck min
  hour = prependZeroCheck hour
  hour + ":" + min + ":" + sec + "." + ds

prependZeroCheck = (time) ->
  time = time + "" # convert from int to string
  unless time.charAt(time.length - 2) == ""
    time = time.charAt(time.length - 2) + time.charAt(time.length - 1)
  else
    time = 0 + time.charAt(time.length - 1)

reset = ->
  flagStop = 0
  stopTime = 0
  window.clearTimeout refresh
  if flagClock == 1
    resetDate = new Date()
    resetTime = resetDate.getTime()
    counter resetTime
  else
    $(clock).val "00:00:00.0"

@StopWatch = {
  start: start
  reset: reset
}

The Scalate/Jade template to render this stopwatch looks as follows:

script(type="text/javascript" src={uri("/public/javascripts/stopwatch.coffee")})

#display
  input(id="clock" class="xlarge" type="text" value="00:00:00.0" readonly="readonly")
#controls
  button(id="start" type="button" class="btn primary") Start
  button(id="reset" type="button" class="btn :disabled") Reset

:plain
  <script type="text/coffeescript">
    $(document).ready ->
      $('#start').click ->
        StopWatch.start this, $('#clock')

      $('#reset').click ->
        StopWatch.reset()
  </script>

Next, I wanted to create a map that would show your location. For this, I used Merge Design's HTML 5 Geolocation Demo as a guide. The HTML5 Geo API is pretty simple, containing only three methods:

// Gets the users current position
navigator.geolocation.getCurrentPosition(successCallback,
                                         errorCallback,
                                         options);
// Request repeated updates of position
watchId = navigator.geolocation.watchPosition(successCallback, errorCallback);

// Cancel the updates
navigator.geolocation.clearWatch(watchId);

After rewriting the geolocation example in CoffeeScript, I ended up with the following code in my map.coffee script. You'll notice it uses Google Maps JavaScript API to show an actual map with a marker.

# Geolocation with HTML 5 and Google Maps API based on example from maxheapsize: 
# http://maxheapsize.com/2009/04/11/getting-the-browsers-geolocation-with-html-5/
# This script is by Merge Database and Design, http://merged.ca/ -- if you use some, 
# all, or any of this code, please offer a return link.

map = null
mapCenter = null
geocoder = null
latlng = null
timeoutId = null

initialize = ->
  if Modernizr.geolocation
    navigator.geolocation.getCurrentPosition showMap

showMap = (position) ->
  latitude = position.coords.latitude
  longitude = position.coords.longitude
  mapOptions = {
    zoom: 15,
    mapTypeId: google.maps.MapTypeId.ROADMAP
  }
  map = new google.maps.Map(document.getElementById("map"), mapOptions)
  latlng = new google.maps.LatLng(latitude, longitude)
  map.setCenter(latlng)

  geocoder = new google.maps.Geocoder()
  geocoder.geocode({'latLng': latlng}, addAddressToMap)

addAddressToMap = (results, status) ->
  if (status == google.maps.GeocoderStatus.OK) 
    if (results[1]) 
      marker = new google.maps.Marker({
          position: latlng,
          map: map
      })
      $('#location').html('Your location: ' + results[0].formatted_address)
  else 
    alert "Sorry, we were unable to geocode that address."

start = ->
  timeoutId = setTimeout initialize, 500

reset = ->
  if (timeoutId)
    clearTimeout timeoutId

@Map = {
  start: start
  reset: reset
}

The template to show the map is a mere 20 lines of Jade:

script(type="text/javascript" src="//www.google.com/jsapi")
script(type="text/javascript" src="//maps.googleapis.com/maps/api/js?sensor=false")

:css
  .demo-map {
    border: 1px solid silver;
    height: 200px;
    margin: 10px auto;
    width: 280px;
  }

#map(class="demo-map")

p(id="location")
  span(class="label success") New
  | Fetching your location with HTML 5 geolocation...

script(type="text/javascript" src={uri("/public/javascripts/map.coffee")})
:javascript
    Map.start();

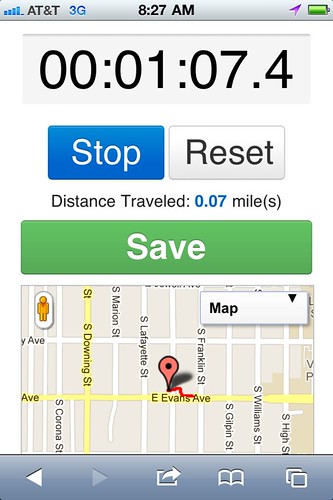
The last two features I wanted were 1) distance traveled and 2) drawing the route taken on the map. For this I learned from A Simple Trip Meter using the Geolocation API. As I was beginning to port the JS to CoffeeScript, I thought, "there's got to be a better way." I searched and found Js2coffee to do most of the conversion for me. If you know JavaScript and you're learning CoffeeScript, this is an invaluable tool.

I tried out the trip meter that evening on a bike ride and noticed it said I'd traveled 3 miles when I'd really gone 6. I quickly figured out it was only calculating start point to end point and not taking into account all the turns in between. To view what was happening, I integrated my odometer.coffee with my map using Google Maps Polylines. Upon finishing the integration, I discovered two things, 1) HTML5 geolocation was highly inaccurate and 2) geolocation doesn't run in the background.

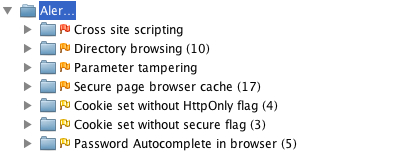
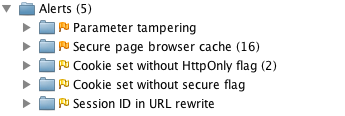
I was able to solve the first problem by passing in {enableHighAccuracy: true} to navigator.geolocation.watchPosition(). Below are two screenshots showing before high accuracy and after. Both screenshots are from the same two-block walk.

Without {enableHighAccuracy: true} With {enableHighAccuracy: true}

The second issue is a slight show-stopper. PhoneGap might be able to solve the problem, but I'm currently using a workaround → turning off auto-lock and keeping Safari in the foreground.

Making it look good
After I got all my desired features developed, I moved onto making the app look good. I started by using SASS for my CSS and installed Play's SASS module. I then switched to LESS when I discovered and added Twitter's Bootstrap to my project. At first I used Play's LESS module (version 0.3), but ran into compilation issues. I then tried Play's GreenScript module, but gave up on it when I found it was incompatible with the CoffeeScript module. Switching back to the LESS module and using the "0.3.compatibility" version solved all remaining issues.

You might remember that I integrated HTML5 Boilerplate and wondering why I have both Bootstrap and Boilerplate in my project. At this point, I don't think Boilerplate is needed, but I've kept it just in case it's doing something for HTML5 cross-browser compatibility. I've renamed its style.css to style.less and added the following so it has access to Bootstrap's variables.

/* Variables from Bootstrap */
@import "libs/variables.less";

Then I made my app look a lot better with layouts, stylish forms, a fixed topbar and alerts. For example, here's the CoffeeScript I wrote to display geolocation errors:

geolocationError = (error) ->
  msg = 'Unable to locate position. '
  switch error.code
    when error.TIMEOUT then msg += 'Timeout.'
    when error.POSITION_UNAVAILABLE then msg += 'Position unavailable.'
    when error.PERMISSION_DENIED then msg += 'Please turn on location services.'
    when error.UNKNOWN_ERROR then msg += error.code
  $('.alert-message').remove()
  alert = $('<div class="alert-message error fade in" data-alert="alert">')
  alert.html('<a class="close" href="#">×</a>' + msg);
  alert.insertBefore($('.span10'))

Then I set about styling up the app so it looked good on a smartphone with CSS3 Media Queries. Below is the LESS code I used to hide elements and squish the widths for smaller devices.

@media all and (max-device-width: 480px) {
  /* hide scrollbar on mobile */
  html { overflow-y:hidden }
  /* hide sidebar on mobile */
  .home .span4, .home .page-header, .topbar form {
    display: none
  }
  .home .container {
    width: 320px;
  } 
  .about {
    .container, .span10 {
      width: 280px;
    }
    .span10 {
      padding-top: 0px;
    }
  }

Tools
In the process of developing a stopwatch, odometer, displaying routes and making everything look good, I used a number of tools. I started out primarily with TextMate and its bundles for LESS, CoffeeScript and Jade. When I started writing more Scala, I installed the Scala TextMate Bundle. When I needed some debugging, I switched to IntelliJ and installed its Scala plugin. CoffeeScript, LESS and HAML plugins (for Jade) were already installed by default. I also used James Ward's Setup Play Framework with Scala in IntelliJ.

Issues
I think it's obvious that my biggest issue so far is the fact that a webapp can't multitask in the background like a native app can. Beyond that, there's accuracy issues with HTML5's geolocation that I haven't seen in native apps.

I also ran into a caching issue when calling getCurrentPosition(). It only worked the first time and I had to refresh my browser to get it to work again. Strangely enough, this only happened on my desktop (in Safari and Firefox) and worked fine on my iPhone. Unfortunately, it looks like PhoneGap has issues similar to this.

My workaround for no webapp multitasking is turning off auto-lock and leaving the browser in the foreground while I exercise. The downside to this is it really drains the battery quickly (~ 3 hours). I constantly have to charge my phone if I'm testing it throughout the day. The testing is a real pain too. I have to deploy to Heroku (which is easy enough), then go on a walk or bike ride. If something's broke, I have to return home, tweak some things, redeploy and go again. Also, there's been a few times where Safari crashes halfway through and I lose all the tracking data. This happens with native apps too, but seemingly not as often.

If you'd like to try the app on your mobile phone and see if you experience these issues, checkout play-more.com.

Summary
Going forward, there's still more HTML5 features I'd like to use. In particular, I'd like to play music while the fitness tracker is running. I'd love it if cloud music services (e.g. Pandora or Spotify) had an API I could use to play music in a webapp. Soundcloud might be an option, but I've also thought of just uploading some MP3s and playing them with the <audio> tag.

I've really enjoyed developing with all these technologies and haven't experienced much frustration so far. The majority has come from integrating Scalate into Play, but I've resolved most problems. Next, I'll talk about how I've improved Play's Scalate support and my experience working with Anorm.

Posted in Java at Oct 20 2011, 02:47:36 PM MDT 3 Comments

Integrating HTML5 Boilerplate with Scalate and Play

HTML5 Boilerplate is a project that provides a number of basic files to help you build an HTML5 application. At its core, it's an HTML template that puts CSS at the top, JavaScript at the bottom, installs Chrome Frame for IE6 users and leverages Modernizr for legacy browser support. It also includes jQuery with the download. One of the major benefits of HTML5 Boilerplate is it ships with a build system (powered by Ant) that concatenates and minimizes CSS and JS for maximum performance. From html5boilerplate.com:

Boilerplate is not a framework, nor does it prescribe any philosophy of development, it's just got some tricks to get your project off the ground quickly and right-footed.

I like the idea of its build system to minify and gzip, but I'd probably only use it if I was working on a project that uses Ant. Since I'm using it in a Play project, the whole Ant build system doesn't help me. Besides, I prefer something like wro4j. Wro4j allows you to specify a group of files and then it compiles, minimizes and gzips them all on-the-fly. As far as I know, Play doesn't have any support for Servlet Filters, so using wro4j in Play is not trivial.

The good news is Play has a GreenScript module that contains much of the wro4j functionality. However, since I'm using Scalate in my project, this goodness is unavailable to me. In the future, the Scalate Team is considering adding better wro4j, JavaScript and CSS integration. In the meantime, I'm going to pretend I don't care about concatenation and minimization and trundle along without this feature.

To add HTML5 Boilerplate to my Play project, I performed the following steps:

  • Downloaded the 2.0 Zipball.
  • Copied all the static files to my project. Below are the commands I used (where $boilerplate-download is the expanded download directory and ~/dev/play-more is my project):
    cd $boilerplate-download
    cp 404.html ~/dev/play-more/app/views/errors/404.html
    cp *.png ~/dev/play-more/public/.
    cp crossdomain.xml ~/dev/play-more/public/.
    cp -r css ~/dev/play-more/public/stylesheets/.
    cp favicon.ico ~/dev/play-more/public/.
    cp humans.txt ~/dev/play-more/public/.
    cp -r js/libs ~/dev/play-more/public/javascripts/.
    cp robots.txt ~/dev/play-more/public/.
    
  • Copied the index.html to ~/dev/play-more/app/templates/layouts/default.jade and modified it to use Jade syntax. Since I downloaded the comments-heavy version, I modified many of them to be hidden in the final output.
    -@ val body: String 
    -@ var title: String = "Play More"
    -@ var header: String = ""
    -@ var footer: String = ""
    !!! 5
    / paulirish.com/2008/conditional-stylesheets-vs-css-hacks-answer-neither/ 
    <!--[if lt IE 7]> <html class="no-js ie6 oldie" lang="en"> <![endif]-->
    <!--[if IE 7]>    <html class="no-js ie7 oldie" lang="en"> <![endif]-->
    <!--[if IE 8]>    <html class="no-js ie8 oldie" lang="en"> <![endif]-->
    -# Consider adding an manifest.appcache: h5bp.com/d/Offline 
    <!--[if gt IE 8]><!--> <html class="no-js" lang="en"> <!--<![endif]-->
    head
      meta(charset="utf-8")
    
      -# Use the .htaccess and remove these lines to avoid edge case issues. More info: h5bp.com/b/378 
      meta(http-equiv="X-UA-Compatible" content="IE=edge,chrome=1")
    
      title=title
      meta(name="description" content="")
      meta(name="author" content="Matt Raible ~ [email protected]")
    
      -# Mobile viewport optimized: j.mp/bplateviewport 
      meta(name="viewport" content="width=device-width,initial-scale=1")
    
      -# Place favicon.ico and apple-touch-icon.png in the root directory: mathiasbynens.be/notes/touch-icons
    
      -# CSS: implied media=all
      link(rel="stylesheet" href={uri("/public/stylesheets/style.css")})
      -# end CSS
    
      -# More ideas for your <head> here: h5bp.com/d/head-Tips 
      -#
        All JavaScript at the bottom, except for Modernizr / Respond.
        Modernizr enables HTML5 elements & feature detects; Respond is a polyfill for min/max-width CSS3 Media Queries
        For optimal performance, use a custom Modernizr build: www.modernizr.com/download/ 
    
      script(type="text/javascript" src={uri("/public/javascripts/libs/modernizr-2.0.6.min.js")})
    body
      #container
        header = header
        #main(role="main")
          != body
        footer = footer
    
      -# JavaScript at the bottom for fast page loading 
      
      / Grab Google CDN's jQuery, with a protocol relative URL; fall back to local if offline 
      script(type="text/javascript" src="//ajax.googleapis.com/ajax/libs/jquery/1.6.2/jquery.min.js")
      :javascript
        window.jQuery || document.write('<script src={uri("/public/javascripts/libs/jquery-1.6.2.min.js")}><\/script>')
    
      -# Change UA-XXXXX-X to be your site's ID 
      :javascript
        window._gaq = [['_setAccount','UA-25859875-1'],['_trackPageview'],['_trackPageLoadTime']];
        Modernizr.load({
          load: ('https:' == location.protocol ? '//ssl' : '//www') + '.google-analytics.com/ga.js'
        });
    
      -# Prompt IE 6 users to install Chrome Frame. Remove this if you want to support IE 6. 
      -# http://chromium.org/developers/how-tos/chrome-frame-getting-started 
      /[if lt IE 7]
        script(src="//ajax.googleapis.com/ajax/libs/chrome-frame/1.0.3/CFInstall.min.js")
        :javascript
          window.attachEvent('onload',function(){CFInstall.check({mode:'overlay'})})
            
    != "</html>"
    
  • Next, I had to add support for layouts to my homegrown Scalate support. I did this by specifying a layoutStrategy when initializing the TemplateEngine. From play-more/app/controllers/ScalateTemplate.scala:
    engine.classLoader = Play.classloader
    engine.layoutStrategy = new DefaultLayoutStrategy(engine, 
      Play.getFile("/app/templates/layouts/default" + scalateType).getAbsolutePath)
    engine
    

That's it! Now I have HTML5 Boilerplate integrated into my Play/Scalate/Jade application. To set the title and header in my index.jade, I simply added the following lines at the top:

- attributes("title") = "Counting"
- attributes("header") = "HTML5 Rocks!"

CoffeeScript Tip
Yesterday, I mentioned that I was having issues getting CoffeeScript to work with Scalate and that I was going to try and get the in-browser compiler working. First of all, reverting to Scalate 1.4.1 didn't work because there is no CoffeeScript support in 1.4.1. So I stayed with 1.5.2 and used PandaWood's Running CoffeeScript In-Browser Tutorial. I copied coffee-script.js to ~/dev/play-more/public/javascripts/libs and added a reference to it in my default.jade layout:

-# JavaScript at the bottom for fast page loading 
script(type="text/javascript" src={uri("/public/javascripts/libs/coffee-script.js")})

Then I was able to write CoffeeScript in a .jade template using the following syntax:

:plain
  <script type="text/coffeescript">
    alert "hello world"
  </script>

Summary
If you've integrated HTML5 Boilerplate into your Play application, I'd love to hear about it. Now that I have all the infrastructure in place (Jade, CoffeeScript, HTML5 Boilerplate), I'm looking forward to getting some development done. Who knows, maybe I'll even come up with my own Play Un-Features That Really Irk My Inner Geek.

Posted in Java at Sep 28 2011, 08:49:35 AM MDT 2 Comments

Installing OpenJDK 7 on OS X

Last week, I scanned an article and saw there was a Java 7 Webinar. At first, I thought Java 7 was released, but soon after realized it was a Developer Preview. Unfortunately, the download page doesn't have support for OS X. Since it took me a bit of work to figure out how to install OpenJDK 7 on OS X (I'm running Snow Leopard 10.6.7), I figured I'd write down how I did it.

I started off by downloading "OpenJDK 1.7 universal (32/64 bits) from Mac OS/X branch" from the openjdk-osx-build project's downloads (direct link). After downloading, I installed the dmg as normal.

Update Jan 27, 2012:
After installing the dmg, add the following to your ~/.profile and you should be good to go. Thanks to Mark Beaty for the tip.

function setjdk() { if [ $# -ne 0 ];then export JAVA_HOME=`/usr/libexec/java_home -v $@`; fi; java -version; }

Continue with the instructions below if you don't like this technique for some reason.

I don't use Java Preferences to set my JDK, instead I use David Blevin's handy setjdk script. To make this script work with JDK 7 on OS X, I had to make one minor change. On line 40, I added "Contents" to the path for JAVA_HOME:

export JAVA_HOME=$vmdir/$ver/Contents/Home

Update Jan 27, 2012: You no longer need to make this change.

From there, I had to setup some symlinks so everything would work as expected:

cd /System/Library/Java/JavaVirtualMachines/
sudo ln -s /Library/Java/JavaVirtualMachines/1.7.0.jdk

Update Jan 27, 2012: The latest version installs at a different location so the symlink command above should be changed to:

sudo ln -s /Library/Java/JavaVirtualMachines/1.7.0u.jdk 1.7.0.jdk

Lastly, I had my JAVA_HOME set to "/System/Library/Frameworks/JavaVM.framework/Home". I like the shorter (and seemingly more common) "/Library/Java/Home", so I set it back to that in my ~/.profile:

export JAVA_HOME=/Library/Java/Home

On my system, /Library/Java/Home had a symlink to /System/Library/Frameworks/JavaVM.framework/Home, so I changed it to the CurrentJDK that Java Preferences and setjdk use.

cd /Library/Java
rm Home
ln -s /System/Library/Frameworks/JavaVM.framework/Versions/CurrentJDK/Contents/Home

Then I had to add a symlink for 1.7 in the Versions directory.

cd /System/Library/Frameworks/JavaVM.framework/Versions
sudo ln -s /System/Library/Java/JavaVirtualMachines/1.7.0.jdk/Contents 1.7

After making these changes, I was able to switch to JDK 7 easily.

$ setjdk 1.7
Setting this terminal's JDK to 1.7 ... openjdk version "1.7.0-internal"
OpenJDK Runtime Environment (build 1.7.0-internal-b00)
OpenJDK 64-Bit Server VM (build 21.0-b17, mixed mode)

I was also able to switch back to JDK 6.

$ setjdk 1.6
Setting this terminal's JDK to 1.6 ... java version "1.6.0_26"
Java(TM) SE Runtime Environment (build 1.6.0_26-b03-384-10M3425)
Java HotSpot(TM) 64-Bit Server VM (build 20.1-b02-384, mixed mode)

Maven Issues
Next, I tried using JDK 7 to build AppFuse. I ran into two issues when I tried to do this. The first was caused by the native2ascii plugin, which has been known to cause issues on non-Mac platforms. Adding the following profile seemed to solve the problem.

<profile>
    <activation>
        <jdk>1.7</jdk>
    </activation>
    <build>
        <plugins>
            <plugin>
                <groupId>org.codehaus.mojo</groupId>
                <artifactId>native2ascii-maven-plugin</artifactId>
                <dependencies>
                    <dependency>
                      <groupId>com.sun</groupId>
                      <artifactId>tools</artifactId>
                      <version>1.7.0</version>
                      <scope>system</scope>
                      <systemPath>${java.home}/../lib/tools.jar</systemPath>
                    </dependency>
                </dependencies>
            </plugin>
        </plugins>
    </build>
</profile>

The next issue was with Enunciate and its maven-enunciate-cxf-plugin.

[INFO] ------------------------------------------------------------------------
[ERROR] FATAL ERROR
[INFO] ------------------------------------------------------------------------
[INFO] com/sun/mirror/apt/AnnotationProcessorFactory
com.sun.mirror.apt.AnnotationProcessorFactory
[INFO] ------------------------------------------------------------------------
[INFO] Trace
java.lang.NoClassDefFoundError: com/sun/mirror/apt/AnnotationProcessorFactory

It seemed like adding a profile that included tools.jar would solve this, but it doesn't. When I add the dependency directly to the plugin itself, I get the following error:

warning: The apt tool and its associated API are planned to be
removed in the next major JDK release.  These features have been
superseded by javac and the standardized annotation processing API,
javax.annotation.processing and javax.lang.model.  Users are
recommended to migrate to the annotation processing features of
javac; see the javac man page for more information.
[WARNING] Validation result has errors.
error: [core] java.lang.StackTraceElement: A TypeDefinition must have a public no-arg constructor or be annotated with a factory method.
1 error
[INFO] ------------------------------------------------------------------------
[ERROR] BUILD ERROR
[INFO] ------------------------------------------------------------------------

Hopefully this article helps you get started with Java 7 on OS X. If you have any additional tips, please leave a comment.

Posted in Java at Jul 12 2011, 02:11:44 PM MDT 9 Comments

Hyperproductive JSF 2.0 with Ed Burns at Jazoon

This morning, I attended Ed Burn's Talk on Hyperproductive JSF 2.0 at Jazoon. As you might know, I've been a critic of JSF for many years. However, it is one of the most used Java web frameworks, so I was hoping to learn how it's improved in the latest version. Below are my notes from Ed's presentation.

Ed's Plan for our Time Investment:

  1. Define a productive development environment
  2. JSF for greenfield and brownfield projects
  3. List the top 9 productivity killers with JSF projects and solutions

"I am always doing that which I cannot do, in order that I may learn how to do it." -- Pablo Picasso

Software is an executable representation of knowledge, a byproduct of learning how to solve a problem. Knowledge is something that changes as more information comes in. A productive environment makes it as easy as possible to learn how to solve a problem. Learning is an iterative process. Early iterations don't need to be optimal. Later iterations do ... and they need to be maintainable. First is the hardest. Fast iterations are they key. Spring Roo and Play are examples of frameworks that make the first iteration very fast.

You should use a tool to jumpstart JSF development: copy from an old project, use a Maven archetype or use your IDE. With greenfield development, you don't have to bother learning the byproduct of other people's learning. It's a great opportunity to pad your resume with the latest hot technologies. With brownfield development, it's vitally important to understand the existing solution and hidden assumptions. You're also much more constrained in your technology choices. If you want to change, you'll need to come up with a migration strategy, which can be difficult. JSF works well for both because it's not just a runtime framework, it's also a conceptual framework. You need to understand how your framework handles data conversion, validation, page flow, persistence integration, I18N, L10N, A11Y, Web standards and user friendliness.

Top 9 JSF Productivity Killers:

  1. Time wasting deployment step
  2. The perils of "there's more than one way to do it"
  3. Lengthy and painful developer on-boarding process
  4. Misused logging and misunderstood error messages
  5. Phantoms
  6. Under-utilized developer tools
  7. Premature optimization
  8. Difficulty in doing TDD
  9. Lack of an app framework

Time wasting deployment step
ZeroTurnaround solves this problem with JRebel, but there's other ways to do it. Some of the killers of flow state: 1) one large war file, 2) underutilizing dynamic language features, 3) complex server environment and 4) build process is redoing work unnecessarily. To stop the time wasting deployment step, the most important things you can do are as follows:

  • Configure your IDE correctly. In Eclipse, compile directly into WEB-INF/classes and use continuous compilation. With NetBeans, use GlassFish.
  • Don't do control-flow programming in XML.

Ed then showed a simple demo that showed how you can use Groovy to create a JSF UI Component. He also mentioned that Groovy can be used to author any JSF artifact. The benefit of this is you can simply edit and save a .groovy file without having to recompile or redeploy. Unfortunately, using Groovy didn't eliminate the XML syntax for pages or the XML for defining UI components.

The perils of "there's more than one way to do it"
JSF is very flexible, but flexibility is, more often than not, abused. There's a lack of convention for common things (e.g. master-detail, JSF concepts like converter, validator, etc.). The best way to fix this is to establish the norms for a project and stick with them. For example, Neil Griffin has a good blog entry for the different kind of managed beans you can create. Develop recommendations like Neil's and use them on all your projects.

Lengthy developer on-boarding process
Stick with standards when possible (at least have a common project description and build system across projects). Be committed to periodic cleanup cycles, including documenting for re-use. Pick one JSF component library and stick with it. Support for mixing and switching component libraries has improved with JSF 2, but it's still recommended you use only one.

Misused logging and misunderstood error messages
JSF is notorious for cryptic error messages and very long stack traces. It's still a problem, but the JSF Team is still working on improving them. Good tip: use the <ui:debug> tag. Its recordStateSize="true" attribute can be especially useful. If you're using PrimeFaces, add trace=true to request URLs.

Phantoms
Phantoms is when running code is not the same as the code you are modifying or wrong version of library gets picked up. You should have the capability to hit breakpoints anywhere in your entire software stack, including core Java sources. This is one of the most useful things about open source software. Solutions to phantoms: 1) put a timestamp on every redeploy and have the timestamp appear in the system log 2) write the running library stack to the system log (each library and version being used) and make it easy to compare one developer's runtime stack with another's 3) consider doing all work in tightly controlled VMs (checkout the VM at the beginning of the day, do your work, commit your changes and throw your VM away at the end of the day).

Under-utilizing developer tools
Make sure everyone has the fastest machines available and as much screen real estate as desired. Hardware is much cheaper than developer time. Another tip is to use Hudson as your butler. It's not just the team CI server. In other words, take advantage of automation wherever you can.

Premature Optimization
Keep in mind the trade-offs between readability and performance. When using frameworks such as JSF, don't try to outsmart the implementation. Rather, use the framework as intended and use open-source contributions to treat performance problems. Example, EL expressions got a lot faster between EE5 and EE6. If you spent time trying to optimize EL expressions, you might've been wasting your time.

Difficulty in doing TDD
Try to figure out why TDD is difficult in your company. For JSF, strongly consider JBoss's JSFUnit. Write your testcases to extend from Cactus ServletTestCase and leverage HtmlUnit (JSFUnit does this for you).

Lack of an app framework
Create common components: login panel, CRUD components, etc. If you don't have an app framework, build one over time.

Conclusion
This was an interesting talk by Ed. The dynamics of the room where a bit interesting. Jazoon is held in a movie theater, much like Devoxx. However, it appears there's a spotlight on the speaker that makes it very difficult to see the audience. I don't remember having this problem at Devoxx. Ed asked the audience quite a few questions, but it seemed he had a lot of difficulty in seeing if folks raised their hands. This made for some periods of awkward silence.

Personally, I was hoping to learn some new whizbang tips about JSF that I was not aware of. Unfortunately, I didn't learn anything new and wasn't that impressed with the Groovy demo.

I think Ed's tips about things outside of JSF were good, especially buying developers good hardware. I've seen many companies, including my current client, skimp on developer hardware and cause developer frustration because of it. I think it's great when companies provide developers top-of-the-line hardware and eliminate frustration over CPU and memory resources. LinkedIn and Time Warner Cable both provide their developers with Mac Pros and MacBook Pros as well as huge monitors. IMO, this is one of the best benefits you can provide your engineers.

Posted in Java at Jun 23 2011, 04:53:10 AM MDT 3 Comments

Java Web Application Security - Part V: Penetrating with Zed Attack Proxy

Web Application Security is an important part of developing applications. As developers, I think we often forget this, or simply ignore it. In my career, I've learned a lot about web application security. However, I only recently learned and became familiar with the rapidly growing "appsec" industry.

I found a disconnect between what appsec consultants were selling and what I was developing. It seemed like appsec consultants were selling me fear, mostly because I thought my apps were secure. So I set out on a mission to learn more about web application security and penetration testing to see if my apps really were secure. This article is part of that mission, as are the previous articles I've written in this series.

When I first decided I wanted to do a talk on Webapp Security, I knew it would be more interesting if I showed the audience how to hack and fix an application. That's why I wrote it into my original proposal:

Webapp Security: Develop. Penetrate. Protect. Relax.
In this session, you'll learn how to implement authentication in your Java web applications using Spring Security, Apache Shiro and good ol' Java EE Container Managed Authentication. You'll also learn how to secure your REST API with OAuth and lock it down with SSL.

After learning how to develop authentication, I'll introduce you to OWASP, the OWASP Top 10, its Testing Guide and its Code Review Guide. From there, I'll discuss using WebGoat to verify your app is secure and commercial tools like webapp firewalls and accelerators.

At the time, I hadn't done much webapp pentesting. You can tell this from the fact that I mentioned WebGoat as the pentesting tool. From WebGoat's Project page:

WebGoat is a deliberately insecure J2EE web application maintained by OWASP designed to teach web application security lessons. In each lesson, users must demonstrate their understanding of a security issue by exploiting a real vulnerability in the WebGoat application. For example, in one of the lessons the user must use SQL injection to steal fake credit card numbers. The application is a realistic teaching environment, providing users with hints and code to further explain the lesson.

What I really meant to say and use was Zed Attack Proxy, also known as OWASP ZAP. ZAP is a Java Desktop application that you setup as a proxy for your browser, then use to find vulnerabilities in your application. This article explains how you can use ZAP to pentest a web applications and fix its vulnerabilities.

The application I'll be using in this article is the Ajax Login application I've been using throughout this series. I think it's great that projects like Damn Vulnerable Web App and WebGoat exist, but I wanted to test one that I think is secure, rather than one I know is not secure. In this particular example, I'll be testing the Spring Security implementation, since that's the framework I most often use in my open source projects.

Zed Attack Proxy Tutorial

Download and Run the Application
To begin, download the application and expand it on your hard drive. This app is the completed version of the Ajax Login application referenced in Java Web Application Security - Part II: Spring Security Login Demo. You'll need Java 6 and Maven installed to run the app. Run it using mvn jetty:run and open http://localhost:8080 in your browser. You'll see it's a simple CRUD application for users and you need to login to do anything.

Install and Configure ZAP
The Zed Attack Proxy (ZAP) is an easy to use integrated penetration testing tool for finding vulnerabilities in web applications. Download the latest version (I used 1.3.0) and install it on your system. After installing, launch the app and change the proxy port to 9000 (Tools > Options > Local Proxy). Next, configure your browser to proxy requests through port 9000 and allow localhost requests to be proxied. I used Firefox 4 (Preferences > Advanced > Network > Connection Settings). When finished, your proxy settings should look like the following screenshot:

Firefox Proxy Settings

Another option (instead of removing localhost) is to add an entry to your hosts file with your production domain name. This is what I've done for this demo.

127.0.0.1       demo.raibledesigns.com

I've also configured Apache to proxy requests to Jetty with the following mod_proxy settings in my httpd.conf:

<IfModule mod_proxy.c>
    ProxyRequests Off 
    ProxyPreserveHost Off 

    <VirtualHost *:80>
       ProxyPass  /  http://localhost:8080/
    </VirtualHost>

    <VirtualHost *:443>
        SSLEngine on
        SSLProxyEngine on
        SSLCertificateFile "/etc/apache2/ssl.key/server.crt"
        SSLCertificateKeyFile "/etc/apache2/ssl.key/server.key"

        ProxyPass  /  https://localhost:8443/
    </VirtualHost>
</IfModule>

Perform a Scan
Now you need to give ZAP some data to work with. Using Firefox, I navigated to http://demo.raibledesigns.com and browsed around a bit, listing users, added a new one and deleted an existing one. After doing this, I noticed a number of flags in the ZAP UI under Sites. I then right-clicked on each site (one for http and one for https) and selected Attack > Active Scan site. You should be able to do this from the "Active Scan" tab at the bottom of ZAP, but there's a bug when the URLs are the same. After doing this, I received a number of alerts, ranging from high (cross-site scripting) to low (password autocomplete). The screenshot below shows the various issues.

ZAP Alerts

Now let's take a look at how to fix them.

Fix Vulnerabilities
One of the things not mentioned by the scan, but #1 in Seven Security (Mis)Configurations in Java web.xml Files, is Custom Error Pages Not Configured. Custom error pages are configured in this app, but error.jsp contains the following code:

<% if (exception != null) { %>
    <% exception.printStackTrace(new java.io.PrintWriter(out)); %>
<% } else { %>
    Please check your log files for further information.
<% } %>

Stack traces can be really useful to an attacker, so it's important to start by removing the above code from src/main/webapp/error.jsp.

The rest of the issues have to do with XSS, autocomplete, and cookies. Let's start with the easy ones. Fixing autocomplete is easy enough; simply changed the HTML in login.jsp and userform.jsp to have autocomplete="off" as part of the <form> tag.

Then modify web.xml so http-only and secure cookies are used. While you're at it, add session-timeout and tracking-mode as recommended by the aforementioned web.xml misconfigurations article.

<session-config>
    <session-timeout>15</session-timeout>
    <cookie-config>
        <http-only>true</http-only>
        <secure>true</secure>
    </cookie-config>
    <tracking-mode>COOKIE</tracking-mode>
</session-config>

Next, modify Spring Security's Remember Me configuration so it uses secure cookies. To do this, add use-secure-cookies="true" to the <remember-me> element in security.xml.

<remember-me user-service-ref="userService" key="e37f4b31-0c45-11dd-bd0b-0800200c9a66"
             use-secure-cookie="true"/>

Unfortunately, Spring Security doesn't support HttpOnly cookies, but will in a future release.

The next issue to solve is disabling directory browsing. You can do this by copying Jetty's webdefault.xml (from the org.eclipse.jetty:jetty-webapp JAR) into src/test/resources and changing its "dirAllowed" <init-param> to false:

<servlet>
  <servlet-name>default</servlet-name>
  <servlet-class>org.mortbay.jetty.servlet.DefaultServlet</servlet-class>
  <init-param>
    <param-name>acceptRanges</param-name>
    <param-value>true</param-value>
  </init-param>
  <init-param>
    <param-name>dirAllowed</param-name>
    <param-value>false</param-value>
  </init-param>
  <init-param>

You'll also need to modify the plugin's configuration to point to this file by adding it to the <webAppConfig> section in pom.xml.

<configuration>
    <webAppConfig>
        <contextPath>/</contextPath>
        <defaultsDescriptor>src/test/resources/webdefault.xml</defaultsDescriptor>
    </webAppConfig>

Of course, if you're running in production you'll want to configure this in your server's settings rather than in your pom.xml file.

Next, I set out to fix secure page browser cache issues. I had the following settings in my SiteMesh decorator:

<meta http-equiv="Cache-Control" content="no-store"/>
<meta http-equiv="Pragma" content="no-cache"/>

However, according to ZAP, the first meta tag should have "no-cache" instead of "no-store", so I changed it to "no-cache".

After making all these changes, I created a new ZAP session and ran an active scan on both sites again. Below are the results:

Active Scan after Fixes

I believe the first issue (parameter tampering) is because I show the error page when a duplicate user exists. To fix this, I changed UserFormController so it catches a UserExistsException and sends the user back to the form.

try {
    userManager.saveUser(user);
} catch (UserExistsException uex) {
    result.addError(new ObjectError("user", uex.getMessage()));
    return "userform";
}

However, this still doesn't seem to cause the alert to go away. This is likely because I'm not filtering/escaping HTML when it's first submitted. I believe the best solution for this would be to use something like OWASP's ESAPI to filter parameter values. However, I was unable to find integration with Spring MVC's data binding, so I decided not to try and fix this vulnerability.

Finally, I tried to disable jsessionid in URLs using suggestions from Stack Overflow. The previous setting in web.xml (<tracking-mode>COOKIE</tracking-mode>) should do this, but it doesn't seem to work with Jetty 8. The other issues (secure page browser cache, HttpOnly cookies and secure cookies), I was unable to solve. The last two are issues caused by Spring Security as far as I can tell.

Summary
In this article, I've shown you how to pentest a web application using Firefox and OWASP's Zed Attack Proxy (ZAP). I found ZAP to be a nice tool for figuring out vulnerabilities, but it'd be nice if it had a "retest" feature to see if you fixed an issue for a particular URL. It does have a "resend" feature, but running it didn't seem to clear alerts after I'd fixed them.

The issues I wasn't able to solve seemed to be mostly related to frameworks (e.g. Spring Security and HttpOnly cookies) or servers (Jetty not using cookies for tracking). My suspicion is the Jetty issues are because it doesn't support Servlet 3 as well as it advertises. I believe this is fair; I am using a milestone release after all. I tried scanning http://demo.raibledesigns.com/ajax-login (which runs on Tomcat 7 at Contegix) and confirmed that no jsessionid exists.

Hopefully this article has helped you understand how to figure out security vulnerabilities in your web applications. I believe ZAP will continue to get more popular as developers become aware of it. If you feel ambitious and want to try and solve all of the issues in my Ajax Login application, feel free to fork it on GitHub.

If you're interested in talking more about Webapp Security, please leave a comment, meet me at Jazoon later this week or let's talk in July at Über Conf.

Posted in Java at Jun 21 2011, 07:45:41 AM MDT 4 Comments

Java Web Application Security - Part III: Apache Shiro Login Demo

A couple weeks ago, I wrote a tutorial on how to implement security with Spring Security. The week prior, I wrote a similar tutorial for Java EE 6. This week, I'd like to show you how to implement the same features using Apache Shiro. As I mentioned in previous articles, I'm writing this because I told the audience at April's UJUG that I would publish screencasts of the demos.

Today, I've finished the third screencast showing how to implement security with Apache Shiro. Below is the presentation (with the screencast embedded on slide 22) as well as a step-by-step tutorial.


Apache Shiro Login Tutorial

Download and Run the Application
To begin, download the application you'll be implementing security in. This app is a stripped-down version of the Ajax Login application I wrote for my article on Implementing Ajax Authentication using jQuery, Spring Security and HTTPS. You'll need Java 6 and Maven installed to run the app. Run it using mvn jetty:run and open http://localhost:8080 in your browser. You'll see it's a simple CRUD application for users and there's no login required to add or delete users.

Implement Basic Authentication
The first step is to protect the list screen so people have to login to view users. To do this, you'll need to create a shiro.ini file Shiro's configuration. Create src/main/resources/shiro.ini and populate it with the contents below:

[main]

[users]
admin = admin, ROLE_ADMIN

[roles]
ROLE_ADMIN = *

[urls]
/app/users = authcBasic

You can see this file has four sections and is pretty simple to read and understand. For more information about what each section is for, check out Shiro's configuration documentation.

Next, open src/main/webapp/WEB-INF/web.xml and add Shiro's IniShiroFilter:

<filter>
    <filter-name>securityFilter</filter-name>
    <filter-class>org.apache.shiro.web.servlet.IniShiroFilter</filter-class>
    <!-- no init-param means load the INI config from classpath:shiro.ini -->
</filter>

And add its filter-mapping just after the rewriteFilter in the filter-mappings section (order is important!):

<filter-mapping>
    <filter-name>rewriteFilter</filter-name>
    <url-pattern>/*</url-pattern>
</filter-mapping>
<filter-mapping>
    <filter-name>securityFilter</filter-name>
    <url-pattern>/*</url-pattern>
    <dispatcher>REQUEST</dispatcher>
    <dispatcher>FORWARD</dispatcher>
    <dispatcher>INCLUDE</dispatcher>
</filter-mapping>

Then add Shiro's core and web dependencies to your pom.xml:

<dependency>
    <groupId>org.apache.shiro</groupId>
    <artifactId>shiro-core</artifactId>
    <version>1.1.0</version>
</dependency>
<dependency>
    <groupId>org.apache.shiro</groupId>
    <artifactId>shiro-web</artifactId>
    <version>1.1.0</version>
</dependency>

At this point, if you restart Jetty (Ctrl+C and jetty:run again), you should be prompted to login when you click on the "Users" tab. Enter admin/admin to login. Apache Shiro is easier to configure than Spring Security out-of-the-box, mostly because it doesn't require XML.

After logging in, you can try to logout by clicking the "Logout" link in the top-right corner. This calls a LogoutController with the following code that logs the user out.

public void logout(HttpServletResponse response) throws ServletException, IOException {
    request.getSession().invalidate();
    response.sendRedirect(request.getContextPath()); 
}

NOTE: Shiro doesn't currently have a way to logout with its API. However, it will be added in the 1.2 release.

You'll notice that clicking this link doesn't log you out, even though the session is invalidated. The only way to logout with basic authentication is to close the browser. In order to get the ability to logout, as well as to have more control over the look-and-feel of the login, you can implement form-based authentication. Before you implement form-based authentication, I'd like to show you how easy it is to force SSL with Apache Shiro.

Force SSL
Apache Shiro allows you to force SSL on a URL by simply adding "ssl[port]" to a URL in the [urls] section. If you don't specify the port, it will use the default port (443). I'm not sure if it allows you to switch back to http like Spring Security's requires-channel, but I don't think it does. Modify the URLs section of your shiro.ini to have the following:

[urls]
/app/users = ssl[8443],authc

In order for this to work, you have to configure Jetty to listen on an SSL port. Add the following just after the jetty-maven-plugin's </webAppConfig> element in your pom.xml:

<connectors>
    <connector implementation="org.eclipse.jetty.server.nio.SelectChannelConnector">
        <forwarded>true</forwarded>
        <port>8080</port>
    </connector>
    <connector implementation="org.eclipse.jetty.server.ssl.SslSelectChannelConnector">
        <forwarded>true</forwarded>
        <port>8443</port>
        <maxIdleTime>60000</maxIdleTime>
        <keystore>${project.build.directory}/ssl.keystore</keystore>
        <password>appfuse</password>
        <keyPassword>appfuse</keyPassword>
    </connector>
</connectors>

The keystore must be generated for Jetty to start successfully, so add the keytool-maven-plugin just above the jetty-maven-plugin in pom.xml.

<plugin>
    <groupId>org.codehaus.mojo</groupId>
    <artifactId>keytool-maven-plugin</artifactId>
    <version>1.0</version>
    <executions>
        <execution>
            <phase>generate-resources</phase>
            <id>clean</id>
            <goals>
                <goal>clean</goal>
            </goals>
        </execution>
        <execution>
            <phase>generate-resources</phase>
            <id>genkey</id>
            <goals>
                <goal>genkey</goal>
            </goals>
        </execution>
    </executions>
    <configuration>
        <keystore>${project.build.directory}/ssl.keystore</keystore>
        <dname>cn=localhost</dname>
        <keypass>appfuse</keypass>
        <storepass>appfuse</storepass>
        <alias>appfuse</alias>
        <keyalg>RSA</keyalg>
    </configuration>
</plugin>

Now if you restart Jetty, go to http://localhost:8080 and click on the "Users" tab, you'll be prompted to accept the Untrusted Certificate and then redirected to https://localhost:8443/users after logging in.

Now let's look at how to have more control over the look-and-feel of the login screen, as well as how to make logout work with form-based authentication.

Implement Form-based Authentication
To change from basic to form-based authentication, you simply have to add a few lines to shiro.ini. First of all, since I'd rather not change the name of the input elements in login.jsp, override the default names in the [main] section:

# name of request parameter with username; if not present filter assumes 'username'
authc.usernameParam = j_username
# name of request parameter with password; if not present filter assumes 'password'
authc.passwordParam = j_password
authc.failureKeyAttribute = shiroLoginFailure

Then change the [urls] section to filter on login.jsp and use "authc" instead of "authcBasic":

[urls]
# The /login.jsp is not restricted to authenticated users (otherwise no one could log in!), but
# the 'authc' filter must still be specified for it so it can process that url's
# login submissions. It is 'smart' enough to allow those requests through as specified by the
# shiro.loginUrl above.
/login.jsp = authc
/app/users = ssl[8443],authc

Then change login.jsp so the form's action is blank (causing it to submit to itself) instead of j_security_check:

<form action="" id="loginForm" method="post">

Now, restart Jetty and you should be prompted to login with this JSP instead of the basic authentication dialog.

Store Users in a Database
To store your users in a database instead of file, you'll need to add a few settings to shiro.ini to define your database and tables to use. Open src/main/resources/shiro.ini and add the following lines under the [main] section.

jdbcRealm=org.apache.shiro.realm.jdbc.JdbcRealm
#jdbcRealm.permissionsLookupEnabled=false
# If not filled, subclasses of JdbcRealm assume "select password from users where username = ?"
jdbcRealm.authenticationQuery = select user_pass from users where user_name = ?
# If not filled, subclasses of JdbcRealm assume "select role_name from user_roles where username = ?"
jdbcRealm.userRolesQuery = select role_name from users_roles where user_name = ?

ds = com.mysql.jdbc.jdbc2.optional.MysqlDataSource
ds.serverName = localhost
ds.user = root
ds.databaseName = appfuse
jdbcRealm.dataSource = $ds

This configuration is similar to what I did with the Java EE 6 tutorial where I'm pointing to a database other than the H2 instance that's used by the application. I believe Shiro can talk to a DAO like Spring Security, but I have yet to explore that option.

While you're at it, add the following lines to enable password encryption.

sha256Matcher = org.apache.shiro.authc.credential.Sha256CredentialsMatcher
jdbcRealm.credentialsMatcher = $sha256Matcher

You'll need to install MySQL for this to work. After installing it, you should be able to create an "appfuse" database using the following command:

mysql -u root -p -e 'create database appfuse'

Then create the tables necessary and populate it with an 'admin' user. Login using "mysql -u root -p appfuse" and execute the following SQL statements:

create table users (
  user_name         varchar(30) not null primary key,
  user_pass         varchar(100) not null
);

create table user_roles (
  user_name         varchar(30) not null,
  role_name         varchar(30) not null,
  primary key (user_name, role_name)
);

insert into users values ('admin', '22f256eca1f336a97eef2b260773cb0d81d900c208ff26e94410d292d605fed8');
insert into user_roles values ('admin', 'ROLE_ADMIN');

Now if you restart Jetty, you should be able to login with admin/adminjdbc and view the list of users.

Summary
In this tutorial, you learned how to implement authentication using Apache Shiro 1.1.0. I don't have a lot of experience with Apache Shiro, but I was able to get the basics working without too much effort. This tutorial doesn't show how to do Remember Me because I couldn't figure it out in 5 minutes, which means I have 5 more minutes before it fails the 10-minute test. ;)

Shiro was formerly named JSecurity and has been an Apache project for less than a year. It seems to be more targeted towards non-web use, so its certainly something to look at if you're more interested in cryptography or non-web apps. I think there's a good chance this project will continue to grow and be used more as more developers learn about it. The Apache brand certainly doesn't hurt.

I didn't include a slide about the limitations I found with Shiro, mostly because I haven't used it much. I've used Java EE and Spring Security for several years. The main limitation I found was the lack of documentation, but I've heard it's improving rapidly.

In the next couple weeks, I'll post a Part IV on implementing programmatic login using the APIs of Java EE 6, Spring Security and Apache Shiro. I'll be presenting this topic at Jazoon as well as the long-form version (with hacking) at ÜberConf. Hopefully I'll see you at one of those conferences.

Update: Thanks to help from Les Hazlewood, I've figured out how to implement Remember Me with Apache Shiro. In the [urls] section of shiro.ini, the second url (shown below) says to Shiro "In order to visit the /app/users URL, you must be connecting via SSL on port 8443 and you must also be authenticated."

/app/users = ssl[8443],authc

Remembered users are not authenticated because their identity hasn't been proven during the current session. What I want Shiro to say is "In order to visit the /app/users URL, you must be connecting via SSL on 8443 and you must also be a known user. If you're not, you should login first." Where a known user is someone who has a recognized identity and has either authenticated during the current session or is known via RememberMe from a previous session. The documentation gives a good example with Amazon.com for why Shiro makes this distinction. It allows more control (usually necessary), but you can relax the control as you see fit.

So, to relax my configuration a bit to match what I want (known users), I updated shiro.ini's [urls] section to be as follows:

/app/users = ssl[8443],user

The key is that the /app/users url is now protected with the more relaxed user filter instead of the authc filter. However, you would typically want an account profile page (or credit card information page, or similar) protected with the authc filter instead to guarantee proof of identity for those sensitive operations.

Posted in Java at May 26 2011, 04:43:22 PM MDT 10 Comments

AppFuse 2.1 Released!

The AppFuse Team is pleased to announce the release of AppFuse 2.1. This release includes upgrades to all dependencies to bring them up-to-date with their latest releases. Most notable are JPA 2, JSF 2, Tapestry 5 and Spring 3. In addition, we've migrated from XFire to CXF and enabled REST for web services. There's even a new appfuse-ws archetype that leverages Enunciate to generate web service endpoints, documentation and downloadable clients. This release fixes many issues with archetypes, improving startup time and allowing jetty:run to be used for quick turnaround while developing. For more details on specific changes see the release notes.

What is AppFuse?
AppFuse is an open source project and application that uses open source frameworks to help you develop Web applications with Java quickly and efficiently. It was originally developed to eliminate the ramp-up time when building new web applications. At its core, AppFuse is a project skeleton, similar to the one that's created by your IDE when you click through a wizard to create a new web project. If you use JRebel with IntelliJ, you can achieve zero-turnaround in your project and develop features without restarting the server.

Release Details
Archetypes now include all the source for the web modules so using jetty:run and your IDE will work much smoother now. The backend is still embedded in JARs, enabling you to choose with persistence framework (Hibernate, iBATIS or JPA) you'd like to use. If you want to modify the source for that, add the core classes to your project or run "appfuse:full-source".

AppFuse comes in a number of different flavors. It offers "light", "basic" and "modular" and archetypes. Light archetypes use an embedded H2 database and contain a simple CRUD example. Light archetypes allow code generation and full-source features, but do not currently support Stripes or Wicket. Basic archetypes have web services using CXF, authentication from Spring Security and features including signup, login, file upload and CSS theming. Modular archetypes are similar to basic archetypes, except they have multiple modules which allows you to separate your services from your web project.

AppFuse provides archetypes for JSF, Spring MVC, Struts 2 and Tapestry 5. The light archetypes are available for these frameworks, as well as for Spring MVC + FreeMarker, Stripes and Wicket. You can see demos of these archetypes at http://demo.appfuse.org.

For information on creating a new project, please see the QuickStart Guide.

If you have questions about AppFuse, please read the FAQ or join the user mailing list. If you find any issues, please report them on the mailing list or create an issue in JIRA.

Thanks to everyone for their help contributing patches, writing documentation and participating on the mailing lists.

We greatly appreciate the help from our sponsors, particularly Atlassian, Contegix and JetBrains. Atlassian and Contegix are especially awesome: Atlassian has donated licenses to all its products and Contegix has donated an entire server to the AppFuse project.

Posted in Java at Apr 04 2011, 09:38:05 AM MDT 5 Comments

Livin' it up in Vegas at TSSJS 2011

Last Wednesday, Trish and I traveled to Las Vegas for TheServerSide Java Symposium 2011 conference. We had a free room from TechTarget, but opted to upgrade to a suite with a view over the Bellagio Fountains. Trish won a trip to Vegas as a sales award earlier in the year and cleverly exchanged it for cash, so our upgrade was sort of free.

Caesars Pool The Bellagio Fountains

My first talk was on Online Video and my experience at Time Warner Cable. With my former team's iPad app releasing the day before, it was a fun session. The attendance was kind of sparse, but I had some good competition so wasn't surprised.

After I finished speaking, we headed to happy hour and met up with some friends that happened to be in town. We had dinner at the Todd English Pub and headed to the Penn & Teller show at the Rio. We closed the night after Trish had a 45-minute roll at the craps table at O'Sheas.

We slept in on Thursday and I gave my Comparing JVM Web Frameworks talk that afternoon. I made sure to mention some other methods to choosing web frameworks: doing performance comparisons like Peter Thomas has done or choosing Lift because one of its developers says it's the best. While Vaadin did sneak into the #5 spot, I made sure and mentioned that Wicket and Tapestry seem to belong there moreso (based on stats, mailing list traffic, etc.).

Trish took a bunch of pictures during my talk, which had a great turnout and lots of participation.

Getting Intro'd My Intro My Dream on Display

The Problem How do you choose? Choosing a Framework

That evening, we celebrated St. Patty's Day with some college buddies of mine, ate great sushi at Mizuya and experienced the joys of three card poker. Thanks to TechTarget for inviting me to TSSJS 2011; we had an awesome time. You can find all the pictures we took on Flickr.

P.S. If you can't see the presentations in this post (a.k.a. you don't have Flash), you can view them on on Slideshare or download the PDFs.

Posted in Java at Mar 22 2011, 09:04:17 AM MDT Add a Comment

Adding Search to AppFuse with Compass

Over 5 years ago, I recognized that AppFuse needed to have a search feature and entered an issue in JIRA. Almost 4 years later, a Compass Tutorial was created and shortly after Shay Banon (Compass Founder), sent in a patch. From the message he sent me:

A quick breakdown of enabling search:

  1. Added Searchable annotations to the User and Address.
  2. Defined Compass bean, automatically scanning the model package for mapped searchable classes. It also automatically integrates with Spring transaction manager, and stores the index on the file system ([work dir]/target/test-index).
  3. Defined CompassTemplate (similar in concept to HibernateTemplate).
  4. Defined CompassSearchHelper. Really helps to perform search since it does pagination and so on.
  5. Defined CompassGps, basically it allows for index operation allowing to completely reindex the data from the database. JPA and Hiberante also automatically mirror changes done through their API to the index. iBatis uses AOP.

Fast forward 2 years and I finally found the time/desire to put a UI on the backend Compass implementation that Shay provided. Yes, I realize that Compass is being replaced by ElasticSearch. I may change to use ElasticSearch in the future; now that the search feature exists, I hope to see it evolve and improve.

Since Shay's patch integrated the necessary Spring beans for indexing and searching, the only thing I had to do was to implement the UI. Rather than having an "all objects" results page, I elected to implement it so you could search on an entity's list screen. I started with Spring MVC and added a search() method to the UserController:

@RequestMapping(method = RequestMethod.GET)
public ModelAndView handleRequest(@RequestParam(required = false, value = "q") String query) throws Exception {
    if (query != null && !"".equals(query.trim())) {
        return new ModelAndView("admin/userList", Constants.USER_LIST, search(query));
    } else {
        return new ModelAndView("admin/userList", Constants.USER_LIST, mgr.getUsers());
    }
}

public List<User> search(String query) {
    List<User> results = new ArrayList<User>();
    CompassDetachedHits hits = compassTemplate.findWithDetach(query);
    log.debug("No. of results for '" + query + "': " + hits.length());
    for (int i = 0; i < hits.length(); i++) {
        results.add((User) hits.data(i));
    }
    return results;
}

At first, I used compassTemplate.find(), but got an error because I wasn't using an OpenSessionInViewFilter. I decided to go with findWithDetach() and added the following search form to the top of the userList.jsp page:

<div id="search">
<form method="get" action="${ctx}/admin/users" id="searchForm">
    <input type="text" size="20" name="q" id="query" value="${param.q}"
           placeholder="Enter search terms"/>
    <input type="submit" value="<fmt:message key="button.search"/>"/>
</form>
</div>

NOTE: I tried using HTML5's <input type="search">, but found Canoo WebTest doesn't support it.

Next, I wrote a unit test to verify everything worked as expected. I found I had to call compassGps.index() as part of my test to make sure my index was created and up-to-date.

public class UserControllerTest extends BaseControllerTestCase {
    @Autowired
    private CompassGps compassGps;
    @Autowired
    private UserController controller;

    public void testSearch() throws Exception {
        compassGps.index();
        ModelAndView mav = controller.handleRequest("admin");
        Map m = mav.getModel();
        List results = (List) m.get(Constants.USER_LIST);
        assertNotNull(results);
        assertTrue(results.size() >= 1);
        assertEquals("admin/userList", mav.getViewName());
    }
}

After getting this working, I started integrating similar code into AppFuse's other web framework modules (Struts, JSF and Tapestry). When I was finished, they all looked pretty similar from a UI perspective.

Struts:

<div id="search">
<form method="get" action="${ctx}/admin/users" id="searchForm">
    <input type="text" size="20" name="q" id="query" value="${param.q}"
           placeholder="Enter search terms..."/>
    <input type="submit" value="<fmt:message key="button.search"/>"/>
</form>
</div>

JSF:

<div id="search">
<h:form id="searchForm">
    <h:inputText id="q" name="q" size="20" value="#{userList.query}"/>
    <h:commandButton value="#{text['button.search']}" action="#{userList.search}"/>
</h:form>
</div>

Tapestry:

<div id="search">
<t:form method="get" t:id="searchForm">
    <t:textfield size="20" name="q" t:id="q"/>
    <input t:type="submit" value="${message:button.search}"/>
</t:form>
</div>

One frustrating thing I found was that Tapestry doesn't support method="get" and AFAICT, neither does JSF 2. With JSF, I had to make my UserList bean session-scoped or the query parameter would be null when it listed the results. Tapestry took me the longest to implement, mainly because I had issues figuring out how it's easy-to-understand-once-you-know onSubmit() handlers worked and I had the proper @Property and @Persist annotations on my "q" property. This tutorial was the greatest help for me. Of course, now that it's all finished, the code looks pretty intuitive.

Feeling proud of myself for getting this working, I started integrating this feature into AppFuse's code generation and found I had to add quite a bit of code to the generated list pages/controllers.

So I went on a bike ride...

While riding, I thought of a much better solution and added the following search method to AppFuse's GenericManagerImpl.java. In the code I added to pages/controllers previously, I'd already refactored to use CompassSearchHelper and I continued to do so in the service layer implementation.

@Autowired
private CompassSearchHelper compass;

public List<T> search(String q, Class clazz) {
    if (q == null || "".equals(q.trim())) {
        return getAll();
    }

    List<T> results = new ArrayList<T>();

    CompassSearchCommand command = new CompassSearchCommand(q);
    CompassSearchResults compassResults = compass.search(command);
    CompassHit[] hits = compassResults.getHits();

    if (log.isDebugEnabled() && clazz != null) {
        log.debug("Filtering by type: " + clazz.getName());
    }

    for (CompassHit hit : hits) {
        if (clazz != null) {
            if (hit.data().getClass().equals(clazz)) {
                results.add((T) hit.data());
            }
        } else {
            results.add((T) hit.data());
        }
    }

    if (log.isDebugEnabled()) {
        log.debug("Number of results for '" + q + "': " + results.size());
    }

    return results;
}

This greatly simplified my page/controller logic because now all I had to do was call manager.search(query, User.class) instead of doing the Compass login in the controller. Of course, it'd be great if I didn't have to pass in the Class to filter by object, but that's the nature of generics and type erasure.

Other things I learned along the way:

  • To index on startup, I added compassGps.index() to the StartupListener..
  • In unit tests that leveraged transactions around methods, I had to call compassGps.index() before any transactions started.
  • To scan multiple packages for searchable classes, I had to add a LocalCompassBeanPostProcessor.

But more than anything, I was reminded it always helps to take a bike ride when you don't like the design of your code. ;-)

This feature and many more will be in AppFuse 2.1, which I hope to finish by the end of the month. In the meantime, please feel free to try out the latest snapshot.

Posted in Java at Mar 15 2011, 05:11:12 PM MDT 1 Comment

JSR 303 and JVM Web Framework Support

Emmanuel Bernard recently sent an email to the JSR 303 Experts Group about the next revision of the Bean Validation JSR (303). Rather than sending the proposed changes privately, he blogged about them. I left a comment with what I'd like to see:

+1 for Client-side validation. I'd love to see an API that web frameworks can hook into to add "required" to their tags for HTML5. Or some service that can be registered so the client can make Ajax requests to an API to see if an object is valid.

Emmanuel replied that most of the necessary API already exists for this, but frameworks have been slow to adopt it.

Hi Matt,

The sad thing is that the API is present on the Bean Validation side but presentation frameworks are slow to adopt it and use it :(

RichFaces 4 now has support for it but I wished more presentation frameworks had worked on the integration. If you can convince a few people or have access to a few people, feel free to send them by me :)

The integration API is described here. Let me know if you think some parts are missing or should be improved. We should definitely do some more buzz around it.

In the interest of generating more buzz around it, I decided to do some research and see what JVM Frameworks support JSR 303. Here's what I've come up with so far (in no particular order):

Struts 2 has an open issue, but doesn't seem to support JSR 303. Since I did a quick-n-dirty google search for most of these, I'm not sure if they support client-side JavaScript or HTML5's required. If you know of other JVM-based web frameworks that support JSR 303, please let me know in the comments.

Posted in Java at Mar 08 2011, 11:33:24 AM MST 4 Comments