Matt RaibleMatt Raible is a writer with a passion for software. Connect with him on LinkedIn.

The Angular Mini-Book The Angular Mini-Book is a guide to getting started with Angular. You'll learn how to develop a bare-bones application, test it, and deploy it. Then you'll move on to adding Bootstrap, Angular Material, continuous integration, and authentication.

Spring Boot is a popular framework for building REST APIs. You'll learn how to integrate Angular with Spring Boot and use security best practices like HTTPS and a content security policy.

For book updates, follow @angular_book on Twitter.

The JHipster Mini-Book The JHipster Mini-Book is a guide to getting started with hip technologies today: Angular, Bootstrap, and Spring Boot. All of these frameworks are wrapped up in an easy-to-use project called JHipster.

This book shows you how to build an app with JHipster, and guides you through the plethora of tools, techniques and options you can use. Furthermore, it explains the UI and API building blocks so you understand the underpinnings of your great application.

For book updates, follow @jhipster-book on Twitter.

10+ YEARS


Over 10 years ago, I wrote my first blog post. Since then, I've authored books, had kids, traveled the world, found Trish and blogged about it all.
You searched this site for "young russian teenboy model pre teen". 788 entries found.

You can also try this same search on Google.

How to do cross-domain GWT RPC with a ProxyServlet

Last week, I started working on a new project using GWT. On my last project, we used GWT HTTP Calls and my new project is using RPC. We'll likely migrate to a JSON backend eventually, but in the meantime, I wanted to be able to develop in hosted mode (localhost:8888) and call services on another host (localhost:8080), where the services are running in a JSF/Spring webapp.

At first, I thought it'd be easy thanks to the handy-dandy ProxyServlet I mentioned in Implementing OAuth with GWT. However, when I tried to hook it in and use it, I saw the following error in my server-side logs.

java.lang.NullPointerException
        at javax.servlet.GenericServlet.getServletName(GenericServlet.java:322)
        at javax.servlet.GenericServlet.log(GenericServlet.java:277)
        at com.google.gwt.user.server.rpc.RemoteServiceServlet.doGetSerializationPolicy(RemoteServiceServlet.java:219)
        at com.google.gwt.user.server.rpc.RemoteServiceServlet.getSerializationPolicy(RemoteServiceServlet.java:117)
        at com.google.gwt.user.server.rpc.impl.ServerSerializationStreamReader.prepareToRead(ServerSerializationStreamReader.java:429)
        at com.google.gwt.user.server.rpc.RPC.decodeRequest(RPC.java:234)

Looking at RemoteServiceServlet.java:219, there's a logging call that fails for some reason (at least in my application).

/*
 * Check that the module path must be in the same web app as the servlet
 * itself. If you need to implement a scheme different than this, override
 * this method.
 */
if (modulePath == null || !modulePath.startsWith(contextPath)) {
  String message = "ERROR: The module path requested, "
      + modulePath
      + ", is not in the same web application as this servlet, "
      + contextPath
      + ".  Your module may not be properly configured or your client and server code maybe out of date.";
  log(message, null);
}

In the above code, you might notice that GWT is checking to make sure the client is hosted in the same application as the server. After I figured this out, it was pretty easy to modify my ProxyServlet to trick GWT RPC into thinking the client was in the same web application. In the ProxyServlet's handleContentPost method, I added the following code to replace "localhost:8888/" with "localhost:8080/services/" (in the content of the post to the server).

if (contentType.startsWith("text/x-gwt-rpc")) {
    String clientHost = httpServletRequest.getLocalName();
    if (clientHost.equals("127.0.0.1")) {
        clientHost = "localhost";
    }

    int clientPort = httpServletRequest.getLocalPort();
    String clientUrl = clientHost + ((clientPort != 80) ? ":" + 
                       clientPort : "");
    String serverUrl = stringProxyHost + ((intProxyPort != 80) ? ":" + 
                       intProxyPort : "") + httpServletRequest.getServletPath();
    postContent = postContent.replace(clientUrl , serverUrl);
}

After manipulating the posted content, I was successfully able to use GWT RPC cross-domain.

Woo hoo!

For your convenience, the full handleContentPost() method is listed below.

private void handleContentPost(PostMethod postMethodProxyRequest, 
                               HttpServletRequest httpServletRequest) 
            throws IOException, ServletException {
    StringBuilder content = new StringBuilder();
    BufferedReader reader = httpServletRequest.getReader();
    for (;;) {
        String line = reader.readLine();
        if (line == null) break;
        content.append(line);
    }

    String contentType = httpServletRequest.getContentType();
    String postContent = content.toString();

    if (contentType.startsWith("text/x-gwt-rpc")) {
        String clientHost = httpServletRequest.getLocalName();
        if (clientHost.equals("127.0.0.1")) {
            clientHost = "localhost";
        }

        int clientPort = httpServletRequest.getLocalPort();
        String clientUrl = clientHost + ((clientPort != 80) ? ":" + 
                           clientPort : "");
        String serverUrl = stringProxyHost + ((intProxyPort != 80) ? ":" + 
                           intProxyPort : "") + httpServletRequest.getServletPath();
        postContent = postContent.replace(clientUrl , serverUrl);
    }

    String encoding = httpServletRequest.getCharacterEncoding();
    debug("POST Content Type: " + contentType + " Encoding: " + encoding,
          "Content: " + postContent);
    StringRequestEntity entity;
    try {
        entity = new StringRequestEntity(postContent, contentType, encoding);
    } catch (UnsupportedEncodingException e) {
        throw new ServletException(e);
    }
    // Set the proxy request POST data
    postMethodProxyRequest.setRequestEntity(entity);
}

Update: In the comments, Ganesh asked for more details, so I figured it'd be a good idea to post the full source code. First of all, click here to see the code for the ProxyServlet:

I generally subclass ProxyServlet to provide my own configuration:

public class MyProxyServlet extends ProxyServlet {

    @Override
    public void init(ServletConfig servletConfig) {
        setFollowRedirects(true);
        setRemovePrefix(false);
        setProxyPort(8080);
    }
}

Here's another example that reads configuration settings from web.xml and proxies to a different domain name:

public class AlternateHostProxyServlet extends ProxyServlet {

    @Override
    public void init(ServletConfig servletConfig) {

        setProxyHost(servletConfig.getInitParameter("proxyHost"));

        String secure = servletConfig.getInitParameter("secure");
        if (secure != null) {
            setSecure(Boolean.valueOf(secure));
        }

        setFollowRedirects(false);
        setRemovePrefix(true);
        setProxyPort(80);
    }
}

After you've added these to your project, simply map the servlet (and its path) in your *.gwt.xml file (if you're using GWT) and your web.xml.
Posted in Java at Aug 05 2009, 04:06:12 PM MDT 17 Comments

How to use GWT 2.0 with Maven and Generate SOYC Reports

One of the most interesting features coming in GWT 2.0 is code splitting and the ability to use GWT.runAsync() to reduce the size of your application's initial download. This week, I learned how to use GWT 2.0 with my GWT 1.6/Maven project. Below are instructions on how to build and use the latest GWT with Maven.

  • Checkout GWT and setup GWT_TOOLS.
  • Set a GWT_VERSION environment variable to 2.0.0-SNAPSHOT (export GWT_VERSION=2.0.0-SNAPSHOT).
  • Build GWT with the ant command.
  • After building completes, install the GWT artifacts into your local Maven repository using the following commands:
    mvn install:install-file -DgroupId=com.google.gwt \
    -DartifactId=gwt-user -Dversion=2.0.0-SNAPSHOT \
    -Dpackaging=jar -Dfile=build/lib/gwt-user.jar
    
    mvn install:install-file -DgroupId=com.google.gwt \
    -DartifactId=gwt-servlet -Dversion=2.0.0-SNAPSHOT \
    -Dpackaging=jar -Dfile=build/lib/gwt-servlet.jar
    
    mvn install:install-file -DgroupId=com.google.gwt \
    -DartifactId=gwt-dev -Dversion=2.0.0-SNAPSHOT \
    -Dclassifier=mac -Dpackaging=jar -Dfile=build/lib/gwt-dev-mac.jar
    
    mkdir temp
    tar -zxf build/dist/gwt-mac-2.0.0-SNAPSHOT.tar.gz -C temp
    cd temp/gwt-mac-2.0.0-SNAPSHOT
    zip -0 gwt-mac-2.0.0-SNAPSHOT.zip lib*.jnilib
    cd ../..
    
    mvn install:install-file -DgroupId=com.google.gwt \
    -DartifactId=gwt-dev -Dversion=2.0.0-SNAPSHOT \
    -Dclassifier=mac-libs -Dpackaging=zip \
    -Dfile=temp/gwt-mac-2.0.0-SNAPSHOT/gwt-mac-2.0.0-SNAPSHOT.zip
    
    Thanks to Jason for his help with this script.
  • Modify the pom.xml of your GWT project to use the the gwt-maven-plugin from Codehaus. Of course, you'll need to modify the <runTarget> to fit your project.
    <plugin>
        <groupId>org.codehaus.mojo</groupId>
        <artifactId>gwt-maven-plugin</artifactId>
        <version>1.1</version>
        <configuration>
            <runTarget>org.appfuse.gwt.mvc.${entry.point}/${entry.point}.html</runTarget>
        </configuration>
        <executions>
            <execution>
                <goals>
                    <goal>compile</goal>
                    <goal>test</goal>
                </goals>
            </execution>
        </executions>
    </plugin>
    
  • Modify your dependencies to match the ones below. With the Codehaus plugin, dependencies are much more concise.
    <dependency>
        <groupId>com.google.gwt</groupId>
        <artifactId>gwt-servlet</artifactId>
        <version>${gwt.version}</version>
        <scope>compile</scope>
    </dependency>
    <dependency>
        <groupId>com.google.gwt</groupId>
        <artifactId>gwt-user</artifactId>
        <version>${gwt.version}</version>
        <scope>provided</scope>
    </dependency>
    
  • Add <gwt.version>2.0.0-SNAPSHOT</gwt.version> to the properties section of your pom.xml.
  • At this point, you should be able to compile your project with mvn gwt:compile and run it in hosted mode using mvn gwt:run.

Generate SOYC Reports
In Google's code splitting documentation, it mentions The Story of Your Compile (SOYC). From the documentation:

To obtain a SOYC report for your application, there are two steps necessary. First, add -soyc to the compilation options that are passed to the GWT compiler. This will cause the compiler to emit raw information about the compile to XML files in an -aux directory beside the rest of the compiled output. In that directory, you will see an XML file for each permutation and a manifest.xml file that describes the contents of all the others.

The second step is to convert that raw information into viewable HTML. This is done with the SoycDashboard tool.

The first step is not currently possible with the gwt-maven-plugin, so I created a patch for it.

If you patch the gwt-maven-plugin and install it locally, make sure and change the version in your pom.xml to 1.2-SNAPSHOT.

To use the SoycDashboard tool, you'll need to install the gwt-soyc-vis.jar.

mvn install:install-file -DgroupId=com.google.gwt \
-DartifactId=gwt-soyc-vis -Dversion=2.0.0-SNAPSHOT \
-Dpackaging=jar -Dfile=build/lib/gwt-soyc-vis.jar

Now you can generate SOYC reports with mvn gwt:compile -Dgwt.compiler.soyc=true. You can also add <soyc>true</soyc> to the <configuration> section of the gwt-maven-plugin.

The second step (converting the raw information into viewable HTML) is possible using java from the command-line, or by using the exec-maven-plugin. Here's the (lengthy) command-line version:

java -Xmx1024m -cp /Users/mraible/.m2/repository/com/google/gwt/gwt-soyc/2.0.0-SNAPSHOT/gwt-soyc-2.0.0-SNAPSHOT.jar:/Users/mraible/.m2/repository/com/google/gwt/gwt-dev/2.0.0-SNAPSHOT/gwt-dev-2.0.0-SNAPSHOT-mac.jar com.google.gwt.soyc.SoycDashboard -resources ~/.m2/repository/com/google/gwt/gwt-soyc/2.0.0-SNAPSHOT/gwt-soyc-2.0.0-SNAPSHOT.jar -out target/soyc-report target/extra/org.appfuse.gwt.mvc.MVC/soycReport/stories0.xml.gz target/extra/org.appfuse.gwt.mvc.MVC/soycReport/dependencies0.xml.gz target/extra/org.appfuse.gwt.mvc.MVC/soycReport/splitPoints0.xml.gz

In this example, I'm using the files from stories0.xml.gz, dependencies0.xml.gz, splitPoints0.xml.gz. In the soycReport output directory, there's 5 of each these files and I'm not sure what the difference between reports is. Hopefully someone on the GWT team can elaborate. The exec-maven-plugin version is as follows:

<plugin>
    <groupId>org.codehaus.mojo</groupId>
    <artifactId>exec-maven-plugin</artifactId>
    <version>1.1</version>
    <configuration>
        <executable>java</executable>
        <arguments>
            <argument>-cp</argument>
            <argument>
                ${settings.localRepository}/com/google/gwt/gwt-soyc/2.0.0-SNAPSHOT/gwt-soyc-2.0.0-SNAPSHOT.jar:${settings.localRepository}/com/google/gwt/gwt-dev/2.0.0-SNAPSHOT/gwt-dev-2.0.0-SNAPSHOT-${platform}.jar
            </argument>
            <argument>com.google.gwt.soyc.SoycDashboard</argument>
            <argument>-out</argument>
            <argument>target/soyc-report</argument>
            <argument>-resources</argument>
            <argument>
                ${settings.localRepository}/com/google/gwt/gwt-soyc/2.0.0-SNAPSHOT/gwt-soyc-2.0.0-SNAPSHOT.jar
            </argument>
            <argument>${project.build.directory}/extra/org.appfuse.gwt.mvc.MVC/soycReport/stories0.xml.gz</argument>
            <argument>${project.build.directory}/extra/org.appfuse.gwt.mvc.MVC/soycReport/dependencies0.xml.gz</argument>
            <argument>${project.build.directory}/extra/org.appfuse.gwt.mvc.MVC/soycReport/splitPoints0.xml.gz</argument>
        </arguments>
    </configuration>
</plugin>

After configuring this plugin in your project, you should be able to run mvn gwt:compile exec:exec and open the generated report (at target/soyc-report/SoycDashboard-index.html). Currently, there doesn't seem to be much documentation on SOYC. Fred Sauer's recent presentation talks a bit about SOYC and GWT.runAsync(), but that's about it.

To figure out how to use GWT 2.0 with Maven, I used my GWT MVC Example project. The first SOYC report I generated said the initial download was 108,967 KB. To integrate GWT.runAsync(), I modified all the project's controllers so their handleEvent() methods changed from this:

public void handleEvent(AppEvent event) {
    onViewHome(event);
}

To this:

public void handleEvent(final AppEvent event) {
    GWT.runAsync(new RunAsyncCallback() {
        public void onFailure(Throwable throwable) {
            Window.alert(throwable.getMessage());
        }

        public void onSuccess() {
            onViewHome(event);
        }
    });
}

When I generated a new SOYC report, the initial download size was reduced to 56,718 KB. Furthermore, I was able to see that my "Leftovers code" consisted of 63,175 KB. I'm sure there's better ways to split my project using GWT.runAsync(), but I'm happy to see I was able to reduce the initial download by 50%.

If you'd like to try GWT 2.0, you can can download my gwt-mvc example project. To build/run this project, you'll need to 1) build and install GWT, 2) patch gwt-maven-plugin and 3) run mvn gwt:compile exec:exec to generate the SOYC report. In an ideal world, the gwt-maven-plugin can be enhanced to generate the SOYC report (rather than using the exec-maven-plugin). In the meantime, I think it's pretty cool that you can try out GWT 2.0 features while they're still being developed.

Posted in Java at Jun 25 2009, 11:45:04 PM MDT 11 Comments

JSON Parsing with JavaScript Overlay Types in GWT

A reader recently asked:

I would love to see a snippet of how to eval the JSON coming from RequestBuilder into the OverlayTypes. What is the mapping like? I used OverlayTypes to read in static data that I render into the head section of the hosted page, which is pretty easy and fast, but I don't know how to do this "reading" dynamically at runtime.

If you're not familiar with GWT's Overlay Types (added in 1.5), see Getting to really know GWT, Part 2: JavaScript Overlay Types. In our project, we're using Overlay Types to simplify JSON parsing and make our application lean-and-mean as possible.

First of all, we have a JSOModel class that acts as our overlay type:

import java.util.HashSet;
import java.util.Set;

import com.google.gwt.core.client.JavaScriptObject;
import com.google.gwt.core.client.JsArray;
import com.google.gwt.core.client.JsArrayString;

/**
 * Java overlay of a JavaScriptObject.
 */
public abstract class JSOModel extends JavaScriptObject {

    // Overlay types always have protected, zero-arg constructors
    protected JSOModel() {
    }

    /**
     * Create an empty instance.
     * 
     * @return new Object
     */
    public static native JSOModel create() /*-{
        return new Object();
    }-*/;

    /**
     * Convert a JSON encoded string into a JSOModel instance.
     * <p/>
     * Expects a JSON string structured like '{"foo":"bar","number":123}'
     *
     * @return a populated JSOModel object
     */
    public static native JSOModel fromJson(String jsonString) /*-{
        return eval('(' + jsonString + ')');
    }-*/;

    /**
     * Convert a JSON encoded string into an array of JSOModel instance.
     * <p/>
     * Expects a JSON string structured like '[{"foo":"bar","number":123}, {...}]'
     *
     * @return a populated JsArray
     */
    public static native JsArray<JSOModel> arrayFromJson(String jsonString) /*-{
        return eval('(' + jsonString + ')');
    }-*/;

    public final native boolean hasKey(String key) /*-{
        return this[key] != undefined;
    }-*/;

    public final native JsArrayString keys() /*-{
        var a = new Array();
        for (var p in this) { a.push(p); }
        return a;
    }-*/;

    @Deprecated
    public final Set<String> keySet() {
        JsArrayString array = keys();
        Set<String> set = new HashSet<String>();
        for (int i = 0; i < array.length(); i++) {
            set.add(array.get(i));
        }
        return set;
    }

    public final native String get(String key) /*-{
        return "" + this[key];
    }-*/;

    public final native String get(String key, String defaultValue) /*-{
        return this[key] ? ("" + this[key]) : defaultValue;
    }-*/;

    public final native void set(String key, String value) /*-{
        this[key] = value;
    }-*/;

    public final int getInt(String key) {
        return Integer.parseInt(get(key));
    }

    public final boolean getBoolean(String key) {
        return Boolean.parseBoolean(get(key));
    }

    public final native JSOModel getObject(String key) /*-{
        return this[key];
    }-*/;

    public final native JsArray<JSOModel> getArray(String key) /*-{
        return this[key] ? this[key] : new Array();
    }-*/;
}

This class alone allows you to easily parse JSON returned in a callback. For example, here's an example of parsing Twitter's User Timeline in my OAuth with GWT application.

private class TwitterApiCallback implements RequestCallback {
    public void onResponseReceived(Request request, Response response) {
        if (response.getStatusCode() == 200) {
            JsArray<JSOModel> data = JSOModel.arrayFromJson(response.getText());
            List<JSOModel> statuses = new ArrayList<JSOModel>();
            for (int i = 0; i < data.length(); i++) {
                statuses.add(data.get(i));
            }

            // populate textarea with returned statuses
            for (JSOModel status : statuses) {
                payload.setValue(payload.getValue() + status.get("text") + "\n\n");
            }
            
            Label success = new Label("API call successful!");
            success.setStyleName("success");
            form.add(success);
        } else {
            onError(request, new RequestException(response.getText()));
        }
    }

    public void onError(Request request, Throwable throwable) {
        Window.alert("Calling API failed. " + OAuthPage.STANDARD_ERROR + "\n\n" + throwable.getMessage());
    }
}

To simply things even more, we created a BaseModel class that can be extended.

import java.util.Map;
import java.util.HashMap;

import com.google.gwt.core.client.JsArrayString;
import com.google.gwt.user.client.Element;
import com.google.gwt.user.client.DOM;

public abstract class BaseModel {

    protected JSOModel data;

    public BaseModel(JSOModel data) {
        this.data = data;
    }

    public String get(String field) {
        String val = this.data.get(field);
        if (val != null && "null".equals(val) || "undefined".equals(val)) {
            return null;
        } else {
            return escapeHtml(val);
        }
    }

    public Map<String, String> getFields() {
        Map<String, String> fieldMap = new HashMap<String, String>();

        if (data != null) {
            JsArrayString array = data.keys();

            for (int i = 0; i < array.length(); i++) {
                fieldMap.put(array.get(i), data.get(array.get(i)));
            }
        }
        return fieldMap;
    }

    private static String escapeHtml(String maybeHtml) {
        final Element div = DOM.createDiv();
        DOM.setInnerText(div, maybeHtml);
        return DOM.getInnerHTML(div);
    }
}

You can extend this class and create model objects that represent a more Java-like view of your data. For example, I could create a Status class with the following code:

public class Status extends BaseModel {
    
    public Status(JSOModel data) {
        super(data);
    }

    public String getText() {
        return get("text");
    }
}

Then I could change my JSON parsing in TwitterApiCallback to be:

    private class TwitterApiCallback implements RequestCallback {
    public void onResponseReceived(Request request, Response response) {
        if (response.getStatusCode() == 200) {
            JsArray<JSOModel> data = JSOModel.arrayFromJson(response.getText());
            List<Status> statuses = new ArrayList<Status>();
            for (int i = 0; i < data.length(); i++) {
                Status s = new Status(data.get(i));
                statuses.add(s);
            }

            // populate textarea with returned statuses
            for (Status status : statuses) {
                payload.setValue(payload.getValue() + status.getText() + "\n\n");
            }

            Label success = new Label("API call successful!");
            success.setStyleName("success");
            form.add(success);
        } else {
            onError(request, new RequestException(response.getText()));
        }
    }

    public void onError(Request request, Throwable throwable) {
        Window.alert("Calling API failed. " + OAuthPage.STANDARD_ERROR + "\n\n" + throwable.getMessage());
    }
}

That's how we're doing lightweight JSON parsing with GWT. I've updated my GWT with OAuth demo with this code. You can also download the source. Please let me know if you have any questions.

Update October 20, 2009: I recently had to enhance the JSOModel and BaseModel classes in my project to handle nested objects and arrays. In my project, I have a Conversation object that has a Channel and a List of Task objects. These objects are available in the JSOModel of my BaseModel, I just needed to grab them a bit differently.

public Channel getChannel() {
    return new Channel(data.getObject("channel"));
}

public List<Task> getTasks() {
    JsArray<JSOModel> array = data.getArray("tasks");
    List<Task> tasks = new ArrayList<Task>(array.length());

    for (int i = 0; i < array.length(); i++) {
        Task task = new Task(array.get(i));
        tasks.add(task);
    }
    
    return tasks;
}

To set a Channel, it's as simple as:

data.set("channel", channel.toJson().toString());

To allow setting Lists, I had to enhance JSOModel by adding the following two methods:

public final void set(String key, List<JSOModel> values) {
    JsArray<JSOModel> array = JavaScriptObject.createArray().cast();
    for (int i=0; i < values.size(); i++) {
        array.set(i, values.get(i));
    }
    setArray(key, array);
}

protected final native void setArray(String key, JsArray<JSOModel> values) /*-{
    this[key] = values;
}-*/;

After making this change, I was able to convert my List to List and set it on the underlying JSOModel.

public void setTasks(List<Task> tasks) {
    List<JSOModel> values = new ArrayList<JSOModel>();
    for (Task task : tasks) {
        values.add(task.getModel());
    }

    data.set("tasks", values);
}

To allow the task.getModel() method to work, I added a getter to BaseModel to allow retrieving the underlying JSOModel. Currently, I'm using a homegrown JSON.java class to produce JSON from my BaseModel objects. It all seems to work great and I'm pumped I can receive and send all my JSON using overlay types.

Posted in Java at Jun 24 2009, 09:52:49 AM MDT 10 Comments

Implementing OAuth with GWT

I've heard about OAuth for quite some time, but never had an opportunity to implement it on a project. For a good explanation of what OAuth is, see its Introduction. Here's an excerpt:

...it allows you the User to grant access to your private resources on one site (which is called the Service Provider), to another site (called Consumer, not to be confused with you, the User). While OpenID is all about using a single identity to sign into many sites, OAuth is about giving access to your stuff without sharing your identity at all (or its secret parts).

The reason I needed OAuth was to interact with the Google Contacts API. I've always hated how sites make you import all your contacts from Gmail. I wanted to develop a system that'd let you simply read your contacts from Google in real-time.

Since the application I'm working on uses GWT, I chose to implement an OAuth client in GWT. After googling for "gwt oauth", I found two examples. Unfortunately, neither worked out-of-the-box.

The good news is I did manage to create a working solution. The bad news is it only seems to work at random. That's right folks, I created a solution that only works 50% of the time. I'm somewhat embarrassed to post it here, but I also realize the power of open source and community. By sharing, I hope we can find the flaws in my logic and come up with a solution for all GWT applications.

The best project for OAuth libraries seems to be oauth on Google Code. However, you'll notice that there is no JavaScript implementation listed on the homepage. I did look at the Java implementation, but quickly realized it wouldn't be usable in GWT. Therefore, I opted for the JavaScript implementation.

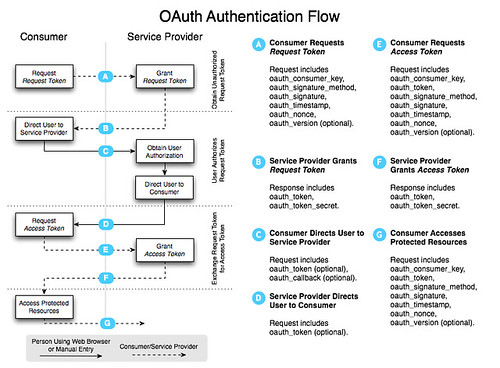
OAuth consists of several steps. The following diagram explains the authentication flow nicely.

OAuth Authentication Flow

In a nutshell, you have to complete the following steps:

  1. Get a token from the service provider.
  2. Redirect user to service provider to grant access and redirect back to application.
  3. Request access token to access protected resources.
  4. Access protected resources and pull/push data.

To access a service provider's OAuth service, you'll likely need to start by registering your application. For Google, OAuth Authentication for Web Applications is an excellent resource. Google's OAuth Playground is a great way to with the Google Data APIs after you've registered.

Now that you know how OAuth works, let's look at how I implemented it with GWT. I started by adding the necessary JavaScript references to my *.gwt.xml file.

<script src="//oauth.googlecode.com/svn/code/javascript/oauth.js"/>
<script src="//oauth.googlecode.com/svn/code/javascript/sha1.js"/>

Next, I needed a way to sign the request. I tried to use Sergi Mansilla's OAuth.java for this, but discovered issues with how the parameters were being written with GWT 1.6. I opted for Paul Donnelly's makeSignedRequest function instead. By adding this to my application's HTML page, I'm able to call it using the following JSNI method:

public native static String signRequest(String key, String secret, String tokenSecret, String url) /*-{
    return $wnd.makeSignedRequest(key, secret, tokenSecret, url);
}-*/;

After the URL is signed, it needs to be sent to the provider to get a request token. To do this, I used GWT's RequestBuilder and created a send() method:

protected void send(RequestCallback cb, String URL) {
    RequestBuilder builder = new RequestBuilder(RequestBuilder.GET, URL);
    builder.setTimeoutMillis(10000);
    builder.setCallback(cb);
    
    Request req = null;
    try {
        req = builder.send();
    } catch (RequestException e) {
        cb.onError(req, e);
    }
}

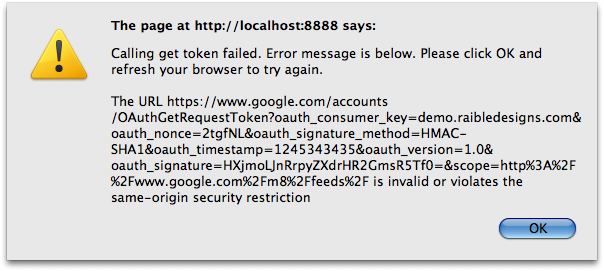
If you try this with Google's Request Token URL in GWT's hosted mode, nothing will happen. Compile/browse to Safari and you'll still see nothing. Try it in Firefox and you'll see the following.

SOP Error

To workaround browsers' Same Origin Policy, I added a proxy servlet to send the requests. I started with Jason Edwards's ProxyServlet and modified it to fit my needs. I then registered it in both *.gwt.xml and web.xml.

<servlet path="/google/" class="org.appfuse.gwt.servlet.AlternateHostProxyServlet"/>

Now, before calling the send() method, I replace the start of the URL so the request would be routed through the servlet.

public void getToken(RequestCallback cb) {
    String url = signRequest(provider.getConsumerKey(), 
                             provider.getConsumerSecret(), 
                             "", provider.getRequestTokenURL());
    url = url.replace("https://www.google.com/", "/google/");
    send(cb, url);
}

When the request returns, I create two cookies by calling a createOAuthCookies() method with the payload returned:

public static String[] createOAuthCookies(String data) {
    String oauth_token = data.substring(data.indexOf("oauth_token=") + 12);
    oauth_token = oauth_token.substring(0, oauth_token.indexOf("&"));

    String oauth_token_secret = data.substring(data.indexOf("oauth_token_secret=") + 19);

    Cookies.setCookie("oauth_token", URL.decode(oauth_token));
    Cookies.setCookie("oauth_token_secret", URL.decode(oauth_token_secret));
    return new String[]{oauth_token, oauth_token_secret};
}

The next step is to authorize the token. This is where things got tricky with my proxy servlet and I had to add some special logic for GWT. Google was sending back a 302 with a Location header, but it wasn't hitting the onResponseReceived() method in my callback. For this reason, I had to change it to a 200 status code and add the redirect location to the body. I also discovered that sometimes they'd return an HTML page with a <meta http-equiv="refresh" ...> tag. When using Twitter, I discovered the full HTML for the allow/deny page was returned. Below is the callback I'm using. WindowUtils is a class I got from Robert Hanson and the gwt-widget project.

public void onResponseReceived(Request request, Response response) {
    String text = response.getText();
    if (response.getStatusCode() == 200 && response.getText().startsWith("http")) {
        WindowUtils.changeLocation(response.getText());
    } else {
        // look for meta-tag that refreshes and grab its URL
        if (text.contains("";
            String url = text.substring(text.indexOf(tokenToStartWith) + tokenToStartWith.length());
            url = url.substring(0, url.indexOf(tokenToEndWith) + tokenToEndWith.length());
            WindowUtils.changeLocation(url);
        } else {
            // Twitter returns a full HTML page, so redirect to the authorize URL manually
            if (provider instanceof Twitter) {
                String url = provider.getAuthorizeTokenURL();
                url = url.replace("$1", OAuthRequest.getAuthToken());
                url = url.replace("$2", DefaultRequest.getCurrentLocation());
                WindowUtils.changeLocation(url);
            } else {
                onError(request, new RequestException(text));
            }
        }
    }
}

public void onError(Request request, Throwable caught) {
    Window.alert("Calling authorize token failed. " + OAuthPage.STANDARD_ERROR + "\n\n" + caught.getMessage());
}

The 3rd step is to get an access token. The most important thing to remember when you do this is to include the "oauth_token_secret" value when signing the request.

signRequest(provider.getConsumerKey(), provider.getConsumerSecret(), 
            getAuthTokenSecret(), url);

After this completes with a 200, I create the cookies again (since oauth_token and oauth_token_secret are returned in the body), then call the API to get a list of contacts. The ContactsRequests class is responsible for making the call. The DefaultRequest class contains the send() method as well as utility methods to get the cookie values of the oauth tokens.

public class ContactsRequest extends DefaultRequest {
    private static final String GOOGLE_CONTACTS_URL = 
        "http://www.google.com/m8/feeds/contacts/default/thin?oauth_token=$1";
    private OAuthProvider provider;

    public ContactsRequest(OAuthProvider provider) {
        this.provider = provider;
    }

    public void getContacts(RequestCallback cb) {
        String url = GOOGLE_CONTACTS_URL.replace("$1", getAuthToken());
        url = signRequest(provider.getConsumerKey(), provider.getConsumerSecret(), 
                          getAuthTokenSecret(), url);

        String proxiedURLPrefix = "/contacts/";
        // allow for deploying at /gwt-oauth context
        if (WindowUtils.getLocation().getPath().contains("gwt-oauth")) {
            proxiedURLPrefix = "/gwt-oauth" + proxiedURLPrefix;
        }

        url = url.replace("http://www.google.com/", proxiedURLPrefix);

        send(cb, url);
    }
}

If all goes well, the response contains the data you requested and it's used to populate a textarea (at least in this demo application). Of course, additional processing needs to occur to parse/format this data into something useful.

This all sounds pretty useful for GWT applications, right? I believe it does - but only if it works consistently. I sent a message to the OAuth Google Group explaining the issues I've had.

I'm trying to use the JavaScript API to authenticate with OAuth from a GWT application. I've got it working with both Google and Twitter's OAuth implementations. However, it seems to fail to sign the URL at random. In other words, it works 1 out of 3 times. ... Any idea why this could be happening?

I received a response with a cleaner makeSignedRequest() function. I tried it and, unfortunately, it seems to be equally unreliable. I suspect the problem is with the OAuth JavaScript implementation, GWT's interpretation of it, or that OAuth isn't as mature as it appears to be. I'd like to think one of the first two causes the problem.

To make it easier to create a robust example of GWT and OAuth, I created a gwt-oauth project you can download or view online. Please keep in mind the demo is likely to be flakey. If you're persistent and try enough times, it's likely to work. Firefox seems to succeed moreso than Safari or Chrome. If you have any suggestions for improving this example, please let me know.

Posted in Java at Jun 18 2009, 01:59:13 PM MDT 13 Comments

Creating a Facebook-style Autocomplete with GWT

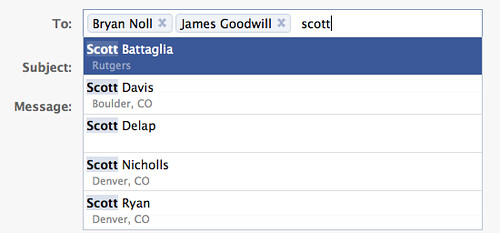
Have you used the "To:" widget on on Facebook or LinkedIn when composing a message? It's an autocompleter that looks up contact names and displays them as you type. It looks like a normal textbox (a.k.a. <input type="text">), but wraps the contact name to allow you to easily delete it. Here's a screenshot of what Facebook's widget looks like.

Facebook Autocomplete

Last week, I was asked to create a similar widget with GWT. After searching the web and not finding much, I decided to try writing my own. The best example I found on how to create this widget was from James Smith's Tokenizing Autocomplete jQuery Plugin. I used its demo to help me learn how the DOM changed after you selected a contact.

GWT's SelectBox allows you to easily create an autocompleter. However, it doesn't have support for multiple values (for example, a comma-delimited list). The good news is it's not difficult to add this functionality using Viktor Zaprudnev's HowTo. Another feature you might want in a SelectBox is to populate it with POJOs. GWT SuggestBox backed by DTO Model is a good blog post that shows how to do this.

Back to the Facebook Autocompleter. To demonstrate how to create this widget in GWT, I put together a simple application. You can view the demo or download it. The meat of this example is in an InputListWidget. After looking at the jQuery example, I learned the widget was a <div> with a unordered list (<ul>). It starts out looking like this:

<ul class="token-input-list-facebook">
    <li class="token-input-input-token-facebook">
        <input type="text" style="outline-color: -moz-use-text-color; outline-style: none; outline-width: medium;"/>
    </li>
</ul>

I did this in GWT using custom BulletList and ListItem widgets (contained in the download).

final BulletList list = new BulletList();
list.setStyleName("token-input-list-facebook");

final ListItem item = new ListItem();
item.setStyleName("token-input-input-token-facebook");

final TextBox itemBox = new TextBox();
itemBox.getElement().setAttribute("style", 
        "outline-color: -moz-use-text-color; outline-style: none; outline-width: medium;");

final SuggestBox box = new SuggestBox(getSuggestions(), itemBox);
box.getElement().setId("suggestion_box");

item.add(box);
list.add(item);

After tabbing off the input, I noticed that it was removed and replaced with a <p> around the value and a <span> to show the "x" to delete it. After adding a couple items, the HTML is as follows:

<ul class="token-input-list-facebook">
    <li class="token-input-token-facebook">
        <p>What's New Scooby-Doo?</p>
        <span class="token-input-delete-token-facebook">x</span>
    </li>
    <li class="token-input-token-facebook">
        <p>Fear Factor</p>
        <span class="token-input-delete-token-facebook">x</span>
     </li>
     <li class="token-input-input-token-facebook">
         <input type="text" style="outline-color: -moz-use-text-color; outline-style: none; outline-width: medium;"/>
     </li>
</ul>

To do this, I created a deselectItem() method that triggers the DOM transformation.

private void deselectItem(final TextBox itemBox, final BulletList list) {
    if (itemBox.getValue() != null && !"".equals(itemBox.getValue().trim())) {
        /** Change to the following structure:
         * <li class="token-input-token-facebook">
         * <p>What's New Scooby-Doo?</p>
         * <span class="token-input-delete-token-facebook">x</span>
         * </li>
         */

        final ListItem displayItem = new ListItem();
        displayItem.setStyleName("token-input-token-facebook");
        Paragraph p = new Paragraph(itemBox.getValue());

        displayItem.addClickHandler(new ClickHandler() {
            public void onClick(ClickEvent clickEvent) {
                displayItem.addStyleName("token-input-selected-token-facebook");
            }
        });

        Span span = new Span("x");
        span.addClickHandler(new ClickHandler() {
            public void onClick(ClickEvent clickEvent) {
                list.remove(displayItem);
            }
        });

        displayItem.add(p);
        displayItem.add(span);
        
        list.insert(displayItem, list.getWidgetCount() - 1);
        itemBox.setValue("");
        itemBox.setFocus(true);
    }
}

This method is called after selecting a new item from the SuggestBox:

box.addSelectionHandler(new SelectionHandler<SuggestOracle.Suggestion>() {
    public void onSelection(SelectionEvent selectionEvent) {
        deselectItem(itemBox, list);
    }
});

I also added the ability for you to type in an e-mail address manually and to delete the previous item when you backspace from the input field. Here's the handler that calls deselectItem() and allows deleting with backspace:

// this needs to be on the itemBox rather than box, or backspace will get executed twice
itemBox.addKeyDownHandler(new KeyDownHandler() {
    public void onKeyDown(KeyDownEvent event) {
        if (event.getNativeKeyCode() == KeyCodes.KEY_ENTER) {
            // only allow manual entries with @ signs (assumed email addresses)
            if (itemBox.getValue().contains("@"))
                deselectItem(itemBox, list);
        }
        // handle backspace
        if (event.getNativeKeyCode() == KeyCodes.KEY_BACKSPACE) {
            if ("".equals(itemBox.getValue().trim())) {
                ListItem li = (ListItem) list.getWidget(list.getWidgetCount() - 2);
                Paragraph p = (Paragraph) li.getWidget(0);

                list.remove(li);
                itemBox.setFocus(true);
            }
        }
    }
});

I'm happy with the results, and grateful for the jQuery plugin's CSS. However, it still has one issue that I haven't been able to solve: I'm unable to click on a list item (to select it) and then delete it (with the backspace key). I believe this is because I'm unable to give focus to the list item. Here's the code that highlights the item and you can see the commented-out code that doesn't work.

displayItem.addClickHandler(new ClickHandler() {
    public void onClick(ClickEvent clickEvent) {
        displayItem.addStyleName("token-input-selected-token-facebook");
    }
});

/** TODO: Figure out how to select item and allow deleting with backspace key
displayItem.addKeyDownHandler(new KeyDownHandler() {
    public void onKeyDown(KeyDownEvent event) {
        if (event.getNativeKeyCode() == KeyCodes.KEY_BACKSPACE) {
            list.remove(displayItem);
        }
    }
});
displayItem.addBlurHandler(new BlurHandler() {
    public void onBlur(BlurEvent blurEvent) {
        displayItem.removeStyleName("token-input-selected-token-facebook");
    }
});
*/

If you know of a solution to this issue, please let me know. Feel free to use this widget and improve it as you see fit. I'd love to see this as a native widget in GWT. In the meantime, here's the GWT Facebook-style Autocomplete demo and code.

Posted in Java at Jun 05 2009, 07:05:10 AM MDT 25 Comments

My Eye Surgery Experience

On May 7, I visited my local TLC Laser Eye Center for eye surgery. I began looking into eye surgery way back in December. At that time, I wore my glasses for a week, then waltzed into my local TLC and tried to get it done the next day. I quickly found out that 1) it wasn't possible for 2 weeks and 2) I couldn't ski for a couple weeks afterward. Since we were in the midst of a great ski season, I decided to schedule it for May.

PRK I failed the LASIK-eligibility and learned I'd have to have PRK instead. The scars on my right eyeball caused me to fail. I received these scars as a boy when a friend and I blew up a .45-70 bullet with a nail and sledgehammer. I was the one holding the nail and couldn't see for the next 3 days.

In a nutshell: with LASIK they cut a flap, lift it up and shoot the laser under it. It heals quickly and is relatively painless. PRK has been around since before LASIK. With PRK, they seem to shave your eyeball and then shoot a laser into it. PRK takes a lot longer to heal, but the results are often as good or better than LASIK. Wikipedia has a more technical PRK vs. LASIK reference.

The Procedure
My mom flew into town for my surgery and drove me to TLC's office on that Thursday morning. It took 2 hours to prep for surgery, with most of the time spent sitting around and talking to my mom. Finally, they asked her to sit in the lobby and took me back to a waiting area. When I walked in the room, there were 2 other patients with surgery gear (funny hat and booties) and masks. They were leaning back, looking at the ceiling with their masks on and eyes closed. I quickly became the 3rd person who looked like this. Right before they started putting drops in my eyes, I remember being terrified that I might never see daylight again. At the very least, I thought I wouldn't see anything but black for the next 3 days.

Right before they called me in, the previous patient walked out and muttered "Damn, that burns." Believe me, this is not what you want to hear right before it's your turn. I was led into the operating room, sat down and received numbing drops in my eyes. Less than a minute later, I was led over to the operating table.

The rest of the procedure lasted less than 5 minutes. They taped my left eye shut and told me to stare at the red light with my right eye. At this point, they used some contraption to shave my eyeball. It was slightly painful, similar to the mild pain you feel when getting a cavity drilled with Novocaine. After each stroke, the world would ripple like a pebble thrown in a lake. After 10 strokes or so, they shot a laser into my eye for around 20 seconds. You don't actually see the laser (the red light looks the same), but you can smell your eyeball burning. Each eye only took a few minutes. My mom was able to watch the entire surgery on a television on the other side of a glass wall.

The Recovery
I was surprised to discover I was immediately able to open my eyes and see normally. Of course, my eyes felt heavy, so I didn't open them wide nor feel like I could. I was led back to the waiting room where I was given a Valium and sent home. I put my sunglasses on when we left and kept my eyes closed for the 5-minute drive home. After arriving at my house, I immediately downed some Tylenol PM and went to bed. It was hard to fall asleep and my eyes began tearing up. There was a dull pain in my eyes that kept the tears flowing for most of the afternoon. It took me 2 hours to fall asleep and I remember my eyes causing my nose to get stuffed up from all the tears.

When I woke up that evening, everything was blurry, but I was able to open my eyes and see better than I had previously w/o glasses. I didn't expect anything in the form of good vision and was mostly pre-occupied with trying to stop the pain (which wasn't terrible, but definitely present). I was prescribed Vicodin and started taking it on a regular basis. I was completely unable to watch TV at all that night. Viewing the computer screen was unthinkable.

The next morning, my vision was a lot better as evidenced by the tweet from my iPhone. Shortly after, my mom drove me to my eye doctor's office for a 1-day checkup. The results were surprising.

Friday night was one of the most painful. Saturday wasn't very painful, but my eyesight was very blurry. That afternoon, it was hard to keep my eyes open. Every time I tried to open them, I felt like I had to sneeze. Fortunately, I was able to watch the Nuggets game. I couldn't see players' numbers, but I was able to see Melo's last-second 3-pointer to win.

On Monday, I was able to drive to TLC for my 3-day checkup. Things were definitely blurry, but I didn't feel like it was dangerous for me to be behind the wheel. I was able to work on Monday, but I also had to increase my font sizes to 36pt and used a 30" monitor all day. OS X's Universal Access -> Zoom feature came in awful handy. That night, TV was a LOT clearer than the previous night, but it was still fuzzy.

What's it like now?
It's been almost 4 weeks and I'm very glad that I had the surgery done. I haven't felt any pain since the Sunday after surgery and I haven't had any issues with dryness. My vision does fluctuate from day-to-day. Some days I feel like I have super-hero vision and other days there's a halo around objects beyond 10 feet. According to my doctor, fluctuations are expected to continue for 6 months. I don't mind since it never gets bad enough to seem strange.

Now I enjoy not having to worry about glasses or contacts when traveling. I love waking up every morning and not having to do anything to improve my vision. I feel like I have more freedom in my life. Getting eye surgery is definitely one of the best things I've ever done.

Posted in General at Jun 03 2009, 12:46:18 AM MDT 7 Comments

Ajax Framework Analysis Results

Way back in January, I wrote about how my colleagues and I were evaluating Ajax frameworks to build a SOFEA-style architecture. To make our choice, we used the following process:

  1. Choose a short list of frameworks to prototype with.
  2. Create an application prototype with each framework.
  3. Document findings and create a matrix with important criteria.
  4. Create presentation to summarize document.
  5. Deliver document, presentation and recommendation.

When I wrote that entry, we had just finished step 2 and were starting step 3. I first wrote this blog post a week later, when we delivered step 5. Here is the comparison and conclusion sections of the analysis document we composed.

Framework Comparison
In order to evaluate the different frameworks against important criteria, we created a matrix with weights and ranks for each framework. This matrix shows how our weighting and rankings lead us to the winner for our project. You can view this matrix online or see below for a summary.

Note: Criteria whose values were identical across all candidates were weighted at zero. Charting capability was weighted at zero b/c we decided to use Flash for this.

This matrix indicates that GWT is the best candidate for our team to develop SOFEA-style applications with. In addition to the matrix, below are graphs that illustrate interesting (and possibly meaningless) statistics about each project.

Number of Committers

Books on Amazon

Conclusion
After working with the various frameworks, we believe that all the frameworks were very good and could be used to write applications with. If all weights are equal, these frameworks were almost even when compared against our evaluation criteria. The graph below illustrates this.

Ranking with equal criteria weights

Even after applying the weighted criteria, the evenness doesn't change a whole lot.

Ranking with weighted criteria

Without considering the even or weighted criteria, we believe the decision all comes down to what the developers on the project feel they will be most comfortable with. If you're developing with Dojo or YUI, chances are you're dressing up existing HTML and possibly using progressive enhancement to add more rich functionality. On the other hand, Ext JS and GWT are similar to Swing programming where you build the UI with code (JavaScript for Ext JS, Java for GWT).

The tools available for JavaScript development have gotten increasingly better in recent years. IntelliJ IDEA has a JavaScript Editor that provides many of the same features as its Java editor. Aptana Studio also has excellent support for authoring and debugging JavaScript. However, we believe the Java debugging and authoring support in IDEs is much better. Furthermore, we are more familiar with organizing code in Java projects and feel more comfortable in this development environment.

Based on this evaluation, we believe that GWT is the best framework for our team to develop SOFEA-style applications with.

Flash Forward to Today...
The core GWT library from Google doesn't have a whole lot of widgets, nor do they look good out-of-the-box. So early on, we experimented with two alternative implementations that continue to leverage GWT concepts and tools:

  • GXT: a GWT version of Ext JS
  • SmartGWT: a GWT version of SmartClient

Unfortunately, over the past few months, we've found that both of these implementations are too heavy for our requirements, mostly because of the file size of the generated JavaScript code. For example, a feature I wrote generated a 275K *.cache.html file using GXT. After determining that was too slow to give users the initial "pop", I re-wrote it without GXT. After a day, we had an application with *.cache.html files of 133K. Yes, that's over a 50% reduction in size!*

Because of these findings, we are proceeding with the core GWT library from Google and adding in new components as needed. It is cool to know you can make a UI "pop" with GWT, as long as you stick to the core - close-to-the-metal - components. For those applications that can afford an initial "loading..." state, I'd definitely recommend looking at GXT and SmartGWT.

* To make refactoring easier, I copied GXT MVC into our source tree and modified all imports.

Posted in Java at Apr 23 2009, 08:34:44 PM MDT 53 Comments

My Drunk on Software Interview

Back in February, I met up with James Ward and Jon Rose for a Drunk on Software interview. We enjoyed some good beer and had a great conversation about SOFEA, open source and RIA. See larger video here.

Posted in Java at Apr 05 2009, 10:23:57 PM MDT 8 Comments

Optimizing a GWT Application with Multiple EntryPoints

Building a GWT application is an easy way for Java Developers to write Ajax applications. However, it can be difficult to release a GWT application to production before it's finished. One of the most important things I've learned in Software Development is to get a new application into production as soon as possible. Not only does getting it from dev → qa → prod verify your process works, it also can do a lot to test the viability of the new application.

One of the biggest issues with GWT applications is size. The project I'm working on compiles Java to JavaScript and creates ~570K *.cache.html files (one for each modern browser). These files end up being around 180K gzipped. I believe this is an OK size for an entire application. However, if you're going to release early, release often with GWT, chances are you'll just want to release one feature at a time.

When the first feature was completed on my project, the *.cache.html files were around 300K. Rather than using branches to release to QA and UAT, bug fixes and new features were developed on trunk. Unfortunately, the QA and UAT process took several weeks longer than expected so by the time the feature was ready to release, the *.cache.html files had grown to around ~570K. The reason the file had grown so much was because it included all of the other features.

Earlier this week, while running to a dentist appointment, I thought of a solution to this problem. The basic idea was to optimize the compilation process so only the to-be-released feature was included. Even better, the solution didn't require more modularization. The results:

Before: *.cache.html -> 569K, gzipped 175K
After: *.cache.html -> 314K, gzipped 100K

According to my calculations, that's a 56% reduction in size. How did I do it?

  1. Created a new FeatureName.java EntryPoint with only the to-be-released features imported.
  2. Created a new FeatureName.gwt.xml that references the new EntryPoint.
  3. Copied old (kitchen-sink) EntryPoint.html to FeatureName.html and changed the reference to the nocache.js file.
  4. Created a Maven profile that allows using -PFeatureName to build a FeatureName-only module.

One downside to doing things this way is it's possible to create a WAR that has the same name and different features. Surely the Maven Overlords would frown upon this. Since this is just a temporary solution to release features incrementally, I'm not too worried about it. A possible workaround is to create different WAR names when a feature's profile is activated. I believe the true "Maven way" would be to make the "kitchen sink" application into a JAR and have several WAR modules with the different EntryPoints. Seems a bit complicated to me.

Other than this Maven publishing issue, the only other issue I can foresee is keeping the two EntryPoints and HTML files in synch. Then again, the separate files allow a feature to be customized for the release and can be deleted when its no longer needed.

What do you think? Do you know of a better way to compile a GWT application so it only contains certain features?

Posted in Java at Mar 25 2009, 04:00:37 PM MDT 12 Comments

Modularizing GWT Applications with GWT-Maven

Last week, I spent some time modularizing the GWT application I'm working on. By modularizing, I mean splitting the code from one GWT module into a "core" and "webapp" module. The reason for doing this was so the "core" module could be used by another GWT application. Creating GWT Modules is fairly straightforward, but it wasn't as intuitive as expected when using the gwt-maven-plugin.

The hardest part of moving the code was figuring out how to run tests in the new "core" module. After getting it all working, it seems easy enough. Hopefully this post will make it easy for others. Here's the steps I'd recommend:

  1. Convert your GWT project into a multi-module project where you have a top-level pom.xml and two sub-modules (e.g. gwt-core and gwt-webapp).
  2. Do the normal single-to-multi-project Maven stuff like declaring the <parent> element in the modules and moving plugins/dependencies to the top-level pom.xml.
  3. Refactor your gwt-webapp project to push down all shared classes (and their tests) to gwt-core.
  4. In the gwt-core project, include *.xml and *.java in your JAR so GWT can extract/compile the source code when building gwt-webapp.
    <resources>
        <resource>
            <directory>src/main/java</directory>
            <includes>
                <include>**/*.java</include>
                <include>**/*.xml</include>
            </includes>
        </resource>
    </resources>
    
  5. In gwt-core/src/main/java, create a Core.gwt.xml that references the modules you'd like to use in all your applications. For example:
    <module>
        <inherits name="com.google.gwt.user.User"/>
        <inherits name="com.google.gwt.i18n.I18N"/>
        <inherits name="com.extjs.gxt.ui.GXT"/>
        <inherits name="pl.rmalinowski.gwt2swf.GWT2SWF"/>
    </module>
    
  6. Now the tricky part begins, mostly because of how the gwt-maven plugin currently works. In src/test/java, create a NoOpEntryPoint.gwt.xml that inherits your Core module and defines an EntryPoint.
    <module>
        <inherits name="com.company.app.Core"/>
        <entry-point class="com.company.app.NoOpEntryPoint"/>
    </module>
    
  7. Create a NoOpEntryPoint.java class in the same directory as NoOpEntryPoint.gwt.xml.
    public class NoOpEntryPoint implements EntryPoint {
        
        public void onModuleLoad() {
            // do nothing
        }
    }
    
  8. In any class that extends GWTTestCase (I usually create a parent class for all tests), reference the NoOpEntryPoint in the getModuleName() method.
        @Override
        public String getModuleName() {
            return "com.company.app.NoOpEntryPoint";
        }
    
  9. Lastly, in the gwt-maven plugin's configuration (in gwt-core/pom.xml), reference the NoOpEntryPoint in <compileTargets>, a non-existent file in <runTarget> and only the "test" goal in the executions.
    <plugin>
        <groupId>com.totsp.gwt</groupId>
        <artifactId>maven-googlewebtoolkit2-plugin</artifactId>
        <version>2.0-beta26</version>
        <configuration>
            <compileTargets>
                <value>com.company.app.NoOpEntryPoint</value>
            </compileTargets>
            <runTarget>com.company.app.NoOpEntryPoint/doesntexist.html</runTarget>
            <logLevel>INFO</logLevel>
            <style>OBF</style>
            <noServer>false</noServer>
            <extraJvmArgs>-Xmx512m</extraJvmArgs>
            <gwtVersion>${gwtVersion}</gwtVersion>
            <testFilter>*GwtTestSuite.java</testFilter>
            <testSkip>${skipTests}</testSkip>
        </configuration>
        <executions>
            <execution>
                <goals>
                    <goal>test</goal>
                </goals>
            </execution>
        </executions>
    </plugin>
    

The results of modularizing your application are beneficial (shared code) and detrimental (you have to mvn install gwt-core whenever you make changes in shared classes). If you know of a way to configure the gwt-maven plugin to read sources from both gwt-core and gwt-webapp in hosted mode, I'd love to hear about it.

Posted in Java at Mar 23 2009, 10:36:08 AM MDT 11 Comments