Matt RaibleMatt Raible is a writer with a passion for software. Connect with him on LinkedIn.

The Angular Mini-Book The Angular Mini-Book is a guide to getting started with Angular. You'll learn how to develop a bare-bones application, test it, and deploy it. Then you'll move on to adding Bootstrap, Angular Material, continuous integration, and authentication.

Spring Boot is a popular framework for building REST APIs. You'll learn how to integrate Angular with Spring Boot and use security best practices like HTTPS and a content security policy.

For book updates, follow @angular_book on Twitter.

The JHipster Mini-Book The JHipster Mini-Book is a guide to getting started with hip technologies today: Angular, Bootstrap, and Spring Boot. All of these frameworks are wrapped up in an easy-to-use project called JHipster.

This book shows you how to build an app with JHipster, and guides you through the plethora of tools, techniques and options you can use. Furthermore, it explains the UI and API building blocks so you understand the underpinnings of your great application.

For book updates, follow @jhipster-book on Twitter.

10+ YEARS


Over 10 years ago, I wrote my first blog post. Since then, I've authored books, had kids, traveled the world, found Trish and blogged about it all.

PhoneGap to the Rescue!

This is the 7th article in a series about my adventures developing a web application with HTML5, Play Scala, CoffeeScript and Jade. Previous articles can be found at:

  1. Integrating Scalate and Jade with Play 1.2.3
  2. Trying to make CoffeeScript work with Scalate and Play
  3. Integrating HTML5 Boilerplate with Scalate and Play
  4. Developing with HTML5, CoffeeScript and Twitter's Bootstrap
  5. Play Scala's Anorm, Heroku and PostgreSQL Issues
  6. More Scalate Goodness for Play
A few weeks ago, I wrote about Developing a Stopwatch and Trip Meter with HTML5. I mentioned I'd run into a major issue when I discovered HTML5 Geo's watchPosition() feature didn't run in the background. From that article:

I tried out the trip meter that evening on a bike ride and noticed it said I'd traveled 3 miles when I'd really gone 6. I quickly figured out it was only calculating start point to end point and not taking into account all the turns in between. To view what was happening, I integrated my odometer.coffee with my map using Google Maps Polylines. Upon finishing the integration, I discovered two things, 1) HTML5 geolocation was highly inaccurate and 2) geolocation doesn't run in the background.

At the time, I opted to ignore this issue and use my app by setting Auto-Lock to Never. This worked, but if I happened to bump my phone while exercising, the app would get closed. Not to mention it really drained the battery and seemed to crash every-so-often.

Last week, I realized things were getting down to the wire and I was running out of time to finish my app's functionality for my Devoxx Talk. On Wednesday afternoon, I asked my office-mates (2 iOS developers) about developing a native app and installing it on my phone. They told me I had to be a iOS Certified Developer ($99/year) or jailbreak my iPhone to get an app on it. On Thursday, I downloaded PhoneGap and installed Xcode 4. As you can tell from the following image, PhoneGap seemed to be exactly what I was looking for.

PhoneGap

I spent some time going through PhoneGap's Getting Started Guide and was able to get my app rendering in a short amount of time. I was able to copy the webapp's generated HTML into my PhoneGap project's www directory and launch the app in the iOS Simulator. The only change I had to make was to convert my inline CoffeeScript (that used coffee-script.js for in-browser compilation) to JavaScript. It's possible the in-browser compiler works, but when things didn't work and I didn't see any error messages, it was the first thing I changed.

For getting the app onto a phone for testing, I opted for the easiest route and applied for an iOS Developer Account on Thursday afternoon. While waiting for approval on Friday, I briefly tried to jailbreak my phone, but encountered all kinds of version issues and gave up after 30 minutes. 24 hours after I applied for my account, Apple emailed asking for a business document to prove I was legit. I was unable to download any from the Colorado Secretary of State that were e-certified, so expeditiously switched my application from a business account to an individual one. Apple was great in helping me out before the weekend started and I had everything I needed as we drove to our Ski Shack on Friday evening.

On Friday night, I upgraded Trish's iPhone 4 to iOS 5 to make sure I had the latest and greatest platform for my app. Saturday morning, I woke up around 8 and started trying to figure out how to get my app on her phone. It took about an hour of fumbling, grumbling and searching to figure out how to do this. All the while, the troops were getting restless, noting that they were hungry for breakfast and groaning about Daddy taking so long. At 9:30, I finally got my PhoneGap app installed on Trish's phone and we drove to breakfast at Sharkey's.

I started the app when we left and checked it 5 minutes later when we arrived for breakfast. The blood drained from my face when I saw the app had drawn a straight line from our condo to the breakfast joint. We had taken several turns along the way and my new native app ignored them all. I assumed I had failed and my talk's conclusion at Devoxx would be "You can't develop a reliable Fitness Tracker app with HTML5". However, after a delicious Eggs Benedict, I became determined to succeed and returned home for some more hacking.

This is when I discovered Joel Dare's Play an MP3 Audio Stream in PhoneGap tutorial and the "Required background modes" key. This was the knowledge that saved the day and I anxiously added the key and the values to get location updates and allow audio to run in the background.

Required Background Modes

Saturday afternoon, I strapped on my recently purchased GoPro Camera, shot some video for my demo at Devoxx and had a blast skiing with Abbie, Jack and Trish. I celebrated that evening with an executive workout (15 minutes each in hot tub, sauna and steam room) at the Fraser Rec Center and again on Sunday when the Broncos whooped the Kansas City Chiefs just like last year.

Last night, I stayed up late to put the finishing touches on my Devoxx presentation. Now I'm sitting at the Red Carpet Club in Chicago's O'Hare getting ready to depart for Belgium. It's been a fun journey learning about HTML5, Scala, Play, CoffeeScript and Jade. If you're at Devoxx this week, I think I've got a presentation you're really going to like. ;-)

Posted in Java at Nov 14 2011, 04:32:19 PM MST 2 Comments

More Scalate Goodness for Play

Scalate This article is the 6th in a series on about my adventures developing a web application with HTML5, Play Scala, CoffeeScript and Jade. Previous articles can be found at:

  1. Integrating Scalate and Jade with Play 1.2.3
  2. Trying to make CoffeeScript work with Scalate and Play
  3. Integrating HTML5 Boilerplate with Scalate and Play
  4. Developing with HTML5, CoffeeScript and Twitter's Bootstrap
  5. Play Scala's Anorm, Heroku and PostgreSQL Issues

Last week, I wrote about my adventures with Anorm and mentioned I'd made some improvements to Scalate Play interoperability. First of all, I've been using a Scalate trait and ScalateTemplate class to render Jade templates in my application. I described this setup in my first article on Scalate and Play.

Adding SiteMesh Features and Default Variables
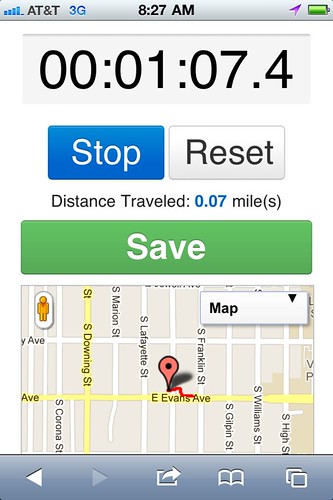
When I started making my app look good with CSS, I started longing for a feature I've used in SiteMesh. That is, to have a body id or class that can identify the page and allow per-page CSS rules. To do this with SiteMesh, you'd have something like the following in your page:

  
<body id="signup"/>

And then read it in your decorator:

<body<decorator:getProperty property="body.class" writeEntireProperty="true"/>>

As I started looking into how to do this, I came across Play Scala's ScalaController and how it was populating Play's default variables (request, response, flash, params, etc.). Based on this newfound knowledge, I added a populateRenderArgs() method to set all the default variables and my desired bodyClass variable.

def populateRenderArgs(args: (Symbol, Any)*): Map[String, Any] = {
  val renderArgs = Scope.RenderArgs.current();

  args.foreach {
    o =>
      renderArgs.put(o._1.name, o._2)
  }

  renderArgs.put("session", Scope.Session.current())
  renderArgs.put("request", Http.Request.current())
  renderArgs.put("flash", Scope.Flash.current())
  renderArgs.put("params", Scope.Params.current())
  renderArgs.put("errors", validationErrors)
  renderArgs.put("config", Play.configuration)

  // CSS class to add to body
  renderArgs.put("bodyClass", Http.Request.current().action.replace(".", " ").toLowerCase)
  renderArgs.data.toMap
}

implicit def validationErrors:Map[String,play.data.validation.Error] = {
  import scala.collection.JavaConverters._
  Map.empty[String,play.data.validation.Error] ++ 
    Validation.errors.asScala.map( e => (e.getKey, e) )
}

After adding this method, I was able to access these values in my templates by defining them at the top:

-@ val bodyClass: String 
-@ val params: play.mvc.Scope.Params
-@ val flash: play.mvc.Scope.Flash

And then reading their values in my template:

body(class=bodyClass)
...
- if (flash.get("success") != null) {
  div(class="alert-message success" data-alert="alert")
    a(class="close" href="#") &×
    | #{flash.get("success")}
- }
...
  fieldset
    legend Leave a comment →
    div.clearfix
      label(for="author") Your name:
      input(type="text" name="author" class="xlarge" value={params.get("author")})
    div.clearfix
      label(for="content") Your message:
      textarea(name="content" class="xlarge") #{params.get("content")}
    div.actions
      button(type="submit" class="btn primary") Submit your comment
      button(type="reset" class="btn") Cancel

For a request like Home/index, the body tag is now rendered as:

<body class="home index">
This allows you to group CSS styles by Controller names as well as by method names.

Next, I started developing forms and validation logic. I quickly discovered I needed an action() method like the one defined in ScalaTemplate's TemplateMagic class.

def action(action: => Any) = {
  new play.mvc.results.ScalaAction(action).actionDefinition.url
}

Since TemplateMagic is an inner class, I determined that copying the method into my ScalateTemplate class was the easiest workaround. After doing this, I was able to import the method and use it in my templates.

-import controllers.ScalateTemplate._
...
form(method="post" class="form-stacked" id="commentForm"
     action={action(controllers.Profile.postComment(workout._1.id()))})

After getting the proper URL written into my form's action attribute, I encountered a new problem. The Play Scala Tutorial explains validation flow as follows:

if (Validation.hasErrors) {
  show(postId)
} else {
  Comment.create(Comment(postId, author, content))
  Action(show(postId))
}

However, when I had validation errors, I end up with the following error:

Could not load resource: [Timeline/postComment.jade]

To fix this, I added logic to my Scalate trait that looks for a "template" variable before using Http.Request.current().action.replace(".", "/") for the name. After making this change, I was able to use the following code to display validation errors.

if (Validation.hasErrors) {
  renderArgs.put("template", "Timeline/show")
  show(postId)
} else {
  Comment.create(Comment(postId, author, content))
  Action(show(postId))
}

Next, I wanted to give child pages the ability to set content in parent pages. With SiteMesh, I could use the <content> tag as follows:

<content tag="underground">
  HTML goes here
</content>

This HTML could then be retrieved in the decorator using the <decorator:getProperty> tag:

<decorator:getProperty property="page.underground"/>

With Scalate, I found it equally easy using the captureAttribute() method. For example, here's how I captured a list of an athlete's workouts for display in a sidebar.

- captureAttribute("sidebar")
  - Option(older).filterNot(_.isEmpty).map { workouts =>
    .older-workouts
      h3
        | Older workouts
        span.from from this app
      - workouts.map { workout =>
        - render("workout.jade", Map('workout -> workout, 'mode -> "teaser"))
      - }
  - }
- }

Then in my layout, I was able to retrieve this and display it. Below is a snippet from the layout I'm using (copied from Twitter's Bootstrap example). You can see how the sidebar is included in the .span4 at the end.

-@ val sidebar: String = ""
...
.container
  .content
    .page-header
      h1
        = pageHeader
        small
          = pageTagline
    .row
      .span10
        !~~ body
      .span4
        = unescape(sidebar)
  footer

View vs. Render in Scalate
In the sidebar code above, you might notice the render() call. This is the Scalate version of server-side includes. It works well, but there's also a view() shortcut you can use if you want to have templates for rendering your model objects. I quickly discovered it might be difficult to use this feature in my app because my object was Option[(models.Workout, models.Athlete, Seq[models.Comment])] instead of a simple object. You can read the view vs. render thread on the Scalate Google Group if you're interested in learning more.

Scalate as a Module
The last enhancement I attempted to make was to put Scalate support into a Play module. At first, I tried overriding Play's Template class but ran into compilation issues. Then Guillaume Bort (Play's lead developer) recommended I stick with the trait approach and I was able to get everything working. I looked at the outdated play-scalate module to figure out how to add Scala support to build.xml and copied its 500.scaml page for error reporting.

In order to get line-precise error reporting working, I had to wrap a try/catch around calling Scalate's TemplateEngine.layout() method. Again, most of this code was copied from the outdated play-scalate module.

case class Template(name: String) {
  
  def render(args: (Symbol, Any)*) = {
    val argsMap = populateRenderArgs(args: _*)
    
    val buffer = new StringWriter()
    var context = new DefaultRenderContext(name, scalateEngine, new PrintWriter(buffer))
    
    try {
      val templatePath = new File(Play.applicationPath+"/app/views","/"+name).toString
        .replace(new File(Play.applicationPath+"/app/views").toString,"")
      scalateEngine.layout(templatePath + scalateType, argsMap)
    } catch {
      case ex:TemplateNotFoundException => {
        if(ex.isSourceAvailable) {
          throw ex
        }
        val element = PlayException.getInterestingStrackTraceElement(ex)
        if (element != null) {
           throw new TemplateNotFoundException(name, 
             Play.classes.getApplicationClass(element.getClassName()), element.getLineNumber());
        } else {
           throw ex
        }
      }  
      case ex:InvalidSyntaxException => handleSpecialError(context,ex)
      case ex:CompilerException => handleSpecialError(context,ex)
      case ex:Exception => handleSpecialError(context,ex)
    } finally {
      if (buffer.toString.length > 0)
        throw new ScalateResult(buffer.toString,name)
    }
  }
}
...
private def handleSpecialError(context:DefaultRenderContext,ex:Exception) {
  context.attributes("javax.servlet.error.exception") = ex
  context.attributes("javax.servlet.error.message") = ex.getMessage
  try {
    scalateEngine.layout(scalateEngine.load(errorTemplate), context)
  } catch {
    case ex:Exception =>
      // TODO use logging API from Play here...
      println("Caught: " + ex)
      ex.printStackTrace
  }
}

private def errorTemplate:String = {
  val fullPath = new File(Play.applicationPath,"/app/views/errors/500.scaml").toString 
  fullPath.replace(new File(Play.applicationPath+"/app/views").toString,"")
}

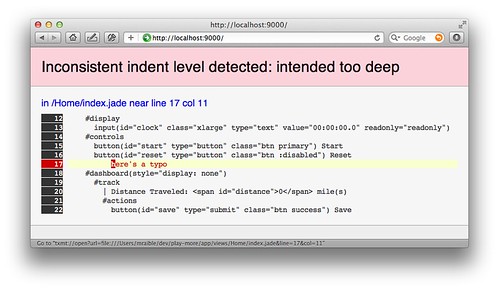
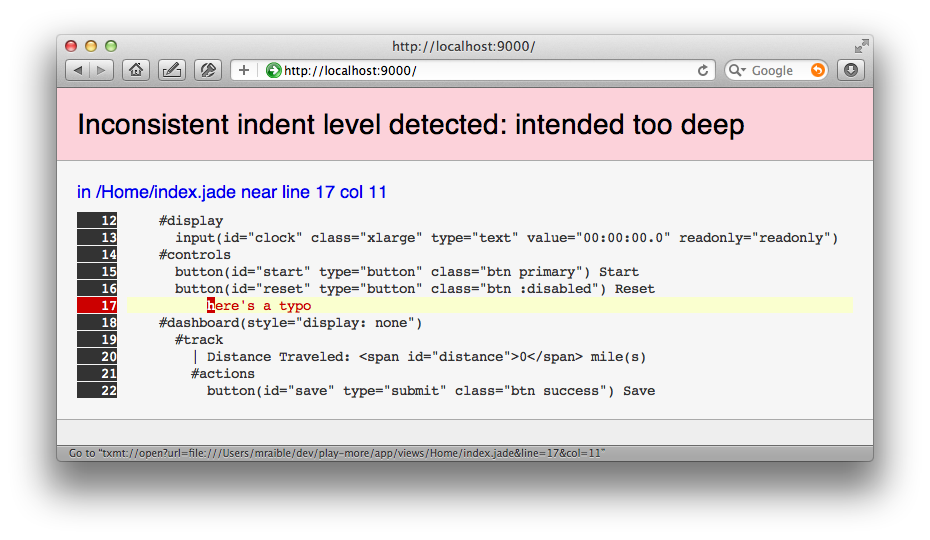
Once I had this in place, error messages from Scalate are much better. Not only do I see the error in my browser, but I can click on the offending line to open it directly in TextMate.

Play Scalate Error Reporting

I've published my play-scalate module on GitHub so others can try it out. To give it a whirl, add the following to your dependencies.yml:

    - upgrades -> play-scalate 0.1

repositories:
    - upgrades:
        type: http
        artifact: "http://static.raibledesigns.com/[module]-[revision].zip"
        contains:
            - upgrades -> *

Then add with play.modules.scalate.Scalate to your controllers and call the render() method.

Summary
After using Scalate and Play for almost 3 months, I'm really enjoying the combination. When I first integrated Scalate with a simple trait, the error messages were always in the console. Now that I've borrowed some smarts from Play's ScalaController and play-scalate's error reporting, I feel like it's practically a built-in solution. I was easily able to integrate my desired SiteMesh features and it even allows reusable template blocks. In the end, it's just Scala and Scalate does a good job of allowing you to leverage that.

Other thoughts:

  • If you're writing a lot of Jade and familiar with HTML, Don Park's html2jade is a great tool that comes with Scalate support.
  • I'm really enjoying writing CSS with LESS, particularly the ability to nest rules and have programming features. The only issue I've seen is IntelliJ's LESS plugin only does code-completion for variables rather than CSS values.
  • The Play Framework Cookbook is a great reference for learning how to write modules. Not only does it explain how to create modules, it has some great real-world examples for doing bytecode enhancement, implementing message queues, using Solr and how to do production monitoring.

If this series of articles has intrigued you and you'll be at Devoxx next week, you should stop by my talk on Thursday afternoon. In addition, there's several other Play talks at Devoxx and a possible meetup on Wednesday. Check out the Devoxx, anyone? thread for more information.

Update: There's one thing I forgot to mention about the Play Scalate Module. When I had Scalate integrated in my app with a trait, I only included the scalate-core and scalate-util JARs in dependencies.yml:

- org.fusesource.scalate -> scalate-core 1.5.2-scala_2.8.1:
    transitive: false
- org.fusesource.scalate -> scalate-util 1.5.2-scala_2.8.1:
    transitive: false

However, when I created the play-scalate module, I allowed more dependencies.

- org.fusesource.scalate -> scalate-core 1.5.2-scala_2.8.1:
    exclude:
        - javax.servlet -> *
        - com.sun.jersey -> *
        - org.osgi -> *
- org.fusesource.scalate -> scalate-util 1.5.2-scala_2.8.1
Because Scalate depends on Logback, debug messages started showing up in my console. To fix this, I created conf/logback.xml in my project and filled it with the following XML.

<configuration>
  <appender name="STDOUT" class="ch.qos.logback.core.ConsoleAppender">
      <encoder>
          <pattern>%msg%n</pattern>
      </encoder>
  </appender>

  <root level="info">
    <appender-ref ref="STDOUT" />
  </root>
</configuration>

This reduces the logging and allows me to increase Scalate's logging if I ever have the need.

Posted in Java at Nov 07 2011, 02:07:40 PM MST Add a Comment

New MacBook Pro and iMac

Almost a month ago, I wrote about how I was hoping to increase my developer happiness by getting a new iMac and MacBook Pro. I received a lot of good advice in the comments and proceeded to order place my order with the Business Group at the Aspen Grove Apple Store the following Monday. I have to admit, the paperwork to get a lease on the equipment was kinda painful, but I was happy to get a 7% discount for being a business customer. It took until Wednesday for my order to be placed and everything started shipping the following weekend.

To make my new machines as fast as possible, I purchased OWC's Turnkey Upgrade Program for my iMac, with the 240GB OWC Mercury EXTREME Pro 6G SSD and 16GB RAM. I also ordered a 480GB Pro 6G SSD and 8GB RAM for my laptop. I received the laptop about two weeks ago and the iMac a few days later. Instead of building my new laptop from my old one, I chose to simply use Lion and copy all my apps and data over manually. I sent the iMac to OWC as soon as I received it and got it back about 3 days later. I was out of town on business last week, and when I arrived home Thursday night, I found all my new equipment waiting for me. I built my iMac by cloning the drive from my laptop and installed the new SSD and memory into my new laptop.

For the last week, I've been very happy with the speed improvements and the wicked fast snappiness of opening apps, compiling programs and IntelliJ indexing in only a few seconds. However, on October 24th, I received a strange email from Aspen Grove Business with the subject MacBook Pro Price Reduction. I quickly replied, asking if new MacBook Pro's came out in the last couple days. I received no response, but learned a couple days ago that indeed they had. One of my office mates bought a new machine and said he got a 2.5GHz processor, while mine had a 2.3GHz.

Today, I packed up my new laptop and drove down to the Aspen Grove store to see if I could exchange it for a faster one. They hesitantly agreed to exchange it, as long as I put the original hard drive and memory back into it. I drove to my office, which was only a couple miles away in downtown Littleton. I put in the original disk and memory back in and returned to the Apple Store. 20 minutes later, I was walking out with a new, new MacBook Pro and happy to get the fastest Apple laptop on the market. The funny thing about this experience is it's the 3rd time in a row I've experienced buying an Apple laptop and returning it shortly after for a newer one. My last laptop purchase (March 2009) and Trish's 13" MacBook Pro (in March) were the first two.

I'm writing this post to thank Apple for having such great customer service. I've been very close to experiencing buyer's remorse (because I missed laptop upgrades by a few days) and Apple has always been very gracious in helping me out. In fact, with this latest purchase, they said there was a $400 difference between my two-week-old laptop and the latest 2.5GHz. Then they only charged me $50 for "being such a great business customer".

Thanks Apple, you rock!

Posted in Mac OS X at Nov 06 2011, 06:10:17 PM MST 8 Comments

Happy 9th Birthday Abbie!

Abbie and I on her 9th Birthday Today we celebrated Abbie's 9th Birthday. It's hard to believe how grown up she is, but easy to love her. We had a blast celebrating with lots of her classmates and even had a magician thanks to a hookup from Greg Ostravich. Julie got her a super cute outfit for the party and smiles were shared throughout the afternoon.

Last year on Abbie's birthday is when Trish met Abbie and Jack for the first time. It's been a year and we're all still having a blast and living life to its fullest. We'll be celebrating our Kids met Trish Anniversary at the DU Hockey game tonight. A great day celebrating with great people ... I couldn't be happier. :)

To see Abbie on her birthday through the years, checkout my past Happy Birthday posts: #1, #3, #4, #5, #6, #7 and #8.

Posted in General at Nov 05 2011, 06:05:58 PM MDT 1 Comment

Play Scala's Anorm, Heroku and PostgreSQL Issues

This article is the 5th in a series on about my adventures developing a Fitness Tracking application for my talk at Devoxx in two weeks. Previous articles can be found at:

  1. Integrating Scalate and Jade with Play 1.2.3
  2. Trying to make CoffeeScript work with Scalate and Play
  3. Integrating HTML5 Boilerplate with Scalate and Play
  4. Developing with HTML5, CoffeeScript and Twitter's Bootstrap

Anorm
In my previous article, I described how I created my application's features using CoffeeScript and make it look good using Twitter's Bootstrap. Next, I turned to persisting this data with Anorm.

The Scala module includes a brand new data access layer called Anorm that uses plain SQL to make your database request and provides several API to parse and transform the resulting dataset.

I'm a big fan of ORMs like Hibernate and JPA, so having to learn a new JDBC abstraction wasn't exactly appealing at first. However, since Anorm is the default for Play Scala, I decided to try it. The easiest way for me to learn Anorm was to start coding with it. I used A first iteration for the data model as my guide and created model objects, companion objects that extended Magic (appropriately named) and wrote some tests using scalatest. I started with an "Athlete" model since I knew "User" was a keyword in PostgreSQL and that's what Heroku uses for its database.

package models

import play.db.anorm._
import play.db.anorm.defaults._

case class Athlete(
  id: Pk[Long],
  email: String, password: String, firstName: String, lastName: String
  ) {
}

object Athlete extends Magic[Athlete] {
  def connect(email: String, password: String) = {
    Athlete.find("email = {email} and password = {password}")
      .on("email" -> email, "password" -> password)
      .first()
  }

  def apply(firstName: String) = new Athlete(NotAssigned, null, null, firstName, null)
}

Then I wrote a couple tests for it in test/Tests.scala.

import play._
import play.test._

import org.scalatest._
import org.scalatest.junit._
import org.scalatest.matchers._

class BasicTests extends UnitFlatSpec with ShouldMatchers with BeforeAndAfterEach {

  import models._
  import play.db.anorm._

  override def beforeEach() {
      Fixtures.deleteDatabase()
  }

  it should "create and retrieve a Athlete" in {

      var athlete = Athlete(NotAssigned, "[email protected]", "secret", "Jim", "Smith")
      Athlete.create(athlete)

      val jim = Athlete.find(
          "email={email}").on("email" -> "[email protected]"
      ).first()

      jim should not be (None)
      jim.get.firstName should be("Jim")

  }

  it should "connect a Athlete" in {

      Athlete.create(Athlete(NotAssigned, "[email protected]", "secret", "Bob", "Johnson"))

      Athlete.connect("[email protected]", "secret") should not be (None)
      Athlete.connect("[email protected]", "badpassword") should be(None)
      Athlete.connect("[email protected]", "secret") should be(None)
  }

At this point, everything was fine and dandy. I could run "play test", open http://localhost/@tests in my browser and run the tests to see a beautiful shade of green on my screen. I continued following the tutorial, substituting "Post" with "Workout" and added Comments too. The Workout object shows some of the crazy-ass syntax that is Anorm getting fancy with Scala.

object Workout extends Magic[Workout] {

  def allWithAthlete: List[(Workout, Athlete)] =
    SQL(
      """
          select * from Workout w
          join Athlete a on w.athlete_id = a.id
          order by w.postedAt desc
      """
    ).as(Workout ~< Athlete ^^ flatten *)

  def allWithAthleteAndComments: List[(Workout, Athlete, List[Comment])] =
    SQL(
      """
          select * from Workout w
          join Athlete a on w.athlete_id = a.id
          left join Comment c on c.workout_id = w.id
          order by w.postedAt desc
      """
    ).as(Workout ~< Athlete ~< Workout.spanM(Comment) ^^ flatten *)

  def byIdWithAthleteAndComments(id: Long): Option[(Workout, Athlete, List[Comment])] =
    SQL(
      """
          select * from Workout w
          join Athlete a on w.athlete_id = a.id
          left join Comment c on c.workout_id = w.id
          where w.id = {id}
      """
    ).on("id" -> id).as(Workout ~< Athlete ~< Workout.spanM(Comment) ^^ flatten ?)
}

All of these methods return Tuples, which is quite different from an ORM that returns an object that you call methods on to get its related items. Below is an example of how this is referenced in a Scalate template:

-@ val workout:(models.Workout,models.Athlete,Seq[models.Comment])
-
  var commentsTitle = "No Comments"
  if (workout._3.size > 0)
    commentsTitle = workout._3.size + " comments, lastest by " + workout._3(workout._3.size - 1).author
  
div(class="workout")
  h2.title
    a(href={action(controllers.Profile.show(workout._1.id()))}) #{workout._1.title}
  .metadata
    span.user Posted by #{workout._2.firstName} on
    span.date #{workout._1.postedAt}
    .description
      = workout._1.description

Evolutions on Heroku
I was happy with my progress until I tried to deploy my app to Heroku. I added db=${DATABASE_URL} to my application.conf as recommended by Database-driven web apps with Play! on Heroku/Cedar. However, when I deployed, it failed because my database tables weren't created.

2011-10-05T04:08:52+00:00 app[web.1]: 04:08:52,712 WARN  ~ Your database is not up to date.
2011-10-05T04:08:52+00:00 app[web.1]: 04:08:52,712 WARN  ~ Use `play evolutions` command to manage database evolutions.
2011-10-05T04:08:52+00:00 app[web.1]: 04:08:52,713 ERROR ~
2011-10-05T04:08:52+00:00 app[web.1]:
2011-10-05T04:08:52+00:00 app[web.1]: @681m15j3l
2011-10-05T04:08:52+00:00 app[web.1]: Can't start in PROD mode with errors
2011-10-05T04:08:52+00:00 app[web.1]:
2011-10-05T04:08:52+00:00 app[web.1]: Your database needs evolution!
2011-10-05T04:08:52+00:00 app[web.1]: An SQL script will be run on your database.
2011-10-05T04:08:52+00:00 app[web.1]:
2011-10-05T04:08:52+00:00 app[web.1]: play.db.Evolutions$InvalidDatabaseRevision

With James Ward's help, I learned I needed to use "heroku run" to apply evolutions. So I ran the following command:

heroku run "play evolutions:apply --%prod" 

Unfortunately, this failed:

Running play evolutions:apply --%prod attached to terminal... up, run. 
5 
~        _            _ 
~  _ __ | | __ _ _  _| | 
~ | '_ \| |/ _' | || |_| 
~ |  __/|_|\____|\__ (_) 
~ |_|            |__/ 
~ 
~ play! 1.2.3, http://www.playframework.org 
~ framework ID is prod 
~ 
Oct 17, 2011 7:05:46 PM play.Logger warn 
WARNING: Cannot replace DATABASE_URL in configuration (db=$ 
{DATABASE_URL}) 
Exception in thread "main" java.lang.NullPointerException 
        at play.db.Evolutions.main(Evolutions.java:54)

After opening a ticket with Heroku support, I learned this was because DATABASE_URL was not set ("heroku config" shows your variables). Apparently, this should be set when you create your app, but somehow wasn't for mine. To fix, I had to run the following command:

$ heroku pg:promote SHARED_DATABASE 
-----> Promoting SHARED_DATABASE to DATABASE_URL... done

PostgreSQL and Dates
The next issue I ran into was with loading default data. I have the following BootStrap.scala class in my project to load default data:

class BootStrap extends Job { 
  override def doJob() { 
    import models._ 
    import play.test._ 
    // Import initial data if the database is empty 
    if (Athlete.count().single() == 0) { 
      Yaml[List[Any]]("initial-data.yml").foreach { 
        _ match { 
          case a: Athlete => Athlete.create(a) 
          case w: Workout => Workout.create(w) 
          case c: Comment => Comment.create(c) 
        } 
      } 
    } 
  } 
} 

For some reason, only my "athlete" table was getting populated and the others weren't. I tried turning on debugging and trace, but nothing showed up in the logs. This appears to be a frequent issue with Play. When data fails to load, there's no logging indicating what went wrong. To make matters worse with Anorm, there's no way to log the SQL that it's attempting to run. My BootStrap job was working fine when connecting to "db=mem", but stopped after switching to PostgreSQL. The support I got for this issue was disappointing, since it caused crickets on Play's Google Group. I finally figured out "support of Date for insertion" was added to Anorm a couple months ago.

To get the latest play-scala code into my project, I cloned play-scala, built it locally and uploaded it to my server. Then I added the following to dependencies.yml and ran "play deps --sync".

require:
    ...
    - upgrades -> scala 0.9.1-20111025
    ...

repositories:
    - upgrades:
        type: http
        artifact: "http://static.raibledesigns.com/[module]-[revision].zip"
        contains:
            - upgrades -> *

Summary
When I started writing this article, I was going to talk about some improvements I made to Scalate Play interoperability. However, I think I'll save that for next time and possibly turn it into a plugin using play-excel as an example.

As you can tell from this article, my experience with Anorm was frustrating - particularly due to the lack of error messages when operations failed. The lack of support was expected, as this usually happens when you're living on the bleeding edge. However, based on this experience, I can't help but think that it might be a while before Play 2.0 is ready for production use.

The good news is IntelliJ is adding support for Play. Maybe this will help increase adoption and inspire the framework's developers to stabilize and improve Play Scala before moving the entire framework to Scala. After all, it seems they've encountered some issues making Scala as fast as Java.

Posted in Java at Nov 02 2011, 11:54:25 AM MDT 6 Comments

Developing with HTML5, CoffeeScript and Twitter's Bootstrap

HTML5 Logo This article is the fourth in a series about my adventures developing a Fitness Tracking application with HTML5, Play Scala, CoffeeScript and Jade. Previous articles can be found at:

  1. Integrating Scalate and Jade with Play 1.2.3
  2. Trying to make CoffeeScript work with Scalate and Play
  3. Integrating HTML5 Boilerplate with Scalate and Play

Developing Features
After getting my desired infrastructure setup, I started coding like a madman. The first feature I needed was a stopwatch to track the duration of a workout, so I started writing one with CoffeeScript. After spending 20 minutes playing with dates and setTimeout, I searched and found a stopwatch jQuery plug-in. I added this to my app, deployed it to Heroku, brought up the app on my iPhone 3G, clicked Start and started riding my bike to work.

When I arrived, I unlocked my phone and discovered that the time had stopped. At first, I thought this was a major setback. My disappointed disappeared when I found a Super Neat JavaScript Stopwatch and KÃ¥re Byberg's version that worked just fine. This stopwatch used setTimeout, so by keeping the start time, the app on the phone would catch up as soon as you unlocked it. I ported KÃ¥re's script to CoffeeScript and rejoiced in my working stopwatch.

# Created by Kåre Byberg © 21.01.2005. Please acknowledge if used 
# on other domains than http://www.timpelen.com.
# Ported to CoffeeScript by Matt Raible. Also added hours support.
flagClock = 0
flagStop = 0
stopTime = 0
refresh = null
clock = null

start = (button, display) ->
  clock = display
  startDate = new Date()
  startTime = startDate.getTime()
  if flagClock == 0
    $(button).html("Stop")
    flagClock = 1
    counter startTime, display
  else
    $(button).html("Start")
    flagClock = 0
    flagStop = 1

counter = (startTime) ->
  currentTime = new Date()
  timeDiff = currentTime.getTime() - startTime
  timeDiff = timeDiff + stopTime  if flagStop == 1
  if flagClock == 1
    $(clock).val formatTime timeDiff, ""
    callback = -> counter startTime
    refresh = setTimeout callback, 10
  else
    window.clearTimeout refresh
    stopTime = timeDiff

formatTime = (rawTime, roundType) ->
  if roundType == "round"
    ds = Math.round(rawTime / 100) + ""
  else
    ds = Math.floor(rawTime / 100) + ""
  sec = Math.floor(rawTime / 1000)
  min = Math.floor(rawTime / 60000)
  hour = Math.floor(rawTime / 3600000)
  ds = ds.charAt(ds.length - 1)
  start() if hour >= 24
  sec = sec - 60 * min + ""
  sec = prependZeroCheck sec
  min = min - 60 * hour + ""
  min = prependZeroCheck min
  hour = prependZeroCheck hour
  hour + ":" + min + ":" + sec + "." + ds

prependZeroCheck = (time) ->
  time = time + "" # convert from int to string
  unless time.charAt(time.length - 2) == ""
    time = time.charAt(time.length - 2) + time.charAt(time.length - 1)
  else
    time = 0 + time.charAt(time.length - 1)

reset = ->
  flagStop = 0
  stopTime = 0
  window.clearTimeout refresh
  if flagClock == 1
    resetDate = new Date()
    resetTime = resetDate.getTime()
    counter resetTime
  else
    $(clock).val "00:00:00.0"

@StopWatch = {
  start: start
  reset: reset
}

The Scalate/Jade template to render this stopwatch looks as follows:

script(type="text/javascript" src={uri("/public/javascripts/stopwatch.coffee")})

#display
  input(id="clock" class="xlarge" type="text" value="00:00:00.0" readonly="readonly")
#controls
  button(id="start" type="button" class="btn primary") Start
  button(id="reset" type="button" class="btn :disabled") Reset

:plain
  <script type="text/coffeescript">
    $(document).ready ->
      $('#start').click ->
        StopWatch.start this, $('#clock')

      $('#reset').click ->
        StopWatch.reset()
  </script>

Next, I wanted to create a map that would show your location. For this, I used Merge Design's HTML 5 Geolocation Demo as a guide. The HTML5 Geo API is pretty simple, containing only three methods:

// Gets the users current position
navigator.geolocation.getCurrentPosition(successCallback,
                                         errorCallback,
                                         options);
// Request repeated updates of position
watchId = navigator.geolocation.watchPosition(successCallback, errorCallback);

// Cancel the updates
navigator.geolocation.clearWatch(watchId);

After rewriting the geolocation example in CoffeeScript, I ended up with the following code in my map.coffee script. You'll notice it uses Google Maps JavaScript API to show an actual map with a marker.

# Geolocation with HTML 5 and Google Maps API based on example from maxheapsize: 
# http://maxheapsize.com/2009/04/11/getting-the-browsers-geolocation-with-html-5/
# This script is by Merge Database and Design, http://merged.ca/ -- if you use some, 
# all, or any of this code, please offer a return link.

map = null
mapCenter = null
geocoder = null
latlng = null
timeoutId = null

initialize = ->
  if Modernizr.geolocation
    navigator.geolocation.getCurrentPosition showMap

showMap = (position) ->
  latitude = position.coords.latitude
  longitude = position.coords.longitude
  mapOptions = {
    zoom: 15,
    mapTypeId: google.maps.MapTypeId.ROADMAP
  }
  map = new google.maps.Map(document.getElementById("map"), mapOptions)
  latlng = new google.maps.LatLng(latitude, longitude)
  map.setCenter(latlng)

  geocoder = new google.maps.Geocoder()
  geocoder.geocode({'latLng': latlng}, addAddressToMap)

addAddressToMap = (results, status) ->
  if (status == google.maps.GeocoderStatus.OK) 
    if (results[1]) 
      marker = new google.maps.Marker({
          position: latlng,
          map: map
      })
      $('#location').html('Your location: ' + results[0].formatted_address)
  else 
    alert "Sorry, we were unable to geocode that address."

start = ->
  timeoutId = setTimeout initialize, 500

reset = ->
  if (timeoutId)
    clearTimeout timeoutId

@Map = {
  start: start
  reset: reset
}

The template to show the map is a mere 20 lines of Jade:

script(type="text/javascript" src="//www.google.com/jsapi")
script(type="text/javascript" src="//maps.googleapis.com/maps/api/js?sensor=false")

:css
  .demo-map {
    border: 1px solid silver;
    height: 200px;
    margin: 10px auto;
    width: 280px;
  }

#map(class="demo-map")

p(id="location")
  span(class="label success") New
  | Fetching your location with HTML 5 geolocation...

script(type="text/javascript" src={uri("/public/javascripts/map.coffee")})
:javascript
    Map.start();

The last two features I wanted were 1) distance traveled and 2) drawing the route taken on the map. For this I learned from A Simple Trip Meter using the Geolocation API. As I was beginning to port the JS to CoffeeScript, I thought, "there's got to be a better way." I searched and found Js2coffee to do most of the conversion for me. If you know JavaScript and you're learning CoffeeScript, this is an invaluable tool.

I tried out the trip meter that evening on a bike ride and noticed it said I'd traveled 3 miles when I'd really gone 6. I quickly figured out it was only calculating start point to end point and not taking into account all the turns in between. To view what was happening, I integrated my odometer.coffee with my map using Google Maps Polylines. Upon finishing the integration, I discovered two things, 1) HTML5 geolocation was highly inaccurate and 2) geolocation doesn't run in the background.

I was able to solve the first problem by passing in {enableHighAccuracy: true} to navigator.geolocation.watchPosition(). Below are two screenshots showing before high accuracy and after. Both screenshots are from the same two-block walk.

Without {enableHighAccuracy: true} With {enableHighAccuracy: true}

The second issue is a slight show-stopper. PhoneGap might be able to solve the problem, but I'm currently using a workaround → turning off auto-lock and keeping Safari in the foreground.

Making it look good
After I got all my desired features developed, I moved onto making the app look good. I started by using SASS for my CSS and installed Play's SASS module. I then switched to LESS when I discovered and added Twitter's Bootstrap to my project. At first I used Play's LESS module (version 0.3), but ran into compilation issues. I then tried Play's GreenScript module, but gave up on it when I found it was incompatible with the CoffeeScript module. Switching back to the LESS module and using the "0.3.compatibility" version solved all remaining issues.

You might remember that I integrated HTML5 Boilerplate and wondering why I have both Bootstrap and Boilerplate in my project. At this point, I don't think Boilerplate is needed, but I've kept it just in case it's doing something for HTML5 cross-browser compatibility. I've renamed its style.css to style.less and added the following so it has access to Bootstrap's variables.

/* Variables from Bootstrap */
@import "libs/variables.less";

Then I made my app look a lot better with layouts, stylish forms, a fixed topbar and alerts. For example, here's the CoffeeScript I wrote to display geolocation errors:

geolocationError = (error) ->
  msg = 'Unable to locate position. '
  switch error.code
    when error.TIMEOUT then msg += 'Timeout.'
    when error.POSITION_UNAVAILABLE then msg += 'Position unavailable.'
    when error.PERMISSION_DENIED then msg += 'Please turn on location services.'
    when error.UNKNOWN_ERROR then msg += error.code
  $('.alert-message').remove()
  alert = $('<div class="alert-message error fade in" data-alert="alert">')
  alert.html('<a class="close" href="#">×</a>' + msg);
  alert.insertBefore($('.span10'))

Then I set about styling up the app so it looked good on a smartphone with CSS3 Media Queries. Below is the LESS code I used to hide elements and squish the widths for smaller devices.

@media all and (max-device-width: 480px) {
  /* hide scrollbar on mobile */
  html { overflow-y:hidden }
  /* hide sidebar on mobile */
  .home .span4, .home .page-header, .topbar form {
    display: none
  }
  .home .container {
    width: 320px;
  } 
  .about {
    .container, .span10 {
      width: 280px;
    }
    .span10 {
      padding-top: 0px;
    }
  }

Tools
In the process of developing a stopwatch, odometer, displaying routes and making everything look good, I used a number of tools. I started out primarily with TextMate and its bundles for LESS, CoffeeScript and Jade. When I started writing more Scala, I installed the Scala TextMate Bundle. When I needed some debugging, I switched to IntelliJ and installed its Scala plugin. CoffeeScript, LESS and HAML plugins (for Jade) were already installed by default. I also used James Ward's Setup Play Framework with Scala in IntelliJ.

Issues
I think it's obvious that my biggest issue so far is the fact that a webapp can't multitask in the background like a native app can. Beyond that, there's accuracy issues with HTML5's geolocation that I haven't seen in native apps.

I also ran into a caching issue when calling getCurrentPosition(). It only worked the first time and I had to refresh my browser to get it to work again. Strangely enough, this only happened on my desktop (in Safari and Firefox) and worked fine on my iPhone. Unfortunately, it looks like PhoneGap has issues similar to this.

My workaround for no webapp multitasking is turning off auto-lock and leaving the browser in the foreground while I exercise. The downside to this is it really drains the battery quickly (~ 3 hours). I constantly have to charge my phone if I'm testing it throughout the day. The testing is a real pain too. I have to deploy to Heroku (which is easy enough), then go on a walk or bike ride. If something's broke, I have to return home, tweak some things, redeploy and go again. Also, there's been a few times where Safari crashes halfway through and I lose all the tracking data. This happens with native apps too, but seemingly not as often.

If you'd like to try the app on your mobile phone and see if you experience these issues, checkout play-more.com.

Summary
Going forward, there's still more HTML5 features I'd like to use. In particular, I'd like to play music while the fitness tracker is running. I'd love it if cloud music services (e.g. Pandora or Spotify) had an API I could use to play music in a webapp. Soundcloud might be an option, but I've also thought of just uploading some MP3s and playing them with the <audio> tag.

I've really enjoyed developing with all these technologies and haven't experienced much frustration so far. The majority has come from integrating Scalate into Play, but I've resolved most problems. Next, I'll talk about how I've improved Play's Scalate support and my experience working with Anorm.

Posted in Java at Oct 20 2011, 02:47:36 PM MDT 3 Comments

Increasing My Developer Happiness

I've bought into the idea that a happy developer requires a clean, attractive, comfortable workplace that encourages healthy, sustainable productivity. Rich Armstrong of Fog Creek Software explains how they spend $6,174 per developer to make them happy. Shortly after reading this article, I tweeted:

My ideal setup is ~$10K more (MacBook Pro, Mac Pro, two 30s).

While this is my ideal setup, it's not something I actually need. If you've ever worked with two 30" monitors, you might agree. That much screen real estate can be too much, as you have to pan your head side-to-side to take it all in. I've found that a single 30" or 27" is good enough for me. As far as a Mac Pro goes, they can have awesome horsepower when full-loaded, but unless you're doing some serious processing, you probably won't utilize it all.

The last time I bought a new computer was March 2009, when I bought a 15" MacBook Pro with an SSD. I upgraded it to 8 GB RAM a year later and it's hummed along just fine since then. I also had the pleasure of working on a fully-loaded Mac Pro at Time Warner Cable for all of 2010 and a company-provided MacBook Pro at Overstock for most of this year. With my recent move to a new client, it's time to increase my developer happiness. Since I am my own boss, it's easy to get hardware upgrades approved. ;)

My current hardware inventory is as follows:

  • A 15" MacBook Pro
  • A 30" monitor at home
  • A 27" monitor at my office in Downtown Littleton

Since I ride my bike to work everyday, I've been hauling my laptop back and forth on my 8-mile commute. This is getting old quickly. I'd rather have a permanent machine in my office and a laptop for when I travel to clients, the mountain office or to conferences. So here's what I hope to buy in the next week:

  • A new 15" MacBook Pro, fastest CPU available
  • A fully-loaded 27" iMac for my office

I'll be moving my current 27" monitor to the mountain office. I plan on getting rid of my current MacBook Pro through the Apple Recycling Program. I'm also planning on trying out Apple's 24-month leasing program. I like to get new hardware every two years and it's a better tax deduction, so it seems to make sense.

My only question at this point is should I get Apple's SSD and RAM instead of getting it aftermarket (e.g. via Crucial)? My original plan was to install an aftermarket SSD and 8 GB RAM in the MacBook Pro. For the iMac, I've heard installing an aftermarket SSD isn't an option, but RAM is. I was thinking about getting the SSD + 1 TB drive combo and upgrading the RAM to 8 GB myself. There's a good chance aftermarket is better quality, but I'd also have to pay more vs. having it wrapped up in the total lease price.

Of course, new hardware is only part of developer happiness. A clean, attractive, comfortable workplace is an essential component as well. My home and mountain offices are nice, but my Littleton office needs work. I currently share it with two other developers, Angela and Jim. Over the next couple months, we plan on making a lot of improvements to our daily digs. I'll make sure and take some before and after pictures and blog about how we improve things.

Update: Thanks to everyone for their advice. As I suspected, upgrading RAM and disk aftermarket is the way to go. When I wrote this, I was under the impression that you couldn't upgrade the iMac's disk. Since then, I've discovered OWC's Turnkey Upgrade Program. Using this, I can send them my iMac and get a wicked fast 480 GB SSD, a 2 TB drive, 16 GB of RAM and have it shipped overnight for around $1400. Add in 8 GB RAM and a 480 GB Mercury Extreme 6G SSD for my new MacBook Pro and I'm looking at $2600 (aftermarket) + $5500 (Apple) = $8100. Now I just need to find some external hard drive enclosures for my old drives. Bonus points if I can find one with Thunderbolt support.

I can feel my developer happiness increasing already...

Posted in Mac OS X at Oct 07 2011, 03:35:35 PM MDT 11 Comments

Integrating HTML5 Boilerplate with Scalate and Play

HTML5 Boilerplate is a project that provides a number of basic files to help you build an HTML5 application. At its core, it's an HTML template that puts CSS at the top, JavaScript at the bottom, installs Chrome Frame for IE6 users and leverages Modernizr for legacy browser support. It also includes jQuery with the download. One of the major benefits of HTML5 Boilerplate is it ships with a build system (powered by Ant) that concatenates and minimizes CSS and JS for maximum performance. From html5boilerplate.com:

Boilerplate is not a framework, nor does it prescribe any philosophy of development, it's just got some tricks to get your project off the ground quickly and right-footed.

I like the idea of its build system to minify and gzip, but I'd probably only use it if I was working on a project that uses Ant. Since I'm using it in a Play project, the whole Ant build system doesn't help me. Besides, I prefer something like wro4j. Wro4j allows you to specify a group of files and then it compiles, minimizes and gzips them all on-the-fly. As far as I know, Play doesn't have any support for Servlet Filters, so using wro4j in Play is not trivial.

The good news is Play has a GreenScript module that contains much of the wro4j functionality. However, since I'm using Scalate in my project, this goodness is unavailable to me. In the future, the Scalate Team is considering adding better wro4j, JavaScript and CSS integration. In the meantime, I'm going to pretend I don't care about concatenation and minimization and trundle along without this feature.

To add HTML5 Boilerplate to my Play project, I performed the following steps:

  • Downloaded the 2.0 Zipball.
  • Copied all the static files to my project. Below are the commands I used (where $boilerplate-download is the expanded download directory and ~/dev/play-more is my project):
    cd $boilerplate-download
    cp 404.html ~/dev/play-more/app/views/errors/404.html
    cp *.png ~/dev/play-more/public/.
    cp crossdomain.xml ~/dev/play-more/public/.
    cp -r css ~/dev/play-more/public/stylesheets/.
    cp favicon.ico ~/dev/play-more/public/.
    cp humans.txt ~/dev/play-more/public/.
    cp -r js/libs ~/dev/play-more/public/javascripts/.
    cp robots.txt ~/dev/play-more/public/.
    
  • Copied the index.html to ~/dev/play-more/app/templates/layouts/default.jade and modified it to use Jade syntax. Since I downloaded the comments-heavy version, I modified many of them to be hidden in the final output.
    -@ val body: String 
    -@ var title: String = "Play More"
    -@ var header: String = ""
    -@ var footer: String = ""
    !!! 5
    / paulirish.com/2008/conditional-stylesheets-vs-css-hacks-answer-neither/ 
    <!--[if lt IE 7]> <html class="no-js ie6 oldie" lang="en"> <![endif]-->
    <!--[if IE 7]>    <html class="no-js ie7 oldie" lang="en"> <![endif]-->
    <!--[if IE 8]>    <html class="no-js ie8 oldie" lang="en"> <![endif]-->
    -# Consider adding an manifest.appcache: h5bp.com/d/Offline 
    <!--[if gt IE 8]><!--> <html class="no-js" lang="en"> <!--<![endif]-->
    head
      meta(charset="utf-8")
    
      -# Use the .htaccess and remove these lines to avoid edge case issues. More info: h5bp.com/b/378 
      meta(http-equiv="X-UA-Compatible" content="IE=edge,chrome=1")
    
      title=title
      meta(name="description" content="")
      meta(name="author" content="Matt Raible ~ [email protected]")
    
      -# Mobile viewport optimized: j.mp/bplateviewport 
      meta(name="viewport" content="width=device-width,initial-scale=1")
    
      -# Place favicon.ico and apple-touch-icon.png in the root directory: mathiasbynens.be/notes/touch-icons
    
      -# CSS: implied media=all
      link(rel="stylesheet" href={uri("/public/stylesheets/style.css")})
      -# end CSS
    
      -# More ideas for your <head> here: h5bp.com/d/head-Tips 
      -#
        All JavaScript at the bottom, except for Modernizr / Respond.
        Modernizr enables HTML5 elements & feature detects; Respond is a polyfill for min/max-width CSS3 Media Queries
        For optimal performance, use a custom Modernizr build: www.modernizr.com/download/ 
    
      script(type="text/javascript" src={uri("/public/javascripts/libs/modernizr-2.0.6.min.js")})
    body
      #container
        header = header
        #main(role="main")
          != body
        footer = footer
    
      -# JavaScript at the bottom for fast page loading 
      
      / Grab Google CDN's jQuery, with a protocol relative URL; fall back to local if offline 
      script(type="text/javascript" src="//ajax.googleapis.com/ajax/libs/jquery/1.6.2/jquery.min.js")
      :javascript
        window.jQuery || document.write('<script src={uri("/public/javascripts/libs/jquery-1.6.2.min.js")}><\/script>')
    
      -# Change UA-XXXXX-X to be your site's ID 
      :javascript
        window._gaq = [['_setAccount','UA-25859875-1'],['_trackPageview'],['_trackPageLoadTime']];
        Modernizr.load({
          load: ('https:' == location.protocol ? '//ssl' : '//www') + '.google-analytics.com/ga.js'
        });
    
      -# Prompt IE 6 users to install Chrome Frame. Remove this if you want to support IE 6. 
      -# http://chromium.org/developers/how-tos/chrome-frame-getting-started 
      /[if lt IE 7]
        script(src="//ajax.googleapis.com/ajax/libs/chrome-frame/1.0.3/CFInstall.min.js")
        :javascript
          window.attachEvent('onload',function(){CFInstall.check({mode:'overlay'})})
            
    != "</html>"
    
  • Next, I had to add support for layouts to my homegrown Scalate support. I did this by specifying a layoutStrategy when initializing the TemplateEngine. From play-more/app/controllers/ScalateTemplate.scala:
    engine.classLoader = Play.classloader
    engine.layoutStrategy = new DefaultLayoutStrategy(engine, 
      Play.getFile("/app/templates/layouts/default" + scalateType).getAbsolutePath)
    engine
    

That's it! Now I have HTML5 Boilerplate integrated into my Play/Scalate/Jade application. To set the title and header in my index.jade, I simply added the following lines at the top:

- attributes("title") = "Counting"
- attributes("header") = "HTML5 Rocks!"

CoffeeScript Tip
Yesterday, I mentioned that I was having issues getting CoffeeScript to work with Scalate and that I was going to try and get the in-browser compiler working. First of all, reverting to Scalate 1.4.1 didn't work because there is no CoffeeScript support in 1.4.1. So I stayed with 1.5.2 and used PandaWood's Running CoffeeScript In-Browser Tutorial. I copied coffee-script.js to ~/dev/play-more/public/javascripts/libs and added a reference to it in my default.jade layout:

-# JavaScript at the bottom for fast page loading 
script(type="text/javascript" src={uri("/public/javascripts/libs/coffee-script.js")})

Then I was able to write CoffeeScript in a .jade template using the following syntax:

:plain
  <script type="text/coffeescript">
    alert "hello world"
  </script>

Summary
If you've integrated HTML5 Boilerplate into your Play application, I'd love to hear about it. Now that I have all the infrastructure in place (Jade, CoffeeScript, HTML5 Boilerplate), I'm looking forward to getting some development done. Who knows, maybe I'll even come up with my own Play Un-Features That Really Irk My Inner Geek.

Posted in Java at Sep 28 2011, 08:49:35 AM MDT 2 Comments

Trying to make CoffeeScript work with Scalate and Play

A few weeks ago, I wrote about integrating Scalate with Play.

The next steps in my Play Scala adventure will be trying to get the CoffeeScript module to work. I also hope to integrate HTML5 Boilerplate with Jade and Scalate Layouts.

Since my last writing, the Scalate Team has created a new branch for Scala 2.8.x (that's compatible with Play) and released 1.5.2. To upgrade my Play application to use this version, I changed my dependencies.yml to have the following:

  - org.fusesource.scalate -> scalate-core 1.5.2-scala_2.8.1:
      transitive: false
  - org.fusesource.scalate -> scalate-util 1.5.2-scala_2.8.1:
      transitive: false

Unfortunately, this release breaks Scalate's CoffeeScript support because it wraps the code with illegal comments. This has been fixed in the latest snapshot, but no new release has been cut. However, even if it did work, it's not quite what I'm looking for. The 1.5.2 release allows for compiling inline CoffeeScript on-the-fly, but I'd rather store my .coffee files external to the page.

To try and figure out how to do this, I sent a message to the Scalate Google Group asking Does Scalate allow for referencing (and compiling) CoffeeScript files like the plugin for Play? My email prompted the Scalate Team to do some modifications that seemed to do exactly what I was looking for.

FWIW I've just checked in a couple of coffeescript examples. To run it, grab the code & do a local build...

http://scalate.fusesource.org/source.html
http://scalate.fusesource.org/building.html

then run this...
cd samples/scalate-example 
mvn jetty:run
then open http://localhost:8080/coffee/index

there are 2 sample jade files which use embedded coffee or a separate coffee file (using the .js extension in the <script src attribute>

https://github.com/scalate/scalate/tree/master/samples/scalate-exampl...

e.g. here's a jade file references a separate .js file for a coffee script which gets converted to .js on the server...

https://github.com/scalate/scalate/blob/master/samples/scalate-exampl...

To try out the improved CoffeeScript support, I checked out the source and fumbled with Git branches for a bit before I got latest version of Scalate to build. Unfortunately, it didn't work because Play doesn't know how to process the .js and .css files.

@67o8fflce 
Application.foo.js action not found 
Action not found 
Action Application.foo.js could not be found. Error raised is 
Controller controllers.Application.foo not found 
play.exceptions.ActionNotFoundException: Action Application.foo.js not 
found 
        at play.mvc.ActionInvoker.getActionMethod(ActionInvoker.java: 
588) 
        at play.mvc.ActionInvoker.resolve(ActionInvoker.java:85) 
        at Invocation.HTTP Request(Play!) 
Caused by: java.lang.Exception: Controller controllers.Application.foo 
not found 
        ... 3 more 
08:20:21,133 ERROR ~

Based on this error, I assumed I needed a Controller to do receive the .js and .css requests and compile them accordingly with Scalate. I changed my Jade template to have the following:

script(src="/assets/foo.js" type="text/javascript") 

Then I added a new route to my Play application:

  GET     /                           Application.index
  GET     /assets/{template}          ScalateResource.process

My ScalateResource.scala class is as follows:

package controllers 

import play.mvc._ 

object ScalateResource extends Controller { 

  def process(args: (Symbol, Any)*) = { 
    var template = params.get("template") 
    // replace .js with .coffee 
    template = template.replace(".js", ".coffee") 
    // replace .css with .scss 
    template = template.replace(".css", ".scss") 
    ScalateTemplate(template).render(); 
  } 
} 

Unfortunately, when I tried to access http://localhost:9000/assets/foo.js, I received the following error:

TemplateException occured : Not a template file extension (md | markdown | ssp | scaml | mustache | jade), you requested: coffee

At this point, I still haven't figured out how to solve this. I can only assume that the reason this works in the example application is because it uses a TemplateEngineFilter that's mapped to /*.

As I see it, I have a few choices if I want to continue using CoffeeScript and Scalate in my application:

  1. Revert to an older build of Scalate that uses the in-browser CoffeeScript compiler.
  2. Try to get a new version released that fixes the comment bug and use inline CoffeeScript.
  3. Keep trying to figure out how to get external files compiled by Scalate.

Obviously, I'd like to do #3 the most, but with the lack of responses from the Scalate group, this seems like the most challenging. Since #1 is the easiest (and I can complete without anyone's help), I'll be going that route for now. With any luck, the 2nd and third solutions will surface as options before my talk in November.

Update Oct 4, 2011: I was able to get external CoffeeScript files working! It was rather simple actually. I just tried the Play CoffeeScript module again, using Scalate's {uri("/path")} helper. For example, in a Jade template:

script(type="text/javascript" src={uri("/public/javascripts/script.coffee")})

This compiles the CoffeeScript file on the server and returns JavaScript. Sweet!

Posted in Java at Sep 27 2011, 01:59:18 PM MDT 3 Comments

Mahalo Kauai

I've heard great things about Hawaii for most of my life. My Dad was stationed at Barbers Point when he was in the Navy. His sister, my Aunt Mary, was born there. My sister and I sent my parents to Hawaii for their 30th Wedding Anniversary. You can imagine my excitement when Trish sent me an email on January 25th:

It's only 40,000 miles for both of us to fly to Kauai!! I picked the week after Labor Day just for fun :)

My response:

WAHOOOOOO! BOOK IT!!

She booked it that night. For $10.

We left for Kuaui the morning after the disappointing Broncos home opener and a fun sports weekend with Abbie and Jack. Our trip started out great, sneaking into the Red Carpet Club for free at LAX and getting a slew of free drinks from a super-cool flight attendant (Anthony) on our flight from LAX to Kauai.

After landing and marveling at the open-air airport, we picked up our rental Jeep and drove to the north side of the island. A friend recommended we stay at the St. Regis Princeville Resort and we were very impressed when we checked into our room overlooking Hanalei Bay.

The next morning, we vowed to do nothing but relax by the pool. We enjoyed a scrumptious breakfast at the Mekana Terrace, complete with Bloody Mary's. We had to have Bloody's since the St. Regis in NYC claims to have invented them. We spent the rest of the day napping, swimming, sunbathing, snorkeling and sipping on Mai Tai's.

Breakfast From the St. Regis Hanalei Bay The Pool Relaxing

After enjoying a beautiful sunset ...

HDR Sunset next to the palm trees on the beach at Hanalei Bay

... we visited the concierge to book some activities for the rest of our trip. We wanted to take things up a notch and enjoy all the cool stuff Kuai had to offer. So we arranged for Stand Up Paddling and the Mailani Dinner Shown on Thursday, golf on Friday, a doorless helicopter ride on Saturday and a kayak trip along the Na Pali coast on Sunday.

We woke up Thursday refreshed and ready to go. Our view out the window was exceptional.

Aloha in the morning at the St Regis Hanalei Bay

After a delicious room service breakfast in our room, we wandered down to the beach to meet our SUP guide. He warned us that girls were generally better than guys at SUP and we proceeded to prove him correct. Trish never got her hair wet and I had to abandon ship several times.

Ready for SUP! Breakfast with a view
Board Meeting

That afternoon, we headed to the The Kalalau Trail for a hike. Our SUP guide recommended it and said it was "so easy, your grandma could do it". His Grandma must be a lot younger than most, because the trail was not easy, but we certainly enjoyed the challenge.

Beautiful trail to Hanakapi'ai Beach and looking down the Napali Coast An easy 5' x 5' spot to land your helicopter?
Trish at Kalalau Beach Kalalau Beach

We were rewarded with some spectular views at Kalalau Beach.

Kalalau Beach Kalalau Beach

We made it back to the hotel just in time for the dinner show and another marvelous Hanalei sunset.

Hanalei Bay Sunset

At the dinner show, we sat with honeymooners from Houston that worked at NASA. Since they both spoke Russian, we had fun discussing Russia, our trips there and how we learned the language. The dinner show was great and they featured quite a few of the top Hula dancers in Hawaii.

Mailani Dinner show Hula dancer from side Kauai Mailani Dinner show Hula dancer with fire St Regis Kauai
Mailani Dinner show Hula dancers with Kala'au rhythm sticks and Hui'hui feathered rattles St Regis Kauai
Mailani Dinner show male performer St Regis Kauai
Mailani Dinner Show
Polynesian fireknife dancer with a fire knife Mailani Dinner Show
Mailani Dinner show firedancer with poi Kauai 3

The next morning, we grabbed Huevos Rancheros in Princeville and headed to the Makai Golf Club for a one-of-a-kind experience. Not only did they let us bring our full-stocked cooler on the course, but they rented us some fantastic Callaway clubs. We golfed for hours with no one in front, and no one trailing behind.

The famous third tee drop on the Makai Golf Course over looking Hanalei Bay Kauai - Matt's drive was perfect right onto the green below Makai Golf Club my pitch out of the sand is next to the pin.  Matt's is on the edge of the green :) Matt's drive headed toward the ravine on Makai Golf course!
This one is a gonner too! Heaven at Makai Golf Course!

Trish's photo of the Bougainvillia on the back nine is one of my favorites.

Bougainvillia on the Makai Golf course looking across Hanalei Bay

We enjoyed some Blue Hawaii's at the St. Regis afterward, in a cabana that's normally reserved for $1000/day. We snuck in and even got the honeymooner's discount from a hometown waiter.

2 Blue Hawai'i on the beach in Hanalei Bay

On Saturday, I booked a tour at the Ahonui Botanical Gardens. The gardens where amazing, built by Bill and Lucinda Robertson. They converted a jungle of 8 acres into an elaborate garden with trees, flowers and plants from around the world. Since you can grow almost anything on The Garden Isle, they planted many exotic fruit trees that we had the pleasure of snacking on throughout our 3-hour tour. About halfway through, Lucinda treated us to an adventure in making and tasting delicious chocolates.

Heart of Palm - Paul Michell uses this in their products - it's a wonderful clear light lotion and great for hair too! Ahonui Botanical Gardens Ahonui Botanical Gardens Whoa, this is an Apple banana native to Hawai'i and tastes much better than regular Del Monte bananas!

Lucinda Robertson gave us a great Chocolate tasting and history of chocolate.  The chocolate they made was the best of the bunch! Bill Robertson, the owner gave us the tour which they just started doing publically in June 2011.  It was a great experience!

We rushed from the garden tour to the helicopter ride on the other side of the island. The concierge had booked us with Jack Harter Helicopters, because they were the only ones that flew without doors (for better pictures). As soon as we lifted off, I knew it was going to be an experience of a lifetime. We flew over the Waimea Canyon, along the Na Pali Coast, over Hanalei Bay and back into the mountains to the wettest place on earth. It felt like an amusement park ride combined with an IMAX movie. Our pilot was a Hawaii native that knew the whole island and gave us an excellent tour of its features. I cannot recommend this tour enough if you're ever in Kauai.

Bell 500 here we come! Honopu Valley - King Kong was filmed in this area.

Rainbow to Kalalau Valley Napali Coast State Park

Looking back toward Makuaiki Point Wailua Falls - yep from Fantasy Island

The next morning, we had to get up early for our kayak trip. We had a wakeup call at 4:30, breakfast via room service arrived at 5 and we were packed and checked out of the hotel at 5:30. We arrived at Na Pali Kayak at 6 and quickly realized we had our work cut out for us. Both Trish and I expected the kayak trip to be like paddling across a lake and didn't know we were in for the Everest of kayaking - a 17-mile journey that would take most of the day.

Our Put in point for Napali Coast Kayak Tour.  I couldn't bring the D700 on the kayak and the waterproof camera was futile.  I thought they would have gotten better by now? We borrowed some sea-sickness medication, bought some water from our hosts and got ready for a good challenge. Unfortunately, we couldn't take Trish's camera, and the waterproof camera she bought took mediocre pictures. However, we did get to see two schools of dolphins (one even jumped into the air for us) and a couple turtles along the way. Having to paddle in unison turned out to be great couples therapy too.

We enjoyed lunch on a beach along the coast around 1, took a nap and hopped back in the boats for the last 5 miles. We pulled out around 4 and were on the road by 5 for the 2.5 hour drive back to Hanalei Bay. It was country dark when we arrived. We hopped in the Jeep and drove an hour back across the island to stay at the Sheraton Kauai (the St. Regis was full) for our last night.

At the Sheraton, we had one of their best rooms and enjoyed awesome views and a final relaxing day before heading home.

View from The Sheraton Hibiscus!

The Tunnel of Trees on the way to the airport was one last reminder of how beautiful Kauai is.

The Tunnel of Trees Kauai!

Mahalo Kauai. You are one of the most breathtaking places I have ever been too. Your views, your waves, your rainbows - all spectacular. Trish and I will be back, you've made an impression on us that will last forever.

If you'd like to see many of the places we visited in a movie, check out Soul Surfer. It takes place in Hanalei Bay and we recognized many of the locations while watching it. For more pictures, see my Shareholders Meeting in Kauai or Trish's magnificent photos.

Posted in General at Sep 26 2011, 10:19:54 AM MDT 3 Comments