Matt RaibleMatt Raible is a writer with a passion for software. Connect with him on LinkedIn.

The Angular Mini-Book The Angular Mini-Book is a guide to getting started with Angular. You'll learn how to develop a bare-bones application, test it, and deploy it. Then you'll move on to adding Bootstrap, Angular Material, continuous integration, and authentication.

Spring Boot is a popular framework for building REST APIs. You'll learn how to integrate Angular with Spring Boot and use security best practices like HTTPS and a content security policy.

For book updates, follow @angular_book on Twitter.

The JHipster Mini-Book The JHipster Mini-Book is a guide to getting started with hip technologies today: Angular, Bootstrap, and Spring Boot. All of these frameworks are wrapped up in an easy-to-use project called JHipster.

This book shows you how to build an app with JHipster, and guides you through the plethora of tools, techniques and options you can use. Furthermore, it explains the UI and API building blocks so you understand the underpinnings of your great application.

For book updates, follow @jhipster-book on Twitter.

10+ YEARS


Over 10 years ago, I wrote my first blog post. Since then, I've authored books, had kids, traveled the world, found Trish and blogged about it all.
You searched this site for "howto". 64 entries found.

You can also try this same search on Google.

EMMA vs. Cobertura for Code Coverage

I'm looking to add code-coverage reporting to AppFuse. The two open source libraries I know of to do this are EMMA (CPL) and Cobertura (ASL). Which one is the better library to use? Both projects seem to be actively developed - and there are AppFuse HowTos for both, so the decision making process is a bit difficult.

Any insights into why one tool (or project) is better than the other is appreciated.

Posted in Java at Feb 03 2006, 05:16:35 PM MST 13 Comments

[DJUG] Real World Mapping and Holistic Testing

A few weeks ago (January 11th to be exact), I attended a Denver JUG meeting where Scott Davis spoke about Real World Mapping (download presentation) and Holistic Testing (download). Below are my notes from the event.

The first-generation mapping web application was MapQuest. Second generation mapping webapps include Google Maps (now renamed to Google Local) and MSN Virtual Earth (now renamed to Windows Live Local). The funny thing is MapQuest had sattelite images way back when, but they dropped it b/c no one was interested.

I like how googling for "msn virtual earth" brings up earth.google.com as the sponsored link at the top.

MapQuest - simple example from the oldest player in the map space. The URL of the query results gives us our first glimpse into building a custom application. For example:

http://www.mapquest.com/maps/map.adp?address=1600+Pennsylvania+Ave+Nw&city=Washington&state=DC

Is using MapQuest and building URLs on your site hacking? No - it might be considered hacking, but they encourage you to use it by publishing a howto. Once you're familiar with the basics, you can begin to customize the URL, for example:

Add a title: title=The+White House
Change the zoom level: zoom=9 (0-10, 0 == world)
Even use good ol' Latitude/Longitude: ?latlongtype=decimal&latitude&38(whitehouse)

Why use Lat/Long? While addresses are more user-friendly, lat/long coordinates are more precise. All map services must "geocode" addresses into lat/long anyway in order to show the location on the map.

Did you know that Google is a huge dictionary? Just use "define: geocode". So how do you find your Lat/Long? There are a couple of simple ways to geocode a street address for free:

  • Option #1: URL harvesting from http://maps.msn.com - when you submit an address, the resulting URL has the lat/long in it (in the "C" parameter)
  • Option #2: Use http://geocoder.us. Find the latitude & longitude of any US address - for free. The US Gov't provides the data, they just display it. If you want to use this in your application, you'll have to screen-scrape to get the data.

Geocoder.us also offers a web services interface - RESTful based on URLs. You query for address, it returns XML. There's also SOAP, XML-RPC and JSON interfaces.

RESTful Web Services: If your GET request returns XML instead of HTML, it is called a "RESTful Web Service". To use REST in Java, you can use the HttpClient package from Jakarta Commons.

Yahoo Maps

Yahoo! Maps offers the same level of hackability as MapQuest. The parameter names change, but remain conceptually identical. They use "mag" instead of "zoom", "addr" instead of "address", etc. One thing Yahoo! can do that MapQuest can't is allow you to display your own data on the map (more at http://developer.yahoo.net/maps/).

For example, the URL below displays cities on the NFJS tour:

http://api.maps.yahoo.com/Maps/V1/annotatedMaps?appid=nfjs_cities&xmlsrc=http://www.davisworld.org/nfjs.xml. Appid must be registered with Yahoo, but it is free and the process is fast. Xmlsrc is an XML file describing your map (most of the name/value GET parameters are pushed into XML...). Nice! The document linked to in Xmlsrc is actually an RSS feed.

Web 2.0

The Yahoo! Maps Web Service is getting very close to what the pundits are calling "Web 2.0". Tim O'Reilly calls it "Web 2.0," Jonathan Schwartz calls it "The Participation Age".

What is Web 2.0? The there are no hard and fast definitions, the same basic ideas come up over and over:

  • Favor interactive web applications over static/passive web pages
  • Favor data/web services over fixed presentation/HTML
  • Allow/encourage your content to be integrated into other applications

2/3rds of things bought and sold on eBay are done through web services - not through their web interface.

Google Maps

Google Maps does have Web 1.0 functionality, with query parameters. However, unlike Yahoo and MapQuest, the names of their parameters are only 1-digit. For example, z == "Zoom", t == "Type" (m=map, k=image, h=hybrid map/image). The reason it's called "k" for images is because Google bought Keyhole. It's now called Google Earth and and apparently the OS X version came out today.

Google also supports gazetteering - which are "natural language" queries. For example, you can search for "colorado rockies denver co" and it'll bring up a picture of Coors Field.

But what moves Googles aquarely into Web 2.0 territory is their Maps API. Using Ajax and Google's API, you can develop your own location-based services using Google Maps. To use Google's API, you have to singup for key, but then you become a JavaScript programmer.

Now Scott is showing some JavaScript - 2 lines of JavaScript code - 1 line of HTML to get a map. The bare-bones code will give you a map w/o controls - and you can programmatically add them. There's an API for adding overlays, and you can even control if the drop-shadow for the popup shows up. I wasn't aware the popup window shows a shadow on the underlying map - that's pretty cool. Finally, you can respond to user events by adding event listeners to the different user actions.

Google now has competition - MSN Virtual Earth now called Windows Live Live. There is a website devoted to using Microsoft's API, but looking at Scott's example - the Google API is much cleaner. Interestingly enough, it also works best in IE.

If you want to learn more about this stuff, I encourage you to checkout Scott's Google Maps API book.

In the "Main Event", Scott talked about a whirlwind of open-source testing tools, including: JUnit, Cobertura, Groovy, EasyMock, HttpUnit, DbUnit and JunitPerf.

Before this talk, I'd never heard of Cobertura, but I have used jcoverage and EMMA . After seeing talk, and seeing that Mike Clark endorses Corbertura, I should probably check out. However, since there's already a AppFuse + EMMA HowTo, maybe I should just stick with that.

The main benefit of unit testing is it facilitates change. Unit tests are a safety net. It simplifies integration - if you "trust" the individual pieces, then using them in the larger picture is much easier. Unit testing makes your code "self-documenting" - rather than relying on Word documentations that get stale immediately, unit tests are always an up-to-date reflection of the code base. Enforces a loosely-coupled architecture - because your code is being consumed by two different entities (unit tests and application), best practices naturally occur. For example, coding to interfaces instead of implementations.

At this point, I decided to stop taking notes. Thanks for the great talks Scott!

Posted in Java at Jan 27 2006, 08:12:38 AM MST 3 Comments

New AppFuse Documentation: Axis, Handling Complex POJOs and Korean Translation

A few AppFuse enthusiasts have been hard at work, writing new documentation and tutorials. First of all, Mika Göckel has written a HowTo implement Axis tutorial - complete with an installation package! I tried it out last night, and it works quite well with AppFuse 1.8.2. If you're using a build from CVS, you'll need to make some modifications because web.xml is no longer generated. Hopefully we can fix that and get this "extras" package into CVS this week.

The 2nd tutorial is titled Handling complex objects with XDoclet, Hibernate and Struts. This one is written by the AppFuse committer Thomas Gaudin. Thomas has now written 5 tutorials, all of which include source code and step-by-step instructions.

Last, but certainly not least, DongGuk Lee has translated a large amount of AppFuse's documentation to Korean. I'm amazed that the QuickStart Guide and Tutorials have now been translated to 6 Languages!

Thanks for the contributions everyone - you guys rock!

Posted in Java at Dec 05 2005, 08:53:21 AM MST 5 Comments

Edit Java webapps Redux: Jetty Launcher and Equinox

A few weeks ago, I realized I was developing webapps the hard way, by re-deploying everytime I made a change. It's important to have a build process that can create a WAR and deploy, but it's also important to have a system where you can edit/save/view changes w/o ever deploying.

I spent some time this weekend working with Jetty Launcher, Eclipse 3.1 and the latest version of Equinox. Below are instructions on how to make the two work together. Once you've completed the steps below, you should be able to launch Jetty and edit/save Java files or JSP files in Equinox - and the changes will show up immediately in your webapp. No deployment or Ant/Maven interaction necessary.

I've tested this setup on Eclipse 3.1, using both OS X and Windows XP.

Step 1: Install Jetty and Launcher

Download and install Jetty. I tested 5.1.4 and 5.1.6 and both seem to work (6.0.0 Beta does not). In Eclipse, go to Help » Software Updates » Find and Install. Select Search for new features to install and click Next. Click on the New Remote Site button and enter "Jetty Launcher" for the name and "http://jettylauncher.sourceforge.net/updates" for the URL. Click OK, continue to download and restart your workspace.

Step 2: Install Equinox and create Eclipse project files

Download Equinox 1.5 beta 1 and extract to your workspace (I generally use c:\Source on Windows and /Users/${username}/dev on OS X). Download Maven 2.0, install it, and add $M2_HOME/bin to your $PATH. From the command line, cd into the equinox directory and type "mvn eclipse:eclipse". Get a cup of coffee or soda while you wait for Maven to download all the dependencies.

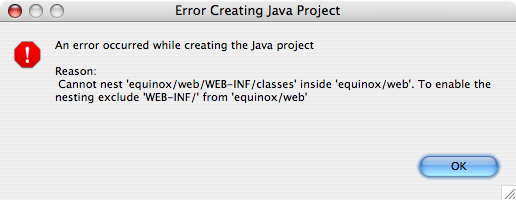
Once the project files have been created, open Eclipse and go to File » New » Project » Java Project. Click Next and type "equinox" in the Project name box. Click Finish to begin importing the project. You'll probably get an error like the following. Click OK to continue.

Eclipse Error

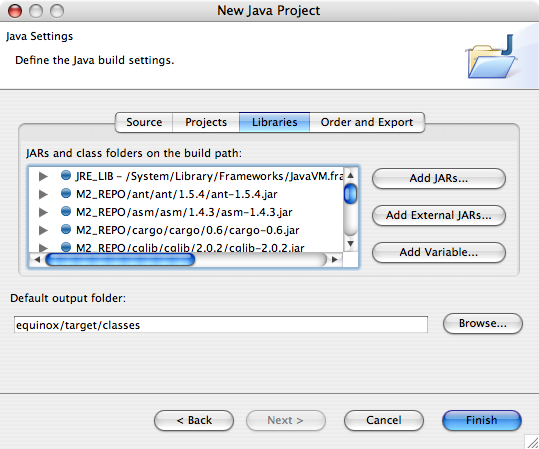
Click Next to continue (I had to click it a few times before it took me to the next screen). On the next screen (Define the Java build settings), select the web directory and click Configure inclusion and exclusion filters. Click the Add button for Exclusion patterns and enter "WEB-INF/classes/" (the trailing slash is important).

You're not done yet, now you need to define the M2_REPO variable that points to all the downloaded dependencies. Click the Libraries tab and then the "Add Variable" button as seen below.

Eclipse Error

Click the Configure Variables button and add a new one with a name of M2_REPO and Path of to your local Maven repository (/Users/${username}/.m2/repository on OS X and C:\Documents and Settings\${username}\.m2\repository on Windows). Click OK, Cancel and then Finish.

Step 3: Configure Jetty Launcher for Equinox

In Eclipse, go to Run » Debug and select Jetty Web in the Configurations panel. Click the New button. In the "Use Options" section, use "web" for the webapp root and (optionally) "/equinox" for the context name.

Jetty has issues running applications that use commons-logging, so you'll need to turn off all the INFO logging from the projects that Equinox uses. To do this, click on the Arguments tab and add the following to the list of VM arguments:

-DDEBUG -DDEBUG_PATTERNS=org.appfuse -DDEBUG_VERBOSE=-1

This can be placed on the line below the -Djetty.home argument. For more information on logging in Jetty, see the Jetty logging and debugging tutorial.

Step 4: Start Jetty in debug mode and modify to your hearts content

Click Apply and then Debug, and watch Jetty startup. If you go to http://localhost:8080/equinox/users.html in your browser, you should see a log message like the following:

11:44:25.855 DEBUG  [SocketListener0-1] org.appfuse.web.UserController.handleRequest
(UserController.java:24) >29> entering 'handleRequest' method...

You should be able to click on "UserController.java:24" to navigate to the UserController.java class. In this class, modify the log.debug(...) message, save the file and hit refresh on your browser. The console should spit out your updated log message. If it didn't, go to Window » Preferences » Workspace and make sure Build automatically is checked.

As far as I can tell, edit/save/refresh will work for .java and .jsp files, but not for .xml files. For that, the Jetty Launcher adds a Stop/Restart Jetty icon to your Eclipse toolbar. This setup seems to work great, except for the fact that you can't see when Jetty is done starting up in the console.

NOTE: I tried to get a similar setup working with the Tomcat Eclipse Plugin (v3.1 beta) and the Eclipse Web Tools Project (v0.7.1). Neither worked as smoothly, and the WTP wouldn't even deploy to Tomcat.

Posted in Java at Nov 28 2005, 11:58:15 AM MST 8 Comments

Hibernate Relationships with XDoclet Tutorial

I finally got around to finishing the Hibernate Relationships tutorial for AppFuse today. This initial version includes a howto for creating the UI with Struts. In the future, I'll add sections for creating the UI with Spring MVC, WebWork, Tapestry and JSF. Those should be easy now that the hard part is done. This is a first cut at this tutorial, so it's likely there's issues, bugs and things I did wrong.

Now it's your turn. If you have a chance, please try it out and let us know how we can improve it.

Posted in Java at Sep 23 2005, 11:51:50 AM MDT 2 Comments

Integrating Lucene with Hibernate

The code_poet has an interesting post on using a Hibernate interceptor to index objects for Lucene searching. I've been thinking about integrating Lucene into AppFuse (or at least providing a tutorial) for quite some time. Hopefully this post will serve as a starting point when I do. I wonder how much the Lucene code can be simplified by the Spring support in the Spring Modules project?

Posted in Java at Aug 17 2005, 10:19:09 PM MDT 17 Comments

HowTo set the default submit button on a form

Howard has a nice little trick for setting the default submit button on a form. Basically, you just put the default button first, and then use style="display: none" to hide it. For the most part, I haven't had any issues with putting the default submit button first (i.e. "Save"), but I have noticed an issue when developing wizards (b/c "« Previous" is likely to be first). Nice tip Howard.

Posted in The Web at Jun 20 2005, 08:58:53 AM MDT 7 Comments

Using DWR with Spring and Hibernate

For the past few weeks, I've been developing an application using Struts, Spring, Hibernate and the DWR project for my XmlHttpRequest framework. As you might remember, I used JSON-RPC for Ajax stuff on my last project. I found DWR to be much more full-featured and easier to use. This post is meant to capture some issues I encountered so others won't have to jump the hurdles that I did. For those of you that get bored quickly, here's a movie (QuickTime) of the app's Ajax features.

I've been using version 0.4 of DWR, and I haven't had a chance to try out version 0.5. When I first started using it, I ran into a ThreadDeath problem that was easily resolved by changing a log.debug message to System.out.println. I tried to reproduce this issue yesterday and couldn't, so who knows what that was all about. As far as configuring DWR in your webapp, that's pretty easy to do, and well documented. See the project's documentation or this Spring MVC HowTo.

Here are a few things I remember from my development experience.

  • The examples are great, especially how to dynamically edit a table.
  • When developing, make sure to set the "debug" init-param to "true". This allows you to go to http://location:8080/yourapp/dwr and see a screen that allows you to call methods on your exposed classes.
  • In WEB-INF/dwr.xml, you need to specify a converter for each POJO you want to expose to your UI via JavaScript. I started out by converting a whole package, but found this to be *extremely* slow (we have a package of around 50 DTOs). So I changed it to be only the DTOs I was using. This turned out to take about 30 seconds to do the conversion, and was again unacceptable. The problem turned out to be that the converter was invoking all the lazy-loaded children for each DTO. My final solution was to create a NameValue object and only convert that. Then in my Spring bean, I populate it from DAOs and DTOs. I'm using Spring's OSIVF for Hibernate to ensure that DWR doesn't invoke lazy-loading.
  • I had to override a few of DWR's JavaScript functions in util.js b/c they didn't work for me. I changed showById() and toggleDisplay() to use style.display='' instead of style.display='block' b/c this is what I've always used and block doesn't work that well. I also changed useLoadingMessage() to have a cleaner-looking load message.
  • I used the Fade Anything Technique in this project and found that IE likes to have full 6-digit hex values for colors in CSS rules. The shorter 3-digit hex values simply don't work in IE.
  • Using "test" buttons that only showed up for my username proved to be a great way to test the UI and the Ajax stuff. These buttons called a number of JavaScript functions to drive the UI and wait between invoking different functions using window.setTimeout.

All in all, using DWR was a great experience and I definitely plan to use it more in my projects. The client loves the app - especially since it's wicked fast and seems to work like a desktop app.

Posted in Java at Apr 28 2005, 02:10:26 PM MDT 31 Comments

Setting up CVS, AppFuse, JSPWiki, Tomcat, MySQL, Apache and Bugzilla on Suse 9.2

I have a few different clients right now. One of them has taked me with building a Linux box for them, configured with all the standard stuff you need for developing/testing Java apps. I decided to document the process in hopes that the next time I do it, it will be a little less painful. The box had Suse 9.2 Professional installed on it, and was unlike most Linux boxes I've setup. There was hardly anything setup on it, not even gcc - which is used to compile/install most Linux-based software. All of the this work was done remotely, using SSH and Cygwin.

NOTE: This was written after-the-fact, so it might not be up to date. I've tried to remember what I could.

Table of Contents

  • [1] Installing CVS
  • [2] Installing Tomcat, Ant and MySQL
  • [3] Testing installation with Equinox and AppFuse
  • [4] Installing JSPWiki
  • [5] Installing Apache
  • [6] Configuring the Apache Tomcat Connector
  • [7] Installing Bugzilla

Installing CVS [#1]

When I first logged into this machine, it had virtually nothing installed. In most cases, when I've installed packages on Linux, I've found it easiest to download the source, run ./configure, make and make install because installing RPMs often gets into strange dependencies that I can never figure out. Luckily, with CVS, I was able to easily install an RPM. I uploaded the RPM for CVS from my Suse 9.2 Professional CD. I then logged in as root and installed it using "rpm -i cvs-1.11.14-20.i586.rpm".

I also setup CVSSpam, which can be configured to send us e-mails when someone commits. If you read the CVSSpam manual, you'll see that you can checkout the CVSROOT module and configure settings in there.

Installing Tomcat, Ant and MySQL [#2]

Before installing Tomcat and Ant, I had to install the JDK. There was already a JDK installed, but it was IBM's and I've had more success with Sun's. I downloaded the "self-installing binary" (v. 1.4.2_06) from http://java.sun.com/j2se/1.4.2/download.html and installed it in the /usr/java directory. I then created a jdk-1.4.2 symlink to the "j2sdk1.4.2_06" directory in this same directory. Next, I changed the Java-related environment variables in /etc/profile.d/alljava.sh to point to /usr/java/jdk1.4.2.

Installing Tomcat and Ant was fairly easily. I just downloaded the binaries and unzipped them into the following directories.

I then created "ant" and "tomcat" symlinks in the /opt/tools directory to point to these installation. Next, I created environment variables for ANT_HOME and CATALINA_HOME by appending the following to the bottom of the /etc/profile file:

#
# Java Development Enviroment Variables
#
export TOOLS_HOME=/opt/tools
export ANT_HOME=$TOOLS_HOME/ant
export CATALINA_HOME=$TOOLS_HOME/tomcat
export PATH=$ANT_HOME/bin:$CATALINA_HOME/bin:$PATH

For MySQL, I installed version 4.1.7 using an RPM. I created /etc/my.cnf file with the following settings - so AppFuse/UTF-8 would work, as well as Transactions:

[mysqld]
default-table-type=innodb
default-character-set=utf8

Testing installation with Equinox and AppFuse [#3]

After installing Ant, Tomcat and MySQL, I was able to successfully checkout Equinox (and AppFuse) into my home directory and run all tests against Tomcat.

One thing I did have to change in the default AppFuse setup was the MySQL Driver. Suse uses IPv6, which doesn't work with the current JDBC Driver in AppFuse 1.7 (or prior). You can get the latest one at http://dev.mysql.com.

Installing JSPWiki [#4]

Installing and configuring JSPWiki was fairly easy. I downloaded version 2.1.115-alpha, extracted its contents and renamed JSPWiki.war to wiki.war. Then I copied it to $CATALINA_HOME/webapps. After Tomcat expanded it, I modified the $CATALINA_HOME/webapps/wiki/WEB-INF/jspwiki.properties file and changed a few settings:

jspwiki.fileSystemProvider.pageDir = /opt/tools/tomcat/webapps/wiki/data
jspwiki.basicAttachmentProvider.storageDir = /opt/tools/tomcat/webapps/wiki/data/files
jspwiki.translatorReader.allowHTML = true
jspwiki.templateDir = blueman

I have a custom template that I use for most clients. It's called "blueman" and I downloaded it and extracted it into the $CATALINA_HOME/webapps/wiki/templates directory. I also copied the sample pages that come with JSPWiki into the /opt/tools/tomcat/webapps/wiki/data directory.

NOTE: One issue I had while doing this was having trailing spaces for the "*Dir" attributes in jspwiki.properties. Make sure these values don't have any trailing spaces.

Installing Apache [#5]

Installing Apache was the hardest part of this whole setup. Not because the installation was hard, but figuring out how to do it was. There are no pre-built binaries for Apache. I tried to install RPMs, but dependency failures kept happening and I couldn't get them resolved. I couldn't compile from source because there was no C-compiler installed. After much googling and a lot of research, I discovered I could change where YaST looked for its installation files. The default was set to look on the CDs.

To change the location, I typed "yast2", selected Software >> Change Source of Installation, and added a new FTP Source with the following settings:

Protocol: FTP
Server Name: ftp.suse.com
Directory on Server: pub/suse/i386/9.1 (I tried 9.2, but it didn't resolve)
Authentication: anonymous

I then turned off the other 2 CD sources. When I first did this, I used "yast" rather than "yast2" and it didn't seem to have any effect. In fact, I think I rebooted before I even tried "yast2", but then I read about it on some website, tried "yast2" and found I could easily install a number of programs using this utility.

After configuring the new source, I went to Software >> Installed and Remove Software and searched for "apache2". I selected the following modules to install:

  • apache2
  • apache2-jakarta-tomcat-connectors
  • apache2-mod_perl
  • apache2-prefork
  • apache2-worker

The last 2 are required by apache2. After installing all of these, Apache 2.0.49 was installed and I received a page when I navigated to the host's IP address. It turned out to be an error page, but only because there was no index.html file in /srv/www/htdocs. I created a symlink from htdocs/index.html to $CATALINA_HOME/webapps/ROOT/index.jsp (a simple static page) to solve this issue.

Configuring the Apache Tomcat Connector [#6]

I found most of the information for this section from reading the /usr/share/doc/packages/apache2-jakarta-tomcat-connectors/README.SuSE file. I've used both mod_jk and mod_jk2 in the past, but since this file said "The module JK2 is only experimental in this package", I opted to configure the mod_jk connector. Below are the steps I went through to configure Apache2 to connect to Tomcat 5.0.30 on Suse 9.2:

1. Create a file named jk.conf in the /etc/apache2/conf.d directory with the contents below. This file contains the URI mappings to tell Apache what URLs to direct to Tomcat. Many of the samples I found go a bit further and map the full directories in Tomcat, but since the apps deployed are entirely self-contained, it seems to make more sense to just do the JkMount.

<IfModule mod_jk.c>

    JkWorkersFile /etc/apache2/workers.properties
    JkLogFile /opt/tools/tomcat/logs/mod_jk.log

    # Log level to be used by mod_jk
    JkLogLevel error

    # AppFuse - the 2nd line eliminates the need for a
    # trailing slash on the URL
    JkMount /appfuse/* ajp13
    JkMount /appfuse ajp13

    # Equinox - the 2nd line eliminates the need for a
    # trailing slash on the URL
    JkMount /equinox/* ajp13
    JkMount /equinox ajp13

    # JSPWiki - the 2nd line eliminates the need for a
    # trailing slash on the URL
    JkMount /wiki/* ajp13
    JkMount /wiki ajp13

</IfModule>

After configuring Apache+Tomcat, I blocked port 8080 on the firewall and changed AppFuse to use port 80 as its default port. This is easy to do - just create a .build.properties file in your home directory with the following contents:

http.port=80

Then run "ant clean deploy". This will affect all of your AppFuse-based projects.

2. Create an /etc/apache2/workers.properties file with the following contents:

#
# You should configure your environment slash... ps=\ on NT and / on UNIX
# and maybe something different elsewhere.
#
ps=/

#
# The workers that your plugins should create and work with
#
# Add 'inprocess' if you want JNI connector
worker.list=ajp13

#------ DEFAULT ajp13 WORKER DEFINITION ------------------------------
#---------------------------------------------------------------------
#

#
# Defining a worker named ajp13 and of type ajp13

# Note that the name and the type do not have to match.
#
worker.ajp13.port=8009
worker.ajp13.host=localhost
worker.ajp13.type=ajp13
#
# Specifies the load balance factor when used with
# a load balancing worker.
# Note:
#  ----> lbfactor must be > 0
#  ----> Low lbfactor means less work done by the worker.
worker.ajp13.lbfactor=1

#
# Specify the size of the open connection cache.
#worker.ajp13.cachesize

3. Add the module "jk" to the list of apache2 modules APACHE_MODULES. It can be done by YaST in the "Editor for /etc/sysconfig Files" or by editing the file /etc/sysconfig/apache2. If you have done it by editing the file. The apache2 configuration has to be updated by the command:

SuSEconfig --module apache2 

4. Make sure the server tomcat is stopped.

5. Change CATALINA_BASE to "/opt/tools/tomcat". It can be done by YaST in the "Editor for /etc/sysconfig Files" or by editing the file /etc/sysconfig/j2ee. (I don't think this is necessary since I didn't install Tomcat using YaST).

6. Start Tomcat and restart Apache using "rcapache2 restart".

Installing Bugzilla [#7]

To install Bugzilla, I downloaded the 2.18rc3 version and extracted it to the /opt/tools directory. I then moved it to /opt/tools/bugzilla and cd'd into it. Then I ran "./checkconfig.pl" and proceeded to install the Perl modules it told me to. Then I modified the "localconfig" file in this directory. I changed the "$webservergroup" to be "" since I couldn't figure out what group Apache's files were supposed to belong too. I also changed the "$db_user" to be "root" since I couldn't get the "bugs" user to work. The group and db_user are things that I still need to fix - any advice is appreciated. I changed the "$webservergroup" to be "www" (thanks John Norman) and I had to use old_password() on the "bugs" user to get bugzilla to work with MySQL 4.1.7.

Next, I edited the /etc/apache2/default-server.conf file so "/bugzilla" would be recognized. I added the following right after the configuration for the "/icons" directory.

Alias /bugzilla "/opt/tools/bugzilla"
<Directory "/opt/tools/bugzilla">
        Options FollowSymLinks Indexes Includes +ExecCGI
        AllowOverride All
        DirectoryIndex index.cgi
        Order allow,deny

        Allow from all
</Directory>

Then, at the bottom of the file, I added:

AddHandler cgi-script .cgi

I restarted Apache and I kept getting an error that Apache couldn't open the /opt/tools/bugzilla/.htaccess file. I tried running "chmod +r", "chmod 644", "chmod 755" and even "chmod 777", but no luck. Finally, I googled and found that running "chmod 701 /opt/tools/bugzilla" solved the problem.

Hopefully this will help anyone else trying to setup these tools on a remote Suse box.
Posted in Java at Jan 04 2005, 03:58:03 PM MST 11 Comments

Eclipse Tips

From my Eclipse HowTo for Spring Live:

TIP: In order to clean up the project view in Eclipse, you can hide the files you don't need. First of all, make sure you're in the Java Perspective (Window → Open Perspective). Then click the little (down) arrow in the top right corner of the Package Explorer pane. Select Filters, check the "Name Filter Patterns" and type "*.jar" (no quotes) in the text field. Then in the list of elements, scroll down and check Referenced Libraries. Click OK to continue.

Another useful Eclipse trick is to use abbreviated package names. You probably won't need it on this project, but its nice on projects where you're inflicted with super.long.package.name.syndrome. Go to Window → Preferences → Java → Appearance. Check the "Compress all package names" checkbox and type "1." (no quotes) in the text field.

Want more tips? Ask Bill.

Posted in Java at Jul 23 2004, 04:02:39 PM MDT 16 Comments