

Edit Java webapps Redux: Jetty Launcher and Equinox
A few weeks ago, I realized I was developing webapps the hard way, by re-deploying everytime I made a change. It's important to have a build process that can create a WAR and deploy, but it's also important to have a system where you can edit/save/view changes w/o ever deploying.
I spent some time this weekend working with Jetty Launcher, Eclipse 3.1 and the latest version of Equinox. Below are instructions on how to make the two work together. Once you've completed the steps below, you should be able to launch Jetty and edit/save Java files or JSP files in Equinox - and the changes will show up immediately in your webapp. No deployment or Ant/Maven interaction necessary.
I've tested this setup on Eclipse 3.1, using both OS X and Windows XP.
Step 1: Install Jetty and Launcher
Download and install Jetty. I tested 5.1.4 and 5.1.6 and both seem to work (6.0.0 Beta does not). In Eclipse, go to Help » Software Updates » Find and Install. Select Search for new features to install and click Next. Click on the New Remote Site button and enter "Jetty Launcher" for the name and "http://jettylauncher.sourceforge.net/updates" for the URL. Click OK, continue to download and restart your workspace.
Step 2: Install Equinox and create Eclipse project files
Download Equinox 1.5 beta 1 and extract to your workspace (I generally use c:\Source on Windows and /Users/${username}/dev on OS X). Download Maven 2.0, install it, and add $M2_HOME/bin to your $PATH. From the command line, cd into the equinox directory and type "mvn eclipse:eclipse". Get a cup of coffee or soda while you wait for Maven to download all the dependencies.
Once the project files have been created, open Eclipse and go to File » New » Project » Java Project. Click Next and type "equinox" in the Project name box. Click Finish to begin importing the project. You'll probably get an error like the following. Click OK to continue.

Click Next to continue (I had to click it a few times before it took me to the next screen). On the next screen (Define the Java build settings), select the web directory and click Configure inclusion and exclusion filters. Click the Add button for Exclusion patterns and enter "WEB-INF/classes/" (the trailing slash is important).
You're not done yet, now you need to define the M2_REPO variable that points to all the downloaded dependencies. Click the Libraries tab and then the "Add Variable" button as seen below.
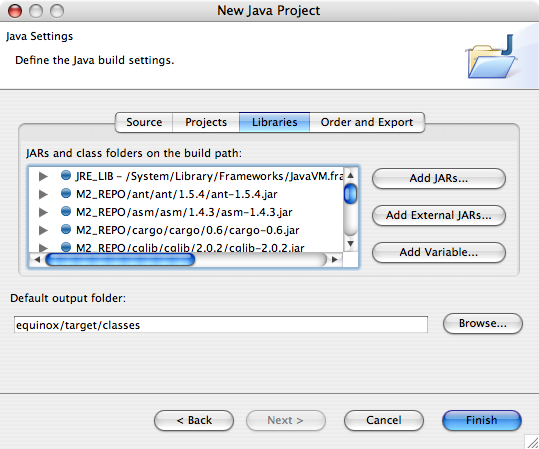
Click the Configure Variables button and add a new one with a name of M2_REPO and Path of to your local Maven repository (/Users/${username}/.m2/repository on OS X and C:\Documents and Settings\${username}\.m2\repository on Windows). Click OK, Cancel and then Finish.
Step 3: Configure Jetty Launcher for Equinox
In Eclipse, go to Run » Debug and select Jetty Web in the Configurations panel. Click the New button. In the "Use Options" section, use "web" for the webapp root and (optionally) "/equinox" for the context name.
Jetty has issues running applications that use commons-logging, so you'll need to turn off all the INFO logging from the projects that Equinox uses. To do this, click on the Arguments tab and add the following to the list of VM arguments:
-DDEBUG -DDEBUG_PATTERNS=org.appfuse -DDEBUG_VERBOSE=-1
This can be placed on the line below the -Djetty.home argument. For more information on logging in Jetty, see the Jetty logging and debugging tutorial.
Step 4: Start Jetty in debug mode and modify to your hearts content
Click Apply and then Debug, and watch Jetty startup. If you go to http://localhost:8080/equinox/users.html in your browser, you should see a log message like the following:
11:44:25.855 DEBUG  [SocketListener0-1] org.appfuse.web.UserController.handleRequest
(UserController.java:24) >29> entering 'handleRequest' method...
You should be able to click on "UserController.java:24" to navigate to the UserController.java class. In this class, modify the log.debug(...) message, save the file and hit refresh on your browser. The console should spit out your updated log message. If it didn't, go to Window » Preferences » Workspace and make sure Build automatically is checked.
As far as I can tell, edit/save/refresh will work for .java and .jsp files, but not for .xml files. For that, the Jetty Launcher adds a Stop/Restart Jetty icon to your Eclipse toolbar. This setup seems to work great, except for the fact that you can't see when Jetty is done starting up in the console.
NOTE: I tried to get a similar setup working with the Tomcat Eclipse Plugin (v3.1 beta) and the Eclipse Web Tools Project (v0.7.1). Neither worked as smoothly, and the WTP wouldn't even deploy to Tomcat.