Matt RaibleMatt Raible is a writer with a passion for software. Connect with him on LinkedIn.

The Angular Mini-Book The Angular Mini-Book is a guide to getting started with Angular. You'll learn how to develop a bare-bones application, test it, and deploy it. Then you'll move on to adding Bootstrap, Angular Material, continuous integration, and authentication.

Spring Boot is a popular framework for building REST APIs. You'll learn how to integrate Angular with Spring Boot and use security best practices like HTTPS and a content security policy.

For book updates, follow @angular_book on Twitter.

The JHipster Mini-Book The JHipster Mini-Book is a guide to getting started with hip technologies today: Angular, Bootstrap, and Spring Boot. All of these frameworks are wrapped up in an easy-to-use project called JHipster.

This book shows you how to build an app with JHipster, and guides you through the plethora of tools, techniques and options you can use. Furthermore, it explains the UI and API building blocks so you understand the underpinnings of your great application.

For book updates, follow @jhipster-book on Twitter.

10+ YEARS


Over 10 years ago, I wrote my first blog post. Since then, I've authored books, had kids, traveled the world, found Trish and blogged about it all.
You searched this site for "maven". 270 entries found.

You can also try this same search on Google.

AppFuse News: GitHub, Hibernate Search and The Future

It's been a while since I've written anything about AppFuse, but since the project has had quite a bit of activity lately, now seems like a good time.

GitHub
First of all, we moved the source code from java.net to GitHub way back in June. Thanks to Serge for helping with this process and making it quick and painless. For some reason, shortly after moving, we started having quite a few build issues with Bamboo. I was able to diagnose the problem as not enough memory on our server. Thankfully, Contegix was able to add another 2GB of RAM to our box and get everything back up-to-snuff.

New Committer: J. Garcia
J. Garcia has been a regular voice on the users and developers mailing list for several months. He's recently started contributing a lot of patches in JIRA and seems genuinely interested in the success of AppFuse. That's why we voted and added him as a committer. To prove this was a smart move, he recently replaced Compass with Hibernate Search and upgraded to Hibernate 4. As part of this work, he removed iBATIS support, which brings me to my next point.

The Future
In mid-August, I sent an email to the community, asking them "Anyone using iBATIS?"

I'm thinking of replacing AppFuse's Data Tier with Spring Data, especially because it has NoSQL and REST support. There's a good intro on InfoQ today:

http://www.infoq.com/articles/spring-data-intro

Does anyone see an issue with this? The lack of iBATIS support could be an issue, but I doubt it since if we wanted to continue supporting it, we should move to MyBATIS.

Everyone agreed this was a good idea and it seemed like a logical time to remove iBATIS support. In addition, I posted a roadmap I jotted down in early May. Since we've missed all the dates so far, I've removed them from the listing below. We hope to get 1-2 releases done by the end of this year, with 2.2 in the next 2-3 weeks.

2.2
Hibernate 4
Hibernate Search
Bootstrap
H5BP

2.3
AMP for all light modules
Wicket
PrimeFaces

2.4
JSR 303 (might require removing or developing client-side support)
Mockito instead of jMock/EasyMock

2.5
AMP one-to-many
Spring Data
MyBatis (if there's interest in adding it back in)

2.6
wro4j for concatenation and minimizing JS and CSS
pjax - https://github.com/defunkt/jquery-pjax

2.7
Scala example
Gradle example
Article about examples

3.0
GWT

Maven Central Statistics
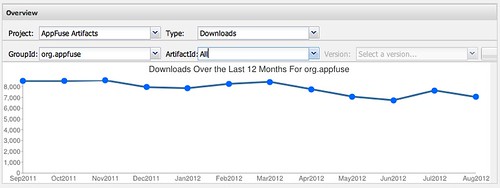
To prove there's still a fair amount of folks using AppFuse, here's some statistic from Sonatype's OSS Repository Hosting Service.

AppFuse Downloads

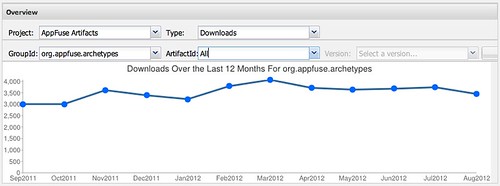
From this screenshot, you can see that AppFuse artifacts are downloaded around 7,000 times per month. The following graph is even more interesting. Apparently, around 3,000 new projects are created with AppFuse archetypes each month.

AppFuse Archetype Downloads

The AppFuse Name
Finally, I recently discovered that ShoreTel decided to name a new product AppFuse. I guess this signifies two things: 1) it's a good name for a product and 2) someone didn't do their research before naming it. At this point, I'm not too concerned, but it is an interesting development.

Posted in Java at Sep 25 2012, 10:42:14 AM MDT 5 Comments

2011 - A Year in Review

2010 was an awesome year, but 2011 rocked the house! At the end of last year, I kept my goals simple:

In 2011, I plan on doing two main things: keep rockin' it with Trish and finishing The Bus. Everything else is gravy.

As predicted, it was a spectacular year, but I only accomplished 50% of my goals. That is, Trish and I had a great time skiing (especially in Utah), moving in together, traveling the world and getting engaged in Versailles. I even satisfied some 5-year goals: building a sauna in my basement and getting a ski shack in the mountains.

However, I didn't get much done with The Bus. Or rather, the guys at MotorWorks Restorations didn't drain me for all I'm worth in 2011. We did make good progress with estimating the final cost and obtaining many hard-to-find parts though. I now have a Porsche 911 Engine (1983 3.0L 6 cylinder), a Porsche 901 5 speed transmission, Porsche "Turbo Twist" wheels and a Custom Air Ride Front Beam from Franklin's VW Works. The thing that slowed our progress the most was the custom beam, as it took almost 6 months from order to delivery. When it arrived in September, I decided to put things on hold. I didn't want to get my bus back in the midst of winter and not be able to drive it.

[Read More]

Posted in Roller at Jan 11 2012, 09:45:20 AM MST 2 Comments

Upgrading AppFuse to Spring Security 3.1 and Spring 3.1

Before the holiday break, I spent some time upgrading AppFuse to use the latest releases of Spring and Spring Security. I started with Spring Security in early December and quickly discovered its 3.1 XSD required some changes. After changing to the 3.1 XSD in my security.xml, I had to change its <http> element to use security="none" instead of filters="none". With Spring Security 3.0.5, I had:

<http auto-config="true" lowercase-comparisons="false">
    <intercept-url pattern="/images/**" filters="none"/>
    <intercept-url pattern="/styles/**" filters="none"/>
    <intercept-url pattern="/scripts/**" filters="none"/>
After upgrading to 3.1, I had to change this to:
<http pattern="/images/**" security="none"/>
<http pattern="/styles/**" security="none"/>
<http pattern="/scripts/**" security="none"/>

<http auto-config="true">

The next thing I had to change was UserSecurityAdvice.java. Instead of using Collection<GrantedAuthority> for Authentication's getAuthority() method, I had to change it to use Collection<? extends GrantedAuthority>.

Authentication auth = ctx.getAuthentication();
Collection<? extends GrantedAuthority> roles = auth.getAuthorities();

Lastly, I discovered that SPRING_SECURITY_CONTEXT_KEY moved to HttpSessionSecurityContextRepository. Click here to see the changelog for this upgrade in AppFuse's FishEye.

You can read more about what's new in Spring Security 3.1 on InfoQ. I'm especially pumped to see http-only cookie support for Servlet 3.0. I discovered Spring Security didn't support this when Pen-Testing with Zed Attack Proxy.

Upgrading to Spring Framework 3.1
Compared to the Spring Security upgrade, upgrading to Spring 3.1 was a breeze. The first thing I discovered after changing my pom.xml's version was that Spring Security required some additional exclusions in order to get the latest Spring versions. Of course, this was communicated to me through the following cryptic error.

-------------------------------------------------------------------------------
Test set: org.appfuse.dao.LookupDaoTest
-------------------------------------------------------------------------------
Tests run: 1, Failures: 0, Errors: 1, Skipped: 0, Time elapsed: 0.004 sec <<< FAILURE!
testGetRoles(org.appfuse.dao.LookupDaoTest)  Time elapsed: 0.001 sec  <<< ERROR!
java.lang.NoSuchMethodError: org.springframework.context.support.GenericApplicationContext.getEnvironment()Lorg/springframework/core/env/ConfigurableEnvironment;
	at org.springframework.test.context.support.AbstractGenericContextLoader.loadContext(AbstractGenericContextLoader.java:97)
	at org.springframework.test.context.support.AbstractGenericContextLoader.loadContext(AbstractGenericContextLoader.java:1)
	at org.springframework.test.context.support.DelegatingSmartContextLoader.loadContext(DelegatingSmartContextLoader.java:228)
	at org.springframework.test.context.TestContext.loadApplicationContext(TestContext.java:124)
	at org.springframework.test.context.TestContext.getApplicationContext(TestContext.java:148)
	at org.springframework.test.context.support.DependencyInjectionTestExecutionListener.injectDependencies(DependencyInjectionTestExecutionListener.java:109)

Without these additional exclusions, Spring Security pulled in Spring 3.0.6. I had to exclude spring-expression, spring-context and spring-web from spring-security-taglibs to get the 3.1.0.RELEASE version of Spring.

<dependency>
    <groupId>org.springframework.security</groupId>
    <artifactId>spring-security-taglibs</artifactId>
    <version>${spring.security.version}</version>
    <exclusions>
        <exclusion>
            <groupId>org.springframework</groupId>
            <artifactId>spring-expression</artifactId>
        </exclusion>
        <exclusion>
            <groupId>org.springframework</groupId>
            <artifactId>spring-context</artifactId>
        </exclusion>
        <exclusion>
            <groupId>org.springframework</groupId>
            <artifactId>spring-web</artifactId>
        </exclusion>
    </exclusions>
</dependency>

I also had to exclude spring-context from spring-security-config and spring-context and spring-expression from spring-security-core. Isn't Maven wonderful?

<dependency>
    <groupId>org.springframework.security</groupId>
    <artifactId>spring-security-core</artifactId>
    <version>${spring.security.version}</version>
    <exclusions>
        <exclusion>
            <groupId>org.springframework</groupId>
            <artifactId>spring-expression</artifactId>
        </exclusion>
        <exclusion>
            <groupId>org.springframework</groupId>
            <artifactId>spring-context</artifactId>
        </exclusion>
    </exclusions>
</dependency>
<dependency>
    <groupId>org.springframework.security</groupId>
    <artifactId>spring-security-config</artifactId>
    <version>${spring.security.version}</version>
    <exclusions>
        <exclusion>
            <groupId>org.springframework</groupId>
            <artifactId>spring-context</artifactId>
        </exclusion>
    </exclusions>
</dependency>

After making these changes, I got a bit further, but ended up being blocked by a bug in Tapestry 5's Spring support. Basically, after upgrading to Spring 3.1, I started seeing the following error:

java.lang.RuntimeException: Service id 'environment' has already been defined by 
org.apache.tapestry5.services.TapestryModule.buildEnvironment(PerthreadManager) 

Luckily, I was able to easily fix this with advice I found on Tapestry's mailing list. Unfortunately, even though I submitted a fix on December 15th, it didn't make it into Tapestry's 5.3.1 release on December 21st. As soon as Tapestry 5.3.2 is released, I hope to get the AppFuse's build passing again (it's currently failing).

I hope this article helps you upgrade your AppFuse-started applications to the latest versions of Spring and Spring Security. Over the next few weeks, I'll be exploring many of Spring 3.1's new features and implementing them as I see fit. Right now, I'm thinking environments/profiles, Servlet 3 / Java 7 support and Hibernate 4 support. These seem to be the best new features to learn about for my talk in a few weeks.

Posted in Java at Jan 05 2012, 08:58:21 AM MST 7 Comments

What have I been working on at Taleo?

2011 has been a year of great clients for me. I started working with O.co and very much enjoyed my time there, especially on powder days in Utah. The people were great, the contract was great (no end date), but the work was not my forte. I was on a project to modularize the main shopping site's codebase, which involved mostly refactoring. By refactoring, I mean creating new Maven projects, modifying lots of pom.xml files and literally moving files from one directory to another. IntelliJ made this easy, the hard part was refactoring tests, moving from EasyMock to Mockito and splitting classes into interfaces and implementations where appropriate. As a developer who likes developing UIs and visually seeing my accomplishments, the project wasn't that exciting. However, I knew that it was strategically important to O.co, so I didn't complain much.

In mid-May, I received a LinkedIn message from the Director of Software Engineering at Taleo.

This is OB, I am the Director of Software Engineering at Taleo. We are the 2nd largest Software as a Service company. I am building a new specialist UI team that will take the product to the next level. I am looking for someone to lead this initiative. If you are interested to have a chat about it, please let me know.

At that time, I'd never heard of Taleo and quickly recommended they not hire me.

This probably isn't the best position for me. While I am a good leader, I'm not willing to relocate from Denver. I've found that leaders usually do best when face-to-face with their developers.

This conversation continued back-and-forth where I explained how I wasn't willing to go full-time and I didn't want to leave Overstock. In the end, OB was persistent and explained how the position would entail lots of UI work and wouldn't require me to travel much. Our negotiations trailed off in June and resumed in July after I returned from vacation in Montana. Shortly after, we met each other's expectations, agreed on a start date and I started working at Taleo in early September.

When I started, there were three features they wanted to add to to Taleo Business Edition: Profile Pictures, Talent Cards and Org Charts. They knew the schedule was tight (8 weeks), but I was confident I could make it happen. At first, I groaned at the fact that they were using Ant to build the project. Then I smiled when I learned they'd standardized on IntelliJ and set things up so you could do everything from the IDE. After using Maven for many years, this setup has actually become refreshing and I rarely have to restart or long for something like JRebel. Of course, a new kick-ass laptop and awesome IDE make it so I rarely wait for anything to happen.

To give you a taste of how I implemented each of these new features in 8 weeks, I've broken them into sections below.

Profile Pictures
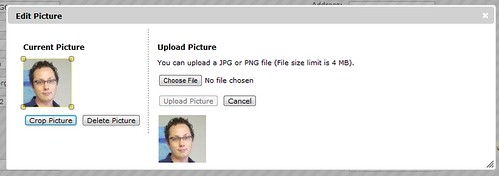
Adding profile pictures was a pretty simple concept, one you see on my social networking sites today. I needed to give users the ability to upload a JPEG or PNG and crop it so it looked good. The uploading was a pretty straightforward process and I used a lot of internal APIs to grab the file from the request and save it to disk. The more difficult part was scaling the image to certain dimensions on upload (to save space) and allowing users to crop it after.

Most of Taleo Business Edition (TBE) is written in good ol' servlets and JSPs, with lots of scriptlets in their JSPs. When I saw the amount of HTML produced from Java, I laughed out loud and cringed. Soon after, I breathed a sigh of relief when I learned that any new features could be written using FreeMarker templates, which IntelliJ has excellent support for.

For image resizing on upload, I used Chris Campbell's Image.getScaledInstance() tutorial. For creating thumbnails, I used a combination of scaling, getSubimage() and the Java Image I/O API. I made sure to write to BufferedOutputStream for scalability. For cropping images client-side, I used jQuery UI's Dialog and Jcrop, the jQuery image cropping plugin. Below is a screenshot of what the cropping UI looks like:

Taleo's TBE: Profile Picture

Talent Cards
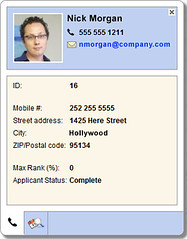
Talent Cards were a whole different beast. Not only did they need to display profile pictures, they also needed to contain contact information, work history and a number of other data points. Not just for employees, but for candidates as well. They also needed to be rendered with tabs at the bottom that allowed you to navigate between different data sections.

Taleo's TBE: Talent Card I'll admit, most of the hard work for this feature was done by the server-side developers (Harish and Vlad) on my team. Vlad built the tabbed interface and Harish built the administrative section that allows you to add/remove/sort fields, as well as show and hide certain tabs. I performed most of my magic with jQuery, its clueTip plugin and good ol' CSS. I was particularly thankful for CSS3 and its border-radius, box-shadow and Justin Maxwell's tutorial on CSS String Truncation with Ellipsis. I used DWR to fetch all the data from the server using Ajax.

Talent Cards are a slick feature in TBE 11.5 and I think they're a great way to see a lot of information about someone very quickly. If you enable them for your company, you'll be able to mouse over any employee or candidate's names and see their information.

Org Chart
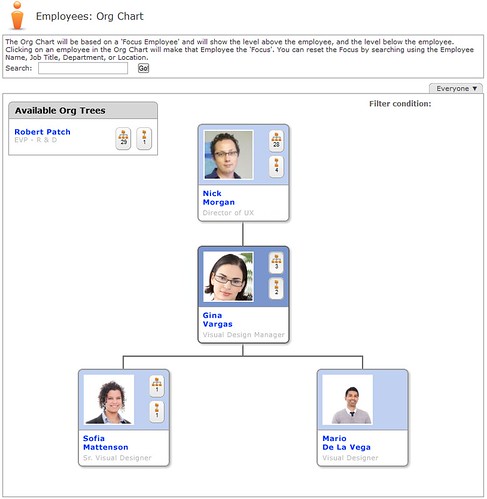
The last feature I completed in this 8-week sprint was creating an organization chart. For this, I was given a rough prototype based on Caprica Software's JQuery/CSS Organisation Chart. When I received it, it had all kinds of cool CSS 3 transformations (like this one), but they only worked in Safari and Chrome. I ended up removing the transformations and adding the ability to navigate up and down the org tree with Ajax (we currently only show three levels at a time).

The Org Chart feature also allows you to see how many direct/indirect reports an employee has, as well as access their Talent Card by hovering over their name. It's one of my favorite features because it's so visual and because it builds upon all the other features we've built.

Taleo's TBE: Org Chart

Summary
As you might've guessed by now, I've been having a lot of fun doing UI development over the last few months. While I seem to have a knack for backend Java development, I enjoy developing UIs a lot more. The smile you see on people's faces during demos is priceless. I can't help but think this kind of thing contributes greatly to my developer happiness. All these features will be in next week's release of TBE and I couldn't be happier.

If you'd like to work on my team at Taleo (or even take over my current role as UI Architect), please drop me a line. If you live near their headquarters (Dublin, CA), it'd also be great to see you at the next Silicon Valley Spring User Group meetup. I'll be speaking about What's New in Spring 3.1 on February 1st.

Posted in Java at Dec 09 2011, 12:57:36 PM MST 1 Comment

Deploying Java and Play Framework Apps to the Cloud with James Ward

Yesterday, I attended James Ward's presentation on Deploying Java & Play Framework Apps to the Cloud at Devoxx. I arrived a bit late, but still managed to get there in time to see a lot of demos and learn more about Heroku. Below are my notes from James's talk.

When I arrived, James was doing a demo using Spring Roo. He was using Roo's Petclinic sample app and showed us how you could use Git to create a local repository of the new project and install Heroku's command line tool. From there, he ran the following command to create a new application on Heroku.

heroku create -s cedar

The Cedar Stack is what supports Java, Scala and Play Framework. It's the 3rd generation stack for Heroku. The command above created two endpoints, one for HTTP and one for Git. It picks from a list of randomly generated names, which all seem to have some humor in them. James ended up with "electric-sword-8877" for this demo.

From there, he ran git push heroku master to deploy the project to Heroku. Unfortunately, this resulted in a login error and there was an akward moment where we all thought the Demo Gods were angry. However, James was able to resolve this by using Heroku's sharing feature with the following command.

heroku sharing:add [email protected]

For Java projects, Heroku looks for a pom.xml file in the root directory and runs a Maven build on project. All the dependencies get downloaded on the cloud rather than put them into a WAR and requiring you to upload a large WAR file. You don't have to upload your source code to Heroku; James did it for the sake of the demo because it was faster.

After the build finishes, it creates a slug file. This file contains everything Heroku needs to run your application.

Next, James showed a demo of the running application and added a new Pet through its UI. Then he scaled it to two servers using the following command:

heroku scale web=2

He proved this was working by running heroku ps, which showed there were two running processes. He showed the app again, but noted that the record he added was missing. This is because when it started up a new dyno, Hibernate created the schema again and deleted all records. To fix, James changed Hibernate to only update the schema instead of create a new one. If you're a Hibernate user, you know this is as simple as changing:

hibernate.hbm2ddl.auto=create

to:

hibernate.hbm2ddl.auto=update

After committing this change, James redeployed using Git.

git push heroku master

The slug file got built again and Heroku deployed the new slug onto both dynos, automatically load balancing the app across two servers. James then ran heroku logs to see the logs of his dynos and prove that a request to his app's HTTP endpoint made requests to both dynos. The logging is powered by Logplex and you can read about how it works in the article Heroku Gets Sweet Logging.

James mentioned that Roo has a Heroku plugin, but after watching his talk and searching a bit on the internet, it seems it's just the jetty-runner setup as described in Getting Started with Spring MVC Hibernate on Heroku/Cedar.

What about autoscaling? There are some 3rd party tools that do this. Heroku's Management infrastructure has APIs that these tools talk too. Heroku hasn't built autoscaling into the platform because they don't know where the bottlenecks are in your application.

Heroku = Polyglot + PaaS + Cloud Components. It supports Ruby, node.js, Java, Clojure, Play and Scala and they're working on native Grails and Gradle support. There's currently 534,374 apps running on Heroku.

Heroku is a cloud application platform and there's 5 different components.

  1. Instant deployment
  2. HTTP Routing / Load Balancing
  3. Elastic Polyglot Runtime
  4. Management & Logging
  5. Component as a Service Ecosystem

For instant deployment, it's a pretty simple process:

  • You add files to a git repo
  • You provision the app on Heroku (heroku create)
  • You upload the files to Heroku (git push heroku master)
  • Heroku runs the build and assembles a "slug" file
  • Heroku starts a "dyno"
  • Heroku copies the "slug" to the "dyno"
  • Heroku starts the web application

Most apps will contain a Procfile that contains information about how to run the web process. For Spring Roo, it has:

web: java $JAVA_OPTS -jar target/dependency/jetty-runner.jar --port $PORT target/*.war

So how does Heroku decide what application server to use? It doesn't, you do. You need to get your application server into the slug file. The easiest way to do this is to specify your application server as a dependency in your pom.xml. In the Roo example, James uses the maven-dependency-plugin to get the jetty-runner dependency and copy it to the target directory. On Heroku, you bring your application server with you.

Heroku gives you 750 free dyno hours per app, per month. For developers, it's very easy to get started and use. Once you extend past one dyno, it's $.05 per dyno hour, which works out to around $30/month. It's only when you want to scale beyond one dyno where you get charged by Heroku, no matter how much data you transfer. Scalatest is running on Heroku. It has one dyno and is doing fine with that. Bill Venners doesn't have to pay anything for it.

java.herokuapp.com is a site James created that allows you to clone example apps and get started quickly with Heroku's Cedar Stack.

For HTTP Routing, Heroku uses an Erlang-based routing system to route all the HTTP requests across your dynos. Heroku doesn't support sticky sessions. Distributed session management does not work well, because it does not scale well. Heroku recommends you use a stateless web architecture or move your state into something like memcached. Jetty has (in the latest version) the ability to automatically serialize your session into a Mongo system. This works fine on Heroku. The problem with this is if you have 2 dynos running, each request can hit a different dyno and get different session state. Hence the recommendation for an external storage mechanism that can synchronize between dynos.

You can also run non-web applications on Heroku. You can have one web process, but as many non-web processes as you want.

Heroku has native support for the Play framework. To detect Play applications, it look for a conf/application.conf file. You don't need to have a Procfile in your root directory because Heroku knows how to start a Play application.

At this point, James created a new Play application, created a new Heroku app (he got "young-night-7104" this time) and pushed it to Heroku. He created a simple model object, a controller to allow adding new data and then wrote some jQuery to show new records via Ajax and JSON. He also showed how to configure the application to talk to Heroku's PostgreSQL database using the DATABASE_URL environment variable. He explained how you can use the heroku config command to see your environment variables.

The reason they use environment variables is so Heroku can update DATABASE_URL (and other variables) without having to call up all their customers and have them change them in their source code.

Play on Heroku supports Scala if you create your app with Scala. Play 2.0 uses Scala, Akka and SBT. Heroku added support for SBT a couple month ago, so everything will work just fine.

Heroku also supports Scala, detecting it by looking for the build.sbt file in the root directory. Heroku supports SBT 0.11.0 and it builds the 'stage' task. It currently does not support Lift because Lift uses an older version of SBT and because it's a very stateful framework that would require sticky sessions. Use Play, BlueEyes or Scalatra if you want Scala on Heroku.

Heroku has addons for adding functionality to your application, including Custom DNS, HTTPS, Amazon RDS, NoSQL and many more. They're also working on making their add-on and management APIs available via Java, so you'll (hopefully) be able to use them from your IDE in the future.

From there, James showed us how Heroku keeps slug files around so you can do rollbacks with heroku rollback. He also showed how you can use:

heroku run "your bash command"
to run any Bash command on the cloud.

Summary
I attended James's talk because he's a good friend, but also because I've been using Heroku to host my latest adventures with Play, Scala, CoffeeScript and Jade. I'm glad I attended because I learned some good tips and tricks and more about how Heroku works.

Heroku seems like a great development tool to me. In my experience, it's been really nice to have instant deployments using Git. In fact, I've created a 'push' alias so I can push to my project's repo and heroku at the same time.

alias push='git push origin master && git push heroku master'

I'd like to see more organizations embrace something like Heroku for developers. It'd be great if everyone had their own sandbox that business owners and product managers could see. I can't help but think this would be awesome for demos, prototyping, etc.

There were some other talks I wanted to attend at the same time, particularly Martin Odersky's What's in store for Scala? and WWW: World Wide Wait? A Performance Comparison of Java Web Frameworks. The WWW talk has posted their presentation but I'm sure it'd be more fun to watch.

It's pretty awesome that all the talks from Devoxx 2011 will be up on Parleys.com soon.

Update: James has posted his slides from this talk.

Posted in Java at Nov 18 2011, 08:14:45 AM MST 2 Comments

Installing OpenJDK 7 on OS X

Last week, I scanned an article and saw there was a Java 7 Webinar. At first, I thought Java 7 was released, but soon after realized it was a Developer Preview. Unfortunately, the download page doesn't have support for OS X. Since it took me a bit of work to figure out how to install OpenJDK 7 on OS X (I'm running Snow Leopard 10.6.7), I figured I'd write down how I did it.

I started off by downloading "OpenJDK 1.7 universal (32/64 bits) from Mac OS/X branch" from the openjdk-osx-build project's downloads (direct link). After downloading, I installed the dmg as normal.

Update Jan 27, 2012:
After installing the dmg, add the following to your ~/.profile and you should be good to go. Thanks to Mark Beaty for the tip.

function setjdk() { if [ $# -ne 0 ];then export JAVA_HOME=`/usr/libexec/java_home -v $@`; fi; java -version; }

Continue with the instructions below if you don't like this technique for some reason.

I don't use Java Preferences to set my JDK, instead I use David Blevin's handy setjdk script. To make this script work with JDK 7 on OS X, I had to make one minor change. On line 40, I added "Contents" to the path for JAVA_HOME:

export JAVA_HOME=$vmdir/$ver/Contents/Home

Update Jan 27, 2012: You no longer need to make this change.

From there, I had to setup some symlinks so everything would work as expected:

cd /System/Library/Java/JavaVirtualMachines/
sudo ln -s /Library/Java/JavaVirtualMachines/1.7.0.jdk

Update Jan 27, 2012: The latest version installs at a different location so the symlink command above should be changed to:

sudo ln -s /Library/Java/JavaVirtualMachines/1.7.0u.jdk 1.7.0.jdk

Lastly, I had my JAVA_HOME set to "/System/Library/Frameworks/JavaVM.framework/Home". I like the shorter (and seemingly more common) "/Library/Java/Home", so I set it back to that in my ~/.profile:

export JAVA_HOME=/Library/Java/Home

On my system, /Library/Java/Home had a symlink to /System/Library/Frameworks/JavaVM.framework/Home, so I changed it to the CurrentJDK that Java Preferences and setjdk use.

cd /Library/Java
rm Home
ln -s /System/Library/Frameworks/JavaVM.framework/Versions/CurrentJDK/Contents/Home

Then I had to add a symlink for 1.7 in the Versions directory.

cd /System/Library/Frameworks/JavaVM.framework/Versions
sudo ln -s /System/Library/Java/JavaVirtualMachines/1.7.0.jdk/Contents 1.7

After making these changes, I was able to switch to JDK 7 easily.

$ setjdk 1.7
Setting this terminal's JDK to 1.7 ... openjdk version "1.7.0-internal"
OpenJDK Runtime Environment (build 1.7.0-internal-b00)
OpenJDK 64-Bit Server VM (build 21.0-b17, mixed mode)

I was also able to switch back to JDK 6.

$ setjdk 1.6
Setting this terminal's JDK to 1.6 ... java version "1.6.0_26"
Java(TM) SE Runtime Environment (build 1.6.0_26-b03-384-10M3425)
Java HotSpot(TM) 64-Bit Server VM (build 20.1-b02-384, mixed mode)

Maven Issues
Next, I tried using JDK 7 to build AppFuse. I ran into two issues when I tried to do this. The first was caused by the native2ascii plugin, which has been known to cause issues on non-Mac platforms. Adding the following profile seemed to solve the problem.

<profile>
    <activation>
        <jdk>1.7</jdk>
    </activation>
    <build>
        <plugins>
            <plugin>
                <groupId>org.codehaus.mojo</groupId>
                <artifactId>native2ascii-maven-plugin</artifactId>
                <dependencies>
                    <dependency>
                      <groupId>com.sun</groupId>
                      <artifactId>tools</artifactId>
                      <version>1.7.0</version>
                      <scope>system</scope>
                      <systemPath>${java.home}/../lib/tools.jar</systemPath>
                    </dependency>
                </dependencies>
            </plugin>
        </plugins>
    </build>
</profile>

The next issue was with Enunciate and its maven-enunciate-cxf-plugin.

[INFO] ------------------------------------------------------------------------
[ERROR] FATAL ERROR
[INFO] ------------------------------------------------------------------------
[INFO] com/sun/mirror/apt/AnnotationProcessorFactory
com.sun.mirror.apt.AnnotationProcessorFactory
[INFO] ------------------------------------------------------------------------
[INFO] Trace
java.lang.NoClassDefFoundError: com/sun/mirror/apt/AnnotationProcessorFactory

It seemed like adding a profile that included tools.jar would solve this, but it doesn't. When I add the dependency directly to the plugin itself, I get the following error:

warning: The apt tool and its associated API are planned to be
removed in the next major JDK release.  These features have been
superseded by javac and the standardized annotation processing API,
javax.annotation.processing and javax.lang.model.  Users are
recommended to migrate to the annotation processing features of
javac; see the javac man page for more information.
[WARNING] Validation result has errors.
error: [core] java.lang.StackTraceElement: A TypeDefinition must have a public no-arg constructor or be annotated with a factory method.
1 error
[INFO] ------------------------------------------------------------------------
[ERROR] BUILD ERROR
[INFO] ------------------------------------------------------------------------

Hopefully this article helps you get started with Java 7 on OS X. If you have any additional tips, please leave a comment.

Posted in Java at Jul 12 2011, 02:11:44 PM MDT 9 Comments

Integrating OAuth with AppFuse and its REST API

One of the new features in AppFuse 2.1 is an appfuse-ws archetype. This archetype leverages Enunciate and CXF to create a project with a REST API and generated HTML documentation. Enunciate is a very useful tool, allowing you to develop web services with JAX-RS and JAX-WS annotations and have all types of client libraries generated. For me, it seems very useful for developing the backend of SOFEA (a.k.a. modern) applications.

Back in March, Ryan Heaton published a nice article on Securing Web Services in an Enunciate application. I decided to take his tutorial a step further and not only secure my web services, but also to integrate with OAuth 2. In this tutorial, I'll show you how to create a new application with AppFuse WS, secure it, add OAuth support, and then use a client app to authenticate and retrieve data.

Create a New AppFuse WS Project
To begin, I visited the Create AppFuse Archetypes page and created a new application using the "Web Services Only" option in the Web Framework dropdown. Below is the command I used to create the "appfuse-oauth" project.

mvn archetype:generate -B -DarchetypeGroupId=org.appfuse.archetypes \
-DarchetypeArtifactId=appfuse-ws-archetype -DarchetypeVersion=2.1.0 \
-DgroupId=org.appfuse.example -DartifactId=appfuse-oauth 

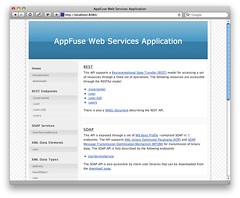
After doing this, I started the app using mvn jetty:run and confirmed it started OK. At this point, I was able to view the generated documentation for the application at http://localhost:8080. The screenshot below shows what the app looks like at this point.

AppFuse WS Homepage

NOTE: You might notice the REST endpoint of /{username}. This is a bug in AppFuse 2.1.0 and has been fixed in SVN. It does not affect this tutorial.

Integrate Spring Security and OAuth
I originally tried to integrate Spring Security with Enunciate's Securing Web Services Tutorial. However, it only secures endpoints and doesn't do enough filtering for OAuth support, so I ended up using a custom web.xml. I put this file in src/main/resources and loaded it in my enunciate.xml file. I also upgraded Spring Security and imported my security.xml file.

  <?xml version="1.0"?>
  <enunciate xmlns:xsi="http://www.w3.org/2001/XMLSchema-instance"
             xsi:noNamespaceSchemaLocation="http://enunciate.codehaus.org/schemas/enunciate-1.22.xsd">
      ...
      <webapp mergeWebXML="src/main/resources/web.xml"/>
      <modules>
      ...
          <spring-app disabled="false" springVersion="3.0.5.RELEASE">
              <springImport uri="classpath:/applicationContext-resources.xml"/>
              <springImport uri="classpath:/applicationContext-dao.xml"/>
              <springImport uri="classpath:/applicationContext-service.xml"/>
              <springImport uri="classpath:/applicationContext.xml"/>
              <springImport uri="classpath:/security.xml"/>
          </spring-app>
      </modules>
  </enunciate>

Then I created src/main/resources/web.xml with a filter for Spring Security and a DispatcherServlet for OAuth support.

<?xml version="1.0" encoding="UTF-8"?>
<web-app xmlns="http://java.sun.com/xml/ns/javaee"
         xmlns:xsi="http://www.w3.org/2001/XMLSchema-instance"
         xsi:schemaLocation="http://java.sun.com/xml/ns/javaee http://java.sun.com/xml/ns/javaee/web-app_3_0.xsd"
         version="3.0">

    <filter>
        <filter-name>securityFilter</filter-name>
        <filter-class>org.springframework.web.filter.DelegatingFilterProxy</filter-class>
        <init-param>
            <param-name>targetBeanName</param-name>
            <param-value>springSecurityFilterChain</param-value>
        </init-param>
    </filter>

    <filter-mapping>
        <filter-name>securityFilter</filter-name>
        <url-pattern>/*</url-pattern>
    </filter-mapping>

    <servlet>
        <servlet-name>appfuse-oauth</servlet-name>
        <servlet-class>org.springframework.web.servlet.DispatcherServlet</servlet-class>
        <load-on-startup>1</load-on-startup>
    </servlet>

    <servlet-mapping>
        <servlet-name>appfuse-oauth</servlet-name>
        <url-pattern>/oauth/*</url-pattern>
    </servlet-mapping>
</web-app>

Next, I created a src/main/resources/security.xml and used it to secure my API, specify a login page, supply the users and integrate OAuth (see the last 4 beans below).

<?xml version="1.0" encoding="UTF-8"?>
<beans:beans xmlns="http://www.springframework.org/schema/security"
             xmlns:xsi="http://www.w3.org/2001/XMLSchema-instance"
             xmlns:beans="http://www.springframework.org/schema/beans"
             xmlns:oauth="http://www.springframework.org/schema/security/oauth2"
             xsi:schemaLocation="http://www.springframework.org/schema/beans http://www.springframework.org/schema/beans/spring-beans.xsd
                           http://www.springframework.org/schema/security http://www.springframework.org/schema/security/spring-security.xsd
                           http://www.springframework.org/schema/security/oauth2 http://www.springframework.org/schema/security/spring-security-oauth2.xsd">

    <http auto-config="true">
        <intercept-url pattern="/api/**" access="ROLE_USER"/>
        <intercept-url pattern="/oauth/**" access="ROLE_USER"/>
        <intercept-url pattern="/**" access="IS_AUTHENTICATED_ANONYMOUSLY"/>
        <form-login login-page="/login.jsp" authentication-failure-url="/login.jsp?error=true"
                    login-processing-url="/j_security_check"/>
    </http>

    <authentication-manager>
        <authentication-provider>
            <user-service>
                <user name="admin" password="admin" authorities="ROLE_USER,ROLE_ADMIN"/>
                <user name="user" password="user" authorities="ROLE_USER"/>
            </user-service>
        </authentication-provider>
    </authentication-manager>

    <!--hook up the spring security filter chain-->
    <beans:alias name="springSecurityFilterChain" alias="securityFilter"/>

    <beans:bean id="tokenServices"
                class="org.springframework.security.oauth2.provider.token.InMemoryOAuth2ProviderTokenServices">
        <beans:property name="supportRefreshToken" value="true"/>
    </beans:bean>

    <oauth:provider client-details-service-ref="clientDetails" token-services-ref="tokenServices">
        <oauth:verification-code user-approval-page="/oauth/confirm_access"/>
    </oauth:provider>

    <oauth:client-details-service id="clientDetails">
        <!--<oauth:client clientId="my-trusted-client" authorizedGrantTypes="password,authorization_code,refresh_token"/>
        <oauth:client clientId="my-trusted-client-with-secret"
                      authorizedGrantTypes="password,authorization_code,refresh_token" secret="somesecret"/>
        <oauth:client clientId="my-less-trusted-client" authorizedGrantTypes="authorization_code"/>-->
        <oauth:client clientId="ajax-login" authorizedGrantTypes="authorization_code"/>
    </oauth:client-details-service>
</beans:beans>

I used the OAuth for Spring Security sample apps to figure this out. In this example, I used authorizedGrantTypes="authorization_code", but you can see from the commented <oauth:client> elements above that there's a few different options. You should also note that the clientId is hard-coded to "ajax-login", signifying I only want to allow a single application to authenticate.

At this point, I'd like to give a shoutout to Ryan Heaton for creating both Enunciate and Spring Security's OAuth support. Nice work Ryan!

At this point, I needed to do a number of additional tasks to finish integrating oauth. The first was to modify the Jetty Plugin's configuration to 1) run on port 9000, 2) load my custom files and 3) allow jetty:run to recognize Enunciate's generated files. Below is the final configuration in my pom.xml.

<plugin>
    <groupId>org.mortbay.jetty</groupId>
    <artifactId>maven-jetty-plugin</artifactId>
    <version>6.1.26</version>
    <configuration>
        <connectors>
            <connector implementation="org.mortbay.jetty.nio.SelectChannelConnector">
                <port>9000</port>
                <maxIdleTime>60000</maxIdleTime>
            </connector>
        </connectors>
        <webAppConfig>
            <baseResource implementation="org.mortbay.resource.ResourceCollection">
                <resourcesAsCSV>
                    ${basedir}/src/main/webapp,
                    ${project.build.directory}/${project.build.finalName}
                </resourcesAsCSV>
            </baseResource>
            <contextPath>/appfuse-oauth</contextPath>
        </webAppConfig>
        <webXml>${project.build.directory}/${project.build.finalName}/WEB-INF/web.xml</webXml>
    </configuration>
</plugin>

Next, I added the necessary OAuth dependencies for Spring Security to my pom.xml. Since the latest release is a milestone release, I had to add Spring's milestone repo too.

<repository>
    <id>spring-milestone</id>
    <url>http://s3.amazonaws.com/maven.springframework.org/milestone</url>
</repository>
...
<dependency>
    <groupId>org.springframework.security</groupId>
    <artifactId>spring-security-taglibs</artifactId>
    <version>${spring.version}</version>
    <exclusions>
        <exclusion>
            <groupId>org.springframework</groupId>
            <artifactId>spring-web</artifactId>
        </exclusion>
        <exclusion>
            <groupId>org.springframework</groupId>
            <artifactId>spring-support</artifactId>
        </exclusion>
    </exclusions>
</dependency>
<dependency>
    <groupId>org.springframework.security.oauth</groupId>
    <artifactId>spring-security-oauth</artifactId>
    <version>1.0.0.M3</version>
    <exclusions>
        <exclusion>
            <groupId>org.springframework</groupId>
            <artifactId>spring-beans</artifactId>
        </exclusion>
        <exclusion>
            <groupId>org.springframework</groupId>
            <artifactId>spring-context</artifactId>
        </exclusion>
        <exclusion>
            <groupId>org.springframework</groupId>
            <artifactId>spring-core</artifactId>
        </exclusion>
    </exclusions>
</dependency>
<dependency>
    <groupId>org.springframework</groupId>
    <artifactId>spring-webmvc</artifactId>
    <version>${spring.version}</version>
</dependency>
<dependency>
    <groupId>javax.servlet</groupId>
    <artifactId>servlet-api</artifactId>
    <version>2.5</version>
    <scope>provided</scope>
</dependency>
<dependency>
    <groupId>javax.servlet</groupId>
    <artifactId>jstl</artifactId>
    <version>1.1.2</version>
</dependency>
<dependency>
    <groupId>taglibs</groupId>
    <artifactId>standard</artifactId>
    <version>1.1.2</version>
</dependency>

Since I named my DispatcherServlet "appfuse-oauth" in web.xml, I created a src/main/webapp/WEB-INF/appfuse-oauth-servlet.xml to configure Spring MVC. I had to create the src/main/webapp/WEB-INF directory.

<?xml version="1.0" encoding="UTF-8"?>
<beans xmlns="http://www.springframework.org/schema/beans"
       xmlns:xsi="http://www.w3.org/2001/XMLSchema-instance"
       xmlns:context="http://www.springframework.org/schema/context"
       xmlns:mvc="http://www.springframework.org/schema/mvc"
       xsi:schemaLocation="http://www.springframework.org/schema/beans http://www.springframework.org/schema/beans/spring-beans-3.0.xsd
                http://www.springframework.org/schema/context http://www.springframework.org/schema/context/spring-context-3.0.xsd
                http://www.springframework.org/schema/mvc http://www.springframework.org/schema/mvc/spring-mvc-3.0.xsd">

    <!-- Scans the classpath of this application for @Components to deploy as beans -->
    <context:component-scan base-package="org.appfuse.examples.webapp"/>

    <!-- Configures the @Controller programming model -->
    <mvc:annotation-driven/>

    <!-- Resolves view names to protected .jsp resources within the /WEB-INF/views directory -->
    <bean class="org.springframework.web.servlet.view.InternalResourceViewResolver">
        <property name="viewClass" value="org.springframework.web.servlet.view.JstlView"/>
        <property name="prefix" value="/"/>
        <property name="suffix" value=".jsp"/>
    </bean>
</beans>

In order to show the OAuth confirmation page, I needed to create src/main/java/org/appfuse/examples/webapp/AccessConfirmationController.java and map it to /oauth/confirm_access. I copied this from one of the sample projects and modified to use Spring's annotations.

package org.appfuse.examples.webapp;

import org.springframework.beans.factory.annotation.Autowired;
import org.springframework.security.oauth2.provider.ClientAuthenticationToken;
import org.springframework.security.oauth2.provider.ClientDetails;
import org.springframework.security.oauth2.provider.ClientDetailsService;
import org.springframework.security.oauth2.provider.verification.ClientAuthenticationCache;
import org.springframework.security.oauth2.provider.verification.DefaultClientAuthenticationCache;
import org.springframework.stereotype.Controller;
import org.springframework.web.bind.annotation.RequestMapping;
import org.springframework.web.bind.annotation.RequestMethod;
import org.springframework.web.servlet.ModelAndView;

import javax.servlet.http.HttpServletRequest;
import javax.servlet.http.HttpServletResponse;
import java.util.TreeMap;

/**
 * Controller for retrieving the model for and displaying the confirmation page
 * for access to a protected resource.
 *
 * @author Ryan Heaton
 */
@Controller
@RequestMapping("/confirm_access")
public class AccessConfirmationController {

    private ClientAuthenticationCache authenticationCache = new DefaultClientAuthenticationCache();
    @Autowired
    private ClientDetailsService clientDetailsService;

    @RequestMapping(method = RequestMethod.GET)
    protected ModelAndView confirm(HttpServletRequest request, HttpServletResponse response) throws Exception {
        ClientAuthenticationToken clientAuth = authenticationCache.getAuthentication(request, response);
        if (clientAuth == null) {
            throw new IllegalStateException("No client authentication request to authorize.");
        }

        TreeMap<String, Object> model = new TreeMap<String, Object>();
        ClientDetails client = clientDetailsService.loadClientByClientId(clientAuth.getClientId());
        model.put("auth_request", clientAuth);
        model.put("client", client);

        return new ModelAndView("access_confirmation", model);
    }
}

This controller delegates to src/main/webapp/access_confirmation.jsp. I created this file and filled it with code to display Accept and Deny buttons.

<%@ page import="org.springframework.security.core.AuthenticationException" %>
<%@ page import="org.springframework.security.oauth2.common.exceptions.UnapprovedClientAuthenticationException" %>
<%@ page import="org.springframework.security.oauth2.provider.verification.BasicUserApprovalFilter" %>
<%@ page import="org.springframework.security.oauth2.provider.verification.VerificationCodeFilter" %>
<%@ page import="org.springframework.security.web.WebAttributes" %>
<%@ taglib prefix="authz" uri="http://www.springframework.org/security/tags" %>
<%@ taglib uri="http://java.sun.com/jsp/jstl/core" prefix="c" %>
<html>
<head>
    <title>Confirm Access</title>
    <link rel="stylesheet" type="text/css" media="all"
          href="http://demo.appfuse.org/appfuse-struts/styles/simplicity/theme.css"/>
    <style type="text/css">
        h1 {
            margin-left: -300px;
            margin-top: 50px
        }
    </style>
</head>

<body>

<h1>Confirm Access</h1>

<div id="content">

    <% if (session.getAttribute(WebAttributes.AUTHENTICATION_EXCEPTION) != null && 
                 !(session.getAttribute(WebAttributes.AUTHENTICATION_EXCEPTION) instanceof UnapprovedClientAuthenticationException)) { %>
    <div class="error">
        <h2>Woops!</h2>

        <p>Access could not be granted.
            (<%= ((AuthenticationException) session.getAttribute(WebAttributes.AUTHENTICATION_EXCEPTION)).getMessage() %>)</p>
    </div>
    <% } %>
    <c:remove scope="session" var="SPRING_SECURITY_LAST_EXCEPTION"/>

    <authz:authorize ifAnyGranted="ROLE_USER,ROLE_ADMIN">
        <h2>Please Confirm</h2>

        <p>You hereby authorize "<c:out value="${client.clientId}" escapeXml="true"/>" to access your protected resources.</p>

        <form id="confirmationForm" name="confirmationForm"
              action="<%=request.getContextPath() + VerificationCodeFilter.DEFAULT_PROCESSING_URL%>" method="POST">
            <input name="<%=BasicUserApprovalFilter.DEFAULT_APPROVAL_REQUEST_PARAMETER%>"
                   value="<%=BasicUserApprovalFilter.DEFAULT_APPROVAL_PARAMETER_VALUE%>" type="hidden"/>
            <label><input name="authorize" value="Authorize" type="submit"></label>
        </form>
        <form id="denialForm" name="denialForm"
              action="<%=request.getContextPath() + VerificationCodeFilter.DEFAULT_PROCESSING_URL%>" method="POST">
            <input name="<%=BasicUserApprovalFilter.DEFAULT_APPROVAL_REQUEST_PARAMETER%>"
                   value="not_<%=BasicUserApprovalFilter.DEFAULT_APPROVAL_PARAMETER_VALUE%>" type="hidden"/>
            <label><input name="deny" value="Deny" type="submit"></label>
        </form>
    </authz:authorize>
</div>
</body>
</html>

Finally, I needed to create src/main/webapp/login.jsp to allow users to login.

<%@ page language="java" pageEncoding="UTF-8" contentType="text/html;charset=utf-8" %>
<%@ taglib uri="http://java.sun.com/jsp/jstl/core" prefix="c" %>
<%@ taglib uri="http://java.sun.com/jsp/jstl/fmt" prefix="fmt" %>
<%@ taglib uri="http://java.sun.com/jsp/jstl/core" prefix="c" %>

<html>
<head>
    <title>Login</title>
    <link rel="stylesheet" type="text/css" media="all"
          href="http://demo.appfuse.org/appfuse-struts/styles/simplicity/theme.css"/>
    <style type="text/css">
        h1 {
            margin-left: -300px;
            margin-top: 50px
        }
    </style>
</head>
<body>
<h1>Login</h1>

<form method="post" id="loginForm" action="<c:url value='/j_security_check'/>">
    <fieldset style="padding-bottom: 0">
        <ul>
            <c:if test="${param.error != null}">
                <li class="error">
                    ${sessionScope.SPRING_SECURITY_LAST_EXCEPTION.message}
                </li>
            </c:if>
            <li>
                <label for="j_username" class="required desc">
                    Username <span class="req">*</span>
                </label>
                <input type="text" class="text medium" name="j_username"
                       id="j_username" tabindex="1"/>
            </li>

            <li>
                <label for="j_password" class="required desc">
                    Password <span class="req">*</span>
                </label>
                <input type="password" class="text medium" name="j_password"
                       id="j_password" tabindex="2"/>
            </li>
            <li>
                <input type="submit" class="button" name="login" value="Login"
                       tabindex="3"/>
            </li>
        </ul>
    </fieldset>
</form>
</body>
</html>

All the changes described in the above section are necessary to implement OAuth if you create a project with AppFuse WS 2.1. It may seem like a lot of code, but I was able to copy/paste and get it all working in an app in under 5 minutes. Hopefully you can do the same. I'm also considering adding it by default to the next version of AppFuse. Now let's look at integrating OAuth into a client to authenticate and retrieve data from this application.

Authenticate and Retrieve Data with Client
I originally thought my GWT OAuth application would provide a nice client. However, after 30 minutes of trying to get GWT 1.7.1 and the GWT Maven plugin (1.1) working with my 64-bit Java 6 JDK on OS X, I gave up. So I opted to use the Ajax Login application I've been using in my recent security tutorials.

In this example, I used OAuth2RestTemplate from Spring Security OAuth. While this works, and works well, I'd still like to get things working with GWT (or jQuery) to demonstrate how to do it from a pure client-side perspective.

To begin, I got the latest source of Ajax Login from GitHub (as of this morning) and made some changes. First of all, I added the Spring Security OAuth dependencies to pom.xml:

<repository>
    <id>spring-milestone</id>
    <url>http://s3.amazonaws.com/maven.springframework.org/milestone</url>
</repository>
...
<dependency>
    <groupId>org.springframework.security.oauth</groupId>
    <artifactId>spring-security-oauth</artifactId>
    <version>1.0.0.M3</version>
    <exclusions>
        <exclusion>
            <groupId>org.springframework</groupId>
            <artifactId>spring-beans</artifactId>
        </exclusion>
        <exclusion>
            <groupId>org.springframework</groupId>
            <artifactId>spring-context</artifactId>
        </exclusion>
        <exclusion>
            <groupId>org.springframework</groupId>
            <artifactId>spring-core</artifactId>
        </exclusion>
    </exclusions>
</dependency>

Then I modified src/main/webapp/WEB-INF/security.xml and added an OAuth Token Service and defined the location of the OAuth server.

<?xml version="1.0" encoding="UTF-8"?>
<beans:beans xmlns="http://www.springframework.org/schema/security"
             xmlns:xsi="http://www.w3.org/2001/XMLSchema-instance"
             xmlns:beans="http://www.springframework.org/schema/beans"
             xmlns:oauth="http://www.springframework.org/schema/security/oauth2"
             xsi:schemaLocation="http://www.springframework.org/schema/beans http://www.springframework.org/schema/beans/spring-beans-3.0.xsd
              http://www.springframework.org/schema/security http://www.springframework.org/schema/security/spring-security-3.0.xsd
              http://www.springframework.org/schema/security/oauth2 http://www.springframework.org/schema/security/spring-security-oauth2.xsd">

...
    <oauth:client token-services-ref="oauth2TokenServices"/>

    <beans:bean id="oauth2TokenServices"
                class="org.springframework.security.oauth2.consumer.token.InMemoryOAuth2ClientTokenServices"/>

    <oauth:resource id="appfuse" type="authorization_code" clientId="ajax-login"
                    accessTokenUri="http://localhost:9000/appfuse-oauth/oauth/authorize"
                    userAuthorizationUri="http://localhost:9000/appfuse-oauth/oauth/user/authorize"/>

Next, I created a Controller that uses OAuth2RestTemplate to make the request and get the data from the AppFuse OAuth application's API. I created src/main/java/org/appfuse/examples/webapp/oauth/UsersApiController.java and filled it with the following code:

package org.appfuse.examples.webapp.oauth;

import org.appfuse.model.User;
import org.springframework.beans.factory.annotation.Autowired;
import org.springframework.beans.factory.annotation.Qualifier;
import org.springframework.security.core.context.SecurityContextHolder;
import org.springframework.security.oauth2.common.exceptions.InvalidTokenException;
import org.springframework.security.oauth2.consumer.*;
import org.springframework.security.oauth2.consumer.token.OAuth2ClientTokenServices;
import org.springframework.stereotype.Controller;
import org.springframework.web.bind.annotation.RequestMapping;
import org.springframework.web.bind.annotation.RequestMethod;
import org.springframework.web.bind.annotation.ResponseBody;

import java.util.ArrayList;
import java.util.List;

@RequestMapping("/appfuse/users")
@Controller
public class UsersApiController {

    private OAuth2RestTemplate apiRestTemplate;
    @Autowired
    private OAuth2ClientTokenServices tokenServices;

    private static final String REMOTE_DATA_URL = "http://localhost:9000/appfuse-oauth/api/users";

    @Autowired
    public UsersApiController(OAuth2ProtectedResourceDetails resourceDetails) {
        this.apiRestTemplate = new OAuth2RestTemplate(resourceDetails);
    }

    @RequestMapping(method = RequestMethod.GET)
    @ResponseBody
    public List<User> getUsers() {
        try {
            List users = apiRestTemplate.getForObject(REMOTE_DATA_URL, List.class);
            return new ArrayList<User>(users);
        } catch (InvalidTokenException badToken) {
            //we've got a bad token, probably because it's expired.
            OAuth2ProtectedResourceDetails resource = apiRestTemplate.getResource();
            OAuth2SecurityContext context = OAuth2SecurityContextHolder.getContext();
            if (context != null) {
                // this one is kind of a hack for this application
                // the problem is that the sparklr photos page doesn't remove the 'code=' request parameter.
                ((OAuth2SecurityContextImpl) context).setVerificationCode(null);
            }
            //clear any stored access tokens...
            tokenServices.removeToken(SecurityContextHolder.getContext().getAuthentication(), resource);
            //go get a new access token...
            throw new OAuth2AccessTokenRequiredException(resource);
        }
    }
}

At this point, I thought everything would work and I spent quite some time banging my head against the wall when it didn't. As I was composing an email to the Enunciate users mailing list, I realized the issue. It appeared to be working, but from the server side, and the redirect back to the client was not happening. The Ajax Login app uses UrlRewriteFilter (for pretty URLs) to redirect from /app/* to /$1 and this redirect was losing the code parameter in the URL.

<rule>
    <from>/app/**</from>
    <to last="true" type="redirect">%{context-path}/$1</to>
</rule>

To fix this, I added use-query-string="true" to the root element in src/main/webapp/WEB-INF/urlrewrite.xml:

<urlrewrite default-match-type="wildcard" use-query-string="true">

After making all these changes, I ran mvn jetty:run on both apps and opened http://localhost:8080/appfuse/users in my browser. It all worked and a smile crept across my face. I've checked in the client changes into ajax-login on GitHub and the appfuse-oauth example into AppFuse Demos on Google Code. If you'd like to see this example in action, I'd encourage you to checkout both projects and let me know if you find any issues.

Posted in Java at Jul 05 2011, 10:56:48 AM MDT 4 Comments

Hyperproductive JSF 2.0 with Ed Burns at Jazoon

This morning, I attended Ed Burn's Talk on Hyperproductive JSF 2.0 at Jazoon. As you might know, I've been a critic of JSF for many years. However, it is one of the most used Java web frameworks, so I was hoping to learn how it's improved in the latest version. Below are my notes from Ed's presentation.

Ed's Plan for our Time Investment:

  1. Define a productive development environment
  2. JSF for greenfield and brownfield projects
  3. List the top 9 productivity killers with JSF projects and solutions

"I am always doing that which I cannot do, in order that I may learn how to do it." -- Pablo Picasso

Software is an executable representation of knowledge, a byproduct of learning how to solve a problem. Knowledge is something that changes as more information comes in. A productive environment makes it as easy as possible to learn how to solve a problem. Learning is an iterative process. Early iterations don't need to be optimal. Later iterations do ... and they need to be maintainable. First is the hardest. Fast iterations are they key. Spring Roo and Play are examples of frameworks that make the first iteration very fast.

You should use a tool to jumpstart JSF development: copy from an old project, use a Maven archetype or use your IDE. With greenfield development, you don't have to bother learning the byproduct of other people's learning. It's a great opportunity to pad your resume with the latest hot technologies. With brownfield development, it's vitally important to understand the existing solution and hidden assumptions. You're also much more constrained in your technology choices. If you want to change, you'll need to come up with a migration strategy, which can be difficult. JSF works well for both because it's not just a runtime framework, it's also a conceptual framework. You need to understand how your framework handles data conversion, validation, page flow, persistence integration, I18N, L10N, A11Y, Web standards and user friendliness.

Top 9 JSF Productivity Killers:

  1. Time wasting deployment step
  2. The perils of "there's more than one way to do it"
  3. Lengthy and painful developer on-boarding process
  4. Misused logging and misunderstood error messages
  5. Phantoms
  6. Under-utilized developer tools
  7. Premature optimization
  8. Difficulty in doing TDD
  9. Lack of an app framework

Time wasting deployment step
ZeroTurnaround solves this problem with JRebel, but there's other ways to do it. Some of the killers of flow state: 1) one large war file, 2) underutilizing dynamic language features, 3) complex server environment and 4) build process is redoing work unnecessarily. To stop the time wasting deployment step, the most important things you can do are as follows:

  • Configure your IDE correctly. In Eclipse, compile directly into WEB-INF/classes and use continuous compilation. With NetBeans, use GlassFish.
  • Don't do control-flow programming in XML.

Ed then showed a simple demo that showed how you can use Groovy to create a JSF UI Component. He also mentioned that Groovy can be used to author any JSF artifact. The benefit of this is you can simply edit and save a .groovy file without having to recompile or redeploy. Unfortunately, using Groovy didn't eliminate the XML syntax for pages or the XML for defining UI components.

The perils of "there's more than one way to do it"
JSF is very flexible, but flexibility is, more often than not, abused. There's a lack of convention for common things (e.g. master-detail, JSF concepts like converter, validator, etc.). The best way to fix this is to establish the norms for a project and stick with them. For example, Neil Griffin has a good blog entry for the different kind of managed beans you can create. Develop recommendations like Neil's and use them on all your projects.

Lengthy developer on-boarding process
Stick with standards when possible (at least have a common project description and build system across projects). Be committed to periodic cleanup cycles, including documenting for re-use. Pick one JSF component library and stick with it. Support for mixing and switching component libraries has improved with JSF 2, but it's still recommended you use only one.

Misused logging and misunderstood error messages
JSF is notorious for cryptic error messages and very long stack traces. It's still a problem, but the JSF Team is still working on improving them. Good tip: use the <ui:debug> tag. Its recordStateSize="true" attribute can be especially useful. If you're using PrimeFaces, add trace=true to request URLs.

Phantoms
Phantoms is when running code is not the same as the code you are modifying or wrong version of library gets picked up. You should have the capability to hit breakpoints anywhere in your entire software stack, including core Java sources. This is one of the most useful things about open source software. Solutions to phantoms: 1) put a timestamp on every redeploy and have the timestamp appear in the system log 2) write the running library stack to the system log (each library and version being used) and make it easy to compare one developer's runtime stack with another's 3) consider doing all work in tightly controlled VMs (checkout the VM at the beginning of the day, do your work, commit your changes and throw your VM away at the end of the day).

Under-utilizing developer tools
Make sure everyone has the fastest machines available and as much screen real estate as desired. Hardware is much cheaper than developer time. Another tip is to use Hudson as your butler. It's not just the team CI server. In other words, take advantage of automation wherever you can.

Premature Optimization
Keep in mind the trade-offs between readability and performance. When using frameworks such as JSF, don't try to outsmart the implementation. Rather, use the framework as intended and use open-source contributions to treat performance problems. Example, EL expressions got a lot faster between EE5 and EE6. If you spent time trying to optimize EL expressions, you might've been wasting your time.

Difficulty in doing TDD
Try to figure out why TDD is difficult in your company. For JSF, strongly consider JBoss's JSFUnit. Write your testcases to extend from Cactus ServletTestCase and leverage HtmlUnit (JSFUnit does this for you).

Lack of an app framework
Create common components: login panel, CRUD components, etc. If you don't have an app framework, build one over time.

Conclusion
This was an interesting talk by Ed. The dynamics of the room where a bit interesting. Jazoon is held in a movie theater, much like Devoxx. However, it appears there's a spotlight on the speaker that makes it very difficult to see the audience. I don't remember having this problem at Devoxx. Ed asked the audience quite a few questions, but it seemed he had a lot of difficulty in seeing if folks raised their hands. This made for some periods of awkward silence.

Personally, I was hoping to learn some new whizbang tips about JSF that I was not aware of. Unfortunately, I didn't learn anything new and wasn't that impressed with the Groovy demo.

I think Ed's tips about things outside of JSF were good, especially buying developers good hardware. I've seen many companies, including my current client, skimp on developer hardware and cause developer frustration because of it. I think it's great when companies provide developers top-of-the-line hardware and eliminate frustration over CPU and memory resources. LinkedIn and Time Warner Cable both provide their developers with Mac Pros and MacBook Pros as well as huge monitors. IMO, this is one of the best benefits you can provide your engineers.

Posted in Java at Jun 23 2011, 04:53:10 AM MDT 3 Comments

Java Web Application Security - Part V: Penetrating with Zed Attack Proxy

Web Application Security is an important part of developing applications. As developers, I think we often forget this, or simply ignore it. In my career, I've learned a lot about web application security. However, I only recently learned and became familiar with the rapidly growing "appsec" industry.

I found a disconnect between what appsec consultants were selling and what I was developing. It seemed like appsec consultants were selling me fear, mostly because I thought my apps were secure. So I set out on a mission to learn more about web application security and penetration testing to see if my apps really were secure. This article is part of that mission, as are the previous articles I've written in this series.

When I first decided I wanted to do a talk on Webapp Security, I knew it would be more interesting if I showed the audience how to hack and fix an application. That's why I wrote it into my original proposal:

Webapp Security: Develop. Penetrate. Protect. Relax.
In this session, you'll learn how to implement authentication in your Java web applications using Spring Security, Apache Shiro and good ol' Java EE Container Managed Authentication. You'll also learn how to secure your REST API with OAuth and lock it down with SSL.

After learning how to develop authentication, I'll introduce you to OWASP, the OWASP Top 10, its Testing Guide and its Code Review Guide. From there, I'll discuss using WebGoat to verify your app is secure and commercial tools like webapp firewalls and accelerators.

At the time, I hadn't done much webapp pentesting. You can tell this from the fact that I mentioned WebGoat as the pentesting tool. From WebGoat's Project page:

WebGoat is a deliberately insecure J2EE web application maintained by OWASP designed to teach web application security lessons. In each lesson, users must demonstrate their understanding of a security issue by exploiting a real vulnerability in the WebGoat application. For example, in one of the lessons the user must use SQL injection to steal fake credit card numbers. The application is a realistic teaching environment, providing users with hints and code to further explain the lesson.

What I really meant to say and use was Zed Attack Proxy, also known as OWASP ZAP. ZAP is a Java Desktop application that you setup as a proxy for your browser, then use to find vulnerabilities in your application. This article explains how you can use ZAP to pentest a web applications and fix its vulnerabilities.

The application I'll be using in this article is the Ajax Login application I've been using throughout this series. I think it's great that projects like Damn Vulnerable Web App and WebGoat exist, but I wanted to test one that I think is secure, rather than one I know is not secure. In this particular example, I'll be testing the Spring Security implementation, since that's the framework I most often use in my open source projects.

Zed Attack Proxy Tutorial

Download and Run the Application
To begin, download the application and expand it on your hard drive. This app is the completed version of the Ajax Login application referenced in Java Web Application Security - Part II: Spring Security Login Demo. You'll need Java 6 and Maven installed to run the app. Run it using mvn jetty:run and open http://localhost:8080 in your browser. You'll see it's a simple CRUD application for users and you need to login to do anything.

Install and Configure ZAP
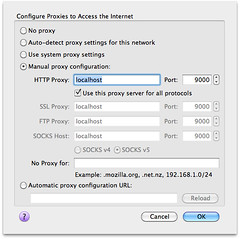
The Zed Attack Proxy (ZAP) is an easy to use integrated penetration testing tool for finding vulnerabilities in web applications. Download the latest version (I used 1.3.0) and install it on your system. After installing, launch the app and change the proxy port to 9000 (Tools > Options > Local Proxy). Next, configure your browser to proxy requests through port 9000 and allow localhost requests to be proxied. I used Firefox 4 (Preferences > Advanced > Network > Connection Settings). When finished, your proxy settings should look like the following screenshot:

Firefox Proxy Settings

Another option (instead of removing localhost) is to add an entry to your hosts file with your production domain name. This is what I've done for this demo.

127.0.0.1       demo.raibledesigns.com

I've also configured Apache to proxy requests to Jetty with the following mod_proxy settings in my httpd.conf:

<IfModule mod_proxy.c>
    ProxyRequests Off 
    ProxyPreserveHost Off 

    <VirtualHost *:80>
       ProxyPass  /  http://localhost:8080/
    </VirtualHost>

    <VirtualHost *:443>
        SSLEngine on
        SSLProxyEngine on
        SSLCertificateFile "/etc/apache2/ssl.key/server.crt"
        SSLCertificateKeyFile "/etc/apache2/ssl.key/server.key"

        ProxyPass  /  https://localhost:8443/
    </VirtualHost>
</IfModule>

Perform a Scan
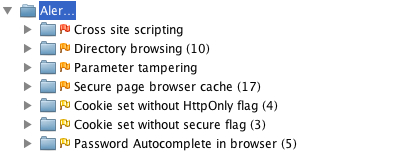
Now you need to give ZAP some data to work with. Using Firefox, I navigated to http://demo.raibledesigns.com and browsed around a bit, listing users, added a new one and deleted an existing one. After doing this, I noticed a number of flags in the ZAP UI under Sites. I then right-clicked on each site (one for http and one for https) and selected Attack > Active Scan site. You should be able to do this from the "Active Scan" tab at the bottom of ZAP, but there's a bug when the URLs are the same. After doing this, I received a number of alerts, ranging from high (cross-site scripting) to low (password autocomplete). The screenshot below shows the various issues.

ZAP Alerts

Now let's take a look at how to fix them.

Fix Vulnerabilities
One of the things not mentioned by the scan, but #1 in Seven Security (Mis)Configurations in Java web.xml Files, is Custom Error Pages Not Configured. Custom error pages are configured in this app, but error.jsp contains the following code:

<% if (exception != null) { %>
    <% exception.printStackTrace(new java.io.PrintWriter(out)); %>
<% } else { %>
    Please check your log files for further information.
<% } %>

Stack traces can be really useful to an attacker, so it's important to start by removing the above code from src/main/webapp/error.jsp.

The rest of the issues have to do with XSS, autocomplete, and cookies. Let's start with the easy ones. Fixing autocomplete is easy enough; simply changed the HTML in login.jsp and userform.jsp to have autocomplete="off" as part of the <form> tag.

Then modify web.xml so http-only and secure cookies are used. While you're at it, add session-timeout and tracking-mode as recommended by the aforementioned web.xml misconfigurations article.

<session-config>
    <session-timeout>15</session-timeout>
    <cookie-config>
        <http-only>true</http-only>
        <secure>true</secure>
    </cookie-config>
    <tracking-mode>COOKIE</tracking-mode>
</session-config>

Next, modify Spring Security's Remember Me configuration so it uses secure cookies. To do this, add use-secure-cookies="true" to the <remember-me> element in security.xml.

<remember-me user-service-ref="userService" key="e37f4b31-0c45-11dd-bd0b-0800200c9a66"
             use-secure-cookie="true"/>

Unfortunately, Spring Security doesn't support HttpOnly cookies, but will in a future release.

The next issue to solve is disabling directory browsing. You can do this by copying Jetty's webdefault.xml (from the org.eclipse.jetty:jetty-webapp JAR) into src/test/resources and changing its "dirAllowed" <init-param> to false:

<servlet>
  <servlet-name>default</servlet-name>
  <servlet-class>org.mortbay.jetty.servlet.DefaultServlet</servlet-class>
  <init-param>
    <param-name>acceptRanges</param-name>
    <param-value>true</param-value>
  </init-param>
  <init-param>
    <param-name>dirAllowed</param-name>
    <param-value>false</param-value>
  </init-param>
  <init-param>

You'll also need to modify the plugin's configuration to point to this file by adding it to the <webAppConfig> section in pom.xml.

<configuration>
    <webAppConfig>
        <contextPath>/</contextPath>
        <defaultsDescriptor>src/test/resources/webdefault.xml</defaultsDescriptor>
    </webAppConfig>

Of course, if you're running in production you'll want to configure this in your server's settings rather than in your pom.xml file.

Next, I set out to fix secure page browser cache issues. I had the following settings in my SiteMesh decorator:

<meta http-equiv="Cache-Control" content="no-store"/>
<meta http-equiv="Pragma" content="no-cache"/>

However, according to ZAP, the first meta tag should have "no-cache" instead of "no-store", so I changed it to "no-cache".

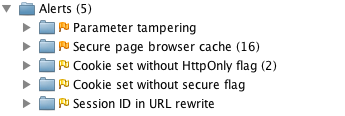
After making all these changes, I created a new ZAP session and ran an active scan on both sites again. Below are the results:

Active Scan after Fixes

I believe the first issue (parameter tampering) is because I show the error page when a duplicate user exists. To fix this, I changed UserFormController so it catches a UserExistsException and sends the user back to the form.

try {
    userManager.saveUser(user);
} catch (UserExistsException uex) {
    result.addError(new ObjectError("user", uex.getMessage()));
    return "userform";
}

However, this still doesn't seem to cause the alert to go away. This is likely because I'm not filtering/escaping HTML when it's first submitted. I believe the best solution for this would be to use something like OWASP's ESAPI to filter parameter values. However, I was unable to find integration with Spring MVC's data binding, so I decided not to try and fix this vulnerability.

Finally, I tried to disable jsessionid in URLs using suggestions from Stack Overflow. The previous setting in web.xml (<tracking-mode>COOKIE</tracking-mode>) should do this, but it doesn't seem to work with Jetty 8. The other issues (secure page browser cache, HttpOnly cookies and secure cookies), I was unable to solve. The last two are issues caused by Spring Security as far as I can tell.

Summary
In this article, I've shown you how to pentest a web application using Firefox and OWASP's Zed Attack Proxy (ZAP). I found ZAP to be a nice tool for figuring out vulnerabilities, but it'd be nice if it had a "retest" feature to see if you fixed an issue for a particular URL. It does have a "resend" feature, but running it didn't seem to clear alerts after I'd fixed them.

The issues I wasn't able to solve seemed to be mostly related to frameworks (e.g. Spring Security and HttpOnly cookies) or servers (Jetty not using cookies for tracking). My suspicion is the Jetty issues are because it doesn't support Servlet 3 as well as it advertises. I believe this is fair; I am using a milestone release after all. I tried scanning http://demo.raibledesigns.com/ajax-login (which runs on Tomcat 7 at Contegix) and confirmed that no jsessionid exists.

Hopefully this article has helped you understand how to figure out security vulnerabilities in your web applications. I believe ZAP will continue to get more popular as developers become aware of it. If you feel ambitious and want to try and solve all of the issues in my Ajax Login application, feel free to fork it on GitHub.

If you're interested in talking more about Webapp Security, please leave a comment, meet me at Jazoon later this week or let's talk in July at Über Conf.

Posted in Java at Jun 21 2011, 07:45:41 AM MDT 4 Comments

Java Web Application Security - Part IV: Programmatic Login APIs

Over the last month, I've posted a number of articles on implementing authentication with Java EE 6, Spring Security and Apache Shiro. One of the things I demonstrated in my live demos (at Utah's JUG Meetings) was programmatic authentication. I left this out of my screencasts and previous tutorials because I thought it'd fit better in a comparison article.

In this article, I'd like to show you how you can programmatically login to an application using the aforementioned security frameworks. To do this, I'll be using my ajax-login application that I wrote for Implementing Ajax Authentication using jQuery, Spring Security and HTTPS.

To begin, I implemented a LoginController as a Spring MVC Controller that returns JSON.

package org.appfuse.examples.webapp.security;

import org.springframework.beans.factory.annotation.Autowired;
import org.springframework.beans.factory.annotation.Qualifier;
import org.springframework.stereotype.Controller;
import org.springframework.web.bind.annotation.RequestMapping;
import org.springframework.web.bind.annotation.RequestMethod;
import org.springframework.web.bind.annotation.RequestParam;
import org.springframework.web.bind.annotation.ResponseBody;

@Controller
@RequestMapping("/api/login.json")
public class LoginController {

    @Autowired
    LoginService loginService;

    @RequestMapping(method = RequestMethod.GET)
    @ResponseBody
    public LoginStatus getStatus() {
        return loginService.getStatus();
    }

    @RequestMapping(method = RequestMethod.POST)
    @ResponseBody
    public LoginStatus login(@RequestParam("j_username") String username,
                             @RequestParam("j_password") String password) {

        return loginService.login(username, password);
    }
}

This controller delegates its logic to a LoginService interface.

package org.appfuse.examples.webapp.security;

public interface LoginService {

  LoginStatus getStatus();

  LoginStatus login(String username, String password);
}

The Client
The client for this controller is the same as mentioned in my previous article, but I'll post it again for your convenience. I used jQuery and jQuery UI to implement a dialog that opens the login page on the same page rather than redirecting to the login page. The "#demo" locator refers to a button in the page.

var dialog = $('<div></div>');

$(document).ready(function() {
    $.get('/login?ajax=true', function(data) {
        dialog.html(data);
        dialog.dialog({
            autoOpen: false,
	       title: 'Authentication Required'
        });
    });

    $('#demo').click(function() {
      dialog.dialog('open');
      // prevent the default action, e.g., following a link
      return false;
    });
});

The login page then has the following JavaScript to add a click handler to the "login" button that submits the request securely to the LoginController.

var getHost = function() {
    var port = (window.location.port == "8080") ? ":8443" : "";
    return ((secure) ? 'https://' : 'http://') + window.location.hostname + port;
};

var loginFailed = function(data, status) {
    $(".error").remove();
    $('#username-label').before('
Login failed, please try again.
'); }; $("#login").live('click', function(e) { e.preventDefault(); $.ajax({url: getHost() + "${ctx}/api/login.json", type: "POST", beforeSend: function(xhr) { xhr.withCredentials = true; }, data: $("#loginForm").serialize(), success: function(data, status) { if (data.loggedIn) { // success dialog.dialog('close'); location.href = getHost() + '${ctx}/users'; } else { loginFailed(data); } }, error: loginFailed }); });

The biggest secret to making this all work (the HTTP -> HTTPS communication, which is considered cross-domain), is the window.name Transport and the jQuery plugin that implements it. To make this plugin work with Firefox 3.6, I had to implement a Filter that adds Access-Control headers.

public class OptionsHeadersFilter implements Filter {

    public void doFilter(ServletRequest req, ServletResponse res, FilterChain chain)
            throws IOException, ServletException {
        HttpServletResponse response = (HttpServletResponse) res;

        response.setHeader("Access-Control-Allow-Origin", "http://" + req.getServerName());
        response.setHeader("Access-Control-Allow-Methods", "GET,POST");
        response.setHeader("Access-Control-Max-Age", "360");
        response.setHeader("Access-Control-Allow-Headers", "x-requested-with");
        response.setHeader("Access-Control-Allow-Credentials", "true");

        chain.doFilter(req, res);
    }

    public void init(FilterConfig filterConfig) {
    }

    public void destroy() {
    }
}

Java EE 6 LoginService
Java EE 6 has a few new methods in HttpServletRequest:

  • authenticate(response)
  • login(user, pass)
  • logout()

In this example, I'll use the new login(username, password) method. The hardest part about getting this working was finding the right Maven dependency. At first, I tried the one that seemed to make the most sense:

<dependency>
    <groupId>javax</groupId>
    <artifactId>javaee-web-api</artifactId>
    <version>6.0</version>
</dependency>

Unfortunately, this resulted in a strange error that means the dependency has the interfaces, but not the implementation classes. I ended up using GlassFish's dependency instead (thanks to Stack Overflow for the tip).

<dependency>
    <groupId>org.glassfish</groupId>
    <artifactId>javax.servlet</artifactId>
    <version>3.0</version>
    <scope>provided</scope>
</dependency>

Since Servlet 3.0 doesn't appear to be in Maven Central, I had to add the GlassFish Repository to my pom.xml's <repositories> element.

<repository>
    <id>glassfish-repo</id>
    <url>http://download.java.net/maven/glassfish</url>
</repository>

After that, it was easy to implement the LoginService interface with a JavaEELoginService class:

package org.appfuse.examples.webapp.security;

import org.apache.commons.logging.Log;
import org.apache.commons.logging.LogFactory;
import org.springframework.beans.factory.annotation.Autowired;
import org.springframework.stereotype.Service;

import javax.servlet.ServletException;
import javax.servlet.http.HttpServletRequest;

@Service("javaeeLoginService")
public class JavaEELoginService implements LoginService {
    private Log log = LogFactory.getLog(JavaEELoginService.class);

    @Autowired
    HttpServletRequest request;

    public LoginStatus getStatus() {
        if (request.getRemoteUser() != null) {
            return new LoginStatus(true, request.getRemoteUser());
        } else {
            return new LoginStatus(false, null);
        }
    }

    @Override
    public LoginStatus login(String username, String password) {
        try {
            if (request.getRemoteUser() == null) {
                request.login(username, password);
                log.debug("Login succeeded!");
            }
            return new LoginStatus(true, request.getRemoteUser());
        } catch (ServletException e) {
            e.printStackTrace();
            return new LoginStatus(false, null);
        }
    }
}

I tried to use this with "mvn jetty:run" (with version 8.0.0.M2 of the jetty-maven-plugin), but I got the following error:

javax.servlet.ServletException
        at org.eclipse.jetty.server.Request.login(Request.java:1927)
        at sun.reflect.NativeMethodAccessorImpl.invoke0(Native Method)
        at sun.reflect.NativeMethodAccessorImpl.invoke(NativeMethodAccessorImpl.java:39)
        at sun.reflect.DelegatingMethodAccessorImpl.invoke(DelegatingMethodAccessorImpl.java:25)
        at java.lang.reflect.Method.invoke(Method.java:597)
        at org.springframework.beans.factory.support.AutowireUtils$ObjectFactoryDelegatingInvocationHandler.invoke(AutowireUtils.java:178)
        at $Proxy52.login(Unknown Source)
        at org.appfuse.examples.webapp.security.JavaEELoginService.login(JavaEELoginService.java:30)

This lead me to believe that Servlet 3 is not quite implemented, so I tried it with Tomcat 7.0.8. To support SSL and container-managed authentication, I had to create a certificate keystore and uncomment the SSL Connector in $CATALINA_HOME/conf/server.xml. I also had to add an "admin" user with roles="ROLE_ADMIN" to $CATALINA_HOME/conf/tomcat-users.xml.

<user username="admin" password="admin" roles="ROLE_ADMIN"/>

With Tomcat 7, I was able to login successfully, proven by the following logging.

DEBUG - JavaEELoginService.login(31) | Login succeeded!

However, in the UI, I still got a "Login failed, please try again." message. Recalling that I had some issues with ports previous, I configured Apache to proxy the default http/https ports to 8080/8443 and tried again. This time it worked!

Spring Security LoginService
Spring Security offers a programmatic API and I was able to implement its LoginService as follows:

package org.appfuse.examples.webapp.security;

import org.apache.commons.logging.Log;
import org.apache.commons.logging.LogFactory;
import org.appfuse.model.User;
import org.springframework.beans.factory.annotation.Autowired;
import org.springframework.beans.factory.annotation.Qualifier;
import org.springframework.security.authentication.AuthenticationManager;
import org.springframework.security.authentication.BadCredentialsException;
import org.springframework.security.authentication.UsernamePasswordAuthenticationToken;
import org.springframework.security.core.Authentication;
import org.springframework.security.core.context.SecurityContextHolder;
import org.springframework.stereotype.Service;

@Service("springLoginService")
public class SpringSecurityLoginService implements LoginService {
    private Log log = LogFactory.getLog(SpringSecurityLoginService.class);

    @Autowired(required = false)
    @Qualifier("authenticationManager")
    AuthenticationManager authenticationManager;

    public LoginStatus getStatus() {
        Authentication auth = SecurityContextHolder.getContext().getAuthentication();
        if (auth != null && !auth.getName().equals("anonymousUser") && auth.isAuthenticated()) {
            return new LoginStatus(true, auth.getName());
        } else {
            return new LoginStatus(false, null);
        }
    }

    public LoginStatus login(String username, String password) {
        UsernamePasswordAuthenticationToken token = new UsernamePasswordAuthenticationToken(username, password);
        User details = new User(username);
        token.setDetails(details);

        try {
            Authentication auth = authenticationManager.authenticate(token);
            log.debug("Login succeeded!");
            SecurityContextHolder.getContext().setAuthentication(auth);
            return new LoginStatus(auth.isAuthenticated(), auth.getName());
        } catch (BadCredentialsException e) {
            return new LoginStatus(false, null);
        }
    }
}

I then modified the LoginService dependency in LoginController so this implementation would be used.

@Autowired
@Qualifier("springLoginService")
LoginService loginService;

Since Spring's API doesn't depend on Servlet 3, I tried it in Jetty using "mvn jetty:run". Of course, I modified my web.xml accordingly for Spring Security before doing so. Interestingly enough, I found that the my SpringSecurityLoginService seemed to work:

DEBUG - SpringSecurityLoginService.login(39) | Login succeeded!

But in the UI, the login failed with a "Login failed, please try again." message. Using the standard ports with Apache in front of Jetty solved this issue.

Apache Shiro LoginService
Apache Shiro is nice enough to offer a programmatic API as well. I was able to implement a ShiroLoginService as follows:

package org.appfuse.examples.webapp.security;

import org.apache.commons.logging.Log;
import org.apache.commons.logging.LogFactory;
import org.apache.shiro.SecurityUtils;
import org.apache.shiro.authc.AuthenticationException;
import org.apache.shiro.authc.UsernamePasswordToken;
import org.apache.shiro.subject.Subject;
import org.springframework.stereotype.Service;

@Service("shiroLoginService")
public class ShiroLoginService implements LoginService {
    private Log log = LogFactory.getLog(ShiroLoginService.class);

    public LoginStatus getStatus() {
        Subject currentUser = SecurityUtils.getSubject();
        if (currentUser.isAuthenticated()) {
            return new LoginStatus(true, currentUser.getPrincipal().toString());
        } else {
            return new LoginStatus(false, null);
        }
    }

    public LoginStatus login(String username, String password) {
        if (!getStatus().isLoggedIn()) {
            UsernamePasswordToken token = new UsernamePasswordToken(username, password);
            Subject currentUser = SecurityUtils.getSubject();
            try {
                currentUser.login(token);
                log.debug("Login succeeded!");
                return new LoginStatus(currentUser.isAuthenticated(),
                        currentUser.getPrincipal().toString());
            } catch (AuthenticationException e) {
                return new LoginStatus(false, null);
            }

        } else {
            return getStatus();
        }
    }
}

Then I modified the LoginService dependency in LoginController so this implementation would be used.

@Autowired
@Qualifier("shiroLoginService")
LoginService loginService;

Next, I modified my web.xml for Apache Shiro and tried "mvn jetty:run". Again, the login appeared to succeed (based on log messages) on the server, but failed in the UI. When using http://localhost instead of http://localhost:8080, everything worked fine.

Summary
This article has shown you how you can programmatically login using Java EE 6, Spring Security and Apache Shiro. Before Java EE 6 (and Servlet 3), there was no API to programmatically login, so this is a welcome addition. The fact that my Ajax login example didn't work when ports differed is because of browsers' same origin policy, which specifies the ports have to be the same. Specifying no ports (the defaults), seems to be the loophole.

On a related note, I've discovered some interesting articles recently from the AppSec Blog.

The 2nd article has an interesting paragraph:

... there's Apache Shiro (FKA JSecurity and then later as Apache Ki), another secure framework for Java apps. Although it looks simpler to use and understand than ESAPI and covers most of the main security bases (authentication, authorization, session management and encryption), it doesn't help take care of important functions like input validation and output encoding. And Spring users have Spring Security (Acegi) a comprehensive, but heavyweight authorization and authentication framework.

So according to this blog, the security frameworks discussed here aren't the best.

The most comprehensive, up-to-date choice for Java developers is OWASP's ESAPI Enterprise Security API especially now that the 2.0 release has just come out.

I haven't heard of many organizations adopting ESAPI over Java EE 6, Spring Security or Apache Shiro, but maybe I'm wrong. Is ESAPI something that's being used out there by companies?

Posted in Java at Jun 06 2011, 09:44:09 PM MDT 4 Comments