Matt RaibleMatt Raible is a writer with a passion for software. Connect with him on LinkedIn.

The Angular Mini-Book The Angular Mini-Book is a guide to getting started with Angular. You'll learn how to develop a bare-bones application, test it, and deploy it. Then you'll move on to adding Bootstrap, Angular Material, continuous integration, and authentication.

Spring Boot is a popular framework for building REST APIs. You'll learn how to integrate Angular with Spring Boot and use security best practices like HTTPS and a content security policy.

For book updates, follow @angular_book on Twitter.

The JHipster Mini-Book The JHipster Mini-Book is a guide to getting started with hip technologies today: Angular, Bootstrap, and Spring Boot. All of these frameworks are wrapped up in an easy-to-use project called JHipster.

This book shows you how to build an app with JHipster, and guides you through the plethora of tools, techniques and options you can use. Furthermore, it explains the UI and API building blocks so you understand the underpinnings of your great application.

For book updates, follow @jhipster-book on Twitter.

10+ YEARS


Over 10 years ago, I wrote my first blog post. Since then, I've authored books, had kids, traveled the world, found Trish and blogged about it all.
You searched this site for "plugin". 300 entries found.

You can also try this same search on Google.

Java Web Application Security - Part V: Penetrating with Zed Attack Proxy

Web Application Security is an important part of developing applications. As developers, I think we often forget this, or simply ignore it. In my career, I've learned a lot about web application security. However, I only recently learned and became familiar with the rapidly growing "appsec" industry.

I found a disconnect between what appsec consultants were selling and what I was developing. It seemed like appsec consultants were selling me fear, mostly because I thought my apps were secure. So I set out on a mission to learn more about web application security and penetration testing to see if my apps really were secure. This article is part of that mission, as are the previous articles I've written in this series.

When I first decided I wanted to do a talk on Webapp Security, I knew it would be more interesting if I showed the audience how to hack and fix an application. That's why I wrote it into my original proposal:

Webapp Security: Develop. Penetrate. Protect. Relax.
In this session, you'll learn how to implement authentication in your Java web applications using Spring Security, Apache Shiro and good ol' Java EE Container Managed Authentication. You'll also learn how to secure your REST API with OAuth and lock it down with SSL.

After learning how to develop authentication, I'll introduce you to OWASP, the OWASP Top 10, its Testing Guide and its Code Review Guide. From there, I'll discuss using WebGoat to verify your app is secure and commercial tools like webapp firewalls and accelerators.

At the time, I hadn't done much webapp pentesting. You can tell this from the fact that I mentioned WebGoat as the pentesting tool. From WebGoat's Project page:

WebGoat is a deliberately insecure J2EE web application maintained by OWASP designed to teach web application security lessons. In each lesson, users must demonstrate their understanding of a security issue by exploiting a real vulnerability in the WebGoat application. For example, in one of the lessons the user must use SQL injection to steal fake credit card numbers. The application is a realistic teaching environment, providing users with hints and code to further explain the lesson.

What I really meant to say and use was Zed Attack Proxy, also known as OWASP ZAP. ZAP is a Java Desktop application that you setup as a proxy for your browser, then use to find vulnerabilities in your application. This article explains how you can use ZAP to pentest a web applications and fix its vulnerabilities.

The application I'll be using in this article is the Ajax Login application I've been using throughout this series. I think it's great that projects like Damn Vulnerable Web App and WebGoat exist, but I wanted to test one that I think is secure, rather than one I know is not secure. In this particular example, I'll be testing the Spring Security implementation, since that's the framework I most often use in my open source projects.

Zed Attack Proxy Tutorial

Download and Run the Application
To begin, download the application and expand it on your hard drive. This app is the completed version of the Ajax Login application referenced in Java Web Application Security - Part II: Spring Security Login Demo. You'll need Java 6 and Maven installed to run the app. Run it using mvn jetty:run and open http://localhost:8080 in your browser. You'll see it's a simple CRUD application for users and you need to login to do anything.

Install and Configure ZAP
The Zed Attack Proxy (ZAP) is an easy to use integrated penetration testing tool for finding vulnerabilities in web applications. Download the latest version (I used 1.3.0) and install it on your system. After installing, launch the app and change the proxy port to 9000 (Tools > Options > Local Proxy). Next, configure your browser to proxy requests through port 9000 and allow localhost requests to be proxied. I used Firefox 4 (Preferences > Advanced > Network > Connection Settings). When finished, your proxy settings should look like the following screenshot:

Firefox Proxy Settings

Another option (instead of removing localhost) is to add an entry to your hosts file with your production domain name. This is what I've done for this demo.

127.0.0.1       demo.raibledesigns.com

I've also configured Apache to proxy requests to Jetty with the following mod_proxy settings in my httpd.conf:

<IfModule mod_proxy.c>
    ProxyRequests Off 
    ProxyPreserveHost Off 

    <VirtualHost *:80>
       ProxyPass  /  http://localhost:8080/
    </VirtualHost>

    <VirtualHost *:443>
        SSLEngine on
        SSLProxyEngine on
        SSLCertificateFile "/etc/apache2/ssl.key/server.crt"
        SSLCertificateKeyFile "/etc/apache2/ssl.key/server.key"

        ProxyPass  /  https://localhost:8443/
    </VirtualHost>
</IfModule>

Perform a Scan
Now you need to give ZAP some data to work with. Using Firefox, I navigated to http://demo.raibledesigns.com and browsed around a bit, listing users, added a new one and deleted an existing one. After doing this, I noticed a number of flags in the ZAP UI under Sites. I then right-clicked on each site (one for http and one for https) and selected Attack > Active Scan site. You should be able to do this from the "Active Scan" tab at the bottom of ZAP, but there's a bug when the URLs are the same. After doing this, I received a number of alerts, ranging from high (cross-site scripting) to low (password autocomplete). The screenshot below shows the various issues.

ZAP Alerts

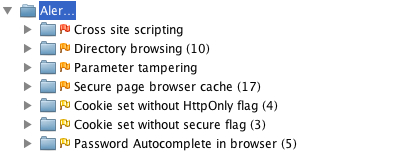
Now let's take a look at how to fix them.

Fix Vulnerabilities
One of the things not mentioned by the scan, but #1 in Seven Security (Mis)Configurations in Java web.xml Files, is Custom Error Pages Not Configured. Custom error pages are configured in this app, but error.jsp contains the following code:

<% if (exception != null) { %>
    <% exception.printStackTrace(new java.io.PrintWriter(out)); %>
<% } else { %>
    Please check your log files for further information.
<% } %>

Stack traces can be really useful to an attacker, so it's important to start by removing the above code from src/main/webapp/error.jsp.

The rest of the issues have to do with XSS, autocomplete, and cookies. Let's start with the easy ones. Fixing autocomplete is easy enough; simply changed the HTML in login.jsp and userform.jsp to have autocomplete="off" as part of the <form> tag.

Then modify web.xml so http-only and secure cookies are used. While you're at it, add session-timeout and tracking-mode as recommended by the aforementioned web.xml misconfigurations article.

<session-config>
    <session-timeout>15</session-timeout>
    <cookie-config>
        <http-only>true</http-only>
        <secure>true</secure>
    </cookie-config>
    <tracking-mode>COOKIE</tracking-mode>
</session-config>

Next, modify Spring Security's Remember Me configuration so it uses secure cookies. To do this, add use-secure-cookies="true" to the <remember-me> element in security.xml.

<remember-me user-service-ref="userService" key="e37f4b31-0c45-11dd-bd0b-0800200c9a66"
             use-secure-cookie="true"/>

Unfortunately, Spring Security doesn't support HttpOnly cookies, but will in a future release.

The next issue to solve is disabling directory browsing. You can do this by copying Jetty's webdefault.xml (from the org.eclipse.jetty:jetty-webapp JAR) into src/test/resources and changing its "dirAllowed" <init-param> to false:

<servlet>
  <servlet-name>default</servlet-name>
  <servlet-class>org.mortbay.jetty.servlet.DefaultServlet</servlet-class>
  <init-param>
    <param-name>acceptRanges</param-name>
    <param-value>true</param-value>
  </init-param>
  <init-param>
    <param-name>dirAllowed</param-name>
    <param-value>false</param-value>
  </init-param>
  <init-param>

You'll also need to modify the plugin's configuration to point to this file by adding it to the <webAppConfig> section in pom.xml.

<configuration>
    <webAppConfig>
        <contextPath>/</contextPath>
        <defaultsDescriptor>src/test/resources/webdefault.xml</defaultsDescriptor>
    </webAppConfig>

Of course, if you're running in production you'll want to configure this in your server's settings rather than in your pom.xml file.

Next, I set out to fix secure page browser cache issues. I had the following settings in my SiteMesh decorator:

<meta http-equiv="Cache-Control" content="no-store"/>
<meta http-equiv="Pragma" content="no-cache"/>

However, according to ZAP, the first meta tag should have "no-cache" instead of "no-store", so I changed it to "no-cache".

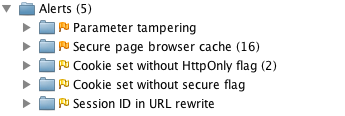
After making all these changes, I created a new ZAP session and ran an active scan on both sites again. Below are the results:

Active Scan after Fixes

I believe the first issue (parameter tampering) is because I show the error page when a duplicate user exists. To fix this, I changed UserFormController so it catches a UserExistsException and sends the user back to the form.

try {
    userManager.saveUser(user);
} catch (UserExistsException uex) {
    result.addError(new ObjectError("user", uex.getMessage()));
    return "userform";
}

However, this still doesn't seem to cause the alert to go away. This is likely because I'm not filtering/escaping HTML when it's first submitted. I believe the best solution for this would be to use something like OWASP's ESAPI to filter parameter values. However, I was unable to find integration with Spring MVC's data binding, so I decided not to try and fix this vulnerability.

Finally, I tried to disable jsessionid in URLs using suggestions from Stack Overflow. The previous setting in web.xml (<tracking-mode>COOKIE</tracking-mode>) should do this, but it doesn't seem to work with Jetty 8. The other issues (secure page browser cache, HttpOnly cookies and secure cookies), I was unable to solve. The last two are issues caused by Spring Security as far as I can tell.

Summary
In this article, I've shown you how to pentest a web application using Firefox and OWASP's Zed Attack Proxy (ZAP). I found ZAP to be a nice tool for figuring out vulnerabilities, but it'd be nice if it had a "retest" feature to see if you fixed an issue for a particular URL. It does have a "resend" feature, but running it didn't seem to clear alerts after I'd fixed them.

The issues I wasn't able to solve seemed to be mostly related to frameworks (e.g. Spring Security and HttpOnly cookies) or servers (Jetty not using cookies for tracking). My suspicion is the Jetty issues are because it doesn't support Servlet 3 as well as it advertises. I believe this is fair; I am using a milestone release after all. I tried scanning http://demo.raibledesigns.com/ajax-login (which runs on Tomcat 7 at Contegix) and confirmed that no jsessionid exists.

Hopefully this article has helped you understand how to figure out security vulnerabilities in your web applications. I believe ZAP will continue to get more popular as developers become aware of it. If you feel ambitious and want to try and solve all of the issues in my Ajax Login application, feel free to fork it on GitHub.

If you're interested in talking more about Webapp Security, please leave a comment, meet me at Jazoon later this week or let's talk in July at Über Conf.

Posted in Java at Jun 21 2011, 07:45:41 AM MDT 4 Comments

Java Web Application Security - Part IV: Programmatic Login APIs

Over the last month, I've posted a number of articles on implementing authentication with Java EE 6, Spring Security and Apache Shiro. One of the things I demonstrated in my live demos (at Utah's JUG Meetings) was programmatic authentication. I left this out of my screencasts and previous tutorials because I thought it'd fit better in a comparison article.

In this article, I'd like to show you how you can programmatically login to an application using the aforementioned security frameworks. To do this, I'll be using my ajax-login application that I wrote for Implementing Ajax Authentication using jQuery, Spring Security and HTTPS.

To begin, I implemented a LoginController as a Spring MVC Controller that returns JSON.

package org.appfuse.examples.webapp.security;

import org.springframework.beans.factory.annotation.Autowired;
import org.springframework.beans.factory.annotation.Qualifier;
import org.springframework.stereotype.Controller;
import org.springframework.web.bind.annotation.RequestMapping;
import org.springframework.web.bind.annotation.RequestMethod;
import org.springframework.web.bind.annotation.RequestParam;
import org.springframework.web.bind.annotation.ResponseBody;

@Controller
@RequestMapping("/api/login.json")
public class LoginController {

    @Autowired
    LoginService loginService;

    @RequestMapping(method = RequestMethod.GET)
    @ResponseBody
    public LoginStatus getStatus() {
        return loginService.getStatus();
    }

    @RequestMapping(method = RequestMethod.POST)
    @ResponseBody
    public LoginStatus login(@RequestParam("j_username") String username,
                             @RequestParam("j_password") String password) {

        return loginService.login(username, password);
    }
}

This controller delegates its logic to a LoginService interface.

package org.appfuse.examples.webapp.security;

public interface LoginService {

  LoginStatus getStatus();

  LoginStatus login(String username, String password);
}

The Client
The client for this controller is the same as mentioned in my previous article, but I'll post it again for your convenience. I used jQuery and jQuery UI to implement a dialog that opens the login page on the same page rather than redirecting to the login page. The "#demo" locator refers to a button in the page.

var dialog = $('<div></div>');

$(document).ready(function() {
    $.get('/login?ajax=true', function(data) {
        dialog.html(data);
        dialog.dialog({
            autoOpen: false,
	       title: 'Authentication Required'
        });
    });

    $('#demo').click(function() {
      dialog.dialog('open');
      // prevent the default action, e.g., following a link
      return false;
    });
});

The login page then has the following JavaScript to add a click handler to the "login" button that submits the request securely to the LoginController.

var getHost = function() {
    var port = (window.location.port == "8080") ? ":8443" : "";
    return ((secure) ? 'https://' : 'http://') + window.location.hostname + port;
};

var loginFailed = function(data, status) {
    $(".error").remove();
    $('#username-label').before('
Login failed, please try again.
'); }; $("#login").live('click', function(e) { e.preventDefault(); $.ajax({url: getHost() + "${ctx}/api/login.json", type: "POST", beforeSend: function(xhr) { xhr.withCredentials = true; }, data: $("#loginForm").serialize(), success: function(data, status) { if (data.loggedIn) { // success dialog.dialog('close'); location.href = getHost() + '${ctx}/users'; } else { loginFailed(data); } }, error: loginFailed }); });

The biggest secret to making this all work (the HTTP -> HTTPS communication, which is considered cross-domain), is the window.name Transport and the jQuery plugin that implements it. To make this plugin work with Firefox 3.6, I had to implement a Filter that adds Access-Control headers.

public class OptionsHeadersFilter implements Filter {

    public void doFilter(ServletRequest req, ServletResponse res, FilterChain chain)
            throws IOException, ServletException {
        HttpServletResponse response = (HttpServletResponse) res;

        response.setHeader("Access-Control-Allow-Origin", "http://" + req.getServerName());
        response.setHeader("Access-Control-Allow-Methods", "GET,POST");
        response.setHeader("Access-Control-Max-Age", "360");
        response.setHeader("Access-Control-Allow-Headers", "x-requested-with");
        response.setHeader("Access-Control-Allow-Credentials", "true");

        chain.doFilter(req, res);
    }

    public void init(FilterConfig filterConfig) {
    }

    public void destroy() {
    }
}

Java EE 6 LoginService
Java EE 6 has a few new methods in HttpServletRequest:

  • authenticate(response)
  • login(user, pass)
  • logout()

In this example, I'll use the new login(username, password) method. The hardest part about getting this working was finding the right Maven dependency. At first, I tried the one that seemed to make the most sense:

<dependency>
    <groupId>javax</groupId>
    <artifactId>javaee-web-api</artifactId>
    <version>6.0</version>
</dependency>

Unfortunately, this resulted in a strange error that means the dependency has the interfaces, but not the implementation classes. I ended up using GlassFish's dependency instead (thanks to Stack Overflow for the tip).

<dependency>
    <groupId>org.glassfish</groupId>
    <artifactId>javax.servlet</artifactId>
    <version>3.0</version>
    <scope>provided</scope>
</dependency>

Since Servlet 3.0 doesn't appear to be in Maven Central, I had to add the GlassFish Repository to my pom.xml's <repositories> element.

<repository>
    <id>glassfish-repo</id>
    <url>http://download.java.net/maven/glassfish</url>
</repository>

After that, it was easy to implement the LoginService interface with a JavaEELoginService class:

package org.appfuse.examples.webapp.security;

import org.apache.commons.logging.Log;
import org.apache.commons.logging.LogFactory;
import org.springframework.beans.factory.annotation.Autowired;
import org.springframework.stereotype.Service;

import javax.servlet.ServletException;
import javax.servlet.http.HttpServletRequest;

@Service("javaeeLoginService")
public class JavaEELoginService implements LoginService {
    private Log log = LogFactory.getLog(JavaEELoginService.class);

    @Autowired
    HttpServletRequest request;

    public LoginStatus getStatus() {
        if (request.getRemoteUser() != null) {
            return new LoginStatus(true, request.getRemoteUser());
        } else {
            return new LoginStatus(false, null);
        }
    }

    @Override
    public LoginStatus login(String username, String password) {
        try {
            if (request.getRemoteUser() == null) {
                request.login(username, password);
                log.debug("Login succeeded!");
            }
            return new LoginStatus(true, request.getRemoteUser());
        } catch (ServletException e) {
            e.printStackTrace();
            return new LoginStatus(false, null);
        }
    }
}

I tried to use this with "mvn jetty:run" (with version 8.0.0.M2 of the jetty-maven-plugin), but I got the following error:

javax.servlet.ServletException
        at org.eclipse.jetty.server.Request.login(Request.java:1927)
        at sun.reflect.NativeMethodAccessorImpl.invoke0(Native Method)
        at sun.reflect.NativeMethodAccessorImpl.invoke(NativeMethodAccessorImpl.java:39)
        at sun.reflect.DelegatingMethodAccessorImpl.invoke(DelegatingMethodAccessorImpl.java:25)
        at java.lang.reflect.Method.invoke(Method.java:597)
        at org.springframework.beans.factory.support.AutowireUtils$ObjectFactoryDelegatingInvocationHandler.invoke(AutowireUtils.java:178)
        at $Proxy52.login(Unknown Source)
        at org.appfuse.examples.webapp.security.JavaEELoginService.login(JavaEELoginService.java:30)

This lead me to believe that Servlet 3 is not quite implemented, so I tried it with Tomcat 7.0.8. To support SSL and container-managed authentication, I had to create a certificate keystore and uncomment the SSL Connector in $CATALINA_HOME/conf/server.xml. I also had to add an "admin" user with roles="ROLE_ADMIN" to $CATALINA_HOME/conf/tomcat-users.xml.

<user username="admin" password="admin" roles="ROLE_ADMIN"/>

With Tomcat 7, I was able to login successfully, proven by the following logging.

DEBUG - JavaEELoginService.login(31) | Login succeeded!

However, in the UI, I still got a "Login failed, please try again." message. Recalling that I had some issues with ports previous, I configured Apache to proxy the default http/https ports to 8080/8443 and tried again. This time it worked!

Spring Security LoginService
Spring Security offers a programmatic API and I was able to implement its LoginService as follows:

package org.appfuse.examples.webapp.security;

import org.apache.commons.logging.Log;
import org.apache.commons.logging.LogFactory;
import org.appfuse.model.User;
import org.springframework.beans.factory.annotation.Autowired;
import org.springframework.beans.factory.annotation.Qualifier;
import org.springframework.security.authentication.AuthenticationManager;
import org.springframework.security.authentication.BadCredentialsException;
import org.springframework.security.authentication.UsernamePasswordAuthenticationToken;
import org.springframework.security.core.Authentication;
import org.springframework.security.core.context.SecurityContextHolder;
import org.springframework.stereotype.Service;

@Service("springLoginService")
public class SpringSecurityLoginService implements LoginService {
    private Log log = LogFactory.getLog(SpringSecurityLoginService.class);

    @Autowired(required = false)
    @Qualifier("authenticationManager")
    AuthenticationManager authenticationManager;

    public LoginStatus getStatus() {
        Authentication auth = SecurityContextHolder.getContext().getAuthentication();
        if (auth != null && !auth.getName().equals("anonymousUser") && auth.isAuthenticated()) {
            return new LoginStatus(true, auth.getName());
        } else {
            return new LoginStatus(false, null);
        }
    }

    public LoginStatus login(String username, String password) {
        UsernamePasswordAuthenticationToken token = new UsernamePasswordAuthenticationToken(username, password);
        User details = new User(username);
        token.setDetails(details);

        try {
            Authentication auth = authenticationManager.authenticate(token);
            log.debug("Login succeeded!");
            SecurityContextHolder.getContext().setAuthentication(auth);
            return new LoginStatus(auth.isAuthenticated(), auth.getName());
        } catch (BadCredentialsException e) {
            return new LoginStatus(false, null);
        }
    }
}

I then modified the LoginService dependency in LoginController so this implementation would be used.

@Autowired
@Qualifier("springLoginService")
LoginService loginService;

Since Spring's API doesn't depend on Servlet 3, I tried it in Jetty using "mvn jetty:run". Of course, I modified my web.xml accordingly for Spring Security before doing so. Interestingly enough, I found that the my SpringSecurityLoginService seemed to work:

DEBUG - SpringSecurityLoginService.login(39) | Login succeeded!

But in the UI, the login failed with a "Login failed, please try again." message. Using the standard ports with Apache in front of Jetty solved this issue.

Apache Shiro LoginService
Apache Shiro is nice enough to offer a programmatic API as well. I was able to implement a ShiroLoginService as follows:

package org.appfuse.examples.webapp.security;

import org.apache.commons.logging.Log;
import org.apache.commons.logging.LogFactory;
import org.apache.shiro.SecurityUtils;
import org.apache.shiro.authc.AuthenticationException;
import org.apache.shiro.authc.UsernamePasswordToken;
import org.apache.shiro.subject.Subject;
import org.springframework.stereotype.Service;

@Service("shiroLoginService")
public class ShiroLoginService implements LoginService {
    private Log log = LogFactory.getLog(ShiroLoginService.class);

    public LoginStatus getStatus() {
        Subject currentUser = SecurityUtils.getSubject();
        if (currentUser.isAuthenticated()) {
            return new LoginStatus(true, currentUser.getPrincipal().toString());
        } else {
            return new LoginStatus(false, null);
        }
    }

    public LoginStatus login(String username, String password) {
        if (!getStatus().isLoggedIn()) {
            UsernamePasswordToken token = new UsernamePasswordToken(username, password);
            Subject currentUser = SecurityUtils.getSubject();
            try {
                currentUser.login(token);
                log.debug("Login succeeded!");
                return new LoginStatus(currentUser.isAuthenticated(),
                        currentUser.getPrincipal().toString());
            } catch (AuthenticationException e) {
                return new LoginStatus(false, null);
            }

        } else {
            return getStatus();
        }
    }
}

Then I modified the LoginService dependency in LoginController so this implementation would be used.

@Autowired
@Qualifier("shiroLoginService")
LoginService loginService;

Next, I modified my web.xml for Apache Shiro and tried "mvn jetty:run". Again, the login appeared to succeed (based on log messages) on the server, but failed in the UI. When using http://localhost instead of http://localhost:8080, everything worked fine.

Summary
This article has shown you how you can programmatically login using Java EE 6, Spring Security and Apache Shiro. Before Java EE 6 (and Servlet 3), there was no API to programmatically login, so this is a welcome addition. The fact that my Ajax login example didn't work when ports differed is because of browsers' same origin policy, which specifies the ports have to be the same. Specifying no ports (the defaults), seems to be the loophole.

On a related note, I've discovered some interesting articles recently from the AppSec Blog.

The 2nd article has an interesting paragraph:

... there's Apache Shiro (FKA JSecurity and then later as Apache Ki), another secure framework for Java apps. Although it looks simpler to use and understand than ESAPI and covers most of the main security bases (authentication, authorization, session management and encryption), it doesn't help take care of important functions like input validation and output encoding. And Spring users have Spring Security (Acegi) a comprehensive, but heavyweight authorization and authentication framework.

So according to this blog, the security frameworks discussed here aren't the best.

The most comprehensive, up-to-date choice for Java developers is OWASP's ESAPI Enterprise Security API especially now that the 2.0 release has just come out.

I haven't heard of many organizations adopting ESAPI over Java EE 6, Spring Security or Apache Shiro, but maybe I'm wrong. Is ESAPI something that's being used out there by companies?

Posted in Java at Jun 06 2011, 09:44:09 PM MDT 4 Comments

Java Web Application Security - Part III: Apache Shiro Login Demo

A couple weeks ago, I wrote a tutorial on how to implement security with Spring Security. The week prior, I wrote a similar tutorial for Java EE 6. This week, I'd like to show you how to implement the same features using Apache Shiro. As I mentioned in previous articles, I'm writing this because I told the audience at April's UJUG that I would publish screencasts of the demos.

Today, I've finished the third screencast showing how to implement security with Apache Shiro. Below is the presentation (with the screencast embedded on slide 22) as well as a step-by-step tutorial.


Apache Shiro Login Tutorial

Download and Run the Application
To begin, download the application you'll be implementing security in. This app is a stripped-down version of the Ajax Login application I wrote for my article on Implementing Ajax Authentication using jQuery, Spring Security and HTTPS. You'll need Java 6 and Maven installed to run the app. Run it using mvn jetty:run and open http://localhost:8080 in your browser. You'll see it's a simple CRUD application for users and there's no login required to add or delete users.

Implement Basic Authentication
The first step is to protect the list screen so people have to login to view users. To do this, you'll need to create a shiro.ini file Shiro's configuration. Create src/main/resources/shiro.ini and populate it with the contents below:

[main]

[users]
admin = admin, ROLE_ADMIN

[roles]
ROLE_ADMIN = *

[urls]
/app/users = authcBasic

You can see this file has four sections and is pretty simple to read and understand. For more information about what each section is for, check out Shiro's configuration documentation.

Next, open src/main/webapp/WEB-INF/web.xml and add Shiro's IniShiroFilter:

<filter>
    <filter-name>securityFilter</filter-name>
    <filter-class>org.apache.shiro.web.servlet.IniShiroFilter</filter-class>
    <!-- no init-param means load the INI config from classpath:shiro.ini -->
</filter>

And add its filter-mapping just after the rewriteFilter in the filter-mappings section (order is important!):

<filter-mapping>
    <filter-name>rewriteFilter</filter-name>
    <url-pattern>/*</url-pattern>
</filter-mapping>
<filter-mapping>
    <filter-name>securityFilter</filter-name>
    <url-pattern>/*</url-pattern>
    <dispatcher>REQUEST</dispatcher>
    <dispatcher>FORWARD</dispatcher>
    <dispatcher>INCLUDE</dispatcher>
</filter-mapping>

Then add Shiro's core and web dependencies to your pom.xml:

<dependency>
    <groupId>org.apache.shiro</groupId>
    <artifactId>shiro-core</artifactId>
    <version>1.1.0</version>
</dependency>
<dependency>
    <groupId>org.apache.shiro</groupId>
    <artifactId>shiro-web</artifactId>
    <version>1.1.0</version>
</dependency>

At this point, if you restart Jetty (Ctrl+C and jetty:run again), you should be prompted to login when you click on the "Users" tab. Enter admin/admin to login. Apache Shiro is easier to configure than Spring Security out-of-the-box, mostly because it doesn't require XML.

After logging in, you can try to logout by clicking the "Logout" link in the top-right corner. This calls a LogoutController with the following code that logs the user out.

public void logout(HttpServletResponse response) throws ServletException, IOException {
    request.getSession().invalidate();
    response.sendRedirect(request.getContextPath()); 
}

NOTE: Shiro doesn't currently have a way to logout with its API. However, it will be added in the 1.2 release.

You'll notice that clicking this link doesn't log you out, even though the session is invalidated. The only way to logout with basic authentication is to close the browser. In order to get the ability to logout, as well as to have more control over the look-and-feel of the login, you can implement form-based authentication. Before you implement form-based authentication, I'd like to show you how easy it is to force SSL with Apache Shiro.

Force SSL
Apache Shiro allows you to force SSL on a URL by simply adding "ssl[port]" to a URL in the [urls] section. If you don't specify the port, it will use the default port (443). I'm not sure if it allows you to switch back to http like Spring Security's requires-channel, but I don't think it does. Modify the URLs section of your shiro.ini to have the following:

[urls]
/app/users = ssl[8443],authc

In order for this to work, you have to configure Jetty to listen on an SSL port. Add the following just after the jetty-maven-plugin's </webAppConfig> element in your pom.xml:

<connectors>
    <connector implementation="org.eclipse.jetty.server.nio.SelectChannelConnector">
        <forwarded>true</forwarded>
        <port>8080</port>
    </connector>
    <connector implementation="org.eclipse.jetty.server.ssl.SslSelectChannelConnector">
        <forwarded>true</forwarded>
        <port>8443</port>
        <maxIdleTime>60000</maxIdleTime>
        <keystore>${project.build.directory}/ssl.keystore</keystore>
        <password>appfuse</password>
        <keyPassword>appfuse</keyPassword>
    </connector>
</connectors>

The keystore must be generated for Jetty to start successfully, so add the keytool-maven-plugin just above the jetty-maven-plugin in pom.xml.

<plugin>
    <groupId>org.codehaus.mojo</groupId>
    <artifactId>keytool-maven-plugin</artifactId>
    <version>1.0</version>
    <executions>
        <execution>
            <phase>generate-resources</phase>
            <id>clean</id>
            <goals>
                <goal>clean</goal>
            </goals>
        </execution>
        <execution>
            <phase>generate-resources</phase>
            <id>genkey</id>
            <goals>
                <goal>genkey</goal>
            </goals>
        </execution>
    </executions>
    <configuration>
        <keystore>${project.build.directory}/ssl.keystore</keystore>
        <dname>cn=localhost</dname>
        <keypass>appfuse</keypass>
        <storepass>appfuse</storepass>
        <alias>appfuse</alias>
        <keyalg>RSA</keyalg>
    </configuration>
</plugin>

Now if you restart Jetty, go to http://localhost:8080 and click on the "Users" tab, you'll be prompted to accept the Untrusted Certificate and then redirected to https://localhost:8443/users after logging in.

Now let's look at how to have more control over the look-and-feel of the login screen, as well as how to make logout work with form-based authentication.

Implement Form-based Authentication
To change from basic to form-based authentication, you simply have to add a few lines to shiro.ini. First of all, since I'd rather not change the name of the input elements in login.jsp, override the default names in the [main] section:

# name of request parameter with username; if not present filter assumes 'username'
authc.usernameParam = j_username
# name of request parameter with password; if not present filter assumes 'password'
authc.passwordParam = j_password
authc.failureKeyAttribute = shiroLoginFailure

Then change the [urls] section to filter on login.jsp and use "authc" instead of "authcBasic":

[urls]
# The /login.jsp is not restricted to authenticated users (otherwise no one could log in!), but
# the 'authc' filter must still be specified for it so it can process that url's
# login submissions. It is 'smart' enough to allow those requests through as specified by the
# shiro.loginUrl above.
/login.jsp = authc
/app/users = ssl[8443],authc

Then change login.jsp so the form's action is blank (causing it to submit to itself) instead of j_security_check:

<form action="" id="loginForm" method="post">

Now, restart Jetty and you should be prompted to login with this JSP instead of the basic authentication dialog.

Store Users in a Database
To store your users in a database instead of file, you'll need to add a few settings to shiro.ini to define your database and tables to use. Open src/main/resources/shiro.ini and add the following lines under the [main] section.

jdbcRealm=org.apache.shiro.realm.jdbc.JdbcRealm
#jdbcRealm.permissionsLookupEnabled=false
# If not filled, subclasses of JdbcRealm assume "select password from users where username = ?"
jdbcRealm.authenticationQuery = select user_pass from users where user_name = ?
# If not filled, subclasses of JdbcRealm assume "select role_name from user_roles where username = ?"
jdbcRealm.userRolesQuery = select role_name from users_roles where user_name = ?

ds = com.mysql.jdbc.jdbc2.optional.MysqlDataSource
ds.serverName = localhost
ds.user = root
ds.databaseName = appfuse
jdbcRealm.dataSource = $ds

This configuration is similar to what I did with the Java EE 6 tutorial where I'm pointing to a database other than the H2 instance that's used by the application. I believe Shiro can talk to a DAO like Spring Security, but I have yet to explore that option.

While you're at it, add the following lines to enable password encryption.

sha256Matcher = org.apache.shiro.authc.credential.Sha256CredentialsMatcher
jdbcRealm.credentialsMatcher = $sha256Matcher

You'll need to install MySQL for this to work. After installing it, you should be able to create an "appfuse" database using the following command:

mysql -u root -p -e 'create database appfuse'

Then create the tables necessary and populate it with an 'admin' user. Login using "mysql -u root -p appfuse" and execute the following SQL statements:

create table users (
  user_name         varchar(30) not null primary key,
  user_pass         varchar(100) not null
);

create table user_roles (
  user_name         varchar(30) not null,
  role_name         varchar(30) not null,
  primary key (user_name, role_name)
);

insert into users values ('admin', '22f256eca1f336a97eef2b260773cb0d81d900c208ff26e94410d292d605fed8');
insert into user_roles values ('admin', 'ROLE_ADMIN');

Now if you restart Jetty, you should be able to login with admin/adminjdbc and view the list of users.

Summary
In this tutorial, you learned how to implement authentication using Apache Shiro 1.1.0. I don't have a lot of experience with Apache Shiro, but I was able to get the basics working without too much effort. This tutorial doesn't show how to do Remember Me because I couldn't figure it out in 5 minutes, which means I have 5 more minutes before it fails the 10-minute test. ;)

Shiro was formerly named JSecurity and has been an Apache project for less than a year. It seems to be more targeted towards non-web use, so its certainly something to look at if you're more interested in cryptography or non-web apps. I think there's a good chance this project will continue to grow and be used more as more developers learn about it. The Apache brand certainly doesn't hurt.

I didn't include a slide about the limitations I found with Shiro, mostly because I haven't used it much. I've used Java EE and Spring Security for several years. The main limitation I found was the lack of documentation, but I've heard it's improving rapidly.

In the next couple weeks, I'll post a Part IV on implementing programmatic login using the APIs of Java EE 6, Spring Security and Apache Shiro. I'll be presenting this topic at Jazoon as well as the long-form version (with hacking) at ÜberConf. Hopefully I'll see you at one of those conferences.

Update: Thanks to help from Les Hazlewood, I've figured out how to implement Remember Me with Apache Shiro. In the [urls] section of shiro.ini, the second url (shown below) says to Shiro "In order to visit the /app/users URL, you must be connecting via SSL on port 8443 and you must also be authenticated."

/app/users = ssl[8443],authc

Remembered users are not authenticated because their identity hasn't been proven during the current session. What I want Shiro to say is "In order to visit the /app/users URL, you must be connecting via SSL on 8443 and you must also be a known user. If you're not, you should login first." Where a known user is someone who has a recognized identity and has either authenticated during the current session or is known via RememberMe from a previous session. The documentation gives a good example with Amazon.com for why Shiro makes this distinction. It allows more control (usually necessary), but you can relax the control as you see fit.

So, to relax my configuration a bit to match what I want (known users), I updated shiro.ini's [urls] section to be as follows:

/app/users = ssl[8443],user

The key is that the /app/users url is now protected with the more relaxed user filter instead of the authc filter. However, you would typically want an account profile page (or credit card information page, or similar) protected with the authc filter instead to guarantee proof of identity for those sensitive operations.

Posted in Java at May 26 2011, 04:43:22 PM MDT 10 Comments

Java Web Application Security - Part II: Spring Security Login Demo

Last week, I wrote a tutorial on how to implement Security in Java EE 6. This week, I'd like to show you how to implement the same features using Spring Security. Before I begin, I'd like to explain my reason for writing this article.

Last month, I presented a talk on Java Web Application Security at the Utah JUG (UJUG). As part of that presentation, I did a number of demos about how to implement security with Java EE 6, Spring Security and Apache Shiro. I told the audience that I would post the presentation and was planning on recording screencasts of the various demos so the online version of the presentation would make more sense.

Today, I've finished the second screencast showing how to implement security with Spring Security. Below is the presentation (with the screencast embedded on slide 16) as well as a step-by-step tutorial.


Spring Security Login Tutorial

Download and Run the Application
To begin, download the application you'll be implementing security in. This app is a stripped-down version of the Ajax Login application I wrote for my article on Implementing Ajax Authentication using jQuery, Spring Security and HTTPS. You'll need Java 6 and Maven installed to run the app. Run it using mvn jetty:run and open http://localhost:8080 in your browser. You'll see it's a simple CRUD application for users and there's no login required to add or delete users.

Implement Basic Authentication
The first step is to protect the list screen so people have to login to view users. To do this, you'll need to create a Spring context file that contains Spring Security's configuration. Create src/main/webapp/WEB-INF/security.xml and populate it with the contents below:

  <?xml version="1.0" encoding="UTF-8"?>
  <beans:beans xmlns="http://www.springframework.org/schema/security"
               xmlns:xsi="http://www.w3.org/2001/XMLSchema-instance"
               xmlns:beans="http://www.springframework.org/schema/beans"
               xsi:schemaLocation="http://www.springframework.org/schema/beans http://www.springframework.org/schema/beans/spring-beans-3.0.xsd
                http://www.springframework.org/schema/security http://www.springframework.org/schema/security/spring-security-3.0.xsd">

      <!-- New in Spring Security 3.1 -->
      <!-- <http pattern="/css/**" security="none"/> -->

      <http auto-config="true">
          <intercept-url pattern="/app/users" access="ROLE_USER,ROLE_ADMIN"/>
          <http-basic/>
      </http>

      <authentication-manager alias="authenticationManager">
          <authentication-provider>
              <password-encoder hash="sha"/>
              <user-service>
                  <user name="user" password="12dea96fec20593566ab75692c9949596833adc9" authorities="ROLE_USER"/>
                  <user name="admin" password="d033e22ae348aeb5660fc2140aec35850c4da997" authorities="ROLE_ADMIN"/>
              </user-service>
          </authentication-provider>
      </authentication-manager>

      <!-- Override userSecurityAdvice bean in appfuse-service to allow any role to update a user. -->
      <beans:bean id="userSecurityAdvice" class="org.appfuse.examples.webapp.security.UserSecurityAdvice"/>
  </beans:beans>

The last bean, userSecurityAdvice, is an aspect that's needed to override some behavior in AppFuse. You won't need this normally when implementing Spring Security.

Next, open src/main/webapp/WEB-INF/web.xml and add Spring's DelegatingFilterProxy:

<filter>
    <filter-name>securityFilter</filter-name>
    <filter-class>org.springframework.web.filter.DelegatingFilterProxy</filter-class>
    <init-param>
        <param-name>targetBeanName</param-name>
        <param-value>springSecurityFilterChain</param-value>
    </init-param>
</filter>

And add its filter-mapping just after the rewriteFilter in the filter-mappings section (order is important!):

<filter-mapping>
    <filter-name>rewriteFilter</filter-name>
    <url-pattern>/*</url-pattern>
</filter-mapping>
<filter-mapping>
    <filter-name>securityFilter</filter-name>
    <url-pattern>/*</url-pattern>
    <dispatcher>REQUEST</dispatcher>
    <dispatcher>FORWARD</dispatcher>
    <dispatcher>INCLUDE</dispatcher>
</filter-mapping>

You don't need to add any dependencies in your pom.xml is because this project depends on AppFuse, which already contains these dependencies.

At this point, if you restart Jetty (Ctrl+C and jetty:run again), you should be prompted to login when you click on the "Users" tab. Enter admin/admin to login. Spring Security is a bit easier to configure than Java EE 6 out-of-the-box, mostly because it doesn't require you to configure your container.

After logging in, you can try to logout by clicking the "Logout" link in the top-right corner. This calls a LogoutController with the following code that logs the user out.

public void logout(HttpServletResponse response) throws ServletException, IOException {
    request.getSession().invalidate();
    response.sendRedirect(request.getContextPath()); 
}

NOTE: Spring Security has a way to configure "logout" to match a URL and get rid of a class like LogoutController. Since it was already in the project, I don't cover that in this tutorial.

You'll notice that clicking this link doesn't log you out, even though the session is invalidated. The only way to logout with basic authentication is to close the browser. In order to get the ability to logout, as well as to have more control over the look-and-feel of the login, you can implement form-based authentication. Before you implement form-based authentication, I'd like to show you how easy it is to force SSL with Spring Security.

Force SSL
Spring Security allows you to switch between secure (https) and non-secure (http) protocols using a simple requires-channel attribute on the <intercept-url> element. Possible values are "http", "https" and "any". Add requires-channel="https" to your security.xml file:

<intercept-url pattern="/app/users" access="ROLE_USER,ROLE_ADMIN" requires-channel="https"/>

In order for this to work, you have to configure Jetty to listen on an SSL port. Add the following just after the jetty-maven-plugin's </webAppConfig> element in your pom.xml:

<connectors>
    <connector implementation="org.eclipse.jetty.server.nio.SelectChannelConnector">
        <forwarded>true</forwarded>
        <port>8080</port>
    </connector>
    <connector implementation="org.eclipse.jetty.server.ssl.SslSelectChannelConnector">
        <forwarded>true</forwarded>
        <port>8443</port>
        <maxIdleTime>60000</maxIdleTime>
        <keystore>${project.build.directory}/ssl.keystore</keystore>
        <password>appfuse</password>
        <keyPassword>appfuse</keyPassword>
    </connector>
</connectors>

The keystore must be generated for Jetty to start successfully, so add the keytool-maven-plugin just above the jetty-maven-plugin in pom.xml.

<plugin>
    <groupId>org.codehaus.mojo</groupId>
    <artifactId>keytool-maven-plugin</artifactId>
    <version>1.0</version>
    <executions>
        <execution>
            <phase>generate-resources</phase>
            <id>clean</id>
            <goals>
                <goal>clean</goal>
            </goals>
        </execution>
        <execution>
            <phase>generate-resources</phase>
            <id>genkey</id>
            <goals>
                <goal>genkey</goal>
            </goals>
        </execution>
    </executions>
    <configuration>
        <keystore>${project.build.directory}/ssl.keystore</keystore>
        <dname>cn=localhost</dname>
        <keypass>appfuse</keypass>
        <storepass>appfuse</storepass>
        <alias>appfuse</alias>
        <keyalg>RSA</keyalg>
    </configuration>
</plugin>

Now if you restart Jetty, go to http://localhost:8080 and click on the "Users" tab, you'll be prompted to accept the Untrusted Certificate and then redirected to https://localhost:8443/users after logging in. This is an improvement on Java EE's user-data-constraint for two reasons:

  • You can switch between http and https protocols. With Java EE, you can only force https. You have to write a custom filter to switch back to http.
  • Redirecting to https actually works. With Java EE (on Jetty at least), a 403 is returned instead of redirecting the request.

Now let's look at how to have more control over the look-and-feel of the login screen, as well as how to make logout work with form-based authentication.

Implement Form-based Authentication
To change from basic to form-based authentication, you simply have to add a <form-login> element in security.xml's <http> element:

<http auto-config="true">
    <intercept-url pattern="/app/users" access="ROLE_USER,ROLE_ADMIN" requires-channel="https"/>
    <form-login login-page="/login" authentication-failure-url="/login?error=true"
                login-processing-url="/j_security_check"/>
    <http-basic/>
</http>

You can leave the <http-basic> element since Spring Security is smart enough to serve up the form for browsers and use Basic Authentication for clients such as web services. The login.jsp page (that /login forwards to) already exists in the project, in the src/main/webapp directory. The forwarding is done by the UrlRewriteFilter with the following configuration in src/main/webapp/WEB-INF/urlrewrite.xml.

<rule>
    <from>/login</from>
    <to>/login.jsp</to>
</rule>

This JSP has 3 important elements: 1) a form that submits to "/j_security_check", 2) an input element named "j_username" and 3) an input element named "j_password". If you restart Jetty, you'll now be prompted to login with this JSP instead of the basic authentication dialog.

Add Remember Me
Remember Me is a feature you see in many web applications today. It's usually a checkbox on the login form that allows you to auto-login the next time you visit a site. This feature doesn't exist in Java EE security, but it does exist in Spring Security. To enable it, add the following just below <form-login> in security.xml:

<remember-me user-service-ref="userDao" key="e37f4b31-0c45-11dd-bd0b-0800200c9a66"/>

Next, open src/main/webapp/login.jsp and change the name of the "remember me" checkbox to be _spring_security_remember_me:

<input type="checkbox" name="_spring_security_remember_me" id="rememberMe"/>

After making these changes, you should be able to restart Jetty, go to http://localhost:8080/users, enter admin/adminjdbc, check the Remember Me checkbox and login. Then close your browser, and repeat the process. This time, you won't be prompted to login. For more information on this feature, see Spring Security's Remember Me documentation.

While storing usernames and passwords in a file is convenient for demos, it's not very real-world-ish. The next section shows you how to configure Spring Security to use a database for its user store.

Store Users in a Database
To store your users in a database instead of file, you'll need to add a user-service-ref attribute to the <authentication-provider> element. You can also delete the <user-service> element.

<authentication-manager alias="authenticationManager">
    <authentication-provider user-service-ref="userDao">
        <password-encoder hash="sha"/>
    </authentication-provider>
</authentication-manager>

The "userDao" bean is provided by AppFuse and its UserDaoHibernate.java class. This class implements Spring Security's UserDetailsService interface. With Java EE, I had to configure a database connection and make sure the JDBC Driver was in my container's classpath. With Spring Security, you can talk to the database you already have configured in your application.

Of course, you could do this with Java EE too. One thing I neglected to show in my last tutorial was that 1) the app uses H2 and 2) I had to configure Java EE's database to be MySQL. This was because when I tried to access my H2 instance, I got an error about two threads trying to access it at once.
2011-05-13 08:47:29.081:WARN::UserRealm Java EE Login could not connect to database; will try later
org.h2.jdbc.JdbcSQLException: Database may be already in use: "Locked by another process". 
        Possible solutions: close all other connection(s); use the server mode [90020-154]
	at org.h2.message.DbException.getJdbcSQLException(DbException.java:327)
	at org.h2.message.DbException.get(DbException.java:167)
	at org.h2.message.DbException.get(DbException.java:144)
	at org.h2.store.FileLock.getExceptionAlreadyInUse(FileLock.java:443)
	at org.h2.store.FileLock.lockFile(FileLock.java:338)
	at org.h2.store.FileLock.lock(FileLock.java:134)
	at org.h2.engine.Database.open(Database.java:535)
	at org.h2.engine.Database.openDatabase(Database.java:218)

The password for the "admin" user is configured in src/test/resources/sample-data.xml and it's loaded by DbUnit before the application starts. You can view your pom.xml and the dbunit-maven-plugin's configuration if you're interested in learning how this is done. The password is currently configured to "adminjdbc", but you can reset it by generating a new password and modifying sample-data.xml.

Now if you restart Jetty, you should be able to login with admin/adminjdbc and view the list of users.

Summary
In this tutorial, you learned how to implement authentication using Spring Security 3.0.5. In addition to the basic XML configuration, Spring Security also provides a AOP support and annotations you can use to secure methods. It also has many more features than standard Java EE Security. In my opinion, it's the most mature security framework we have in Java today. Currently, I think its reference documentation is the best place to learn more.

There are a few limitations I found with Spring Security:

  • The authentication mechanism (file, database, ldap, etc.) is contained in the WAR
  • Securing methods only works on Spring beans
  • Remember Me doesn't work in my screencast (because I forgot to rename the checkbox in login.jsp)

Of course, you can configure Spring to load its configuration from outside the WAR (e.g. a file or JNDI), but it's not as easy as including the configuration in your app.

In the next couple weeks, I'll post Part III of this series, where I'll show you how to implement this same set of features using Apache Shiro. In the meantime, please let me know if you have any questions.

I created the screencasts with Camtasia. For small screens, and embedding in the presentation, I created it at 50% and used the SmartFocus feature to zoom in and out during the demo. For larger screens, I published another screencast at 100%, in HD. If you have a preference for which screencast is better, I'd love to hear about it.

Posted in Java at May 13 2011, 09:20:51 AM MDT 10 Comments

Java Web Application Security - Part I: Java EE 6 Login Demo

Back in February, I wrote about my upcoming conferences:

In addition to Vegas and Poland, there's a couple other events I might speak at in the next few months: the Utah Java Users Group (possibly in April), Jazoon and ÜberConf (if my proposals are accepted). For these events, I'm hoping to present the following talk:

Webapp Security: Develop. Penetrate. Protect. Relax.
In this session, you'll learn how to implement authentication in your Java web applications using Spring Security, Apache Shiro and good ol' Java EE Container Managed Authentication. You'll also learn how to secure your REST API with OAuth and lock it down with SSL.

After learning how to develop authentication, I'll introduce you to OWASP, the OWASP Top 10, its Testing Guide and its Code Review Guide. From there, I'll discuss using WebGoat to verify your app is secure and commercial tools like webapp firewalls and accelerators.

Fast forward a couple months and I'm happy to say that I've completed my talk at the Utah JUG and it's been accepted at Jazoon and Über Conf. For this talk, I created a presentation that primarily consists of demos implementing basic, form and Ajax authentication using Java EE 6, Spring Security and Apache Shiro. In the process of creating the demos, I learned (or re-educated myself) how to do a number of things in all 3 frameworks:

  • Implement Basic Authentication
  • Implement Form-based Authentication
  • Implement Ajax HTTP -> HTTPS Authentication (with programmatic APIs)
  • Force SSL for certain URLs
  • Implement a file-based store of users and passwords (in Jetty/Maven and Tomcat standalone)
  • Implement a database store of users and passwords (in Jetty/Maven and Tomcat standalone)
  • Encrypt Passwords
  • Secure methods with annotations

For the demos, I showed the audience how to do almost all of these, but skipped Tomcat standalone and securing methods in the interest of time. In July, when I do this talk at ÜberConf, I plan on adding 1) hacking the app (to show security holes) and 2) fixing it to protect it against vulnerabilities.

I told the audience at UJUG that I would post the presentation and was planning on recording screencasts of the various demos so the online version of the presentation would make more sense. Today, I've finished the first screencast showing how to implement security with Java EE 6. Below is the presentation (with the screencast embedded on slide 10) as well as a step-by-step tutorial.


Java EE 6 Login Tutorial

Download and Run the Application
To begin, download the application you'll be implementing security in. This app is a stripped-down version of the Ajax Login application I wrote for my article on Implementing Ajax Authentication using jQuery, Spring Security and HTTPS. You'll need Java 6 and Maven installed to run the app. Run it using mvn jetty:run and open http://localhost:8080 in your browser. You'll see it's a simple CRUD application for users and there's no login required to add or delete users.

Implement Basic Authentication
The first step is to protect the list screen so people have to login to view users. To do this, add the following to the bottom of src/main/webapp/WEB-INF/web.xml:

<security-constraint>
    <web-resource-collection>
        <web-resource-name>users</web-resource-name>
        <url-pattern>/users</url-pattern>
        <http-method>GET</http-method>
        <http-method>POST</http-method>
    </web-resource-collection>
    <auth-constraint>
        <role-name>ROLE_ADMIN</role-name>
    </auth-constraint>
</security-constraint>

<login-config>
    <auth-method>BASIC</auth-method>
    <realm-name>Java EE Login</realm-name>
</login-config>

<security-role>
    <role-name>ROLE_ADMIN</role-name>
</security-role>

At this point, if you restart Jetty (Ctrl+C and jetty:run again), you'll get an error about a missing LoginService. This happens because Jetty doesn't know where the "Java EE Login" realm is located. Add the following to pom.xml, just after </webAppConfig> in the Jetty plugin's configuration.

<loginServices>
    <loginService implementation="org.eclipse.jetty.security.HashLoginService">
        <name>Java EE Login</name>
        <config>${basedir}/src/test/resources/realm.properties</config>
    </loginService>
</loginServices>

The realm.properties file already exists in the project and contains user names and passwords. Start the app again using mvn jetty:run and you should be prompted to login when you click on the "Users" tab. Enter admin/admin to login.

After logging in, you can try to logout by clicking the "Logout" link in the top-right corner. This calls a LogoutController with the following code that logs the user out.

public void logout(HttpServletResponse response) throws ServletException, IOException {
    request.getSession().invalidate();
    response.sendRedirect(request.getContextPath());
}

You'll notice that clicking this link doesn't log you out, even though the session is invalidated. The only way to logout with basic authentication is to close the browser. In order to get the ability to logout, as well as to have more control over the look-and-feel of the login, you can implement form-based authentication.

Implement Form-based Authentication
To change from basic to form-based authentication, you simply have to replace the <login-config> in your web.xml with the following:

<login-config>
    <auth-method>FORM</auth-method>
    <form-login-config>
        <form-login-page>/login.jsp</form-login-page>
        <form-error-page>/login.jsp?error=true</form-error-page>
    </form-login-config>
</login-config>

The login.jsp page already exists in the project, in the src/main/webapp directory. This JSP has 3 important elements: 1) a form that submits to "${contextPath}/j_security_check", 2) an input element named "j_username" and 3) an input element named "j_password". If you restart Jetty, you'll now be prompted to login with this JSP instead of the basic authentication dialog.

Force SSL
Another thing you might want to implement to secure your application is forcing SSL for certain URLs. To do this on the same <security-constraint> you already have in web.xml, add the following after </auth-constraint>:

<user-data-constraint>
    <transport-guarantee>CONFIDENTIAL</transport-guarantee>
</user-data-constraint>

To configure Jetty to listen on an SSL port, add the following just after </loginServices> in your pom.xml:

<connectors>
    <connector implementation="org.eclipse.jetty.server.nio.SelectChannelConnector">
        <forwarded>true</forwarded>
        <port>8080</port>
    </connector>
    <connector implementation="org.eclipse.jetty.server.ssl.SslSelectChannelConnector">
        <forwarded>true</forwarded>
        <port>8443</port>
        <maxIdleTime>60000</maxIdleTime>
        <keystore>${project.build.directory}/ssl.keystore</keystore>
        <password>appfuse</password>
        <keyPassword>appfuse</keyPassword>
    </connector>
</connectors>

The keystore must be generated for Jetty to start successfully, so add the keytool-maven-plugin just above the jetty-maven-plugin in pom.xml.

<plugin>
    <groupId>org.codehaus.mojo</groupId>
    <artifactId>keytool-maven-plugin</artifactId>
    <version>1.0</version>
    <executions>
        <execution>
            <phase>generate-resources</phase>
            <id>clean</id>
            <goals>
                <goal>clean</goal>
            </goals>
        </execution>
        <execution>
            <phase>generate-resources</phase>
            <id>genkey</id>
            <goals>
                <goal>genkey</goal>
            </goals>
        </execution>
    </executions>
    <configuration>
        <keystore>${project.build.directory}/ssl.keystore</keystore>
        <dname>cn=localhost</dname>
        <keypass>appfuse</keypass>
        <storepass>appfuse</storepass>
        <alias>appfuse</alias>
        <keyalg>RSA</keyalg>
    </configuration>
</plugin>

Now if you restart Jetty, go to http://localhost:8080 and click on the "Users" tab, you'll get a 403. What the heck?! When this first happened to me, it took me a while to figure out. It turns out that Jetty doesn't redirect to HTTPS when using Java EE authentication, so you have to manually type in https://localhost:8443/ (or add a filter to redirect for you). If you deployed this same application on Tomcat (after enabling SSL), it would redirect for you.

Store Users in a Database
Finally, to store your users in a database instead of file, you'll need to change the <loginService> in the Jetty plugin's configuration. Replace the existing <loginService> element with the following:

<loginServices>
    <loginService implementation="org.eclipse.jetty.security.JDBCLoginService">
        <name>Java EE Login</name>
        <config>${basedir}/src/test/resources/jdbc-realm.properties</config>
    </loginService>
</loginServices>

The jdbc-realm.properties file already exists in the project and contains the database settings and table/column names for the user and role information.

jdbcdriver = com.mysql.jdbc.Driver
url = jdbc:mysql://localhost/appfuse
username = root
password =
usertable = app_user
usertablekey = id
usertableuserfield = username
usertablepasswordfield = password
roletable = role
roletablekey = id
roletablerolefield = name
userroletable = user_role
userroletableuserkey = user_id
userroletablerolekey = role_id
cachetime = 300

Of course, you'll need to install MySQL for this to work. After installing it, you should be able to create an "appfuse" database and populate it using the following commands:

mysql -u root -p -e 'create database appfuse'
curl https://gist.github.com/raw/958091/ceecb4a6ae31c31429d5639d0d1e6bfd93e2ea42/create-appfuse.sql > create-appfuse.sql
mysql -u root -p appfuse < create-appfuse.sql

Next you'll need to configure Jetty so it has MySQL's JDBC Driver in its classpath. To do this, add the following dependency just after the <configuration> element (before <executions>) in pom.xml:

<dependencies>
    <!-- MySQL for JDBC Realm -->
    <dependency>
        <groupId>mysql</groupId>
        <artifactId>mysql-connector-java</artifactId>
        <version>5.1.14</version>
    </dependency>
</dependencies>

Now run the jetty-password.sh file in the root directory of the project to generate a password of your choosing. For example:

$ sh jetty-password.sh javaeelogin
javaeelogin
OBF:1vuj1t2v1wum1u9d1ugo1t331uh21ua51wts1t3b1vur
MD5:53b176e6ce1b5183bc970ef1ebaffd44

The last two lines are obfuscated and MD5 versions of the password. Update the admin user's password to this new value. You can do this with the following SQL statement.

UPDATE app_user SET password='MD5:53b176e6ce1b5183bc970ef1ebaffd44' WHERE username = 'admin';

Now if you restart Jetty, you should be able to login with admin/javaeelogin and view the list of users.

Summary
In this tutorial, you learned how to implement authentication using standard Java EE 6. In addition to the basic XML configuration, there's also some new methods in HttpServletRequest for Java EE 6 and Servlet 3.0:

  • authenticate(response)
  • login(user, pass)
  • logout()

This tutorial doesn't show you how to use them, but I did play with them a bit as part of my UJUG demo when implementing Ajax authentication. I found that login() did work, but it didn't persist the authentication for the users session. I also found that after calling logout(), I still needed to invalidate the session to completely logout the user. There are some additional limitations I found with Java EE authentication, namely:

  • No error messages for failed logins
  • No Remember Me
  • No auto-redirect from HTTP to HTTPS
  • Container has to be configured
  • Doesn’t support regular expressions for URLs

Of course, no error messages indicating why login failed is probably a good thing (you don't want to tell users why their credentials failed). However, when you're trying to figure out if your container is configured properly, the lack of container logging can be a pain.

In the next couple weeks, I'll post Part II of this series, where I'll show you how to implement this same set of features using Spring Security. In the meantime, please let me know if you have any questions.

Posted in Java at May 05 2011, 04:58:00 PM MDT 9 Comments

WebSockets with Johnny Wey at Denver JUG

This evening, I attended Denver JUG to hear Johnny Wey talk about WebSockets. This month, the location moved and even though I had a nice bike ride to the meeting, I showed up about 20 minutes late. Johnny's talk lasted about 40 minutes, so I missed the first half.

When I arrived, he was talking about workarounds for implementing push applications in browsers. He had a slide that talked about Comet and iframes as the common implementation, and the other major option being ActionScript's XMLSocket. The biggest issues with XMLSocket (according to Johnny) are:

  • Not available on many modern mobile platforms.
  • Flash and managing / detecting plugin versions can add unwanted complexity.
  • Many would consider Flash solutions deprecated.

The biggest issue with implementing push on a client is managing it all, especially if you need to support older browsers. Socket.IO is one possible solution. It rides on the coattails of node.js. Features of Socket.IO include:

  • Abstracts socket methods into a unified API.
  • Open source (MIT) with active community.
  • Multiple server implementations (including Java) with the "reference" implementation developed in node.js.

The client API looks as follows:

var socket = new io.Socket(); 
socket.on('connect', function(){ 
  socket.send('hi!'); 
}) 
socket.on('message', function(data){ 
  alert(data);
})
socket.on('disconnect', function(){}) 

jWebSocket is another solution and it's where a lot of the Java WebSocket development is ending up right now. Highlights about the project include:

  • Open source (LGPL) with relatively active community.
  • Servlet-like API.
  • More "enterprisey" than Socket.IO.

Other options include CometD, which is a Dojo-driven Comet implementation that uses a specification called Bayeux. Jetty and GlassFish both support WebSockets in various forms of functionality and stability. Finally, there's Pusher (a SaaS implementation of push with a RESTful API) and Atmosphere (a container-agnostic framework).

How do you scale web sockets? The same way you make a webapp scale:

  • Go stateless
  • Use short request / response cycle
  • Use the smallest payload possible
  • Cache as much as possible

Scaling challenges with web sockets:

  • Connections have intrinsic state (they never close!)
  • Communications pipeline to your app server
  • Some sort of introspection on LB side (JMX)

There's also some existing controversy in the WebSockets Community, mostly around using Upgrade vs. CONNECT with HTTP. An (IETF) experiment found Upgrade portion of HTTP protocol was often improperly implemented by proxy servers and other network hardware. This seems to have caused Google Chrome to deprecate using Upgrade in favor of CONNECT. CONNECT used in this manner is seen by many as an abuse of the web.

Other useful links that Johnny provided were What can I use… to find out native support across browsers. For example, you can see which browsers support websockets. He also pointed out that websocket.org provides a good intro to WebSockets.

I'm glad I attended Johnny's talk. I've been a little leery of using WebSockets in my applications because of older browsers. Now that I'm aware of frameworks (like Socket.IO) that solve this problem, I'm eager to try it when the need arises.

Related: Dojo/Comet support in Java Web Frameworks

Posted in Java at Mar 09 2011, 07:10:12 PM MST Add a Comment

Upgraded to Apache Roller 5.0, RC4

Last Sunday, Dave Johnson released Apache Roller 5.0, RC4. Since I'm an Apache Roller committer, and I've been seeing issues with comments throwing exceptions on this site, I decided to upgrade. In doing so, I discovered a number of issues. Hopefully by documenting them here, you'll be able to upgrade from Roller 4 to Roller 5 without any issues.

To upgrade, I took a snapshot of my existing site and database and copied them locally. After getting everything setup locally (importing existing database and upgrading it), I started Tomcat and began solving problems.

Database settings - JNDI vs. Properties
With Roller 4, I configured by database settings in a ROOT.xml so they'd be read using JNDI. With Roller 5, I got the following error when I tried to do this.

<openjpa-2.0.1-r422266:989424 fatal user error> org.apache.openjpa.persistence.ArgumentException:
A JDBC Driver or DataSource class name must be specified in the ConnectionDriverName property.
       at org.apache.openjpa.jdbc.schema.DataSourceFactory.newDataSource(DataSourceFactory.java:76)

I was able to get around this issue by adding the following to my roller-custom.properties:

database.configurationType=jdbc
database.jdbc.driverClass=com.mysql.jdbc.Driver
database.jdbc.connectionURL=jdbc:mysql://localhost/rollerdb
database.jdbc.username=root
database.jdbc.password=
mail.configurationType=properties
mail.hostname=localhost

After making this change, I received an error when Planet tried to startup:

ERROR 2011-03-02 09:56:08,502 DatabaseProvider:errorMessage - ERROR: unable to obtain database connection. 
Likely problem: bad connection parameters or database unavailable.
FATAL 2011-03-02 09:56:08,502 RollerContext:contextInitialized - Roller Planet startup failed during app preparation
org.apache.roller.planet.business.startup.StartupException: ERROR: unable to obtain database connection. 
Likely problem: bad connection parameters or database unavailable.

I don't remember why I enabled planet, but turning it off in roller-custom.properties seemed to solve the problem.

planet.aggregator.enabled=false

Password Encyrption
The next thing I tried to do was login. When this didn't work, I figured it must be related to password encryption. With Roller 4, I had to have "passwds.encryption.enabled=true" in roller-custom.properties. In Roller 5, I also had to add the encryption algorithm.

passwds.encryption.algorithm=SHA

GZip Compression
In November 2009, I optimized this site and used Roller's CompressionFilter and wro4j to gzip and concatenate JavaScript and CSS. With Roller 4, I used the CompressionFilter to compress *.css and *.js instead of using Wro4J's built-in gzip compression. The Roller 5 CompressionFilter seems to have issues with wro4j, so I had to disable it for *.css and *.js and use wro4j instead.

At this point, I figured I was good to go, so I zipped up my local WAR and scp'ed it to raibledesigns.com. I stopped Tomcat and attempted to upgrade my production MySQL database (version 3.23.56). Below is the error I received.

$ mysql -u raible -p raible < 400-to-500-migration.sql
Enter password:
ERROR 1064 (00000) at line 42: You have an error in your SQL syntax near 'as w set
   lastmodified = lastmodified,
   datecreated = datecreated,
   cr' at line 1

At this point, I figured my database might be slightly hosed, but since it was simply creating tables, I was probably OK. I restarted Tomcat and left the old version in place while I waited for a MySQL 5 database instance from my hosting provider, KGB Internet. Once I got the new instance, I imported my backed-up database, ran the upgrade script and everything worked just peachy.

I generally upgrade Roller by coping the new codebase over my old one. This is because I have a lot of symlinks and other files in my "ROOT" directory and like to keep those. In doing this, I found I had to do a couple things after copying everything over:

  1. Delete WEB-INF/lib and recopy from RC4's WEB-INF/lib.
  2. Delete WEB-INF/classes and recopy from RC4's WEB-INF/classes.

I then experienced some issues with JARs not being present for Roller's JSPWikiPlugin. I enabled this long ago, but don't use it anymore. However, to keep old posts still working, I wanted to enable it. The downloads for the plugin seem to be gone, but luckily I found a copy and put all the JARs into my WEB-INF/lib directory.

After starting Tomcat and browsing around a bit, I discovered two more issues:

  1. Search doesn't seem to work. For example, there are no results for jQuery.
  2. My Archives page's calendar didn't work. It showed the following:
    $calendarModel.showWeblogEntryCalendarBig($weblog, $cat)

I was able to fix issue #2 by changing #showBigWeblogCalendar() to the following.

#showWeblogEntryCalendarBig($model.weblog "nil")

The first issue with search seems to remain.

If you notice any other issues on this site, please let me know. I'll try to get them fixed asap.

Update: I entered an issue for my search problem in Roller's JIRA. I also managed to figure out that the problem is due to the old version of oscache that's needed by the JSPWiki plugin. Hopefully we can get the plugin upgraded to avoid this issue for other users.

Posted in Roller at Mar 03 2011, 11:39:37 AM MST 7 Comments

Implementing Ajax Authentication using jQuery, Spring Security and HTTPS

I've always had a keen interest in implementing security in webapps. I implemented container-managed authentication (CMA) in AppFuse in 2002, watched Tomcat improve it's implementation in 2003 and implemented Remember Me with CMA in 2004. In 2005, I switched from CMA to Acegi Security (now Spring Security) and never looked back. I've been very happy with Spring Security over the years, but also hope to learn more about Apache Shiro and implementing OAuth to protect JavaScript APIs in the near future.

I was recently re-inspired to learn more about security when working on a new feature at Overstock.com. The feature hasn't been released yet, but basically boils down to allowing users to login without leaving a page. For example, if they want to leave a review on a product, they would click a link, be prompted to login, enter their credentials, then continue to leave their review. The login prompt and subsequent review would likely be implemented using a lightbox. While lightboxes are often seen in webapps these days because they look good, it's also possible Lightbox UIs provide a poor user experience. User experience aside, I think it's interesting to see what's required to implement such a feature.

To demonstrate how we did it, I whipped up an example using AppFuse Light, jQuery and Spring Security. The source is available in my ajax-login project on GitHub. To begin, I wanted to accomplish a number of things to replicate the Overstock environment:

  1. Force HTTPS for authentication.
  2. Allow testing HTTPS without installing a certificate locally.
  3. Implement a RESTful LoginService that allows users to login.
  4. Implement login with Ajax, with the request coming from an insecure page.

Forcing HTTPS with Spring Security
The first feature was fairly easy to implement thanks to Spring Security. Its configuration supports a requires-channel attribute that can be used for this. I used this to force HTTPS on the "users" page and it subsequently causes the login to be secure.

<intercept-url pattern="/app/users" access="ROLE_ADMIN" requires-channel="https"/>

Testing HTTPS without adding a certificate locally
After making the above change in security.xml, I had to modify my jWebUnit test to work with SSL. In reality, I didn't have to modify the test, I just had to modify the configuration that ran the test. In my last post, I wrote about adding my 'untrusted' cert to my JVM keystore. For some reason, this works for HttpClient, but not for jWebUnit/HtmlUnit. The good news is I figured out an easier solution - adding the trustStore and trustStore password as system properties to the maven-failsafe-plugin configuration.

<artifactId>maven-failsafe-plugin</artifactId>
<version>2.7.2</version>
<configuration>
    <includes>
        <include>**/*WebTest.java</include>
    </includes>
    <systemPropertyVariables>
      <javax.net.ssl.trustStore>${project.build.directory}/ssl.keystore</javax.net.ssl.trustStore>
      <javax.net.ssl.trustStorePassword>appfuse</javax.net.ssl.trustStorePassword>
    </systemPropertyVariables>
</configuration>

The disadvantage to doing things this way is you'll have to pass these in as arguments when running unit tests in your IDE.

Implementing a LoginService
Next, I set about implementing a LoginService as a Spring MVC Controller that returns JSON thanks to the @ResponseBody annotation and Jackson.

package org.appfuse.examples.web;

import org.appfuse.model.User;
import org.springframework.beans.factory.annotation.Autowired;
import org.springframework.beans.factory.annotation.Qualifier;
import org.springframework.security.authentication.AuthenticationManager;
import org.springframework.security.authentication.BadCredentialsException;
import org.springframework.security.authentication.UsernamePasswordAuthenticationToken;
import org.springframework.security.core.Authentication;
import org.springframework.security.core.context.SecurityContextHolder;
import org.springframework.stereotype.Controller;
import org.springframework.web.bind.annotation.RequestMapping;
import org.springframework.web.bind.annotation.RequestMethod;
import org.springframework.web.bind.annotation.RequestParam;
import org.springframework.web.bind.annotation.ResponseBody;

@Controller
@RequestMapping("/api/login.json")
public class LoginService {

  @Autowired
  @Qualifier("authenticationManager")
  AuthenticationManager authenticationManager;

  @RequestMapping(method = RequestMethod.GET)
  @ResponseBody
  public LoginStatus getStatus() {
    Authentication auth = SecurityContextHolder.getContext().getAuthentication();
    if (auth != null && !auth.getName().equals("anonymousUser") && auth.isAuthenticated()) {
      return new LoginStatus(true, auth.getName());
    } else {
      return new LoginStatus(false, null);
    }
  }

  @RequestMapping(method = RequestMethod.POST)
  @ResponseBody
  public LoginStatus login(@RequestParam("j_username") String username,
                           @RequestParam("j_password") String password) {

    UsernamePasswordAuthenticationToken token = new UsernamePasswordAuthenticationToken(username, password);
    User details = new User(username);
    token.setDetails(details);

    try {
      Authentication auth = authenticationManager.authenticate(token);
      SecurityContextHolder.getContext().setAuthentication(auth);
      return new LoginStatus(auth.isAuthenticated(), auth.getName());
    } catch (BadCredentialsException e) {
      return new LoginStatus(false, null);
    }
  }

  public class LoginStatus {

    private final boolean loggedIn;
    private final String username;

    public LoginStatus(boolean loggedIn, String username) {
      this.loggedIn = loggedIn;
      this.username = username;
    }

    public boolean isLoggedIn() {
      return loggedIn;
    }

    public String getUsername() {
      return username;
    }
  }
}

To verify this class worked as expected, I wrote a unit test using JUnit and Mockito. I used Mockito because Overstock is transitioning to it from EasyMock and I've found it very simple to use.

package org.appfuse.examples.web;

import org.junit.After;
import org.junit.Before;
import org.junit.Test;
import org.mockito.Matchers;
import org.springframework.security.authentication.AuthenticationManager;
import org.springframework.security.authentication.BadCredentialsException;
import org.springframework.security.authentication.TestingAuthenticationToken;
import org.springframework.security.core.Authentication;
import org.springframework.security.core.context.SecurityContext;
import org.springframework.security.core.context.SecurityContextHolder;
import org.springframework.security.core.context.SecurityContextImpl;

import static org.junit.Assert.*;
import static org.mockito.Mockito.*;

public class LoginServiceTest {

  LoginService loginService;
  AuthenticationManager authenticationManager;

  @Before
  public void before() {
    loginService = new LoginService();
    authenticationManager = mock(AuthenticationManager.class);
    loginService.authenticationManager = authenticationManager;
  }

  @After
  public void after() {
    SecurityContextHolder.clearContext();
  }

  @Test
  public void testLoginStatusSuccess() {
    Authentication auth = new TestingAuthenticationToken("foo", "bar");
    auth.setAuthenticated(true);
    SecurityContext context = new SecurityContextImpl();
    context.setAuthentication(auth);
    SecurityContextHolder.setContext(context);

    LoginService.LoginStatus status = loginService.getStatus();
    assertTrue(status.isLoggedIn());
  }

  @Test
  public void testLoginStatusFailure() {
    LoginService.LoginStatus status = loginService.getStatus();
    assertFalse(status.isLoggedIn());
  }

  @Test
  public void testGoodLogin() {
    Authentication auth = new TestingAuthenticationToken("foo", "bar");
    auth.setAuthenticated(true);
    when(authenticationManager.authenticate(Matchers.<Authentication>anyObject())).thenReturn(auth);
    LoginService.LoginStatus status = loginService.login("foo", "bar");
    assertTrue(status.isLoggedIn());
    assertEquals("foo", status.getUsername());
  }

  @Test
  public void testBadLogin() {
    Authentication auth = new TestingAuthenticationToken("foo", "bar");
    auth.setAuthenticated(false);
    when(authenticationManager.authenticate(Matchers.anyObject()))
        .thenThrow(new BadCredentialsException("Bad Credentials"));
    LoginService.LoginStatus status = loginService.login("foo", "bar");
    assertFalse(status.isLoggedIn());
    assertEquals(null, status.getUsername());
  }
}

Implement login with Ajax
The last feature was the hardest to implement and still isn't fully working as I'd hoped. I used jQuery and jQuery UI to implement a dialog that opens the login page on the same page rather than redirecting to the login page. The "#demo" locator refers to a button in the page.

Passing in the "ajax=true" parameter disables SiteMesh decoration on the login page, something that's described in my Ajaxified Body article.

var dialog = $('<div></div>');

$(document).ready(function() {
    $.get('/login?ajax=true', function(data) {
        dialog.html(data);
        dialog.dialog({
            autoOpen: false,
	       title: 'Authentication Required'
        });
    });

    $('#demo').click(function() {
      dialog.dialog('open');
      // prevent the default action, e.g., following a link
      return false;
    });
});

Instead of adding a click handler to a specific id, it's probably better to use a CSS class that indicates authentication is required for a link, or -- even better -- use Ajax to see if the link is secured.

The login page then has the following JavaScript to add a click handler to the "login" button that submits the request securely to the LoginService.

var getHost = function() {
    var port = (window.location.port == "8080") ? ":8443" : "";
    return ((secure) ? 'https://' : 'http://') + window.location.hostname + port;
};

var loginFailed = function(data, status) {
    $(".error").remove();
    $('#username-label').before('<div class="error">Login failed, please try again.</div>');
};

$("#login").live('click', function(e) {
    e.preventDefault();
    $.ajax({url: getHost() + "/api/login.json",
        type: "POST",
        data: $("#loginForm").serialize(),
        success: function(data, status) {
            if (data.loggedIn) {
                // success
                dialog.dialog('close');
                location.href= getHost() + '/users';
            } else {
                loginFailed(data);
            }
        },
        error: loginFailed
    });
});

The biggest secret to making this all work (the HTTP -> HTTPS communication, which is considered cross-domain), is the window.name Transport and the jQuery plugin that implements it. To make this plugin work with Firefox 3.6, I had to implement a Filter that adds Access-Control headers. A question on Stackoverflow helped me figure this out.

public class OptionsHeadersFilter implements Filter {

    public void doFilter(ServletRequest req, ServletResponse res, FilterChain chain)
            throws IOException, ServletException {
        HttpServletResponse response = (HttpServletResponse) res;

        response.setHeader("Access-Control-Allow-Origin", "*");
        response.setHeader("Access-Control-Allow-Methods", "GET,POST");
        response.setHeader("Access-Control-Max-Age", "360");
        response.setHeader("Access-Control-Allow-Headers", "x-requested-with");

        chain.doFilter(req, res);
    }

    public void init(FilterConfig filterConfig) {
    }

    public void destroy() {
    }
}

Issues
I encountered a number of issues when implementing this in the ajax-login project.

  • If you try to run this with ports (e.g. 8080 and 8443) in your URLs, you'll get a 501 (Not Implemented) response. Removing the ports by fronting with Apache and mod_proxy solves this problem.
  • If you haven't accepted the certificate in your browser, the Ajax request will fail. In the example, I solved this by clicking on the "Users" tab to make a secure request, then going back to the homepage to try and login.
  • The jQuery window.name version 0.9.1 doesn't work with jQuery 1.5.0. The error is "$.httpSuccess function not found."
  • Finally, even though I was able to authenticate successfully, I was unable to make the authentication persist. I tried adding the following to persist the updated SecurityContext to the session, but it doesn't work. I expect the solution is to create a secure JSESSIONID cookie somehow.
    @Autowired
    SecurityContextRepository repository;
    
    @RequestMapping(method = RequestMethod.POST)
    @ResponseBody
    public LoginStatus login(@RequestParam("j_username") String username,
                             @RequestParam("j_password") String password,
                             HttpServletRequest request, HttpServletResponse response) {
    
        UsernamePasswordAuthenticationToken token = new UsernamePasswordAuthenticationToken(username, password);
        ...
    
        try {
            Authentication auth = authenticationManager.authenticate(token);
            SecurityContextHolder.getContext().setAuthentication(auth);
            // save the updated context to the session
            repository.saveContext(SecurityContextHolder.getContext(), request, response);
            return new LoginStatus(auth.isAuthenticated(), auth.getName());
        } catch (BadCredentialsException e) {
            return new LoginStatus(false, null);
        }
    }
    

Conclusion
This article has shown you how to force HTTPS for login, how to do integration testing with a self-generated certificate, how to implement a LoginService with Spring MVC and Spring Security, as well as how to use jQuery to talk to a service cross-domain with the window.name Transport. While I don't have everything working as much as I'd like, I hope this helps you implement a similar feature in your applications.

One thing to be aware of is with lightbox/dialog logins and HTTP -> HTTPS is that users won't see a secure icon in their address bar. If your app has sensitive data, you might want to force https for your entire app. OWASP's Secure Login Pages has a lot of good tips in this area.

Update: I've posted a demo of the ajax-login webapp. Thanks to Contegix for hosting the demo and helping obtain/install an SSL certificate so quickly.

Posted in Java at Feb 23 2011, 04:55:55 PM MST 13 Comments

Integration Testing with HTTP, HTTPS and Maven

Earlier this week, I was tasked with getting automated integration tests working in my project at Overstock.com. By automated, I mean that ability to run "mvn install" and have the following process cycled through:

  • Start a container
  • Deploy the application
  • Run all integration tests
  • Stop the container

Since it makes sense for integration tests to run in Maven's integration-test phase, I first configured the maven-surefire-plugin to skip tests in the test phase and execute them in the integration-test phase. I used the <id>default-phase</id> syntax to override the plugins' usual behavior.

<plugin>
  <artifactId>maven-surefire-plugin</artifactId>
  <executions>
    <execution>
      <id>default-test</id>
      <configuration>
        <excludes>
          <exclude>**/*Test*.java</exclude>
        </excludes>
      </configuration>
    </execution>
    <execution>
      <id>default-integration-test</id>
      <phase>integration-test</phase>
      <goals>
        <goal>test</goal>
      </goals>
      <configuration>
        <includes>
          <include>**/*Test.java</include>
        </includes>
        <excludes>
          <exclude>none</exclude>
          <exclude>**/TestCase.java</exclude>
        </excludes>
      </configuration>
    </execution>
  </executions>
</plugin>

After I had this working, I moved onto getting the container started and stopped properly. In the past, I've done this using Cargo and it's always worked well for me. Apart from the usual setup I use in AppFuse archetypes (example pom.xml), I added a couple additional items:

  • Added <timeout>180000</timeout> so the container would wait up to 3 minutes for the WAR to deploy.
  • In configuration/properties, specified <context.path>ROOT</context.path> so the app would deploy at the / context path.
  • In configuration/properties, specified <cargo.protocol>https</cargo.protocol> since many existing unit tests made requests to secure resources.

I started by using Cargo with Tomcat and had to create certificate keystore in order to get Tomcat to start with SSL enabled. After getting it to start, I found the tests failed with the following errors in the logs:

javax.net.ssl.SSLHandshakeException: sun.security.validator.ValidatorException: 
PKIX path building failed: sun.security.provider.certpath.SunCertPathBuilderException: 
unable to find valid certification path to requested target
	at com.sun.net.ssl.internal.ssl.Alerts.getSSLException(Alerts.java:174)
	at com.sun.net.ssl.internal.ssl.SSLSocketImpl.fatal(SSLSocketImpl.java:1649)

Co-workers told me this was easily solved by adding my 'untrusted' cert to my JVM keystore. Once all this was working, I thought I was good to go, but found that some tests were still failing. The failures turned out to be because they were talking to http and https was the only protocol enabled. After doing some research, I discovered that Cargo doesn't support starting on both http and https ports.

So back to the drawing board I went. I ended up turning to the maven-jetty-plugin and the tomcat-maven-plugin to get the functionality I was looking for. I also automated the certificate keystore generation using the keytool-maven-plugin. Below is the extremely-verbose 95-line profiles section of my pom.xml that allows either container to be used.

Sidenote: I wonder how this same setup would look using Gradle?

<profiles>
  <profile>
    <id>jetty</id>
    <activation>
      <activeByDefault>true</activeByDefault>
    </activation>
    <build>
      <plugins>
        <plugin>
          <groupId>org.mortbay.jetty</groupId>
          <artifactId>maven-jetty-plugin</artifactId>
          <version>6.1.26</version>
          <configuration>
            <contextPath>/</contextPath>
            <connectors>
              <connector implementation="org.mortbay.jetty.nio.SelectChannelConnector">
                <!-- forwarded == true interprets x-forwarded-* headers -->
                <!-- http://docs.codehaus.org/display/JETTY/Configuring+mod_proxy -->
                <forwarded>true</forwarded>
                <port>8080</port>
                <maxIdleTime>60000</maxIdleTime>
              </connector>
              <connector implementation="org.mortbay.jetty.security.SslSocketConnector">
                <forwarded>true</forwarded>
                <port>8443</port>
                <maxIdleTime>60000</maxIdleTime>
                <keystore>${project.build.directory}/ssl.keystore</keystore>
                <password>overstock</password>
                <keyPassword>overstock</keyPassword>
              </connector>
            </connectors>
            <stopKey>overstock</stopKey>
            <stopPort>9999</stopPort>
          </configuration>
          <executions>
            <execution>
              <id>start-jetty</id>
              <phase>pre-integration-test</phase>
              <goals>
                <goal>run-war</goal>
              </goals>
              <configuration>
                <daemon>true</daemon>
              </configuration>
            </execution>
            <execution>
              <id>stop-jetty</id>
              <phase>post-integration-test</phase>
              <goals>
                <goal>stop</goal>
              </goals>
            </execution>
          </executions>
        </plugin>
      </plugins>
    </build>
  </profile>
  <profile>
    <id>tomcat</id>
    <build>
      <plugins>
        <plugin>
          <groupId>org.codehaus.mojo</groupId>
          <artifactId>tomcat-maven-plugin</artifactId>
          <version>1.1</version>
          <configuration>
            <addContextWarDependencies>true</addContextWarDependencies>
            <fork>true</fork>
            <path>/</path>
            <port>8080</port>
            <httpsPort>8443</httpsPort>
            <keystoreFile>${project.build.directory}/ssl.keystore</keystoreFile>
            <keystorePass>overstock</keystorePass>
          </configuration>
          <executions>
            <execution>
              <id>start-tomcat</id>
              <phase>pre-integration-test</phase>
              <goals>
                <goal>run-war</goal>
              </goals>
            </execution>
            <execution>
              <id>stop-tomcat</id>
              <phase>post-integration-test</phase>
              <goals>
                <goal>shutdown</goal>
              </goals>
            </execution>
          </executions>
        </plugin>
      </plugins>
    </build>
  </profile>
</profiles>

With this setup in place, I was able to automate running our integration tests by simply typing "mvn install" (for Jetty) or "mvn install -Ptomcat" (for Tomcat). For running in Hudson, it's possible I'll have to further enhance things to randomize the port and pass that into tests as a system property. The build-helper-maven-plugin and its reserve-network-port goal is a nice way to do this. Note: if you want to run more than one instance of Tomcat at a time, you might have to randomize the ajp and rmi ports to avoid collisions.

The final thing I encountered was our app didn't shutdown gracefully. Luckily, this was fixed in a newer version of our core framework and upgrading fixed the problem. Here's the explanation from an architect on the core framework team.

The hanging problem was caused by the way the framework internally aggregated statistics related to database connection usage and page response times. The aggregation runs on a separate thread but not as a daemon thread. Previously, the aggregation threads weren't being terminated on shutdown so the JVM would hang waiting for them to finish. In the new frameworks, the aggregation threads are terminated on shutdown.

Hopefully this post helps you test your secure and unsecure applications at the same time. At the same time, I'm hoping it motivates the Cargo developers to add simultaneous http and https support. ;)

Update: In the comments, Ron Piterman recommended I use the Maven Failsafe Plugin because its designed to run integration tests while Surefire Plugin is for unit tests. I changed my configuration to the following and everything still passes. Thanks Ron!

<plugin>
  <artifactId>maven-surefire-plugin</artifactId>
  <version>2.7.2</version>
  <configuration>
    <skipTests>true</skipTests>
  </configuration>
</plugin>
<plugin>
  <artifactId>maven-failsafe-plugin</artifactId>
  <version>2.7.2</version>
  <configuration>
    <includes>
      <include>**/*Test.java</include>
    </includes>
    <excludes>
      <exclude>**/TestCase.java</exclude>
    </excludes>
  </configuration>
  <executions>
    <execution>
      <id>integration-test</id>
      <phase>integration-test</phase>
      <goals>
        <goal>integration-test</goal>
      </goals>
    </execution>
    <execution>
      <id>verify</id>
      <phase>verify</phase>
      <goals>
        <goal>verify</goal>
      </goals>
    </execution>
  </executions>
</plugin>

Update 2: In addition to application changes to solve hanging issues, I also had to change my Jetty Plugin configuration to use a different SSL connector implementation. This also required adding the jetty-sslengine dependency, which has been renamed to jetty-ssl for Jetty 7.

<connector implementation="org.mortbay.jetty.security.SslSelectChannelConnector">
...
<dependencies>
  <dependency>
    <groupId>org.mortbay.jetty</groupId>
    <artifactId>jetty-sslengine</artifactId>
    <version>6.1.26</version>
  </dependency>
</dependencies>

Posted in Java at Feb 11 2011, 03:54:16 PM MST 9 Comments

Implementing Extensionless URLs with Tapestry, Spring MVC, Struts 2 and JSF

For the past couple of weeks, I've spent several evening hours implementing extensionless URLs in AppFuse. I've been wanting to do this ever since I wrote about how to do it a few years ago. This article details my experience and will hopefully help others implement this feature in their webapps.

First of all, I used the UrlRewriteFilter, one of my favorite Java open source projects. Then I followed a pattern I found in Spring's "mvc-basic" sample app from MVC Simplifications in Spring 3.0. The app has since changed (because SpringSource integrated UrlRewriteFilter-type functionality in Spring MVC), but the pattern was basically path-matching instead of extension-mapping. That is, the "dispatcher" for the web framework was mapped to /app/* instead of *.html.

Prior to the move to extensionless URLs, AppFuse used *.html for its mapping and this seemed to cause users problems when they wanted to serve up static HTML files. To begin with, I removed all extensions from URLs in tests (Canoo WebTest is used for testing the UI). I also did this for any links in the view pages and redirects in the Java code. This provided a decent foundation to verify my changes worked. Below are details about each framework I did this for, starting with the one that was easiest and moving to hardest.

Tapestry 5
Tapestry was by far the easiest to integrate extensionless URLs into. This is because it's a native feature of the framework and was already integrated as part of Serge Eby's Tapestry 5 implementation. In the end, the only things I had to do where 1) add a couple entries for CXF (mapped to /services/*) and DWR (/dwr/*) to my urlrewrite.xml and 2) change the UrlRewriteFilter so it was only mapped to REQUEST instead of both REQUEST and FORWARD. Below are the mappings I added for CXF and DWR.

<urlrewrite default-match-type="wildcard">
    ...
    <rule>
        <from>/dwr/**</from>
        <to>/dwr/$1</to>
    </rule>
    <rule>
        <from>/services/**</from>
        <to>/services/$1</to>
    </rule>
</urlrewrite>

Spring MVC
I had a fair amount of experience with Spring MVC and extensionless URLs. Both the Spring MVC applications we developed last year at Time Warner Cable used them. To change from a *.html mapping to /app/* was pretty easy and involved removing more code than I added. Previously, I had a StaticFilter that looked for HTML files and if it didn't find them, it dispatched to Spring's DispatcherServlet. I was able to remove this class and make the web.xml file quite a bit cleaner.

To make UrlRewriteFilter and Spring Security play well together, I had to move the securityFilter so it came after the rewriteFilter and add an INCLUDE dispatcher so included JSPs would have a security context available to them.

<filter-mapping>
    <filter-name>rewriteFilter</filter-name>
    <url-pattern>/*</url-pattern>
</filter-mapping>
<filter-mapping>
    <filter-name>securityFilter</filter-name>
    <url-pattern>/*</url-pattern>
    <dispatcher>REQUEST</dispatcher>
    <dispatcher>FORWARD</dispatcher>
    <dispatcher>INCLUDE</dispatcher>
</filter-mapping>

The only other things I had to change were security.xml and dispatcher-servlet.xml to remove the .html extensions. The urlrewrite.xml file was fairly straightforward. I used the following at the bottom as a catch-all for dispatching to Spring MVC.

<rule>
    <from>/**</from>
    <to>/app/$1</to>
</rule>
<outbound-rule>
    <from>/app/**</from>
    <to>/$1</to>
</outbound-rule>

Then I added a number of other rules for j_security_check, DWR, CXF and static assets (/images, /scripts, /styles, /favicon.ico). You can view the current urlrewrite.xml in FishEye. The only major issue I ran into was that Spring Security recorded protected URLs as /app/URL so I had to add a rule to redirect when this happened after logging in.

<rule>
    <from>/app/**</from>
    <to last="true" type="redirect">%{context-path}/$1</to>
</rule>

Struts 2
Using extensionless URLs with Struts 2 is likely pretty easy thanks to the Convention Plugin. Even though this plugin is included in AppFuse, it's not configured with the proper constants and I have struts.convention.action.disableScanning=true in struts.xml. It looks like I had to do this when I upgraded from Struts 2.0.x to Struts 2.1.6. It's true AppFuse's Struts 2 support could use a bit of love to be aligned with Struts 2's recommended practices, but I didn't want to spend the time doing it as part of this exercise.

With Struts 2, I tried the path-mapping like I did with Spring MVC, but ran into issues. Instead, I opted to use an ".action" extension by changing struts.action.extension from "html" to "action," in struts.xml. Then I had to do a bunch of filter re-ordering and dispatcher changes. Before, with a .html extension, I had all filters mapped to /* and in the following order.

Filter NameDispatchers
securityFilter request
rewriteFilter request, forward
struts-prepare request
sitemesh request, forward, include
staticFilter request, forward
struts request

Similar to Spring MVC, I had to remove the rewriteFilter in front of the securityFilter and I was able to remove the staticFilter. I also had to map the struts filter to *.action instead of /* to stop Struts from trying to catch static asset and DWR/CXF requests. Below is the order of filters and their dispatchers that seems to work best.

Filter NameDispatchers
rewriteFilter request
securityFilter request, forward, include
struts-prepare request, forward
sitemesh request, forward, include
struts forward

From there, it was a matter of modifying urlrewrite.xml to have the following catch-all and rules for static assets, j_security_check and DWR/CXF.

<rule match-type="regex">
    <from>^([^?]*)/([^?/\.]+)(\?.*)?$</from>
    <to last="true">$1/$2.action$3</to>
</rule>
<outbound-rule match-type="regex">
    <from>^(.*)\.action(\?.*)?$</from>
    <to last="false">$1$2</to>
</outbound-rule>

JSF
JSF was by far the most difficult to get extensionless URLs working with. I'm not convinced it's impossible, but I spent a several hours over a few days and was unsuccessful in completely removing them. I was able to make things work so I could request pages without an extension, but found when clicking buttons and links, the extension would often show up in the URL. I'm also still using JSF 1.2, so it's possible that upgrading to 2.0 would solve many of the issues I encountered.

For the time being, I've changed my FacesServlet mapping from *.html to *.jsf. As with Struts, I had issues when I tried to map it to /app/*. Other changes include changing the order of dispatchers and filters, the good ol' catch-all in urlrewrite.xml and modifying security.xml. For some reason, I wasn't able to get file upload working without adding an exception to the outbound-rule.

<rule match-type="regex">
    <from>^([^?]*)/([^?/\.]+)(\?.*)?$</from>
    <to last="true">$1/$2.jsf</to>
</rule>
<outbound-rule match-type="regex">
  <!-- TODO: Figure out how to make file upload work w/o using *.jsf -->
    <condition type="path-info">selectFile</condition>
    <from>^(.*)\.jsf(\?.*)?$</from>
    <to last="false">$1$2</to>
</outbound-rule>

I also spent a couple hours trying to get Pretty Faces to work. I wrote about my issues on the forums. I tried writing a custom Processor to strip the extension, but found that I'd get into an infinite loop where the processor kept getting called. To workaround this, I tried using Spring's RequestContextHolder to ensure the processor only got invoked once, but that proved fruitless. Finally, I tried inbound and outbound custom processors, but failed to get those working. The final thing I tried was url-mappings for each page in pretty-config.xml.

<url-mapping>
  <pattern value="/admin/users"/>
  <view-id value="/admin/users.jsf"/>
</url-mapping>
<url-mapping>
  <pattern value="/mainMenu"/>
  <view-id value="/mainMenu.jsf"/>
</url-mapping>

The issue with doing this was that some of the navigation rules in my faces-config.xml stopped working. I didn't spend much time trying to diagnose the problem because I didn't like having to add an entry for each page in the application. The one nice thing about Pretty Faces is it did allow me to do things like the following, which I formerly did with a form that auto-submitted when the page loaded.

<url-mapping>
  <pattern value="/passwordHint/#{username}"/>
  <view-id value="/passwordHint.jsf"/>
  <action>#{passwordHint.execute}</action>
</url-mapping>

Conclusion
My journey implementing extensionless URLs was an interesting one, and I solidified my knowledge about ordering of filters, dispatchers and the UrlRewriteFilter. I still think I have more to learn about properly implementing extensionless URLs in Struts 2 and JSF and I hope to do that in the near future. I believe Struts' Convention Plugin will help me and JSF 2 + Pretty Faces will hopefully work nicely too. Of course, it'd be great if all Java Web Frameworks had an easy mechanism for producing and consuming extensionless URLs. In the meantime, thank goodness for the UrlRewriteFilter.

If you'd like to try AppFuse and its shiny new URLs, see the QuickStart Guide and choose the 2.1.0-SNAPSHOT version.

Posted in Java at Feb 10 2011, 04:53:27 PM MST 10 Comments