Matt RaibleMatt Raible is a writer with a passion for software. Connect with him on LinkedIn.

The Angular Mini-Book The Angular Mini-Book is a guide to getting started with Angular. You'll learn how to develop a bare-bones application, test it, and deploy it. Then you'll move on to adding Bootstrap, Angular Material, continuous integration, and authentication.

Spring Boot is a popular framework for building REST APIs. You'll learn how to integrate Angular with Spring Boot and use security best practices like HTTPS and a content security policy.

For book updates, follow @angular_book on Twitter.

The JHipster Mini-Book The JHipster Mini-Book is a guide to getting started with hip technologies today: Angular, Bootstrap, and Spring Boot. All of these frameworks are wrapped up in an easy-to-use project called JHipster.

This book shows you how to build an app with JHipster, and guides you through the plethora of tools, techniques and options you can use. Furthermore, it explains the UI and API building blocks so you understand the underpinnings of your great application.

For book updates, follow @jhipster-book on Twitter.

10+ YEARS


Over 10 years ago, I wrote my first blog post. Since then, I've authored books, had kids, traveled the world, found Trish and blogged about it all.
You searched this site for "framework". 558 entries found.

You can also try this same search on Google.

Play 2.0, A web framework for a new era

This week, I'm in Antwerp, Belgium for the annual Devoxx conference. After traveling 21 hours door-to-door yesterday, I woke up and came to the conference to attend some talks on Play and PhoneGap. I just got out of the session on Play 2.0, which was presented by Sadek Drobi and Guillaume Bort. Below are my notes from this presentation.

The Play 2.0 beta is out! You can read more about this release on the mailing list. This beta includes native support for both Scala and Java, meaning you can use both in the same project. The release also bundles Akka and SBT by default.

In other news, Play 2.0 is now part of the Typesafe Stack. Typesafe is the Scala company, started by the founder of Scala (Martin Odersky) and the founder of Akka (Jonas Bonér). Guillaume is also joining the Typesafe Advisory Board.

Sadek and Guillaume both work at zenexity, where Play is the secret weapon for the web applications they've built for the last decade. Play was born in the real world. They kept listening to the market to see what they should add to the project. At some point, they realized they couldn't keep adding to the old model and they needed to create something new.

The web has evolved from static pages to dynamic pages (ASP, PHP). From there, we moved to structured web applications with frameworks and MVC. Then the web moved to Ajax and long-polling to more real-time, live features. And this changes everything.

Now we need to adapt our tools. We need to handle tremendous flows of data. Need to improve expressiveness for concurrent code. We need to pick the appropriate datastore for the problem (not only SQL). We need to integrate with rapidly-evolving client side technologies like JavaScript, CoffeeScript, and Dart. We need to use elastic deployment that allows scaling up and scaling down.

zenexity wanted to integrated all of these modern web needs into Play 2.0. But they also wanted to keep Play approachable. They wanted to maintain fast turnaround so you can change your code and hit reload to see the changes. They wanted to keep it as a full stack framework with support for JSON, XML, Web Services, Jobs, etc. And they wanted to continue to use and conventions over configuration.

At this point, Guillaume did a Play 2.0 Beta demo, show us how it uses SBT and has a console so everything so it runs really fast. You can have both Scala and Java files in the same project. Play 2.0 templates are based on Scala, but you don't need to know Scala to use them. You might have to learn how to write a for loop in Scala, but it's just a subset of Scala for templates and views. SBT is used for the build system, but you don't have to learn or know SBT. All the old play commands still work, they're just powered by a different system.

After the demo, Sadek took over and started discussing the key features of Play 2.0.

To handle tremendous amounts of data, you need to do chunking of data and be able to process a stream of data, not just wait until it's finished. Java's InputStream is outdated and too low level. Its read() method reads the next byte of data from the input and this method can block until input data is available.

To solve this, Play includes a reactive programming feature, which they borrowed from Haskell. It uses Iteratee/Enumerator IO and leverages inversion of control (not like dependency injection, but more like not micro-managing). The feature allows you to have control when you need it so you don't have to wait for the input stream to complete. The Enumerator is the component that sends data and the Iteratee is the component that receives data. The Iteratee does incremental processing and can tell the Enumerator when it's done. The Iteratee can also send back a continuation, where it tells the Enumerator it wants more data and how to give it. With this paradigm, you can do a lot of cool stuff without consuming resources and blocking data flow.

Akka is an actor system that is a great model for doing concurrent code. An Actor could be both an Enumerator and an Iteratee. This vastly improves the expressiveness for concurrent code. For example, here's how you'd use Akka in Play:

def search(keyword: String) = Action {
  AsyncResult {
    // do something with result
  }
}

Play does not try to abstract data access because datastores are different now. You don't want to think of everything as objects if you're using something like MongoDB or navigating a Social Graph. Play 2.0 will provide some default modules for the different datastores, but they also expect a lot of contributed modules. Anorm will be the default SQL implementation for Play Scala and Ebean will be the default ORM implementation for Play Java. The reason they've moved away from Hibernate is because they needed something that was more stateless.

On the client side, there's so many technologies (LESS, CoffeeScript, DART, Backbone.js, jQuery, SASS), they didn't want to bundle any because they move too fast. Instead, there's plugins you can add that help you leverage these technologies. There's a lot of richness you can take advantage of on the client side and you need to have the tools for that.

Lastly, there's a new type of deployment: container-less deployment to the cloud. Akka allows you to distribute your jobs across many servers and Heroku is an implementation of elastic deployment that has built-in support for Play.

They've explained what they tried to design and the results of this new, clean architecture have been suprising. Side effects include: type-safety everywhere for rock-solid applications. There's an awesome performance boost from Scala. There's easier integration with existing projects via SBT. And it only takes 10 lines of code to develop an HTTP Server that responds to web requests.

The memory consumption is amazing: only 2MB of heap is used when a Play 2.0 app is started. Tests on Guillaume's laptop have shown that it can handle up to 40,000 requests per second, without any optimization of the JVM. Not only that, but after the requests subside, garbage collection cleans up everything and reduces the memory consumption back to 2MB.

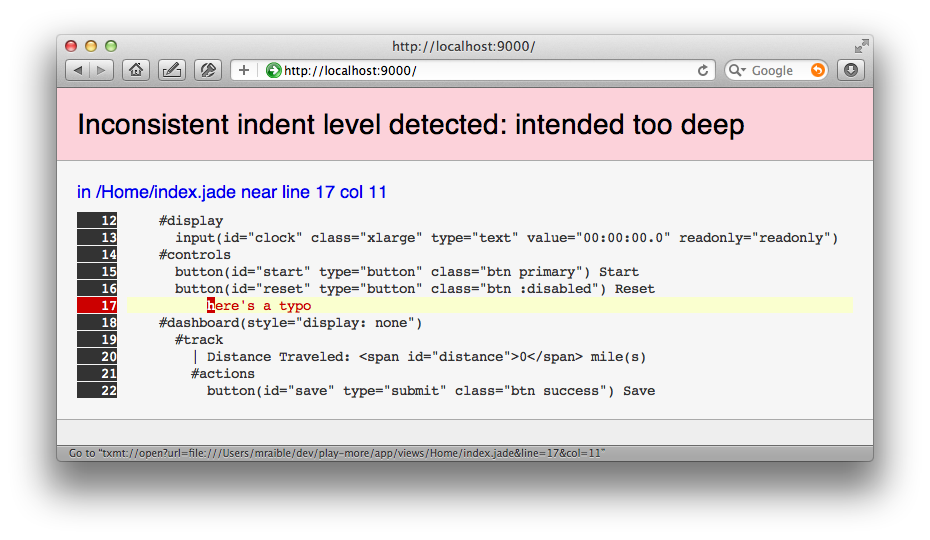
At this point, Guillaume did another demo, showing how everything is type-safe in 2.0, including the routes file. If you mistype (or comment one out) any routes, the compiler will find it and notify you. Play 2.0 also contains a compiled assets feature. This allows you to use Google's Closure Compiler, CoffeeScript and LESS. If you put your LESS files in app/assets/stylesheets, compilation errors will show up in your browser. If you put JavaScript files in app/assets/javascripts, the Closure compiler will be used and compilation errors will show up in your browser.

Play 2.0 ships with 3 different sample applications, all implemented in both Java and Scala. HelloWorld is more than just text in a browser, it includes a form that shows how validation works. Another app is computer-database. When Guillaume started it, we saw how evolutions were used to create the database schema from the browser. The Play Team has done their best to make the development process a browser-based experience rather than having to look in your console. The computer-database is a nice example of how to do CRUD and leverages Twitter's Bootstrap for its look and feel.

The last sample application is zentasks. It uses Ajax and implements security so you can see how to create a login form. It uses LESS for CSS and CoffeeScript and contains features like in-place editing. If you'd like to see any of these applications in action, you can stop by the Typesafe booth this week at Devoxx.

Unfortunately, there will be no migrating path for Play 1.x applications. The API seems very similar, but there are subtle changes that make this difficult. The biggest thing is how templating has changed from Groovy to Scala. To migrate from 1.2.x would be mostly a copy/paste, modify process. There are folks working on getting Groovy templates working in 2.0. The good news is zenexity has hundreds of 1.x applications in production, so 1.x will likely be maintained for many years.

Summary
This was a great talk on what's new in Play 2.0. I especially like the native support for LESS and CoffeeScript and the emphasis on trying to keep developers using two tools: their editor and the browser. The sample apps look great, but the documentation look sparse. I doubt I'll get a chance to migrate my Play 1.2.3 app to 2.0 this month, but I hope to try migrating sometime before the end of the year.

Posted in Java at Nov 16 2011, 05:58:09 AM MST 11 Comments

More Scalate Goodness for Play

Scalate This article is the 6th in a series on about my adventures developing a web application with HTML5, Play Scala, CoffeeScript and Jade. Previous articles can be found at:

  1. Integrating Scalate and Jade with Play 1.2.3
  2. Trying to make CoffeeScript work with Scalate and Play
  3. Integrating HTML5 Boilerplate with Scalate and Play
  4. Developing with HTML5, CoffeeScript and Twitter's Bootstrap
  5. Play Scala's Anorm, Heroku and PostgreSQL Issues

Last week, I wrote about my adventures with Anorm and mentioned I'd made some improvements to Scalate Play interoperability. First of all, I've been using a Scalate trait and ScalateTemplate class to render Jade templates in my application. I described this setup in my first article on Scalate and Play.

Adding SiteMesh Features and Default Variables
When I started making my app look good with CSS, I started longing for a feature I've used in SiteMesh. That is, to have a body id or class that can identify the page and allow per-page CSS rules. To do this with SiteMesh, you'd have something like the following in your page:

  
<body id="signup"/>

And then read it in your decorator:

<body<decorator:getProperty property="body.class" writeEntireProperty="true"/>>

As I started looking into how to do this, I came across Play Scala's ScalaController and how it was populating Play's default variables (request, response, flash, params, etc.). Based on this newfound knowledge, I added a populateRenderArgs() method to set all the default variables and my desired bodyClass variable.

def populateRenderArgs(args: (Symbol, Any)*): Map[String, Any] = {
  val renderArgs = Scope.RenderArgs.current();

  args.foreach {
    o =>
      renderArgs.put(o._1.name, o._2)
  }

  renderArgs.put("session", Scope.Session.current())
  renderArgs.put("request", Http.Request.current())
  renderArgs.put("flash", Scope.Flash.current())
  renderArgs.put("params", Scope.Params.current())
  renderArgs.put("errors", validationErrors)
  renderArgs.put("config", Play.configuration)

  // CSS class to add to body
  renderArgs.put("bodyClass", Http.Request.current().action.replace(".", " ").toLowerCase)
  renderArgs.data.toMap
}

implicit def validationErrors:Map[String,play.data.validation.Error] = {
  import scala.collection.JavaConverters._
  Map.empty[String,play.data.validation.Error] ++ 
    Validation.errors.asScala.map( e => (e.getKey, e) )
}

After adding this method, I was able to access these values in my templates by defining them at the top:

-@ val bodyClass: String 
-@ val params: play.mvc.Scope.Params
-@ val flash: play.mvc.Scope.Flash

And then reading their values in my template:

body(class=bodyClass)
...
- if (flash.get("success") != null) {
  div(class="alert-message success" data-alert="alert")
    a(class="close" href="#") &×
    | #{flash.get("success")}
- }
...
  fieldset
    legend Leave a comment →
    div.clearfix
      label(for="author") Your name:
      input(type="text" name="author" class="xlarge" value={params.get("author")})
    div.clearfix
      label(for="content") Your message:
      textarea(name="content" class="xlarge") #{params.get("content")}
    div.actions
      button(type="submit" class="btn primary") Submit your comment
      button(type="reset" class="btn") Cancel

For a request like Home/index, the body tag is now rendered as:

<body class="home index">
This allows you to group CSS styles by Controller names as well as by method names.

Next, I started developing forms and validation logic. I quickly discovered I needed an action() method like the one defined in ScalaTemplate's TemplateMagic class.

def action(action: => Any) = {
  new play.mvc.results.ScalaAction(action).actionDefinition.url
}

Since TemplateMagic is an inner class, I determined that copying the method into my ScalateTemplate class was the easiest workaround. After doing this, I was able to import the method and use it in my templates.

-import controllers.ScalateTemplate._
...
form(method="post" class="form-stacked" id="commentForm"
     action={action(controllers.Profile.postComment(workout._1.id()))})

After getting the proper URL written into my form's action attribute, I encountered a new problem. The Play Scala Tutorial explains validation flow as follows:

if (Validation.hasErrors) {
  show(postId)
} else {
  Comment.create(Comment(postId, author, content))
  Action(show(postId))
}

However, when I had validation errors, I end up with the following error:

Could not load resource: [Timeline/postComment.jade]

To fix this, I added logic to my Scalate trait that looks for a "template" variable before using Http.Request.current().action.replace(".", "/") for the name. After making this change, I was able to use the following code to display validation errors.

if (Validation.hasErrors) {
  renderArgs.put("template", "Timeline/show")
  show(postId)
} else {
  Comment.create(Comment(postId, author, content))
  Action(show(postId))
}

Next, I wanted to give child pages the ability to set content in parent pages. With SiteMesh, I could use the <content> tag as follows:

<content tag="underground">
  HTML goes here
</content>

This HTML could then be retrieved in the decorator using the <decorator:getProperty> tag:

<decorator:getProperty property="page.underground"/>

With Scalate, I found it equally easy using the captureAttribute() method. For example, here's how I captured a list of an athlete's workouts for display in a sidebar.

- captureAttribute("sidebar")
  - Option(older).filterNot(_.isEmpty).map { workouts =>
    .older-workouts
      h3
        | Older workouts
        span.from from this app
      - workouts.map { workout =>
        - render("workout.jade", Map('workout -> workout, 'mode -> "teaser"))
      - }
  - }
- }

Then in my layout, I was able to retrieve this and display it. Below is a snippet from the layout I'm using (copied from Twitter's Bootstrap example). You can see how the sidebar is included in the .span4 at the end.

-@ val sidebar: String = ""
...
.container
  .content
    .page-header
      h1
        = pageHeader
        small
          = pageTagline
    .row
      .span10
        !~~ body
      .span4
        = unescape(sidebar)
  footer

View vs. Render in Scalate
In the sidebar code above, you might notice the render() call. This is the Scalate version of server-side includes. It works well, but there's also a view() shortcut you can use if you want to have templates for rendering your model objects. I quickly discovered it might be difficult to use this feature in my app because my object was Option[(models.Workout, models.Athlete, Seq[models.Comment])] instead of a simple object. You can read the view vs. render thread on the Scalate Google Group if you're interested in learning more.

Scalate as a Module
The last enhancement I attempted to make was to put Scalate support into a Play module. At first, I tried overriding Play's Template class but ran into compilation issues. Then Guillaume Bort (Play's lead developer) recommended I stick with the trait approach and I was able to get everything working. I looked at the outdated play-scalate module to figure out how to add Scala support to build.xml and copied its 500.scaml page for error reporting.

In order to get line-precise error reporting working, I had to wrap a try/catch around calling Scalate's TemplateEngine.layout() method. Again, most of this code was copied from the outdated play-scalate module.

case class Template(name: String) {
  
  def render(args: (Symbol, Any)*) = {
    val argsMap = populateRenderArgs(args: _*)
    
    val buffer = new StringWriter()
    var context = new DefaultRenderContext(name, scalateEngine, new PrintWriter(buffer))
    
    try {
      val templatePath = new File(Play.applicationPath+"/app/views","/"+name).toString
        .replace(new File(Play.applicationPath+"/app/views").toString,"")
      scalateEngine.layout(templatePath + scalateType, argsMap)
    } catch {
      case ex:TemplateNotFoundException => {
        if(ex.isSourceAvailable) {
          throw ex
        }
        val element = PlayException.getInterestingStrackTraceElement(ex)
        if (element != null) {
           throw new TemplateNotFoundException(name, 
             Play.classes.getApplicationClass(element.getClassName()), element.getLineNumber());
        } else {
           throw ex
        }
      }  
      case ex:InvalidSyntaxException => handleSpecialError(context,ex)
      case ex:CompilerException => handleSpecialError(context,ex)
      case ex:Exception => handleSpecialError(context,ex)
    } finally {
      if (buffer.toString.length > 0)
        throw new ScalateResult(buffer.toString,name)
    }
  }
}
...
private def handleSpecialError(context:DefaultRenderContext,ex:Exception) {
  context.attributes("javax.servlet.error.exception") = ex
  context.attributes("javax.servlet.error.message") = ex.getMessage
  try {
    scalateEngine.layout(scalateEngine.load(errorTemplate), context)
  } catch {
    case ex:Exception =>
      // TODO use logging API from Play here...
      println("Caught: " + ex)
      ex.printStackTrace
  }
}

private def errorTemplate:String = {
  val fullPath = new File(Play.applicationPath,"/app/views/errors/500.scaml").toString 
  fullPath.replace(new File(Play.applicationPath+"/app/views").toString,"")
}

Once I had this in place, error messages from Scalate are much better. Not only do I see the error in my browser, but I can click on the offending line to open it directly in TextMate.

Play Scalate Error Reporting

I've published my play-scalate module on GitHub so others can try it out. To give it a whirl, add the following to your dependencies.yml:

    - upgrades -> play-scalate 0.1

repositories:
    - upgrades:
        type: http
        artifact: "http://static.raibledesigns.com/[module]-[revision].zip"
        contains:
            - upgrades -> *

Then add with play.modules.scalate.Scalate to your controllers and call the render() method.

Summary
After using Scalate and Play for almost 3 months, I'm really enjoying the combination. When I first integrated Scalate with a simple trait, the error messages were always in the console. Now that I've borrowed some smarts from Play's ScalaController and play-scalate's error reporting, I feel like it's practically a built-in solution. I was easily able to integrate my desired SiteMesh features and it even allows reusable template blocks. In the end, it's just Scala and Scalate does a good job of allowing you to leverage that.

Other thoughts:

  • If you're writing a lot of Jade and familiar with HTML, Don Park's html2jade is a great tool that comes with Scalate support.
  • I'm really enjoying writing CSS with LESS, particularly the ability to nest rules and have programming features. The only issue I've seen is IntelliJ's LESS plugin only does code-completion for variables rather than CSS values.
  • The Play Framework Cookbook is a great reference for learning how to write modules. Not only does it explain how to create modules, it has some great real-world examples for doing bytecode enhancement, implementing message queues, using Solr and how to do production monitoring.

If this series of articles has intrigued you and you'll be at Devoxx next week, you should stop by my talk on Thursday afternoon. In addition, there's several other Play talks at Devoxx and a possible meetup on Wednesday. Check out the Devoxx, anyone? thread for more information.

Update: There's one thing I forgot to mention about the Play Scalate Module. When I had Scalate integrated in my app with a trait, I only included the scalate-core and scalate-util JARs in dependencies.yml:

- org.fusesource.scalate -> scalate-core 1.5.2-scala_2.8.1:
    transitive: false
- org.fusesource.scalate -> scalate-util 1.5.2-scala_2.8.1:
    transitive: false

However, when I created the play-scalate module, I allowed more dependencies.

- org.fusesource.scalate -> scalate-core 1.5.2-scala_2.8.1:
    exclude:
        - javax.servlet -> *
        - com.sun.jersey -> *
        - org.osgi -> *
- org.fusesource.scalate -> scalate-util 1.5.2-scala_2.8.1
Because Scalate depends on Logback, debug messages started showing up in my console. To fix this, I created conf/logback.xml in my project and filled it with the following XML.

<configuration>
  <appender name="STDOUT" class="ch.qos.logback.core.ConsoleAppender">
      <encoder>
          <pattern>%msg%n</pattern>
      </encoder>
  </appender>

  <root level="info">
    <appender-ref ref="STDOUT" />
  </root>
</configuration>

This reduces the logging and allows me to increase Scalate's logging if I ever have the need.

Posted in Java at Nov 07 2011, 02:07:40 PM MST Add a Comment

Play Scala's Anorm, Heroku and PostgreSQL Issues

This article is the 5th in a series on about my adventures developing a Fitness Tracking application for my talk at Devoxx in two weeks. Previous articles can be found at:

  1. Integrating Scalate and Jade with Play 1.2.3
  2. Trying to make CoffeeScript work with Scalate and Play
  3. Integrating HTML5 Boilerplate with Scalate and Play
  4. Developing with HTML5, CoffeeScript and Twitter's Bootstrap

Anorm
In my previous article, I described how I created my application's features using CoffeeScript and make it look good using Twitter's Bootstrap. Next, I turned to persisting this data with Anorm.

The Scala module includes a brand new data access layer called Anorm that uses plain SQL to make your database request and provides several API to parse and transform the resulting dataset.

I'm a big fan of ORMs like Hibernate and JPA, so having to learn a new JDBC abstraction wasn't exactly appealing at first. However, since Anorm is the default for Play Scala, I decided to try it. The easiest way for me to learn Anorm was to start coding with it. I used A first iteration for the data model as my guide and created model objects, companion objects that extended Magic (appropriately named) and wrote some tests using scalatest. I started with an "Athlete" model since I knew "User" was a keyword in PostgreSQL and that's what Heroku uses for its database.

package models

import play.db.anorm._
import play.db.anorm.defaults._

case class Athlete(
  id: Pk[Long],
  email: String, password: String, firstName: String, lastName: String
  ) {
}

object Athlete extends Magic[Athlete] {
  def connect(email: String, password: String) = {
    Athlete.find("email = {email} and password = {password}")
      .on("email" -> email, "password" -> password)
      .first()
  }

  def apply(firstName: String) = new Athlete(NotAssigned, null, null, firstName, null)
}

Then I wrote a couple tests for it in test/Tests.scala.

import play._
import play.test._

import org.scalatest._
import org.scalatest.junit._
import org.scalatest.matchers._

class BasicTests extends UnitFlatSpec with ShouldMatchers with BeforeAndAfterEach {

  import models._
  import play.db.anorm._

  override def beforeEach() {
      Fixtures.deleteDatabase()
  }

  it should "create and retrieve a Athlete" in {

      var athlete = Athlete(NotAssigned, "[email protected]", "secret", "Jim", "Smith")
      Athlete.create(athlete)

      val jim = Athlete.find(
          "email={email}").on("email" -> "[email protected]"
      ).first()

      jim should not be (None)
      jim.get.firstName should be("Jim")

  }

  it should "connect a Athlete" in {

      Athlete.create(Athlete(NotAssigned, "[email protected]", "secret", "Bob", "Johnson"))

      Athlete.connect("[email protected]", "secret") should not be (None)
      Athlete.connect("[email protected]", "badpassword") should be(None)
      Athlete.connect("[email protected]", "secret") should be(None)
  }

At this point, everything was fine and dandy. I could run "play test", open http://localhost/@tests in my browser and run the tests to see a beautiful shade of green on my screen. I continued following the tutorial, substituting "Post" with "Workout" and added Comments too. The Workout object shows some of the crazy-ass syntax that is Anorm getting fancy with Scala.

object Workout extends Magic[Workout] {

  def allWithAthlete: List[(Workout, Athlete)] =
    SQL(
      """
          select * from Workout w
          join Athlete a on w.athlete_id = a.id
          order by w.postedAt desc
      """
    ).as(Workout ~< Athlete ^^ flatten *)

  def allWithAthleteAndComments: List[(Workout, Athlete, List[Comment])] =
    SQL(
      """
          select * from Workout w
          join Athlete a on w.athlete_id = a.id
          left join Comment c on c.workout_id = w.id
          order by w.postedAt desc
      """
    ).as(Workout ~< Athlete ~< Workout.spanM(Comment) ^^ flatten *)

  def byIdWithAthleteAndComments(id: Long): Option[(Workout, Athlete, List[Comment])] =
    SQL(
      """
          select * from Workout w
          join Athlete a on w.athlete_id = a.id
          left join Comment c on c.workout_id = w.id
          where w.id = {id}
      """
    ).on("id" -> id).as(Workout ~< Athlete ~< Workout.spanM(Comment) ^^ flatten ?)
}

All of these methods return Tuples, which is quite different from an ORM that returns an object that you call methods on to get its related items. Below is an example of how this is referenced in a Scalate template:

-@ val workout:(models.Workout,models.Athlete,Seq[models.Comment])
-
  var commentsTitle = "No Comments"
  if (workout._3.size > 0)
    commentsTitle = workout._3.size + " comments, lastest by " + workout._3(workout._3.size - 1).author
  
div(class="workout")
  h2.title
    a(href={action(controllers.Profile.show(workout._1.id()))}) #{workout._1.title}
  .metadata
    span.user Posted by #{workout._2.firstName} on
    span.date #{workout._1.postedAt}
    .description
      = workout._1.description

Evolutions on Heroku
I was happy with my progress until I tried to deploy my app to Heroku. I added db=${DATABASE_URL} to my application.conf as recommended by Database-driven web apps with Play! on Heroku/Cedar. However, when I deployed, it failed because my database tables weren't created.

2011-10-05T04:08:52+00:00 app[web.1]: 04:08:52,712 WARN  ~ Your database is not up to date.
2011-10-05T04:08:52+00:00 app[web.1]: 04:08:52,712 WARN  ~ Use `play evolutions` command to manage database evolutions.
2011-10-05T04:08:52+00:00 app[web.1]: 04:08:52,713 ERROR ~
2011-10-05T04:08:52+00:00 app[web.1]:
2011-10-05T04:08:52+00:00 app[web.1]: @681m15j3l
2011-10-05T04:08:52+00:00 app[web.1]: Can't start in PROD mode with errors
2011-10-05T04:08:52+00:00 app[web.1]:
2011-10-05T04:08:52+00:00 app[web.1]: Your database needs evolution!
2011-10-05T04:08:52+00:00 app[web.1]: An SQL script will be run on your database.
2011-10-05T04:08:52+00:00 app[web.1]:
2011-10-05T04:08:52+00:00 app[web.1]: play.db.Evolutions$InvalidDatabaseRevision

With James Ward's help, I learned I needed to use "heroku run" to apply evolutions. So I ran the following command:

heroku run "play evolutions:apply --%prod" 

Unfortunately, this failed:

Running play evolutions:apply --%prod attached to terminal... up, run. 
5 
~        _            _ 
~  _ __ | | __ _ _  _| | 
~ | '_ \| |/ _' | || |_| 
~ |  __/|_|\____|\__ (_) 
~ |_|            |__/ 
~ 
~ play! 1.2.3, http://www.playframework.org 
~ framework ID is prod 
~ 
Oct 17, 2011 7:05:46 PM play.Logger warn 
WARNING: Cannot replace DATABASE_URL in configuration (db=$ 
{DATABASE_URL}) 
Exception in thread "main" java.lang.NullPointerException 
        at play.db.Evolutions.main(Evolutions.java:54)

After opening a ticket with Heroku support, I learned this was because DATABASE_URL was not set ("heroku config" shows your variables). Apparently, this should be set when you create your app, but somehow wasn't for mine. To fix, I had to run the following command:

$ heroku pg:promote SHARED_DATABASE 
-----> Promoting SHARED_DATABASE to DATABASE_URL... done

PostgreSQL and Dates
The next issue I ran into was with loading default data. I have the following BootStrap.scala class in my project to load default data:

class BootStrap extends Job { 
  override def doJob() { 
    import models._ 
    import play.test._ 
    // Import initial data if the database is empty 
    if (Athlete.count().single() == 0) { 
      Yaml[List[Any]]("initial-data.yml").foreach { 
        _ match { 
          case a: Athlete => Athlete.create(a) 
          case w: Workout => Workout.create(w) 
          case c: Comment => Comment.create(c) 
        } 
      } 
    } 
  } 
} 

For some reason, only my "athlete" table was getting populated and the others weren't. I tried turning on debugging and trace, but nothing showed up in the logs. This appears to be a frequent issue with Play. When data fails to load, there's no logging indicating what went wrong. To make matters worse with Anorm, there's no way to log the SQL that it's attempting to run. My BootStrap job was working fine when connecting to "db=mem", but stopped after switching to PostgreSQL. The support I got for this issue was disappointing, since it caused crickets on Play's Google Group. I finally figured out "support of Date for insertion" was added to Anorm a couple months ago.

To get the latest play-scala code into my project, I cloned play-scala, built it locally and uploaded it to my server. Then I added the following to dependencies.yml and ran "play deps --sync".

require:
    ...
    - upgrades -> scala 0.9.1-20111025
    ...

repositories:
    - upgrades:
        type: http
        artifact: "http://static.raibledesigns.com/[module]-[revision].zip"
        contains:
            - upgrades -> *

Summary
When I started writing this article, I was going to talk about some improvements I made to Scalate Play interoperability. However, I think I'll save that for next time and possibly turn it into a plugin using play-excel as an example.

As you can tell from this article, my experience with Anorm was frustrating - particularly due to the lack of error messages when operations failed. The lack of support was expected, as this usually happens when you're living on the bleeding edge. However, based on this experience, I can't help but think that it might be a while before Play 2.0 is ready for production use.

The good news is IntelliJ is adding support for Play. Maybe this will help increase adoption and inspire the framework's developers to stabilize and improve Play Scala before moving the entire framework to Scala. After all, it seems they've encountered some issues making Scala as fast as Java.

Posted in Java at Nov 02 2011, 11:54:25 AM MDT 6 Comments

Developing with HTML5, CoffeeScript and Twitter's Bootstrap

HTML5 Logo This article is the fourth in a series about my adventures developing a Fitness Tracking application with HTML5, Play Scala, CoffeeScript and Jade. Previous articles can be found at:

  1. Integrating Scalate and Jade with Play 1.2.3
  2. Trying to make CoffeeScript work with Scalate and Play
  3. Integrating HTML5 Boilerplate with Scalate and Play

Developing Features
After getting my desired infrastructure setup, I started coding like a madman. The first feature I needed was a stopwatch to track the duration of a workout, so I started writing one with CoffeeScript. After spending 20 minutes playing with dates and setTimeout, I searched and found a stopwatch jQuery plug-in. I added this to my app, deployed it to Heroku, brought up the app on my iPhone 3G, clicked Start and started riding my bike to work.

When I arrived, I unlocked my phone and discovered that the time had stopped. At first, I thought this was a major setback. My disappointed disappeared when I found a Super Neat JavaScript Stopwatch and Kåre Byberg's version that worked just fine. This stopwatch used setTimeout, so by keeping the start time, the app on the phone would catch up as soon as you unlocked it. I ported Kåre's script to CoffeeScript and rejoiced in my working stopwatch.

# Created by Kåre Byberg © 21.01.2005. Please acknowledge if used 
# on other domains than http://www.timpelen.com.
# Ported to CoffeeScript by Matt Raible. Also added hours support.
flagClock = 0
flagStop = 0
stopTime = 0
refresh = null
clock = null

start = (button, display) ->
  clock = display
  startDate = new Date()
  startTime = startDate.getTime()
  if flagClock == 0
    $(button).html("Stop")
    flagClock = 1
    counter startTime, display
  else
    $(button).html("Start")
    flagClock = 0
    flagStop = 1

counter = (startTime) ->
  currentTime = new Date()
  timeDiff = currentTime.getTime() - startTime
  timeDiff = timeDiff + stopTime  if flagStop == 1
  if flagClock == 1
    $(clock).val formatTime timeDiff, ""
    callback = -> counter startTime
    refresh = setTimeout callback, 10
  else
    window.clearTimeout refresh
    stopTime = timeDiff

formatTime = (rawTime, roundType) ->
  if roundType == "round"
    ds = Math.round(rawTime / 100) + ""
  else
    ds = Math.floor(rawTime / 100) + ""
  sec = Math.floor(rawTime / 1000)
  min = Math.floor(rawTime / 60000)
  hour = Math.floor(rawTime / 3600000)
  ds = ds.charAt(ds.length - 1)
  start() if hour >= 24
  sec = sec - 60 * min + ""
  sec = prependZeroCheck sec
  min = min - 60 * hour + ""
  min = prependZeroCheck min
  hour = prependZeroCheck hour
  hour + ":" + min + ":" + sec + "." + ds

prependZeroCheck = (time) ->
  time = time + "" # convert from int to string
  unless time.charAt(time.length - 2) == ""
    time = time.charAt(time.length - 2) + time.charAt(time.length - 1)
  else
    time = 0 + time.charAt(time.length - 1)

reset = ->
  flagStop = 0
  stopTime = 0
  window.clearTimeout refresh
  if flagClock == 1
    resetDate = new Date()
    resetTime = resetDate.getTime()
    counter resetTime
  else
    $(clock).val "00:00:00.0"

@StopWatch = {
  start: start
  reset: reset
}

The Scalate/Jade template to render this stopwatch looks as follows:

script(type="text/javascript" src={uri("/public/javascripts/stopwatch.coffee")})

#display
  input(id="clock" class="xlarge" type="text" value="00:00:00.0" readonly="readonly")
#controls
  button(id="start" type="button" class="btn primary") Start
  button(id="reset" type="button" class="btn :disabled") Reset

:plain
  <script type="text/coffeescript">
    $(document).ready ->
      $('#start').click ->
        StopWatch.start this, $('#clock')

      $('#reset').click ->
        StopWatch.reset()
  </script>

Next, I wanted to create a map that would show your location. For this, I used Merge Design's HTML 5 Geolocation Demo as a guide. The HTML5 Geo API is pretty simple, containing only three methods:

// Gets the users current position
navigator.geolocation.getCurrentPosition(successCallback,
                                         errorCallback,
                                         options);
// Request repeated updates of position
watchId = navigator.geolocation.watchPosition(successCallback, errorCallback);

// Cancel the updates
navigator.geolocation.clearWatch(watchId);

After rewriting the geolocation example in CoffeeScript, I ended up with the following code in my map.coffee script. You'll notice it uses Google Maps JavaScript API to show an actual map with a marker.

# Geolocation with HTML 5 and Google Maps API based on example from maxheapsize: 
# http://maxheapsize.com/2009/04/11/getting-the-browsers-geolocation-with-html-5/
# This script is by Merge Database and Design, http://merged.ca/ -- if you use some, 
# all, or any of this code, please offer a return link.

map = null
mapCenter = null
geocoder = null
latlng = null
timeoutId = null

initialize = ->
  if Modernizr.geolocation
    navigator.geolocation.getCurrentPosition showMap

showMap = (position) ->
  latitude = position.coords.latitude
  longitude = position.coords.longitude
  mapOptions = {
    zoom: 15,
    mapTypeId: google.maps.MapTypeId.ROADMAP
  }
  map = new google.maps.Map(document.getElementById("map"), mapOptions)
  latlng = new google.maps.LatLng(latitude, longitude)
  map.setCenter(latlng)

  geocoder = new google.maps.Geocoder()
  geocoder.geocode({'latLng': latlng}, addAddressToMap)

addAddressToMap = (results, status) ->
  if (status == google.maps.GeocoderStatus.OK) 
    if (results[1]) 
      marker = new google.maps.Marker({
          position: latlng,
          map: map
      })
      $('#location').html('Your location: ' + results[0].formatted_address)
  else 
    alert "Sorry, we were unable to geocode that address."

start = ->
  timeoutId = setTimeout initialize, 500

reset = ->
  if (timeoutId)
    clearTimeout timeoutId

@Map = {
  start: start
  reset: reset
}

The template to show the map is a mere 20 lines of Jade:

script(type="text/javascript" src="//www.google.com/jsapi")
script(type="text/javascript" src="//maps.googleapis.com/maps/api/js?sensor=false")

:css
  .demo-map {
    border: 1px solid silver;
    height: 200px;
    margin: 10px auto;
    width: 280px;
  }

#map(class="demo-map")

p(id="location")
  span(class="label success") New
  | Fetching your location with HTML 5 geolocation...

script(type="text/javascript" src={uri("/public/javascripts/map.coffee")})
:javascript
    Map.start();

The last two features I wanted were 1) distance traveled and 2) drawing the route taken on the map. For this I learned from A Simple Trip Meter using the Geolocation API. As I was beginning to port the JS to CoffeeScript, I thought, "there's got to be a better way." I searched and found Js2coffee to do most of the conversion for me. If you know JavaScript and you're learning CoffeeScript, this is an invaluable tool.

I tried out the trip meter that evening on a bike ride and noticed it said I'd traveled 3 miles when I'd really gone 6. I quickly figured out it was only calculating start point to end point and not taking into account all the turns in between. To view what was happening, I integrated my odometer.coffee with my map using Google Maps Polylines. Upon finishing the integration, I discovered two things, 1) HTML5 geolocation was highly inaccurate and 2) geolocation doesn't run in the background.

I was able to solve the first problem by passing in {enableHighAccuracy: true} to navigator.geolocation.watchPosition(). Below are two screenshots showing before high accuracy and after. Both screenshots are from the same two-block walk.

Without {enableHighAccuracy: true} With {enableHighAccuracy: true}

The second issue is a slight show-stopper. PhoneGap might be able to solve the problem, but I'm currently using a workaround → turning off auto-lock and keeping Safari in the foreground.

Making it look good
After I got all my desired features developed, I moved onto making the app look good. I started by using SASS for my CSS and installed Play's SASS module. I then switched to LESS when I discovered and added Twitter's Bootstrap to my project. At first I used Play's LESS module (version 0.3), but ran into compilation issues. I then tried Play's GreenScript module, but gave up on it when I found it was incompatible with the CoffeeScript module. Switching back to the LESS module and using the "0.3.compatibility" version solved all remaining issues.

You might remember that I integrated HTML5 Boilerplate and wondering why I have both Bootstrap and Boilerplate in my project. At this point, I don't think Boilerplate is needed, but I've kept it just in case it's doing something for HTML5 cross-browser compatibility. I've renamed its style.css to style.less and added the following so it has access to Bootstrap's variables.

/* Variables from Bootstrap */
@import "libs/variables.less";

Then I made my app look a lot better with layouts, stylish forms, a fixed topbar and alerts. For example, here's the CoffeeScript I wrote to display geolocation errors:

geolocationError = (error) ->
  msg = 'Unable to locate position. '
  switch error.code
    when error.TIMEOUT then msg += 'Timeout.'
    when error.POSITION_UNAVAILABLE then msg += 'Position unavailable.'
    when error.PERMISSION_DENIED then msg += 'Please turn on location services.'
    when error.UNKNOWN_ERROR then msg += error.code
  $('.alert-message').remove()
  alert = $('<div class="alert-message error fade in" data-alert="alert">')
  alert.html('<a class="close" href="#">×</a>' + msg);
  alert.insertBefore($('.span10'))

Then I set about styling up the app so it looked good on a smartphone with CSS3 Media Queries. Below is the LESS code I used to hide elements and squish the widths for smaller devices.

@media all and (max-device-width: 480px) {
  /* hide scrollbar on mobile */
  html { overflow-y:hidden }
  /* hide sidebar on mobile */
  .home .span4, .home .page-header, .topbar form {
    display: none
  }
  .home .container {
    width: 320px;
  } 
  .about {
    .container, .span10 {
      width: 280px;
    }
    .span10 {
      padding-top: 0px;
    }
  }

Tools
In the process of developing a stopwatch, odometer, displaying routes and making everything look good, I used a number of tools. I started out primarily with TextMate and its bundles for LESS, CoffeeScript and Jade. When I started writing more Scala, I installed the Scala TextMate Bundle. When I needed some debugging, I switched to IntelliJ and installed its Scala plugin. CoffeeScript, LESS and HAML plugins (for Jade) were already installed by default. I also used James Ward's Setup Play Framework with Scala in IntelliJ.

Issues
I think it's obvious that my biggest issue so far is the fact that a webapp can't multitask in the background like a native app can. Beyond that, there's accuracy issues with HTML5's geolocation that I haven't seen in native apps.

I also ran into a caching issue when calling getCurrentPosition(). It only worked the first time and I had to refresh my browser to get it to work again. Strangely enough, this only happened on my desktop (in Safari and Firefox) and worked fine on my iPhone. Unfortunately, it looks like PhoneGap has issues similar to this.

My workaround for no webapp multitasking is turning off auto-lock and leaving the browser in the foreground while I exercise. The downside to this is it really drains the battery quickly (~ 3 hours). I constantly have to charge my phone if I'm testing it throughout the day. The testing is a real pain too. I have to deploy to Heroku (which is easy enough), then go on a walk or bike ride. If something's broke, I have to return home, tweak some things, redeploy and go again. Also, there's been a few times where Safari crashes halfway through and I lose all the tracking data. This happens with native apps too, but seemingly not as often.

If you'd like to try the app on your mobile phone and see if you experience these issues, checkout play-more.com.

Summary
Going forward, there's still more HTML5 features I'd like to use. In particular, I'd like to play music while the fitness tracker is running. I'd love it if cloud music services (e.g. Pandora or Spotify) had an API I could use to play music in a webapp. Soundcloud might be an option, but I've also thought of just uploading some MP3s and playing them with the <audio> tag.

I've really enjoyed developing with all these technologies and haven't experienced much frustration so far. The majority has come from integrating Scalate into Play, but I've resolved most problems. Next, I'll talk about how I've improved Play's Scalate support and my experience working with Anorm.

Posted in Java at Oct 20 2011, 02:47:36 PM MDT 3 Comments

Integrating HTML5 Boilerplate with Scalate and Play

HTML5 Boilerplate is a project that provides a number of basic files to help you build an HTML5 application. At its core, it's an HTML template that puts CSS at the top, JavaScript at the bottom, installs Chrome Frame for IE6 users and leverages Modernizr for legacy browser support. It also includes jQuery with the download. One of the major benefits of HTML5 Boilerplate is it ships with a build system (powered by Ant) that concatenates and minimizes CSS and JS for maximum performance. From html5boilerplate.com:

Boilerplate is not a framework, nor does it prescribe any philosophy of development, it's just got some tricks to get your project off the ground quickly and right-footed.

I like the idea of its build system to minify and gzip, but I'd probably only use it if I was working on a project that uses Ant. Since I'm using it in a Play project, the whole Ant build system doesn't help me. Besides, I prefer something like wro4j. Wro4j allows you to specify a group of files and then it compiles, minimizes and gzips them all on-the-fly. As far as I know, Play doesn't have any support for Servlet Filters, so using wro4j in Play is not trivial.

The good news is Play has a GreenScript module that contains much of the wro4j functionality. However, since I'm using Scalate in my project, this goodness is unavailable to me. In the future, the Scalate Team is considering adding better wro4j, JavaScript and CSS integration. In the meantime, I'm going to pretend I don't care about concatenation and minimization and trundle along without this feature.

To add HTML5 Boilerplate to my Play project, I performed the following steps:

  • Downloaded the 2.0 Zipball.
  • Copied all the static files to my project. Below are the commands I used (where $boilerplate-download is the expanded download directory and ~/dev/play-more is my project):
    cd $boilerplate-download
    cp 404.html ~/dev/play-more/app/views/errors/404.html
    cp *.png ~/dev/play-more/public/.
    cp crossdomain.xml ~/dev/play-more/public/.
    cp -r css ~/dev/play-more/public/stylesheets/.
    cp favicon.ico ~/dev/play-more/public/.
    cp humans.txt ~/dev/play-more/public/.
    cp -r js/libs ~/dev/play-more/public/javascripts/.
    cp robots.txt ~/dev/play-more/public/.
    
  • Copied the index.html to ~/dev/play-more/app/templates/layouts/default.jade and modified it to use Jade syntax. Since I downloaded the comments-heavy version, I modified many of them to be hidden in the final output.
    -@ val body: String 
    -@ var title: String = "Play More"
    -@ var header: String = ""
    -@ var footer: String = ""
    !!! 5
    / paulirish.com/2008/conditional-stylesheets-vs-css-hacks-answer-neither/ 
    <!--[if lt IE 7]> <html class="no-js ie6 oldie" lang="en"> <![endif]-->
    <!--[if IE 7]>    <html class="no-js ie7 oldie" lang="en"> <![endif]-->
    <!--[if IE 8]>    <html class="no-js ie8 oldie" lang="en"> <![endif]-->
    -# Consider adding an manifest.appcache: h5bp.com/d/Offline 
    <!--[if gt IE 8]><!--> <html class="no-js" lang="en"> <!--<![endif]-->
    head
      meta(charset="utf-8")
    
      -# Use the .htaccess and remove these lines to avoid edge case issues. More info: h5bp.com/b/378 
      meta(http-equiv="X-UA-Compatible" content="IE=edge,chrome=1")
    
      title=title
      meta(name="description" content="")
      meta(name="author" content="Matt Raible ~ [email protected]")
    
      -# Mobile viewport optimized: j.mp/bplateviewport 
      meta(name="viewport" content="width=device-width,initial-scale=1")
    
      -# Place favicon.ico and apple-touch-icon.png in the root directory: mathiasbynens.be/notes/touch-icons
    
      -# CSS: implied media=all
      link(rel="stylesheet" href={uri("/public/stylesheets/style.css")})
      -# end CSS
    
      -# More ideas for your <head> here: h5bp.com/d/head-Tips 
      -#
        All JavaScript at the bottom, except for Modernizr / Respond.
        Modernizr enables HTML5 elements & feature detects; Respond is a polyfill for min/max-width CSS3 Media Queries
        For optimal performance, use a custom Modernizr build: www.modernizr.com/download/ 
    
      script(type="text/javascript" src={uri("/public/javascripts/libs/modernizr-2.0.6.min.js")})
    body
      #container
        header = header
        #main(role="main")
          != body
        footer = footer
    
      -# JavaScript at the bottom for fast page loading 
      
      / Grab Google CDN's jQuery, with a protocol relative URL; fall back to local if offline 
      script(type="text/javascript" src="//ajax.googleapis.com/ajax/libs/jquery/1.6.2/jquery.min.js")
      :javascript
        window.jQuery || document.write('<script src={uri("/public/javascripts/libs/jquery-1.6.2.min.js")}><\/script>')
    
      -# Change UA-XXXXX-X to be your site's ID 
      :javascript
        window._gaq = [['_setAccount','UA-25859875-1'],['_trackPageview'],['_trackPageLoadTime']];
        Modernizr.load({
          load: ('https:' == location.protocol ? '//ssl' : '//www') + '.google-analytics.com/ga.js'
        });
    
      -# Prompt IE 6 users to install Chrome Frame. Remove this if you want to support IE 6. 
      -# http://chromium.org/developers/how-tos/chrome-frame-getting-started 
      /[if lt IE 7]
        script(src="//ajax.googleapis.com/ajax/libs/chrome-frame/1.0.3/CFInstall.min.js")
        :javascript
          window.attachEvent('onload',function(){CFInstall.check({mode:'overlay'})})
            
    != "</html>"
    
  • Next, I had to add support for layouts to my homegrown Scalate support. I did this by specifying a layoutStrategy when initializing the TemplateEngine. From play-more/app/controllers/ScalateTemplate.scala:
    engine.classLoader = Play.classloader
    engine.layoutStrategy = new DefaultLayoutStrategy(engine, 
      Play.getFile("/app/templates/layouts/default" + scalateType).getAbsolutePath)
    engine
    

That's it! Now I have HTML5 Boilerplate integrated into my Play/Scalate/Jade application. To set the title and header in my index.jade, I simply added the following lines at the top:

- attributes("title") = "Counting"
- attributes("header") = "HTML5 Rocks!"

CoffeeScript Tip
Yesterday, I mentioned that I was having issues getting CoffeeScript to work with Scalate and that I was going to try and get the in-browser compiler working. First of all, reverting to Scalate 1.4.1 didn't work because there is no CoffeeScript support in 1.4.1. So I stayed with 1.5.2 and used PandaWood's Running CoffeeScript In-Browser Tutorial. I copied coffee-script.js to ~/dev/play-more/public/javascripts/libs and added a reference to it in my default.jade layout:

-# JavaScript at the bottom for fast page loading 
script(type="text/javascript" src={uri("/public/javascripts/libs/coffee-script.js")})

Then I was able to write CoffeeScript in a .jade template using the following syntax:

:plain
  <script type="text/coffeescript">
    alert "hello world"
  </script>

Summary
If you've integrated HTML5 Boilerplate into your Play application, I'd love to hear about it. Now that I have all the infrastructure in place (Jade, CoffeeScript, HTML5 Boilerplate), I'm looking forward to getting some development done. Who knows, maybe I'll even come up with my own Play Un-Features That Really Irk My Inner Geek.

Posted in Java at Sep 28 2011, 08:49:35 AM MDT 2 Comments

Integrating Scalate and Jade with Play 1.2.3

At the beginning of this year, I decided I wanted to learn Scala. Since I'm a Web Frameworks Aficionado, I figured the best way to do that would be to learn Lift. I entered these two items on my todo list and let them lie for a couple months. After attending TSSJS 2011 and having a conversation with James Strachan, I added a couple more technologies to my learning list. James had great things to say about both CoffeeScript and Jade and I decided to learn those as well.

In May, Devoxx announced their Call For Papers and I started reminiscing about how awesome last year's trip was. I decided I'd try to get accepted again and started brainstorming about talks I'd like to give. I came up with "Comparing Scala Web Frameworks" and "HTML5 with Play Scala, CoffeeScript and Jade". The reason I chose Play over Lift for the latter talk is because I think it fits a lot more with the MVC mindset I have and the easy-to-learn nature of web frameworks I enjoy using. Both topics sounded very interesting to me, and I figured they'd also inspire me to learn the technologies in a brute-force fashion; where I was under a time constraint and would be embarrassed in front of a large audience if I didn't succeed.

In mid-July, I got an email from Stephan inviting me to speak again at the 10th edition of Devoxx. I smile splashed across my face and I quickly realized I had a lot to learn. Since I was still in vacation mode after summer vacation in Montana, I decided to wait until I returned from Cape Cod to start studying. While on my 2nd summer vacation, I received an email from Devoxx stating that they'd like me present "HTML5 with Play/Scala, CoffeeScript and Jade".

To learn all these technologies, I decided on an In Anger approach - where I would study minimally and learn mostly by doing. I ordered CoffeeScript on August 8th and Programming in Scala, 2nd Edition the following week (August 17th). I started reading both books while traveling the following week (I found CoffeeScript and Scala to be very similar, so I don't know if I'd recommend learning them at the same time). That same week, I started integrating Scalate (Jade) into a new Play Scala application.

Scalate advertises on their homepage that it works with Play via the play-scalate module. They neglect to mention that this module hasn't been updated in over a year or what version of Play it works with. I tried to use the scalate-0.7.2 version and quickly ran into issues. I posted a message to the Scalate Google Group explaining my compilation issues and stacktraces. The response? Crickets.

Next, I tried posting to the Play Google Group and got a much better response. Here's what they said:

Looking at the Scalate module code, I don't think it can work as is with Play Scala 0.9.1. The latest version is more than 1 year old, and we have made a lot of changes in the API.
...
The integration of Scalate is pretty difficult if you plan to get the same kind of experience than the native Play scala template regarding auto-reload and error reports.

You can try to port the module to 0.9.1, basically all it has to do is to provide a plugin that detect changes to scaml file, and recompile them. No special integration with the Play API is needed.

After learning that play-scalate was out-of-date, I contacted the project owner via GitHub and tried to get everything working with Play 1.2.3 and Scalate 1.5.1. I updated the dependencies in the project, fixed compilation issues and tried to build. No dice:

build: 
    [mkdir] Created dir: /Users/mraible/dev/play-scalate/tmp/classes 
   [scalac] Compiling 7 source files to /Users/mraible/dev/play-scalate/tmp/classes 
   [scalac] error: class file needed by Binding is missing. 
   [scalac] reference type Serializable of package scala refers to nonexisting symbol. 
   [scalac] one error found

I posted this error to the Play Group, discovered it was caused by Scalate 1.5.1 requiring Scala 2.9. I downgraded to Scalate 2.4.1 and got another nice cryptic error:

build: 
    [mkdir] Created dir: /Users/mraible/dev/play-scalate/tmp/classes 
   [scalac] Compiling 7 source files to /Users/mraible/dev/play-scalate/tmp/classes 
   [scalac] error: class file needed by ScalaController is missing. 
   [scalac] reference value dispatch of package <root> refers to nonexisting symbol. 
   [scalac] one error found

Apparently, this was caused by another Scala versioning issue and I was offered a much simpler solution for integrating Scalate. Below are the steps I performed to integrate Scalate 1.4.1 with Play 1.2.3.

  1. Updated dependencies.yml to references Scala and Scalate dependencies.
    require:
        - play
        - play -> scala 0.9.1
        - org.fusesource.scalate -> scalate-core 1.4.1:
            transitive: false
        - org.fusesource.scalate -> scalate-util 1.4.1:
            transitive: false
    
  2. Added Scalate configuration elements to application.conf.
    scalate=jade
    jvm.memory=-Xmx256M
    
  3. Created a ScalateTemplate class to contain the Scalate Engine and render the template.
    package controllers
    
    import play.Play
    
    object ScalateTemplate {
    
      import org.fusesource.scalate._
      import org.fusesource.scalate.util._
    
      lazy val scalateEngine = {
        val engine = new TemplateEngine
        engine.resourceLoader = new FileResourceLoader(Some(Play.getFile("/app/views")))
        engine.classpath = Play.getFile("/tmp/classes").getAbsolutePath
        engine.workingDirectory = Play.getFile("tmp")
        engine.combinedClassPath = true
        engine.classLoader = Play.classloader
        engine
      }
    
      case class Template(name: String) {
        val scalateType = "." + Play.configuration.get("scalate");
    
        def render(args: (Symbol, Any)*) = {
          scalateEngine.layout(name + scalateType, args.map {
            case (k, v) => k.name -> v
          } toMap)
        }
      }
    
      def apply(template: String) = Template(template)
    }
    
  4. Created a Scalate trait to override the render() method in Play's Controller class.
    package controllers
    
    import play.mvc.Http
    
    trait Scalate {
    
      def render(args: (Symbol, Any)*) = {
        def defaultTemplate = Http.Request.current().action.replace(".", "/")
        ScalateTemplate(defaultTemplate).render(args: _*);
      }
    }
    
  5. Created an Application.scala controller with a default index method.
    package controllers
    
    import play.mvc._
    import models._
    
    object Application extends Controller with Scalate {
    
      def index = {
        render('user -> User("Raible"))
      }
    }
    
    The models/User.scala class is very simple:
    package models
    
    case class User(name:String)
    
  6. Lastly, I created an index.jade file in views/Application.
    -@ var user: models.User
    p Hi #{user.name},
    - for(i <- 1 to 3)
      p= i
    p See, I can count!
    

After getting all this working, I decided it was time to get it into production. As luck would have it, Heroku had just announced Play support a few days earlier. I heard through the grapevine that Play Scala would work, so I gave it a try. It was amazingly easy. All I had to do was create an account, create a "Procfile" in my application's root directory and run a heroku command followed by a git push. It all looked great until Play tried to compile my Jade templates as Groovy templates:

Cannot start in PROD mode with errors 
Template compilation error (In /app/views/Application/index.jade around line 2) 
The template /app/views/Application/index.jade does not compile : #{user.name} is not closed. 
play.exceptions.TemplateCompilationException: #{user.name} is not closed. 
       at play.templates.TemplateCompiler.generate(TemplateCompiler.java:102) 
       at play.templates.TemplateCompiler.compile(TemplateCompiler.java:15) 
       at play.templates.GroovyTemplateCompiler.compile(GroovyTemplateCompiler.java:4 1)

The solution from Guillaume was simple enough and I renamed my "views" directory to "templates" and updated ScalateTemplate.scala accordingly. You can see the deployed application at http://play-more.herokuapp.com.

The next steps in my Play Scala adventure will be trying to get the CoffeeScript module to work. I also hope to integrate HTML5 Boilerplate with Jade and Scalate Layouts. I'll be doing this with the mindset that HTML and JavaScript aren't that bad. I expect a lot from CoffeeScript and Jade and hope I enjoy them as much as Strachan. ;-)

In the meantime, here's some interesting links I've seen recently encountered that discuss Scala and/or Play. I dig the passion and activity that exists in these communities.

Posted in Java at Sep 07 2011, 01:21:41 PM MDT 10 Comments

Integrating OAuth with AppFuse and its REST API

One of the new features in AppFuse 2.1 is an appfuse-ws archetype. This archetype leverages Enunciate and CXF to create a project with a REST API and generated HTML documentation. Enunciate is a very useful tool, allowing you to develop web services with JAX-RS and JAX-WS annotations and have all types of client libraries generated. For me, it seems very useful for developing the backend of SOFEA (a.k.a. modern) applications.

Back in March, Ryan Heaton published a nice article on Securing Web Services in an Enunciate application. I decided to take his tutorial a step further and not only secure my web services, but also to integrate with OAuth 2. In this tutorial, I'll show you how to create a new application with AppFuse WS, secure it, add OAuth support, and then use a client app to authenticate and retrieve data.

Create a New AppFuse WS Project
To begin, I visited the Create AppFuse Archetypes page and created a new application using the "Web Services Only" option in the Web Framework dropdown. Below is the command I used to create the "appfuse-oauth" project.

mvn archetype:generate -B -DarchetypeGroupId=org.appfuse.archetypes \
-DarchetypeArtifactId=appfuse-ws-archetype -DarchetypeVersion=2.1.0 \
-DgroupId=org.appfuse.example -DartifactId=appfuse-oauth 

After doing this, I started the app using mvn jetty:run and confirmed it started OK. At this point, I was able to view the generated documentation for the application at http://localhost:8080. The screenshot below shows what the app looks like at this point.

AppFuse WS Homepage

NOTE: You might notice the REST endpoint of /{username}. This is a bug in AppFuse 2.1.0 and has been fixed in SVN. It does not affect this tutorial.

Integrate Spring Security and OAuth
I originally tried to integrate Spring Security with Enunciate's Securing Web Services Tutorial. However, it only secures endpoints and doesn't do enough filtering for OAuth support, so I ended up using a custom web.xml. I put this file in src/main/resources and loaded it in my enunciate.xml file. I also upgraded Spring Security and imported my security.xml file.

  <?xml version="1.0"?>
  <enunciate xmlns:xsi="http://www.w3.org/2001/XMLSchema-instance"
             xsi:noNamespaceSchemaLocation="http://enunciate.codehaus.org/schemas/enunciate-1.22.xsd">
      ...
      <webapp mergeWebXML="src/main/resources/web.xml"/>
      <modules>
      ...
          <spring-app disabled="false" springVersion="3.0.5.RELEASE">
              <springImport uri="classpath:/applicationContext-resources.xml"/>
              <springImport uri="classpath:/applicationContext-dao.xml"/>
              <springImport uri="classpath:/applicationContext-service.xml"/>
              <springImport uri="classpath:/applicationContext.xml"/>
              <springImport uri="classpath:/security.xml"/>
          </spring-app>
      </modules>
  </enunciate>

Then I created src/main/resources/web.xml with a filter for Spring Security and a DispatcherServlet for OAuth support.

<?xml version="1.0" encoding="UTF-8"?>
<web-app xmlns="http://java.sun.com/xml/ns/javaee"
         xmlns:xsi="http://www.w3.org/2001/XMLSchema-instance"
         xsi:schemaLocation="http://java.sun.com/xml/ns/javaee http://java.sun.com/xml/ns/javaee/web-app_3_0.xsd"
         version="3.0">

    <filter>
        <filter-name>securityFilter</filter-name>
        <filter-class>org.springframework.web.filter.DelegatingFilterProxy</filter-class>
        <init-param>
            <param-name>targetBeanName</param-name>
            <param-value>springSecurityFilterChain</param-value>
        </init-param>
    </filter>

    <filter-mapping>
        <filter-name>securityFilter</filter-name>
        <url-pattern>/*</url-pattern>
    </filter-mapping>

    <servlet>
        <servlet-name>appfuse-oauth</servlet-name>
        <servlet-class>org.springframework.web.servlet.DispatcherServlet</servlet-class>
        <load-on-startup>1</load-on-startup>
    </servlet>

    <servlet-mapping>
        <servlet-name>appfuse-oauth</servlet-name>
        <url-pattern>/oauth/*</url-pattern>
    </servlet-mapping>
</web-app>

Next, I created a src/main/resources/security.xml and used it to secure my API, specify a login page, supply the users and integrate OAuth (see the last 4 beans below).

<?xml version="1.0" encoding="UTF-8"?>
<beans:beans xmlns="http://www.springframework.org/schema/security"
             xmlns:xsi="http://www.w3.org/2001/XMLSchema-instance"
             xmlns:beans="http://www.springframework.org/schema/beans"
             xmlns:oauth="http://www.springframework.org/schema/security/oauth2"
             xsi:schemaLocation="http://www.springframework.org/schema/beans http://www.springframework.org/schema/beans/spring-beans.xsd
                           http://www.springframework.org/schema/security http://www.springframework.org/schema/security/spring-security.xsd
                           http://www.springframework.org/schema/security/oauth2 http://www.springframework.org/schema/security/spring-security-oauth2.xsd">

    <http auto-config="true">
        <intercept-url pattern="/api/**" access="ROLE_USER"/>
        <intercept-url pattern="/oauth/**" access="ROLE_USER"/>
        <intercept-url pattern="/**" access="IS_AUTHENTICATED_ANONYMOUSLY"/>
        <form-login login-page="/login.jsp" authentication-failure-url="/login.jsp?error=true"
                    login-processing-url="/j_security_check"/>
    </http>

    <authentication-manager>
        <authentication-provider>
            <user-service>
                <user name="admin" password="admin" authorities="ROLE_USER,ROLE_ADMIN"/>
                <user name="user" password="user" authorities="ROLE_USER"/>
            </user-service>
        </authentication-provider>
    </authentication-manager>

    <!--hook up the spring security filter chain-->
    <beans:alias name="springSecurityFilterChain" alias="securityFilter"/>

    <beans:bean id="tokenServices"
                class="org.springframework.security.oauth2.provider.token.InMemoryOAuth2ProviderTokenServices">
        <beans:property name="supportRefreshToken" value="true"/>
    </beans:bean>

    <oauth:provider client-details-service-ref="clientDetails" token-services-ref="tokenServices">
        <oauth:verification-code user-approval-page="/oauth/confirm_access"/>
    </oauth:provider>

    <oauth:client-details-service id="clientDetails">
        <!--<oauth:client clientId="my-trusted-client" authorizedGrantTypes="password,authorization_code,refresh_token"/>
        <oauth:client clientId="my-trusted-client-with-secret"
                      authorizedGrantTypes="password,authorization_code,refresh_token" secret="somesecret"/>
        <oauth:client clientId="my-less-trusted-client" authorizedGrantTypes="authorization_code"/>-->
        <oauth:client clientId="ajax-login" authorizedGrantTypes="authorization_code"/>
    </oauth:client-details-service>
</beans:beans>

I used the OAuth for Spring Security sample apps to figure this out. In this example, I used authorizedGrantTypes="authorization_code", but you can see from the commented <oauth:client> elements above that there's a few different options. You should also note that the clientId is hard-coded to "ajax-login", signifying I only want to allow a single application to authenticate.

At this point, I'd like to give a shoutout to Ryan Heaton for creating both Enunciate and Spring Security's OAuth support. Nice work Ryan!

At this point, I needed to do a number of additional tasks to finish integrating oauth. The first was to modify the Jetty Plugin's configuration to 1) run on port 9000, 2) load my custom files and 3) allow jetty:run to recognize Enunciate's generated files. Below is the final configuration in my pom.xml.

<plugin>
    <groupId>org.mortbay.jetty</groupId>
    <artifactId>maven-jetty-plugin</artifactId>
    <version>6.1.26</version>
    <configuration>
        <connectors>
            <connector implementation="org.mortbay.jetty.nio.SelectChannelConnector">
                <port>9000</port>
                <maxIdleTime>60000</maxIdleTime>
            </connector>
        </connectors>
        <webAppConfig>
            <baseResource implementation="org.mortbay.resource.ResourceCollection">
                <resourcesAsCSV>
                    ${basedir}/src/main/webapp,
                    ${project.build.directory}/${project.build.finalName}
                </resourcesAsCSV>
            </baseResource>
            <contextPath>/appfuse-oauth</contextPath>
        </webAppConfig>
        <webXml>${project.build.directory}/${project.build.finalName}/WEB-INF/web.xml</webXml>
    </configuration>
</plugin>

Next, I added the necessary OAuth dependencies for Spring Security to my pom.xml. Since the latest release is a milestone release, I had to add Spring's milestone repo too.

<repository>
    <id>spring-milestone</id>
    <url>http://s3.amazonaws.com/maven.springframework.org/milestone</url>
</repository>
...
<dependency>
    <groupId>org.springframework.security</groupId>
    <artifactId>spring-security-taglibs</artifactId>
    <version>${spring.version}</version>
    <exclusions>
        <exclusion>
            <groupId>org.springframework</groupId>
            <artifactId>spring-web</artifactId>
        </exclusion>
        <exclusion>
            <groupId>org.springframework</groupId>
            <artifactId>spring-support</artifactId>
        </exclusion>
    </exclusions>
</dependency>
<dependency>
    <groupId>org.springframework.security.oauth</groupId>
    <artifactId>spring-security-oauth</artifactId>
    <version>1.0.0.M3</version>
    <exclusions>
        <exclusion>
            <groupId>org.springframework</groupId>
            <artifactId>spring-beans</artifactId>
        </exclusion>
        <exclusion>
            <groupId>org.springframework</groupId>
            <artifactId>spring-context</artifactId>
        </exclusion>
        <exclusion>
            <groupId>org.springframework</groupId>
            <artifactId>spring-core</artifactId>
        </exclusion>
    </exclusions>
</dependency>
<dependency>
    <groupId>org.springframework</groupId>
    <artifactId>spring-webmvc</artifactId>
    <version>${spring.version}</version>
</dependency>
<dependency>
    <groupId>javax.servlet</groupId>
    <artifactId>servlet-api</artifactId>
    <version>2.5</version>
    <scope>provided</scope>
</dependency>
<dependency>
    <groupId>javax.servlet</groupId>
    <artifactId>jstl</artifactId>
    <version>1.1.2</version>
</dependency>
<dependency>
    <groupId>taglibs</groupId>
    <artifactId>standard</artifactId>
    <version>1.1.2</version>
</dependency>

Since I named my DispatcherServlet "appfuse-oauth" in web.xml, I created a src/main/webapp/WEB-INF/appfuse-oauth-servlet.xml to configure Spring MVC. I had to create the src/main/webapp/WEB-INF directory.

<?xml version="1.0" encoding="UTF-8"?>
<beans xmlns="http://www.springframework.org/schema/beans"
       xmlns:xsi="http://www.w3.org/2001/XMLSchema-instance"
       xmlns:context="http://www.springframework.org/schema/context"
       xmlns:mvc="http://www.springframework.org/schema/mvc"
       xsi:schemaLocation="http://www.springframework.org/schema/beans http://www.springframework.org/schema/beans/spring-beans-3.0.xsd
                http://www.springframework.org/schema/context http://www.springframework.org/schema/context/spring-context-3.0.xsd
                http://www.springframework.org/schema/mvc http://www.springframework.org/schema/mvc/spring-mvc-3.0.xsd">

    <!-- Scans the classpath of this application for @Components to deploy as beans -->
    <context:component-scan base-package="org.appfuse.examples.webapp"/>

    <!-- Configures the @Controller programming model -->
    <mvc:annotation-driven/>

    <!-- Resolves view names to protected .jsp resources within the /WEB-INF/views directory -->
    <bean class="org.springframework.web.servlet.view.InternalResourceViewResolver">
        <property name="viewClass" value="org.springframework.web.servlet.view.JstlView"/>
        <property name="prefix" value="/"/>
        <property name="suffix" value=".jsp"/>
    </bean>
</beans>

In order to show the OAuth confirmation page, I needed to create src/main/java/org/appfuse/examples/webapp/AccessConfirmationController.java and map it to /oauth/confirm_access. I copied this from one of the sample projects and modified to use Spring's annotations.

package org.appfuse.examples.webapp;

import org.springframework.beans.factory.annotation.Autowired;
import org.springframework.security.oauth2.provider.ClientAuthenticationToken;
import org.springframework.security.oauth2.provider.ClientDetails;
import org.springframework.security.oauth2.provider.ClientDetailsService;
import org.springframework.security.oauth2.provider.verification.ClientAuthenticationCache;
import org.springframework.security.oauth2.provider.verification.DefaultClientAuthenticationCache;
import org.springframework.stereotype.Controller;
import org.springframework.web.bind.annotation.RequestMapping;
import org.springframework.web.bind.annotation.RequestMethod;
import org.springframework.web.servlet.ModelAndView;

import javax.servlet.http.HttpServletRequest;
import javax.servlet.http.HttpServletResponse;
import java.util.TreeMap;

/**
 * Controller for retrieving the model for and displaying the confirmation page
 * for access to a protected resource.
 *
 * @author Ryan Heaton
 */
@Controller
@RequestMapping("/confirm_access")
public class AccessConfirmationController {

    private ClientAuthenticationCache authenticationCache = new DefaultClientAuthenticationCache();
    @Autowired
    private ClientDetailsService clientDetailsService;

    @RequestMapping(method = RequestMethod.GET)
    protected ModelAndView confirm(HttpServletRequest request, HttpServletResponse response) throws Exception {
        ClientAuthenticationToken clientAuth = authenticationCache.getAuthentication(request, response);
        if (clientAuth == null) {
            throw new IllegalStateException("No client authentication request to authorize.");
        }

        TreeMap<String, Object> model = new TreeMap<String, Object>();
        ClientDetails client = clientDetailsService.loadClientByClientId(clientAuth.getClientId());
        model.put("auth_request", clientAuth);
        model.put("client", client);

        return new ModelAndView("access_confirmation", model);
    }
}

This controller delegates to src/main/webapp/access_confirmation.jsp. I created this file and filled it with code to display Accept and Deny buttons.

<%@ page import="org.springframework.security.core.AuthenticationException" %>
<%@ page import="org.springframework.security.oauth2.common.exceptions.UnapprovedClientAuthenticationException" %>
<%@ page import="org.springframework.security.oauth2.provider.verification.BasicUserApprovalFilter" %>
<%@ page import="org.springframework.security.oauth2.provider.verification.VerificationCodeFilter" %>
<%@ page import="org.springframework.security.web.WebAttributes" %>
<%@ taglib prefix="authz" uri="http://www.springframework.org/security/tags" %>
<%@ taglib uri="http://java.sun.com/jsp/jstl/core" prefix="c" %>
<html>
<head>
    <title>Confirm Access</title>
    <link rel="stylesheet" type="text/css" media="all"
          href="http://demo.appfuse.org/appfuse-struts/styles/simplicity/theme.css"/>
    <style type="text/css">
        h1 {
            margin-left: -300px;
            margin-top: 50px
        }
    </style>
</head>

<body>

<h1>Confirm Access</h1>

<div id="content">

    <% if (session.getAttribute(WebAttributes.AUTHENTICATION_EXCEPTION) != null && 
                 !(session.getAttribute(WebAttributes.AUTHENTICATION_EXCEPTION) instanceof UnapprovedClientAuthenticationException)) { %>
    <div class="error">
        <h2>Woops!</h2>

        <p>Access could not be granted.
            (<%= ((AuthenticationException) session.getAttribute(WebAttributes.AUTHENTICATION_EXCEPTION)).getMessage() %>)</p>
    </div>
    <% } %>
    <c:remove scope="session" var="SPRING_SECURITY_LAST_EXCEPTION"/>

    <authz:authorize ifAnyGranted="ROLE_USER,ROLE_ADMIN">
        <h2>Please Confirm</h2>

        <p>You hereby authorize "<c:out value="${client.clientId}" escapeXml="true"/>" to access your protected resources.</p>

        <form id="confirmationForm" name="confirmationForm"
              action="<%=request.getContextPath() + VerificationCodeFilter.DEFAULT_PROCESSING_URL%>" method="POST">
            <input name="<%=BasicUserApprovalFilter.DEFAULT_APPROVAL_REQUEST_PARAMETER%>"
                   value="<%=BasicUserApprovalFilter.DEFAULT_APPROVAL_PARAMETER_VALUE%>" type="hidden"/>
            <label><input name="authorize" value="Authorize" type="submit"></label>
        </form>
        <form id="denialForm" name="denialForm"
              action="<%=request.getContextPath() + VerificationCodeFilter.DEFAULT_PROCESSING_URL%>" method="POST">
            <input name="<%=BasicUserApprovalFilter.DEFAULT_APPROVAL_REQUEST_PARAMETER%>"
                   value="not_<%=BasicUserApprovalFilter.DEFAULT_APPROVAL_PARAMETER_VALUE%>" type="hidden"/>
            <label><input name="deny" value="Deny" type="submit"></label>
        </form>
    </authz:authorize>
</div>
</body>
</html>

Finally, I needed to create src/main/webapp/login.jsp to allow users to login.

<%@ page language="java" pageEncoding="UTF-8" contentType="text/html;charset=utf-8" %>
<%@ taglib uri="http://java.sun.com/jsp/jstl/core" prefix="c" %>
<%@ taglib uri="http://java.sun.com/jsp/jstl/fmt" prefix="fmt" %>
<%@ taglib uri="http://java.sun.com/jsp/jstl/core" prefix="c" %>

<html>
<head>
    <title>Login</title>
    <link rel="stylesheet" type="text/css" media="all"
          href="http://demo.appfuse.org/appfuse-struts/styles/simplicity/theme.css"/>
    <style type="text/css">
        h1 {
            margin-left: -300px;
            margin-top: 50px
        }
    </style>
</head>
<body>
<h1>Login</h1>

<form method="post" id="loginForm" action="<c:url value='/j_security_check'/>">
    <fieldset style="padding-bottom: 0">
        <ul>
            <c:if test="${param.error != null}">
                <li class="error">
                    ${sessionScope.SPRING_SECURITY_LAST_EXCEPTION.message}
                </li>
            </c:if>
            <li>
                <label for="j_username" class="required desc">
                    Username <span class="req">*</span>
                </label>
                <input type="text" class="text medium" name="j_username"
                       id="j_username" tabindex="1"/>
            </li>

            <li>
                <label for="j_password" class="required desc">
                    Password <span class="req">*</span>
                </label>
                <input type="password" class="text medium" name="j_password"
                       id="j_password" tabindex="2"/>
            </li>
            <li>
                <input type="submit" class="button" name="login" value="Login"
                       tabindex="3"/>
            </li>
        </ul>
    </fieldset>
</form>
</body>
</html>

All the changes described in the above section are necessary to implement OAuth if you create a project with AppFuse WS 2.1. It may seem like a lot of code, but I was able to copy/paste and get it all working in an app in under 5 minutes. Hopefully you can do the same. I'm also considering adding it by default to the next version of AppFuse. Now let's look at integrating OAuth into a client to authenticate and retrieve data from this application.

Authenticate and Retrieve Data with Client
I originally thought my GWT OAuth application would provide a nice client. However, after 30 minutes of trying to get GWT 1.7.1 and the GWT Maven plugin (1.1) working with my 64-bit Java 6 JDK on OS X, I gave up. So I opted to use the Ajax Login application I've been using in my recent security tutorials.

In this example, I used OAuth2RestTemplate from Spring Security OAuth. While this works, and works well, I'd still like to get things working with GWT (or jQuery) to demonstrate how to do it from a pure client-side perspective.

To begin, I got the latest source of Ajax Login from GitHub (as of this morning) and made some changes. First of all, I added the Spring Security OAuth dependencies to pom.xml:

<repository>
    <id>spring-milestone</id>
    <url>http://s3.amazonaws.com/maven.springframework.org/milestone</url>
</repository>
...
<dependency>
    <groupId>org.springframework.security.oauth</groupId>
    <artifactId>spring-security-oauth</artifactId>
    <version>1.0.0.M3</version>
    <exclusions>
        <exclusion>
            <groupId>org.springframework</groupId>
            <artifactId>spring-beans</artifactId>
        </exclusion>
        <exclusion>
            <groupId>org.springframework</groupId>
            <artifactId>spring-context</artifactId>
        </exclusion>
        <exclusion>
            <groupId>org.springframework</groupId>
            <artifactId>spring-core</artifactId>
        </exclusion>
    </exclusions>
</dependency>

Then I modified src/main/webapp/WEB-INF/security.xml and added an OAuth Token Service and defined the location of the OAuth server.

<?xml version="1.0" encoding="UTF-8"?>
<beans:beans xmlns="http://www.springframework.org/schema/security"
             xmlns:xsi="http://www.w3.org/2001/XMLSchema-instance"
             xmlns:beans="http://www.springframework.org/schema/beans"
             xmlns:oauth="http://www.springframework.org/schema/security/oauth2"
             xsi:schemaLocation="http://www.springframework.org/schema/beans http://www.springframework.org/schema/beans/spring-beans-3.0.xsd
              http://www.springframework.org/schema/security http://www.springframework.org/schema/security/spring-security-3.0.xsd
              http://www.springframework.org/schema/security/oauth2 http://www.springframework.org/schema/security/spring-security-oauth2.xsd">

...
    <oauth:client token-services-ref="oauth2TokenServices"/>

    <beans:bean id="oauth2TokenServices"
                class="org.springframework.security.oauth2.consumer.token.InMemoryOAuth2ClientTokenServices"/>

    <oauth:resource id="appfuse" type="authorization_code" clientId="ajax-login"
                    accessTokenUri="http://localhost:9000/appfuse-oauth/oauth/authorize"
                    userAuthorizationUri="http://localhost:9000/appfuse-oauth/oauth/user/authorize"/>

Next, I created a Controller that uses OAuth2RestTemplate to make the request and get the data from the AppFuse OAuth application's API. I created src/main/java/org/appfuse/examples/webapp/oauth/UsersApiController.java and filled it with the following code:

package org.appfuse.examples.webapp.oauth;

import org.appfuse.model.User;
import org.springframework.beans.factory.annotation.Autowired;
import org.springframework.beans.factory.annotation.Qualifier;
import org.springframework.security.core.context.SecurityContextHolder;
import org.springframework.security.oauth2.common.exceptions.InvalidTokenException;
import org.springframework.security.oauth2.consumer.*;
import org.springframework.security.oauth2.consumer.token.OAuth2ClientTokenServices;
import org.springframework.stereotype.Controller;
import org.springframework.web.bind.annotation.RequestMapping;
import org.springframework.web.bind.annotation.RequestMethod;
import org.springframework.web.bind.annotation.ResponseBody;

import java.util.ArrayList;
import java.util.List;

@RequestMapping("/appfuse/users")
@Controller
public class UsersApiController {

    private OAuth2RestTemplate apiRestTemplate;
    @Autowired
    private OAuth2ClientTokenServices tokenServices;

    private static final String REMOTE_DATA_URL = "http://localhost:9000/appfuse-oauth/api/users";

    @Autowired
    public UsersApiController(OAuth2ProtectedResourceDetails resourceDetails) {
        this.apiRestTemplate = new OAuth2RestTemplate(resourceDetails);
    }

    @RequestMapping(method = RequestMethod.GET)
    @ResponseBody
    public List<User> getUsers() {
        try {
            List users = apiRestTemplate.getForObject(REMOTE_DATA_URL, List.class);
            return new ArrayList<User>(users);
        } catch (InvalidTokenException badToken) {
            //we've got a bad token, probably because it's expired.
            OAuth2ProtectedResourceDetails resource = apiRestTemplate.getResource();
            OAuth2SecurityContext context = OAuth2SecurityContextHolder.getContext();
            if (context != null) {
                // this one is kind of a hack for this application
                // the problem is that the sparklr photos page doesn't remove the 'code=' request parameter.
                ((OAuth2SecurityContextImpl) context).setVerificationCode(null);
            }
            //clear any stored access tokens...
            tokenServices.removeToken(SecurityContextHolder.getContext().getAuthentication(), resource);
            //go get a new access token...
            throw new OAuth2AccessTokenRequiredException(resource);
        }
    }
}

At this point, I thought everything would work and I spent quite some time banging my head against the wall when it didn't. As I was composing an email to the Enunciate users mailing list, I realized the issue. It appeared to be working, but from the server side, and the redirect back to the client was not happening. The Ajax Login app uses UrlRewriteFilter (for pretty URLs) to redirect from /app/* to /$1 and this redirect was losing the code parameter in the URL.

<rule>
    <from>/app/**</from>
    <to last="true" type="redirect">%{context-path}/$1</to>
</rule>

To fix this, I added use-query-string="true" to the root element in src/main/webapp/WEB-INF/urlrewrite.xml:

<urlrewrite default-match-type="wildcard" use-query-string="true">

After making all these changes, I ran mvn jetty:run on both apps and opened http://localhost:8080/appfuse/users in my browser. It all worked and a smile crept across my face. I've checked in the client changes into ajax-login on GitHub and the appfuse-oauth example into AppFuse Demos on Google Code. If you'd like to see this example in action, I'd encourage you to checkout both projects and let me know if you find any issues.

Posted in Java at Jul 05 2011, 10:56:48 AM MDT 4 Comments

Hyperproductive JSF 2.0 with Ed Burns at Jazoon

This morning, I attended Ed Burn's Talk on Hyperproductive JSF 2.0 at Jazoon. As you might know, I've been a critic of JSF for many years. However, it is one of the most used Java web frameworks, so I was hoping to learn how it's improved in the latest version. Below are my notes from Ed's presentation.

Ed's Plan for our Time Investment:

  1. Define a productive development environment
  2. JSF for greenfield and brownfield projects
  3. List the top 9 productivity killers with JSF projects and solutions

"I am always doing that which I cannot do, in order that I may learn how to do it." -- Pablo Picasso

Software is an executable representation of knowledge, a byproduct of learning how to solve a problem. Knowledge is something that changes as more information comes in. A productive environment makes it as easy as possible to learn how to solve a problem. Learning is an iterative process. Early iterations don't need to be optimal. Later iterations do ... and they need to be maintainable. First is the hardest. Fast iterations are they key. Spring Roo and Play are examples of frameworks that make the first iteration very fast.

You should use a tool to jumpstart JSF development: copy from an old project, use a Maven archetype or use your IDE. With greenfield development, you don't have to bother learning the byproduct of other people's learning. It's a great opportunity to pad your resume with the latest hot technologies. With brownfield development, it's vitally important to understand the existing solution and hidden assumptions. You're also much more constrained in your technology choices. If you want to change, you'll need to come up with a migration strategy, which can be difficult. JSF works well for both because it's not just a runtime framework, it's also a conceptual framework. You need to understand how your framework handles data conversion, validation, page flow, persistence integration, I18N, L10N, A11Y, Web standards and user friendliness.

Top 9 JSF Productivity Killers:

  1. Time wasting deployment step
  2. The perils of "there's more than one way to do it"
  3. Lengthy and painful developer on-boarding process
  4. Misused logging and misunderstood error messages
  5. Phantoms
  6. Under-utilized developer tools
  7. Premature optimization
  8. Difficulty in doing TDD
  9. Lack of an app framework

Time wasting deployment step
ZeroTurnaround solves this problem with JRebel, but there's other ways to do it. Some of the killers of flow state: 1) one large war file, 2) underutilizing dynamic language features, 3) complex server environment and 4) build process is redoing work unnecessarily. To stop the time wasting deployment step, the most important things you can do are as follows:

  • Configure your IDE correctly. In Eclipse, compile directly into WEB-INF/classes and use continuous compilation. With NetBeans, use GlassFish.
  • Don't do control-flow programming in XML.

Ed then showed a simple demo that showed how you can use Groovy to create a JSF UI Component. He also mentioned that Groovy can be used to author any JSF artifact. The benefit of this is you can simply edit and save a .groovy file without having to recompile or redeploy. Unfortunately, using Groovy didn't eliminate the XML syntax for pages or the XML for defining UI components.

The perils of "there's more than one way to do it"
JSF is very flexible, but flexibility is, more often than not, abused. There's a lack of convention for common things (e.g. master-detail, JSF concepts like converter, validator, etc.). The best way to fix this is to establish the norms for a project and stick with them. For example, Neil Griffin has a good blog entry for the different kind of managed beans you can create. Develop recommendations like Neil's and use them on all your projects.

Lengthy developer on-boarding process
Stick with standards when possible (at least have a common project description and build system across projects). Be committed to periodic cleanup cycles, including documenting for re-use. Pick one JSF component library and stick with it. Support for mixing and switching component libraries has improved with JSF 2, but it's still recommended you use only one.

Misused logging and misunderstood error messages
JSF is notorious for cryptic error messages and very long stack traces. It's still a problem, but the JSF Team is still working on improving them. Good tip: use the <ui:debug> tag. Its recordStateSize="true" attribute can be especially useful. If you're using PrimeFaces, add trace=true to request URLs.

Phantoms
Phantoms is when running code is not the same as the code you are modifying or wrong version of library gets picked up. You should have the capability to hit breakpoints anywhere in your entire software stack, including core Java sources. This is one of the most useful things about open source software. Solutions to phantoms: 1) put a timestamp on every redeploy and have the timestamp appear in the system log 2) write the running library stack to the system log (each library and version being used) and make it easy to compare one developer's runtime stack with another's 3) consider doing all work in tightly controlled VMs (checkout the VM at the beginning of the day, do your work, commit your changes and throw your VM away at the end of the day).

Under-utilizing developer tools
Make sure everyone has the fastest machines available and as much screen real estate as desired. Hardware is much cheaper than developer time. Another tip is to use Hudson as your butler. It's not just the team CI server. In other words, take advantage of automation wherever you can.

Premature Optimization
Keep in mind the trade-offs between readability and performance. When using frameworks such as JSF, don't try to outsmart the implementation. Rather, use the framework as intended and use open-source contributions to treat performance problems. Example, EL expressions got a lot faster between EE5 and EE6. If you spent time trying to optimize EL expressions, you might've been wasting your time.

Difficulty in doing TDD
Try to figure out why TDD is difficult in your company. For JSF, strongly consider JBoss's JSFUnit. Write your testcases to extend from Cactus ServletTestCase and leverage HtmlUnit (JSFUnit does this for you).

Lack of an app framework
Create common components: login panel, CRUD components, etc. If you don't have an app framework, build one over time.

Conclusion
This was an interesting talk by Ed. The dynamics of the room where a bit interesting. Jazoon is held in a movie theater, much like Devoxx. However, it appears there's a spotlight on the speaker that makes it very difficult to see the audience. I don't remember having this problem at Devoxx. Ed asked the audience quite a few questions, but it seemed he had a lot of difficulty in seeing if folks raised their hands. This made for some periods of awkward silence.

Personally, I was hoping to learn some new whizbang tips about JSF that I was not aware of. Unfortunately, I didn't learn anything new and wasn't that impressed with the Groovy demo.

I think Ed's tips about things outside of JSF were good, especially buying developers good hardware. I've seen many companies, including my current client, skimp on developer hardware and cause developer frustration because of it. I think it's great when companies provide developers top-of-the-line hardware and eliminate frustration over CPU and memory resources. LinkedIn and Time Warner Cable both provide their developers with Mac Pros and MacBook Pros as well as huge monitors. IMO, this is one of the best benefits you can provide your engineers.

Posted in Java at Jun 23 2011, 04:53:10 AM MDT 3 Comments

Java Web Application Security - Part V: Penetrating with Zed Attack Proxy

Web Application Security is an important part of developing applications. As developers, I think we often forget this, or simply ignore it. In my career, I've learned a lot about web application security. However, I only recently learned and became familiar with the rapidly growing "appsec" industry.

I found a disconnect between what appsec consultants were selling and what I was developing. It seemed like appsec consultants were selling me fear, mostly because I thought my apps were secure. So I set out on a mission to learn more about web application security and penetration testing to see if my apps really were secure. This article is part of that mission, as are the previous articles I've written in this series.

When I first decided I wanted to do a talk on Webapp Security, I knew it would be more interesting if I showed the audience how to hack and fix an application. That's why I wrote it into my original proposal:

Webapp Security: Develop. Penetrate. Protect. Relax.
In this session, you'll learn how to implement authentication in your Java web applications using Spring Security, Apache Shiro and good ol' Java EE Container Managed Authentication. You'll also learn how to secure your REST API with OAuth and lock it down with SSL.

After learning how to develop authentication, I'll introduce you to OWASP, the OWASP Top 10, its Testing Guide and its Code Review Guide. From there, I'll discuss using WebGoat to verify your app is secure and commercial tools like webapp firewalls and accelerators.

At the time, I hadn't done much webapp pentesting. You can tell this from the fact that I mentioned WebGoat as the pentesting tool. From WebGoat's Project page:

WebGoat is a deliberately insecure J2EE web application maintained by OWASP designed to teach web application security lessons. In each lesson, users must demonstrate their understanding of a security issue by exploiting a real vulnerability in the WebGoat application. For example, in one of the lessons the user must use SQL injection to steal fake credit card numbers. The application is a realistic teaching environment, providing users with hints and code to further explain the lesson.

What I really meant to say and use was Zed Attack Proxy, also known as OWASP ZAP. ZAP is a Java Desktop application that you setup as a proxy for your browser, then use to find vulnerabilities in your application. This article explains how you can use ZAP to pentest a web applications and fix its vulnerabilities.

The application I'll be using in this article is the Ajax Login application I've been using throughout this series. I think it's great that projects like Damn Vulnerable Web App and WebGoat exist, but I wanted to test one that I think is secure, rather than one I know is not secure. In this particular example, I'll be testing the Spring Security implementation, since that's the framework I most often use in my open source projects.

Zed Attack Proxy Tutorial

Download and Run the Application
To begin, download the application and expand it on your hard drive. This app is the completed version of the Ajax Login application referenced in Java Web Application Security - Part II: Spring Security Login Demo. You'll need Java 6 and Maven installed to run the app. Run it using mvn jetty:run and open http://localhost:8080 in your browser. You'll see it's a simple CRUD application for users and you need to login to do anything.

Install and Configure ZAP
The Zed Attack Proxy (ZAP) is an easy to use integrated penetration testing tool for finding vulnerabilities in web applications. Download the latest version (I used 1.3.0) and install it on your system. After installing, launch the app and change the proxy port to 9000 (Tools > Options > Local Proxy). Next, configure your browser to proxy requests through port 9000 and allow localhost requests to be proxied. I used Firefox 4 (Preferences > Advanced > Network > Connection Settings). When finished, your proxy settings should look like the following screenshot:

Firefox Proxy Settings

Another option (instead of removing localhost) is to add an entry to your hosts file with your production domain name. This is what I've done for this demo.

127.0.0.1       demo.raibledesigns.com

I've also configured Apache to proxy requests to Jetty with the following mod_proxy settings in my httpd.conf:

<IfModule mod_proxy.c>
    ProxyRequests Off 
    ProxyPreserveHost Off 

    <VirtualHost *:80>
       ProxyPass  /  http://localhost:8080/
    </VirtualHost>

    <VirtualHost *:443>
        SSLEngine on
        SSLProxyEngine on
        SSLCertificateFile "/etc/apache2/ssl.key/server.crt"
        SSLCertificateKeyFile "/etc/apache2/ssl.key/server.key"

        ProxyPass  /  https://localhost:8443/
    </VirtualHost>
</IfModule>

Perform a Scan
Now you need to give ZAP some data to work with. Using Firefox, I navigated to http://demo.raibledesigns.com and browsed around a bit, listing users, added a new one and deleted an existing one. After doing this, I noticed a number of flags in the ZAP UI under Sites. I then right-clicked on each site (one for http and one for https) and selected Attack > Active Scan site. You should be able to do this from the "Active Scan" tab at the bottom of ZAP, but there's a bug when the URLs are the same. After doing this, I received a number of alerts, ranging from high (cross-site scripting) to low (password autocomplete). The screenshot below shows the various issues.

ZAP Alerts

Now let's take a look at how to fix them.

Fix Vulnerabilities
One of the things not mentioned by the scan, but #1 in Seven Security (Mis)Configurations in Java web.xml Files, is Custom Error Pages Not Configured. Custom error pages are configured in this app, but error.jsp contains the following code:

<% if (exception != null) { %>
    <% exception.printStackTrace(new java.io.PrintWriter(out)); %>
<% } else { %>
    Please check your log files for further information.
<% } %>

Stack traces can be really useful to an attacker, so it's important to start by removing the above code from src/main/webapp/error.jsp.

The rest of the issues have to do with XSS, autocomplete, and cookies. Let's start with the easy ones. Fixing autocomplete is easy enough; simply changed the HTML in login.jsp and userform.jsp to have autocomplete="off" as part of the <form> tag.

Then modify web.xml so http-only and secure cookies are used. While you're at it, add session-timeout and tracking-mode as recommended by the aforementioned web.xml misconfigurations article.

<session-config>
    <session-timeout>15</session-timeout>
    <cookie-config>
        <http-only>true</http-only>
        <secure>true</secure>
    </cookie-config>
    <tracking-mode>COOKIE</tracking-mode>
</session-config>

Next, modify Spring Security's Remember Me configuration so it uses secure cookies. To do this, add use-secure-cookies="true" to the <remember-me> element in security.xml.

<remember-me user-service-ref="userService" key="e37f4b31-0c45-11dd-bd0b-0800200c9a66"
             use-secure-cookie="true"/>

Unfortunately, Spring Security doesn't support HttpOnly cookies, but will in a future release.

The next issue to solve is disabling directory browsing. You can do this by copying Jetty's webdefault.xml (from the org.eclipse.jetty:jetty-webapp JAR) into src/test/resources and changing its "dirAllowed" <init-param> to false:

<servlet>
  <servlet-name>default</servlet-name>
  <servlet-class>org.mortbay.jetty.servlet.DefaultServlet</servlet-class>
  <init-param>
    <param-name>acceptRanges</param-name>
    <param-value>true</param-value>
  </init-param>
  <init-param>
    <param-name>dirAllowed</param-name>
    <param-value>false</param-value>
  </init-param>
  <init-param>

You'll also need to modify the plugin's configuration to point to this file by adding it to the <webAppConfig> section in pom.xml.

<configuration>
    <webAppConfig>
        <contextPath>/</contextPath>
        <defaultsDescriptor>src/test/resources/webdefault.xml</defaultsDescriptor>
    </webAppConfig>

Of course, if you're running in production you'll want to configure this in your server's settings rather than in your pom.xml file.

Next, I set out to fix secure page browser cache issues. I had the following settings in my SiteMesh decorator:

<meta http-equiv="Cache-Control" content="no-store"/>
<meta http-equiv="Pragma" content="no-cache"/>

However, according to ZAP, the first meta tag should have "no-cache" instead of "no-store", so I changed it to "no-cache".

After making all these changes, I created a new ZAP session and ran an active scan on both sites again. Below are the results:

Active Scan after Fixes

I believe the first issue (parameter tampering) is because I show the error page when a duplicate user exists. To fix this, I changed UserFormController so it catches a UserExistsException and sends the user back to the form.

try {
    userManager.saveUser(user);
} catch (UserExistsException uex) {
    result.addError(new ObjectError("user", uex.getMessage()));
    return "userform";
}

However, this still doesn't seem to cause the alert to go away. This is likely because I'm not filtering/escaping HTML when it's first submitted. I believe the best solution for this would be to use something like OWASP's ESAPI to filter parameter values. However, I was unable to find integration with Spring MVC's data binding, so I decided not to try and fix this vulnerability.

Finally, I tried to disable jsessionid in URLs using suggestions from Stack Overflow. The previous setting in web.xml (<tracking-mode>COOKIE</tracking-mode>) should do this, but it doesn't seem to work with Jetty 8. The other issues (secure page browser cache, HttpOnly cookies and secure cookies), I was unable to solve. The last two are issues caused by Spring Security as far as I can tell.

Summary
In this article, I've shown you how to pentest a web application using Firefox and OWASP's Zed Attack Proxy (ZAP). I found ZAP to be a nice tool for figuring out vulnerabilities, but it'd be nice if it had a "retest" feature to see if you fixed an issue for a particular URL. It does have a "resend" feature, but running it didn't seem to clear alerts after I'd fixed them.

The issues I wasn't able to solve seemed to be mostly related to frameworks (e.g. Spring Security and HttpOnly cookies) or servers (Jetty not using cookies for tracking). My suspicion is the Jetty issues are because it doesn't support Servlet 3 as well as it advertises. I believe this is fair; I am using a milestone release after all. I tried scanning http://demo.raibledesigns.com/ajax-login (which runs on Tomcat 7 at Contegix) and confirmed that no jsessionid exists.

Hopefully this article has helped you understand how to figure out security vulnerabilities in your web applications. I believe ZAP will continue to get more popular as developers become aware of it. If you feel ambitious and want to try and solve all of the issues in my Ajax Login application, feel free to fork it on GitHub.

If you're interested in talking more about Webapp Security, please leave a comment, meet me at Jazoon later this week or let's talk in July at Über Conf.

Posted in Java at Jun 21 2011, 07:45:41 AM MDT 4 Comments

Java Web Application Security - Part IV: Programmatic Login APIs

Over the last month, I've posted a number of articles on implementing authentication with Java EE 6, Spring Security and Apache Shiro. One of the things I demonstrated in my live demos (at Utah's JUG Meetings) was programmatic authentication. I left this out of my screencasts and previous tutorials because I thought it'd fit better in a comparison article.

In this article, I'd like to show you how you can programmatically login to an application using the aforementioned security frameworks. To do this, I'll be using my ajax-login application that I wrote for Implementing Ajax Authentication using jQuery, Spring Security and HTTPS.

To begin, I implemented a LoginController as a Spring MVC Controller that returns JSON.

package org.appfuse.examples.webapp.security;

import org.springframework.beans.factory.annotation.Autowired;
import org.springframework.beans.factory.annotation.Qualifier;
import org.springframework.stereotype.Controller;
import org.springframework.web.bind.annotation.RequestMapping;
import org.springframework.web.bind.annotation.RequestMethod;
import org.springframework.web.bind.annotation.RequestParam;
import org.springframework.web.bind.annotation.ResponseBody;

@Controller
@RequestMapping("/api/login.json")
public class LoginController {

    @Autowired
    LoginService loginService;

    @RequestMapping(method = RequestMethod.GET)
    @ResponseBody
    public LoginStatus getStatus() {
        return loginService.getStatus();
    }

    @RequestMapping(method = RequestMethod.POST)
    @ResponseBody
    public LoginStatus login(@RequestParam("j_username") String username,
                             @RequestParam("j_password") String password) {

        return loginService.login(username, password);
    }
}

This controller delegates its logic to a LoginService interface.

package org.appfuse.examples.webapp.security;

public interface LoginService {

  LoginStatus getStatus();

  LoginStatus login(String username, String password);
}

The Client
The client for this controller is the same as mentioned in my previous article, but I'll post it again for your convenience. I used jQuery and jQuery UI to implement a dialog that opens the login page on the same page rather than redirecting to the login page. The "#demo" locator refers to a button in the page.

var dialog = $('<div></div>');

$(document).ready(function() {
    $.get('/login?ajax=true', function(data) {
        dialog.html(data);
        dialog.dialog({
            autoOpen: false,
	       title: 'Authentication Required'
        });
    });

    $('#demo').click(function() {
      dialog.dialog('open');
      // prevent the default action, e.g., following a link
      return false;
    });
});

The login page then has the following JavaScript to add a click handler to the "login" button that submits the request securely to the LoginController.

var getHost = function() {
    var port = (window.location.port == "8080") ? ":8443" : "";
    return ((secure) ? 'https://' : 'http://') + window.location.hostname + port;
};

var loginFailed = function(data, status) {
    $(".error").remove();
    $('#username-label').before('
Login failed, please try again.
'); }; $("#login").live('click', function(e) { e.preventDefault(); $.ajax({url: getHost() + "${ctx}/api/login.json", type: "POST", beforeSend: function(xhr) { xhr.withCredentials = true; }, data: $("#loginForm").serialize(), success: function(data, status) { if (data.loggedIn) { // success dialog.dialog('close'); location.href = getHost() + '${ctx}/users'; } else { loginFailed(data); } }, error: loginFailed }); });

The biggest secret to making this all work (the HTTP -> HTTPS communication, which is considered cross-domain), is the window.name Transport and the jQuery plugin that implements it. To make this plugin work with Firefox 3.6, I had to implement a Filter that adds Access-Control headers.

public class OptionsHeadersFilter implements Filter {

    public void doFilter(ServletRequest req, ServletResponse res, FilterChain chain)
            throws IOException, ServletException {
        HttpServletResponse response = (HttpServletResponse) res;

        response.setHeader("Access-Control-Allow-Origin", "http://" + req.getServerName());
        response.setHeader("Access-Control-Allow-Methods", "GET,POST");
        response.setHeader("Access-Control-Max-Age", "360");
        response.setHeader("Access-Control-Allow-Headers", "x-requested-with");
        response.setHeader("Access-Control-Allow-Credentials", "true");

        chain.doFilter(req, res);
    }

    public void init(FilterConfig filterConfig) {
    }

    public void destroy() {
    }
}

Java EE 6 LoginService
Java EE 6 has a few new methods in HttpServletRequest:

  • authenticate(response)
  • login(user, pass)
  • logout()

In this example, I'll use the new login(username, password) method. The hardest part about getting this working was finding the right Maven dependency. At first, I tried the one that seemed to make the most sense:

<dependency>
    <groupId>javax</groupId>
    <artifactId>javaee-web-api</artifactId>
    <version>6.0</version>
</dependency>

Unfortunately, this resulted in a strange error that means the dependency has the interfaces, but not the implementation classes. I ended up using GlassFish's dependency instead (thanks to Stack Overflow for the tip).

<dependency>
    <groupId>org.glassfish</groupId>
    <artifactId>javax.servlet</artifactId>
    <version>3.0</version>
    <scope>provided</scope>
</dependency>

Since Servlet 3.0 doesn't appear to be in Maven Central, I had to add the GlassFish Repository to my pom.xml's <repositories> element.

<repository>
    <id>glassfish-repo</id>
    <url>http://download.java.net/maven/glassfish</url>
</repository>

After that, it was easy to implement the LoginService interface with a JavaEELoginService class:

package org.appfuse.examples.webapp.security;

import org.apache.commons.logging.Log;
import org.apache.commons.logging.LogFactory;
import org.springframework.beans.factory.annotation.Autowired;
import org.springframework.stereotype.Service;

import javax.servlet.ServletException;
import javax.servlet.http.HttpServletRequest;

@Service("javaeeLoginService")
public class JavaEELoginService implements LoginService {
    private Log log = LogFactory.getLog(JavaEELoginService.class);

    @Autowired
    HttpServletRequest request;

    public LoginStatus getStatus() {
        if (request.getRemoteUser() != null) {
            return new LoginStatus(true, request.getRemoteUser());
        } else {
            return new LoginStatus(false, null);
        }
    }

    @Override
    public LoginStatus login(String username, String password) {
        try {
            if (request.getRemoteUser() == null) {
                request.login(username, password);
                log.debug("Login succeeded!");
            }
            return new LoginStatus(true, request.getRemoteUser());
        } catch (ServletException e) {
            e.printStackTrace();
            return new LoginStatus(false, null);
        }
    }
}

I tried to use this with "mvn jetty:run" (with version 8.0.0.M2 of the jetty-maven-plugin), but I got the following error:

javax.servlet.ServletException
        at org.eclipse.jetty.server.Request.login(Request.java:1927)
        at sun.reflect.NativeMethodAccessorImpl.invoke0(Native Method)
        at sun.reflect.NativeMethodAccessorImpl.invoke(NativeMethodAccessorImpl.java:39)
        at sun.reflect.DelegatingMethodAccessorImpl.invoke(DelegatingMethodAccessorImpl.java:25)
        at java.lang.reflect.Method.invoke(Method.java:597)
        at org.springframework.beans.factory.support.AutowireUtils$ObjectFactoryDelegatingInvocationHandler.invoke(AutowireUtils.java:178)
        at $Proxy52.login(Unknown Source)
        at org.appfuse.examples.webapp.security.JavaEELoginService.login(JavaEELoginService.java:30)

This lead me to believe that Servlet 3 is not quite implemented, so I tried it with Tomcat 7.0.8. To support SSL and container-managed authentication, I had to create a certificate keystore and uncomment the SSL Connector in $CATALINA_HOME/conf/server.xml. I also had to add an "admin" user with roles="ROLE_ADMIN" to $CATALINA_HOME/conf/tomcat-users.xml.

<user username="admin" password="admin" roles="ROLE_ADMIN"/>

With Tomcat 7, I was able to login successfully, proven by the following logging.

DEBUG - JavaEELoginService.login(31) | Login succeeded!

However, in the UI, I still got a "Login failed, please try again." message. Recalling that I had some issues with ports previous, I configured Apache to proxy the default http/https ports to 8080/8443 and tried again. This time it worked!

Spring Security LoginService
Spring Security offers a programmatic API and I was able to implement its LoginService as follows:

package org.appfuse.examples.webapp.security;

import org.apache.commons.logging.Log;
import org.apache.commons.logging.LogFactory;
import org.appfuse.model.User;
import org.springframework.beans.factory.annotation.Autowired;
import org.springframework.beans.factory.annotation.Qualifier;
import org.springframework.security.authentication.AuthenticationManager;
import org.springframework.security.authentication.BadCredentialsException;
import org.springframework.security.authentication.UsernamePasswordAuthenticationToken;
import org.springframework.security.core.Authentication;
import org.springframework.security.core.context.SecurityContextHolder;
import org.springframework.stereotype.Service;

@Service("springLoginService")
public class SpringSecurityLoginService implements LoginService {
    private Log log = LogFactory.getLog(SpringSecurityLoginService.class);

    @Autowired(required = false)
    @Qualifier("authenticationManager")
    AuthenticationManager authenticationManager;

    public LoginStatus getStatus() {
        Authentication auth = SecurityContextHolder.getContext().getAuthentication();
        if (auth != null && !auth.getName().equals("anonymousUser") && auth.isAuthenticated()) {
            return new LoginStatus(true, auth.getName());
        } else {
            return new LoginStatus(false, null);
        }
    }

    public LoginStatus login(String username, String password) {
        UsernamePasswordAuthenticationToken token = new UsernamePasswordAuthenticationToken(username, password);
        User details = new User(username);
        token.setDetails(details);

        try {
            Authentication auth = authenticationManager.authenticate(token);
            log.debug("Login succeeded!");
            SecurityContextHolder.getContext().setAuthentication(auth);
            return new LoginStatus(auth.isAuthenticated(), auth.getName());
        } catch (BadCredentialsException e) {
            return new LoginStatus(false, null);
        }
    }
}

I then modified the LoginService dependency in LoginController so this implementation would be used.

@Autowired
@Qualifier("springLoginService")
LoginService loginService;

Since Spring's API doesn't depend on Servlet 3, I tried it in Jetty using "mvn jetty:run". Of course, I modified my web.xml accordingly for Spring Security before doing so. Interestingly enough, I found that the my SpringSecurityLoginService seemed to work:

DEBUG - SpringSecurityLoginService.login(39) | Login succeeded!

But in the UI, the login failed with a "Login failed, please try again." message. Using the standard ports with Apache in front of Jetty solved this issue.

Apache Shiro LoginService
Apache Shiro is nice enough to offer a programmatic API as well. I was able to implement a ShiroLoginService as follows:

package org.appfuse.examples.webapp.security;

import org.apache.commons.logging.Log;
import org.apache.commons.logging.LogFactory;
import org.apache.shiro.SecurityUtils;
import org.apache.shiro.authc.AuthenticationException;
import org.apache.shiro.authc.UsernamePasswordToken;
import org.apache.shiro.subject.Subject;
import org.springframework.stereotype.Service;

@Service("shiroLoginService")
public class ShiroLoginService implements LoginService {
    private Log log = LogFactory.getLog(ShiroLoginService.class);

    public LoginStatus getStatus() {
        Subject currentUser = SecurityUtils.getSubject();
        if (currentUser.isAuthenticated()) {
            return new LoginStatus(true, currentUser.getPrincipal().toString());
        } else {
            return new LoginStatus(false, null);
        }
    }

    public LoginStatus login(String username, String password) {
        if (!getStatus().isLoggedIn()) {
            UsernamePasswordToken token = new UsernamePasswordToken(username, password);
            Subject currentUser = SecurityUtils.getSubject();
            try {
                currentUser.login(token);
                log.debug("Login succeeded!");
                return new LoginStatus(currentUser.isAuthenticated(),
                        currentUser.getPrincipal().toString());
            } catch (AuthenticationException e) {
                return new LoginStatus(false, null);
            }

        } else {
            return getStatus();
        }
    }
}

Then I modified the LoginService dependency in LoginController so this implementation would be used.

@Autowired
@Qualifier("shiroLoginService")
LoginService loginService;

Next, I modified my web.xml for Apache Shiro and tried "mvn jetty:run". Again, the login appeared to succeed (based on log messages) on the server, but failed in the UI. When using http://localhost instead of http://localhost:8080, everything worked fine.

Summary
This article has shown you how you can programmatically login using Java EE 6, Spring Security and Apache Shiro. Before Java EE 6 (and Servlet 3), there was no API to programmatically login, so this is a welcome addition. The fact that my Ajax login example didn't work when ports differed is because of browsers' same origin policy, which specifies the ports have to be the same. Specifying no ports (the defaults), seems to be the loophole.

On a related note, I've discovered some interesting articles recently from the AppSec Blog.

The 2nd article has an interesting paragraph:

... there's Apache Shiro (FKA JSecurity and then later as Apache Ki), another secure framework for Java apps. Although it looks simpler to use and understand than ESAPI and covers most of the main security bases (authentication, authorization, session management and encryption), it doesn't help take care of important functions like input validation and output encoding. And Spring users have Spring Security (Acegi) a comprehensive, but heavyweight authorization and authentication framework.

So according to this blog, the security frameworks discussed here aren't the best.

The most comprehensive, up-to-date choice for Java developers is OWASP's ESAPI Enterprise Security API especially now that the 2.0 release has just come out.

I haven't heard of many organizations adopting ESAPI over Java EE 6, Spring Security or Apache Shiro, but maybe I'm wrong. Is ESAPI something that's being used out there by companies?

Posted in Java at Jun 06 2011, 09:44:09 PM MDT 4 Comments