

Developing an iOS Native App with Ionic
In my current project, I've been helping a client develop a native iOS app for their customers. It's written mostly in Objective-C and talks to a REST API. I talked about how we documented our REST API a couple days ago. We developed a prototype for this application back in December, using AngularJS and Bootstrap. Rather than using PhoneGap, we loaded our app in a UIWebView.
It all seemed to work well until we needed to read an activation code with the device's camera. Since we didn't know how to do OCR in JavaScript, we figured a mostly-native app was the way to go. We hired an outside company to do iOS development in January and they've been developing the app since the beginning of February. In the last couple weeks, we encountered some screens that seemed fitting for HTML5, so we turned back to our AngularJS prototype.
The prototype used Bootstrap heavily, but we quickly learned it didn't look like an iOS 7 app, which is what our UX Designer requested. A co-worker pointed out Ionic, developed by Drifty. It's basically Bootstrap for Native, so the apps you develop look and behave like a mobile application.
What is Ionic?
Free and open source, Ionic offers a library of mobile-optimized HTML, CSS and JS components for building highly interactive apps. Built with Sass and optimized for AngularJS.
I started developing with Ionic a few weeks ago. Using its CSS classes and AngularJS directives, I was able to create several new screens in a matter of days. Most of the time, I was learning new things: how to override its back button behavior (to launch back into the native app), how to configure routes with ui-router, and how to make the $ionicLoading service look native. Now that I know a lot of the basics, I feel like I can really crank out some code.
Tip: I learned how subviews work with ui-router thanks to a YouTube video of Tim Kindberg on Angular UI-Router. However, subviews never fully made sense until I saw Jared Bell's diagram.
To demonstrate how easy it is to use Ionic, I whipped up a quick example application. You can get the source on GitHub at https://github.com/mraible/boot-ionic. The app is a refactored version of Josh Long's x-auth-security that uses Ionic instead of raw AngularJS and Bootstrap. To keep things simple, I did not develop the native app that wraps the HTML.
Below are the steps I used to convert from AngularJS + Bootstrap to Ionic. If you want to convert a simple AngularJS app to use Ionic, hopefully this will help.
1. Download Ionic and add it to your project.
Ionic 1.0 Beta was released earlier this week. You can download it from here. Add its files to your project. In this example, I added them to src/main/resources/public. In my index.html, I removed Bootstrap's CSS and replaced it with Ionic's.
-    <link href="webjars/bootstrap/3.1.1/css/bootstrap.min.css" rel="stylesheet">
+    <link rel="stylesheet" href="css/ionic.css"/>
  </head>
-<body style="padding-top: 60px">
+<body>
Next, I replaced Angular, Bootstrap and jQuery's JavaScript references.
-    <script src="webjars/jquery/2.0.3/jquery.js"></script>
-    <script src="webjars/bootstrap/3.1.1/js/bootstrap.min.js"></script>
-    <script src="webjars/angularjs/1.2.13/angular.js"></script>
+    <script src="js/ionic.bundle.js"></script>
     <script src="webjars/angularjs/1.2.13/angular-resource.js"></script>
-    <script src="webjars/angularjs/1.2.13/angular-route.js"></script>
     <script src="webjars/angularjs/1.2.13/angular-cookies.js"></script>
What about WebJars?
You might ask - why not use WebJars? You can, once this pull request is accepted and an updated version is deployed to Maven central. Here's how the application would change.
2. Change from Angular's Router to ui-router.
Ionic uses ui-router for matching URLs and loading particular pages.
The raw Angular routing looks pretty similar to how it does with ui-router, except it uses a
$stateProvider
service instead of $routeProvider. You'll notice I also added 'ionic' as a dependency.
-angular.module('exampleApp', ['ngRoute', 'ngCookies', 'exampleApp.services'])
+angular.module('exampleApp', ['ionic', 'ngCookies', 'exampleApp.services'])
 	.config(
-		[ '$routeProvider', '$locationProvider', '$httpProvider', function($routeProvider, $locationProvider, $httpProvider) {
+		[ '$stateProvider', '$urlRouterProvider', '$httpProvider', function($stateProvider, $urlRouterProvider, $httpProvider) {

-	    $routeProvider.when('/create', { templateUrl: 'partials/create.html', controller: CreateController});
+           $stateProvider.state('create', {url: '/create', templateUrl: 'partials/create.html', controller: CreateController})
+               .state('edit', {url: '/edit/:id', templateUrl: 'partials/edit.html', controller: EditController})
+               .state('login', {url: '/login', templateUrl: 'partials/login.html', controller: LoginController})
+               .state('index', {url: '/index', templateUrl: 'partials/index.html', controller: IndexController});

-	    $routeProvider.when('/edit/:id', { templateUrl: 'partials/edit.html', controller: EditController});
-	    $routeProvider.when('/login', { templateUrl: 'partials/login.html', controller: LoginController});
-	    $routeProvider.otherwise({templateUrl: 'partials/index.html', controller: IndexController});
-
-	    $locationProvider.hashPrefix('!');
+	    $urlRouterProvider.otherwise('/index');
3. Add Ionic elements to your index.html.
In contrast to Bootstrap's navbar, Ionic has header and footer elements. Rather than using a ng-view directive, you use an <ion-nav-view>. It's a pretty slick setup once you understand it, especially since they allow you to easily override back-button behavior and nav buttons.
-    <nav class="navbar navbar-fixed-top navbar-default" role="navigation">
-        <!-- lots of HTML here -->
-    </nav>
-
-    <div class="container">
-        <div class="alert alert-danger" ng-show="error">{{error}}</div>
-        <div ng-view></div>
-    </div>
+    <ion-nav-bar class="bar-positive nav-title-slide-ios7"></ion-nav-bar>
+    <ion-nav-view animation="slide-left-right">
+        <div class="alert alert-danger" ng-show="error">{{error}}</div>
+    </ion-nav-view>
+    <ion-footer-bar class="bar-dark" ng-show="user">
+        <button class="button button-assertive" ng-click="logout()">
+            Logout
+        </button>
+    </ion-footer-bar>
4. Change your templates to use <ion-view> and <ion-content>.
After routes are migrated and basic navigation is working, you'll need to modify your templates to use <ion-view> and <ion-content>. Here's a diff from the most complicated page in the app.
-<div style="float: right">
-	<a href="#!/create" class="btn btn-default" ng-show="hasRole('ROLE_ADMIN')">Create</a>
-</div>
-<div class="page-header">
-	<h3>News</h3>
-</div>
+<ion-view title="News">
+    <ion-content>
+        <ion-nav-buttons side="left">
+            <div class="buttons" ng-show="hasRole('ROLE_ADMIN')">
+                <button class="button button-icon icon ion-ios7-minus-outline"
+                        ng-click="data.showDelete = !data.showDelete"></button>
+            </div>
+        </ion-nav-buttons>
+        <ion-nav-buttons side="right">
+            <a href="#/create" class="button button-icon icon ion-ios7-plus-outline"
+               ng-show="hasRole('ROLE_ADMIN')"></a>
+        </ion-nav-buttons>

-<div ng-repeat="newsEntry in newsEntries">
-	<hr />
-	<div class="pull-right">
-		<a ng-click="deleteEntry(newsEntry)" class="btn btn-xs btn-default" ng-show="hasRole('ROLE_ADMIN')">Remove</a>
-		<a href="#!/edit/{{newsEntry.id}}" class="btn btn-xs btn-default" ng-show="hasRole('ROLE_ADMIN')">Edit</a>
-	</div>
-	<h4>{{newsEntry.date | date}}</h4>
-	<p>{{newsEntry.content}}</p>
-</div>
-<hr />
+        <ion-list show-delete="data.showDelete" on-delete="deleteEntry(item)"
+                  option-buttons="itemButtons" can-swipe="hasRole('ROLE_ADMIN')">
+            <ion-item ng-repeat="newsEntry in newsEntries" item="newsEntry">
+                <h4>{{newsEntry.date | date}}</h4>
+                <p>{{newsEntry.content}}</p>
+            </ion-item>
+        </ion-list>
+    </ion-content>
+</ion-view>
I did migrate to use an <ion-list> with delete/options buttons, so some additional JavaScript changes were needed.
-function IndexController($scope, NewsService) {
+function IndexController($scope, $state, NewsService) {

    $scope.newsEntries = NewsService.query();

+     $scope.data = {
+         showDelete: false
+     };
+
    $scope.deleteEntry = function(newsEntry) {
         newsEntry.$remove(function() {
              $scope.newsEntries = NewsService.query();
         });
    };
+
+     $scope.itemButtons = [{
+         text: 'Edit',
+         type: 'button-assertive',
+         onTap: function (item) {
+              $state.go('edit', {id: item.id});
+         }
+     }];
}
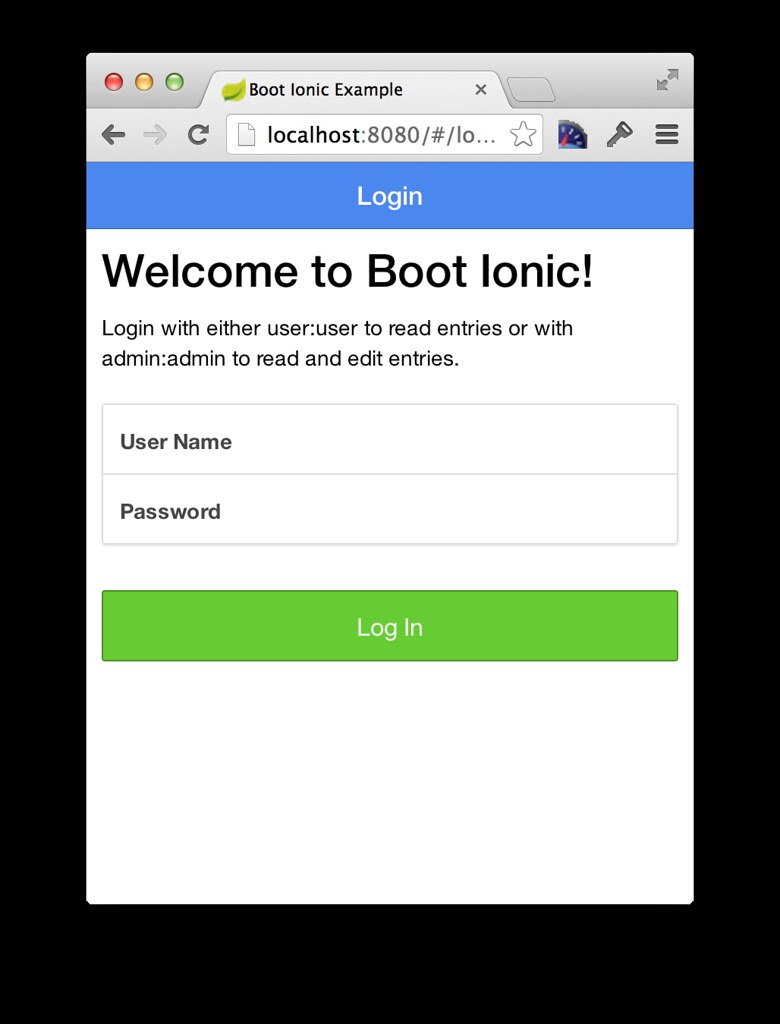
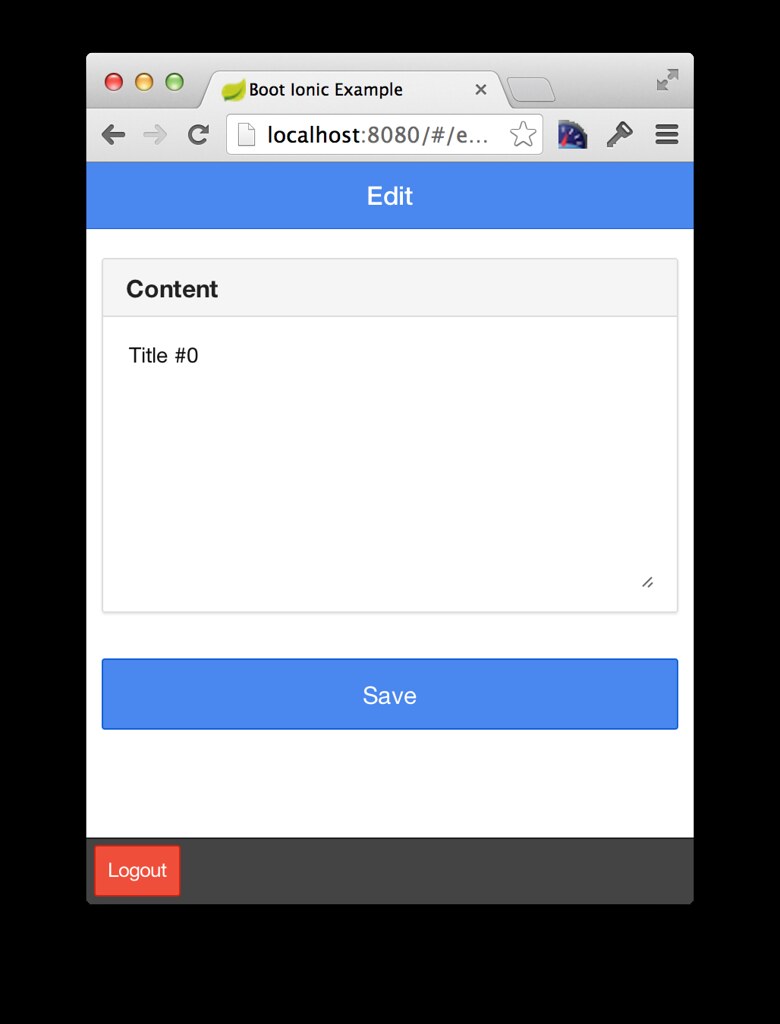
Screenshots
After making all these changes, the app looks pretty good in Chrome.


Tips and Tricks
In additional to figuring out how to use Ionic, I discovered a few other tidbits along the way. First of all, we had a different default color for the header. Since Ionic uses generic color names (e.g. light, stable, positive, calm), I found it easy to change the default value for "positive" and then continue to use their class names.
Modifying CSS variable colors
To modify the base color for "positive", I cloned the source, and
modified scss/_variables.scss.
$light: #fff !default;
$stable: #f8f8f8 !default;
-$positive: #4a87ee !default;
+$positive: #589199 !default;
$calm: #43cee6 !default;
$balanced: #66cc33 !default;
$energized: #f0b840 !default;
After making this change, I ran "grunt" and copied dist/css/ionic.css into our project.
iOS Native Integration
Our app uses a similar token-based authentication mechanism as x-auth-security, except its backed by Crowd.
However, since users won't be logging directly into the Ionic app, we added
the "else" clause in app.js to allow a token to be passed in via URL. We also allowed the backend API
path to be overridden.
/* Try getting valid user from cookie or go to login page */
var originalPath = $location.path();
$location.path("/login");
var user = $cookieStore.get('user');

if (user !== undefined) {
    $rootScope.user = user;
    $http.defaults.headers.common[xAuthTokenHeaderName] = user.token;
    $location.path(originalPath);
} else {
    // token passed in from native app
    var authToken = $location.search().token;
    if (authToken) {
        $http.defaults.headers.common['X-Auth-Token'] = authToken;
    }
}

// allow overriding the base API path
$rootScope.apiPath = '/api/v1.0';
if ($location.search().apiPath) {
    $rootScope.apiPath = $location.search().apiPath;
}
By adding this logic, the iOS app can pull up any particular page in a webview and let the Ionic app talk to the API. Here's what the Objective-C code looks like:
NSString *versionNumber = @"v1.0";
NSString *apiPath = @"https://server.com/api/";
NSString *authToken = [TemporaryDataStore sharedInstance].authToken;
// webapp is a symbolic link to the Ionic app, created with Angular Seed
NSString *htmlFilePath = [[NSBundle mainBundle] pathForResource:@"index" ofType:@"html" inDirectory:@"webapp/app"];

// Note: We need to do it this way because 'fileURLWithPath:' would encode the '#' to '%23" which breaks the html page
NSURL *htmlFileURL = [NSURL fileURLWithPath:htmlFilePath];

NSString *webappURLPath = [NSString stringWithFormat:@"%@#/news?apiPath=%@%@&token=%@",
                           htmlFileURL.absoluteString, apiPath, versionNumber, authToken];

// Now convert the string to a URL (doesn't seem to encode the '#' this way)
NSURL *webappURL = [NSURL URLWithString:webappURLPath];
[super updateWithURL:webappURL];
We also had to write some logic to navigate back to the native app. We used a custom URL scheme to do this, and the Ionic app simply called it. To override the default back button, I added an "ng-controller" attribute to <ion-nav-bar> and added a custom back button.
<ion-nav-bar class="bar-positive nav-title-slide-ios7" ng-controller="NavController">
    <ion-nav-back-button class="button-icon" ng-click="goBack()">
        <i class="ion-arrow-left-c"></i>
    </ion-nav-back-button>
</ion-nav-bar>
To detect if the app was loaded by iOS (vs. a browser, which we tested in), we used the following logic:
// set native app indicator
if (document.location.toString().indexOf('appName.app') > -1) {
    $rootScope.isNative = true;
}
Our Ionic app has three entry points, defined by "stateName1", "stateName2" and "stateName3" in this example. The code for our NavController handles navigating back normally (when in a browser) or back to the native app. The "appName" reference below is a 3-letter acronym we used for our app.
.controller('NavController', function($scope, $ionicNavBarDelegate, $state) {
    $scope.goBack = function() {
        if ($scope.isNative && backToNative($state)) {
            location.href='appName-ios://back';
        } else {
            $ionicNavBarDelegate.back();
        }
    };

    function backToNative($state) {
        var entryPoints = ['stateName1', 'stateName2', 'stateName3'];
        return entryPoints.some(function (entry) {
            return $state.current === $state.get(entry);
        });
    }
})
Summary
I've enjoyed working with Ionic over the last month. The biggest change I've had to make to our AngularJS app has been to integrate ui-router. Apart from this, the JavaScript didn't change much. However, the HTML had to change quite a bit. As far as CSS is concerned, I found myself tweaking things to fit our designs, but less so than I did with Bootstrap. When I've run into issues with Ionic, the community has been very helpful on their forum. It's the first forum I've used that's powered by Discourse, and I dig it.
You can find the source from this article in my boot-ionic project. Clone it and run "mvn spring-boot:run", then open http://localhost:8080.
If you're looking to create a native app using HTML5 technologies, I highly recommend you take a look at Ionic. We're glad we did. Angular 2.0 will target mobile apps and Ionic is already making them look pretty damn good.
Posted by fanturi on March 28, 2014 at 01:08 PM MDT #
did you take a look at Codename One?
You could just do the camera processing stuff in Java with GC for iOS/Android/Windows Phone etc. We have barcode/QR code scanning builtin as well as a ton of other things with a very Swing like API. I'm guessing its a bit late for this project but if you need another mobile app I'm sure we can help you get started.
Posted by Shai Almog on April 07, 2014 at 07:33 PM MDT #
Matt,
What are your thoughts on Famo.us API?
Thanks
Sujay
Posted by Sujay Dutta on August 11, 2014 at 04:02 PM MDT #
Hi,
I have intention to do something similar as you did. Last week I made some workaround related with ionic fmwork. Anyways,today I have encountered with you example, I would like to run of your example however I faced off with an error:
@Api("User") cannot resolve
I actually couldn't figure what exactly "@api"
I would appreciate if you can describe what exactly does in that line and what could be solution for my error.
Posted by ralph buenotte on December 29, 2015 at 01:36 PM MST #
Posted by Matt Raible on December 29, 2015 at 02:46 PM MST #
Posted by ralph buenotte on December 29, 2015 at 05:13 PM MST #
Ralph: It's probably easiest if you open an issue on the GitHub project and we can discuss it there.
Thanks!
Posted by Matt Raible on December 29, 2015 at 08:28 PM MST #
Posted by juan on June 08, 2016 at 06:09 PM MDT #
Posted by Matt Raible on June 15, 2016 at 03:09 AM MDT #