Setting up a Minecraft Server in the Cloud
 My 10-year-old son, Jack, is a huge fan of Minecraft. If you let him,
he'd play all day, skipping meals and having a blast. It's most fun to hear him playing with his sister or
his best friend. I'm amazed it's captured his attention for so long; well over two years. Both my kids loved it when
Scott Davis taught a Devoxx4Kids Denver class on
Server-side Minecraft programming.
We haven't had any Devoxx4Kids Denver workshops this year, but that's about to change. First of all, I'm happy to announce we're working with the Rocky Mountain Oracle Users Group to have a Day of Family Coding Fun at Elitch Gardens this Friday. There will be a workshop on Raspberry Pi and I'll be doing a demonstration on how to setup a Minecraft Server in the cloud. Next weekend, we'll be doing a more in-depth Minecraft Workshop at Devoxx4Kids Denver. If you'd like to join us please RSVP. Since having your own Minecraft Server is a fun thing for kids, and useful for parents, I figured I'd document how to do it here.
First of all, let me say that I'm standing on the shoulders of giants. When I first setup a Minecraft server, I used Ben Garton's Setting up a free Minecraft server in the cloud - part 1 as well as part 2 and 3. I also found Aaron Bell's How to run a Minecraft server on Amazon EC2 to be quite useful.
Without further ado, here's you how to setup a Minecraft Server on Amazon Web Services (AWS) in 2015!
Step 1: Signup for AWS and Create an Instance
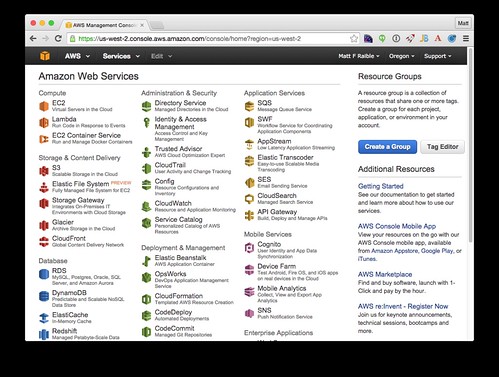
- Navigate to http://aws.amazon.com/, and click "Sign In to the Console" using your Amazon account. If you don't have an AWS account, you'll need to create one and specify a payment method.
Click on EC2 in the top left corner, then Launch Instance on the following screen.
-
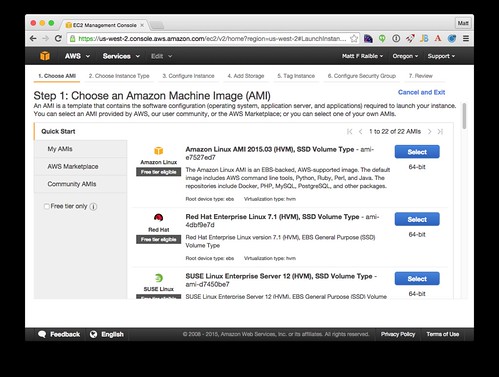
Select Amazon Linux.
-
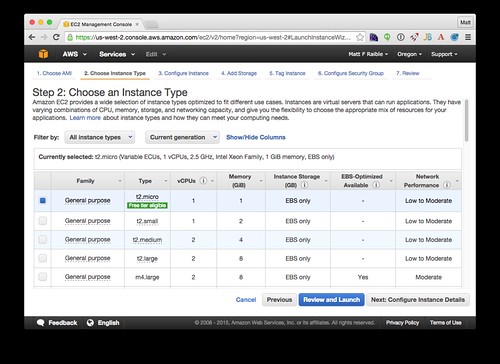
Choose an Instance Type of t2.micro, then click Next: Configure Instance Details.
- You don't need to configure anything on the next screen, so click Next: Add Storage. Storage settings don't need to be changed either, so click Next: Tag Instance.
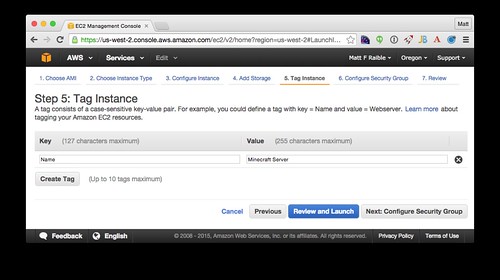
On the Tag Instance screen, assign a name to your server. I chose "Minecraft Server". Click Next: Configure Security Group to continue.
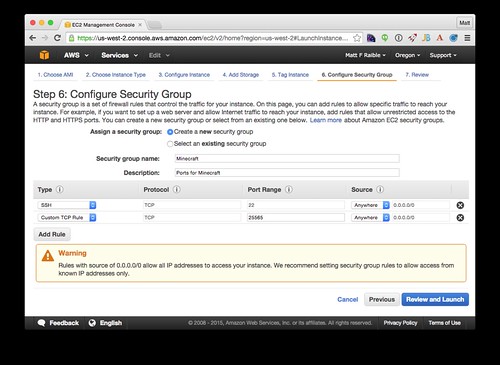
This step is important because it opens a Minecraft port that allows players to connect. Create a new security group with name Minecraft and description Ports for Minecraft. Click Add Rule, specify Custom TCP Rule, Port Range 25565 and Source Anywhere. Note that you can also lock down your instance so only certain IPs can connect. Click Review and Launch to continue.
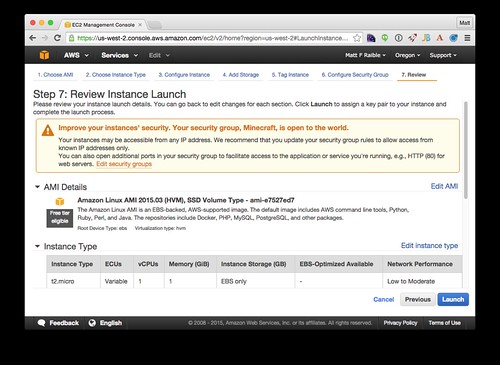
You'll be warned about allowing any IP address on the following screen. Click Launch to continue.
-
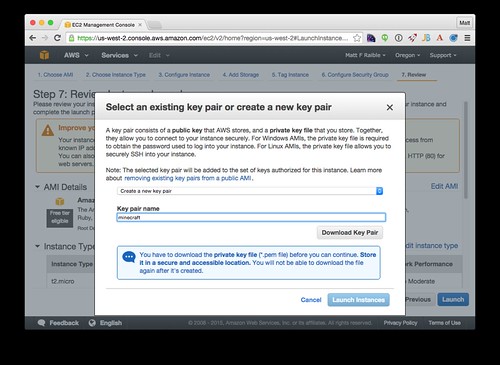
You'll be prompted to create a new keypair. I chose "minecraft" for my key pair name. Click Download to download your key pair.
I executed the following commands to move this key to a location on my hard drive and locked it down so the public can't view it.
mv ~/Downloads/minecraft.pem ~/.ssh/.
chmod 400 .ssh/minecraft.pem
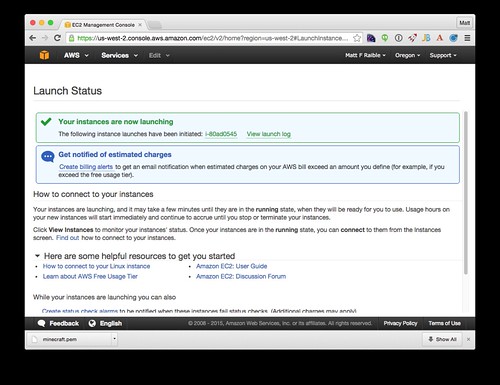
Click Launch Instances to continue. You should see something like the following screen.
-
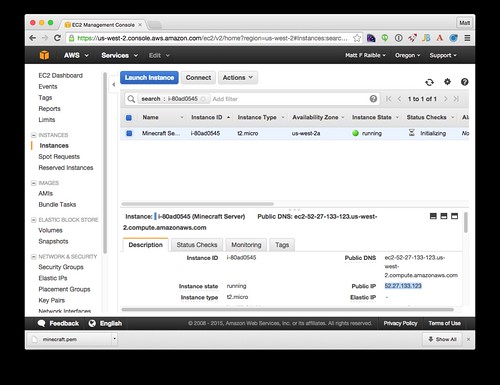
Click on the instance name and copy/paste the Public IP. You'll want to write down this IP address since you'll need it later, and you'll also want to send it to friends so they can join.
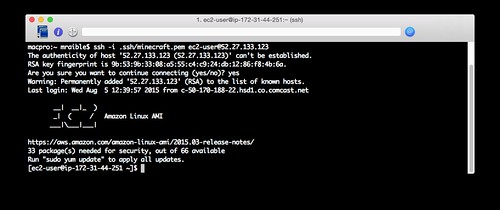
Execute the following command with this IP to connect to your server. Type yes when prompted to continue connecting.
ssh -i .ssh/minecraft.pem ec2-user@your-public-ip
You'll likely be told there's a number of updates to install; run sudo yum update to install them.
Step 2: Install a Minecraft Server
From your Linux prompt, type the following commands to create a folder and copy the latest version* of the Minecraft server into it.
mkdir MinecraftServer
cd MinecraftServer
wget https://s3.amazonaws.com/Minecraft.Download/versions/1.8.8/minecraft_server.1.8.8.jar
* Check http://www.minecraft.net/download to find out the latest version number and change the above command appropriately.
- Create a symlink to the downloaded JAR so you can keep the same launch command, regardless of version.
ln -s minecraft_server.1.8.8.jar minecraft_server.jar
Launch your server using the following command:
sudo java -Xmx1G -Xms1G -jar
minecraft_server.jar nogui
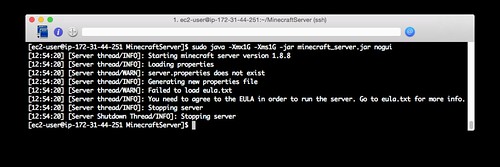
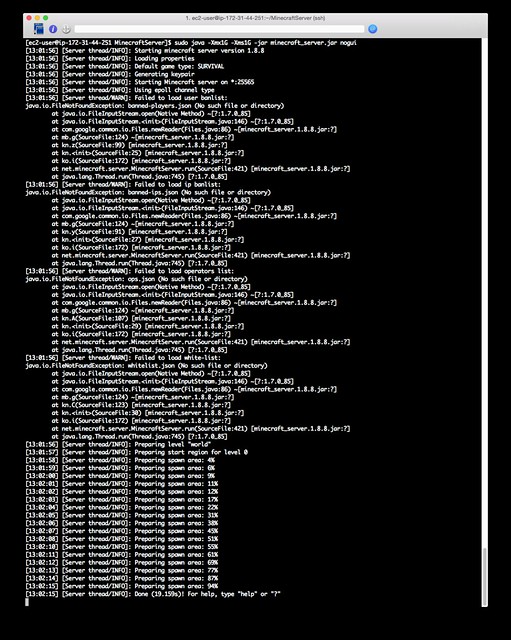
You should see ouput like the screenshot below, prompting you to agree to the EULA.
Edit
eula.txtby running sudo vi eula.txt and changing "eula=false" to "eula=true". If you're unfamiliar with vi, the following instructions will help you edit this file after you've opened it.- Type "/false" followed by [Return]
- Type "xxxxx" to delete "false"
- [Shift+A] to go to the end of the line
- Type "true"
- Hit [Esc], then type ":wq" to save the file
Run the sudo java command again (hitting up arrow twice will retrieve this command from your history). This time, the server should start, albeit with a few warnings about missing files.
This is the easiest step of all, and possibly one that your kids are familiar with.
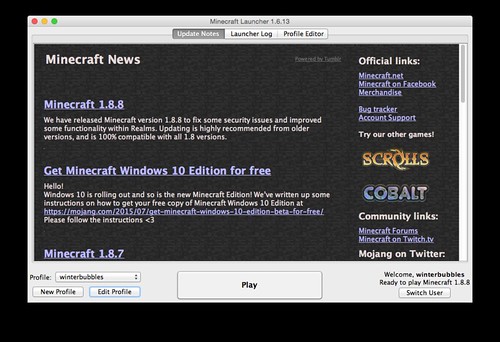
Launch Minecraft. Make sure the profile uses the same version as your server. Copy the IP address of your server to your clipboard and click Play.
Click Multiplayer, followed by Add Server. Give it a name you'll remember and paste the IP address into the Server Address. Click Done, followed by Join Server.
Note: if you want to toggle fullscreen mode, you can do this with F11. If you don't have F11 on your keyboard, go to Options > Video Settings and click Fullscreen to toggle it.
Congratulations! You just setup a Minecraft server in the cloud. Now you can send the IP address to friends and invite them to play!
One of the issues that this setup has is that your server will shut down as soon as you logout of your SSH session. You can run the Minecraft server and leave it running using the following command.
nohup sudo java -Xmx1G -Xms1G -jar minecraft_server.jar nogui > minecraft.log 2>&1 &
This will keep everything running in the background, even after you logout. It also spits out a process id you can use to stop the server.
kill -9 processId
If you lose this number, you can find the process id by running ps aux | grep java. You can also
shutdown all Java processes with
sudo killall java.
If you have any tips or tricks for improving this tutorial, I'd love to hear about them in the comments.
Next Steps
When I first setup a Minecraft server on AWS earlier this year, I never bothered to shut it down. The result was it
cost me around $15 the first month. From then on, I simply started it whenever my son asked me to, then shut it down when he went to bed.
Ben Garton has a good tutorial on how to setup a cron job to shutdown the instance at midnight. He also shows how to start the server using a Desktop shortcut on Windows. If you've done something similar for Mac/Linux, I'd love to hear about it. Allowing your kid to fire up their own Minecraft server on demand (and shutting it down automatically) seems to be the most economical way to run things.
Devoxx4Kids Denver Workshop Next Week
If you'd like to learn more about Minecraft, developing mods and setting up your own server, you should join us at
the Devoxx4Kids Denver Meetup next week (Saturday, August 15th at 9:30am). We'll be tuning in live to
Arun and Aditya Gupta's vJUG
session
on Getting Started with Minecraft Modding. In the
second hour,
I'll show how to setup your own server on AWS and configure it to have the mods we've developed while watching the
vJUG session. Thanks to our venue sponsor Tuliva, you don't even need to bring
a machine! They have computers available for the kids to use and a sweet location too. RSVP today!
Related: It seems you can also run a Minecraft server on Heroku using heroku-minecraft.

I actually tried setting up a Minecraft server on Digital Ocean...it worked well enough, but a big enough droplet instance to support as many users as I needed to support, using a customized server modpack, was at least $40 a month.
I wound up doing better with a dedicated Minecraft-hosting service, Bisect Hosting. I pay about $20 a month for a server which can support 60 users (far more than we need), and it fully supports customized server modpacks.
For future exploration, you might look at Minecraft mods and modpacks. Mods are, like Minecraft itself, written in Java, and there's a fairly-standard API (Minecraft Forge) that most of them use. We use a customized modpack that I created (easy enough to do with the Technic Launcher system), with about 60 mods. They extend the game in various nifty ways. If you've ever wanted to have a nuclear reactor in Minecraft, there are mods that let you do that...
Posted by Erbo on August 05, 2015 at 09:30 PM MDT #
Posted by Raible Designs on August 19, 2015 at 02:54 PM MDT #
Posted by Netizen on April 08, 2016 at 07:37 PM MDT #
Posted by Matt on May 01, 2016 at 12:04 AM MDT #
Posted by Matt Raible on May 02, 2016 at 02:30 PM MDT #
Posted by Wyrd on June 28, 2016 at 10:47 PM MDT #
Posted by Matt Raible on June 29, 2016 at 12:31 AM MDT #
Posted by Asaf Add on February 22, 2017 at 05:36 AM MST #
A AWS Micro server will not be enough to sufficiently and reliably host more then 2-4 users... if you plan to host the server seriously and have any significant amount of users playing then you'll need to add a bit more Ram (16GB) and Storage (I run about 500Gb, just in case) during the instance setup process and choose one of the medium or large instances.
Also you can do this (Ubuntu) to have it auto-start and also run as a service.
(read this article) https://minecraft.gamepedia.com/Tutorials/Ubuntu_startup_script
Goes through and shows you how to create a separate user and group under ubuntu to have the server running, and also sets up a /etc/init script to run on reboot.
Note: the article doesn't explicitly say it and assumes you have upstart installed already but if it's a new server you'll need to run these commands first.
Posted by Rob Wence on August 27, 2017 at 06:36 AM MDT #
When typing out
sudo java -Xmx1G -Xms1G -jar minecraft_server.jar nogui, I get:Please help! :D
Posted by Daniel McLaughlin on November 24, 2017 at 11:07 PM MST #
Posted by Matt Raible on November 27, 2017 at 01:21 PM MST #
Hello,
Thank you for the great tutorial!
I have the same errors come that Daniel McLaughlin had back on 11/27/2017.
Matt Raible was kind enough to reply pretty quickly, but Matt, I am not sure how to upgrade the Jave to Jave 8, would you please provide a few instructions for upgrade the Java version when you have the time.
Thank you for your great work and for your time, Happy Holidays! :)
Matthew
Posted by Matthew on December 18, 2017 at 04:45 AM MST #
Posted by Jay Drake on April 21, 2019 at 04:30 PM MDT #
A few suggestions I had from my own issues:
On step 10 of step 1, if you are not running linux and running windows it will not work, but this article should help: https://linuxacademy.com/guide/17385-use-putty-to-access-ec2-linux-instances-via-ssh-from-windows/
On step 1 of step 2, Minecraft changed the download location, so simply changing the number won't work. Here's the most recent download link you should use instead: https://launcher.mojang.com/v1/objects/3dc3d84a581f14691199cf6831b71ed1296a9fdf/server.jar
In case there is an update, check the "inspect element" of the download button on minecraft.net and copy the new link to download.
Step 2 and 3 of step 2 replace "minecraft_server.1.8.8.jar" with "server.jar"
If you get the error:
Go here and follow all of the steps, then come back: https://blog.knoldus.com/installing-latest-oracle-jdk-on-linux-ec2-instance-centos/
And NEVER proceed to the next step until you get the confirmation that everything that was supposed to happen happened.
Okay that's it hope it helped, good luck.
Posted by Your Mom on September 20, 2019 at 12:45 AM MDT #
Posted by Your Mom on October 13, 2019 at 10:49 PM MDT #
MC server is up in AWS but ... unable to connect to server.
NMAP shows:
Nmap done: 1 IP address (1 host up) scanned in 21.94 seconds
So it appears that my SG isn't open enough - right? (nope) my SG is configured with the appropriates ports open. This also happens on a different instance/vpc/sg, etc that is wide open 0.0.0.0/0 as inbound. Same problem. weird.
Also:
I thought that this would be sufficient to connect but I guess not. what could be the problem?
Posted by MineCraft for AWS on December 23, 2019 at 12:05 AM MST #
Did this in Terraform. 3 commands, 5 minutes, good to go. 2 commands and 5 more minutes and it's all gone. Working on backup/restore to S3 on destroy/deploy to maintain world persistence between sessions.
provider "aws" {
  region = "us-east-2"
}

 resource "aws_eip_association" "eipa-minecraft" {
  instance_id   = "${aws_instance.ec2-tf-minecraft.id}"
  allocation_id = "eipalloc-0f3358f991f948098"
}

resource "aws_security_group" "instance" {
  name     = "sec-minecraft"

  ingress {
    from_port   = 22
    to_port     = 22
    protocol    = "tcp"
    cidr_blocks = ["ip"]
  }

  ingress {
    from_port   = 25565
    to_port     = 25565
    protocol    = "tcp"
    cidr_blocks = ["ip"]
  }

  egress {
    from_port   = 0
    to_port     = 0
    protocol    = "-1"
    cidr_blocks = ["0.0.0.0/0"]
  }
}


resource "aws_instance" "ec2-tf-minecraft" {
  ami                    = "ami-0dacb0c129b49f529"
  instance_type          = "t2.medium"
  key_name               = "AWSKey2"
  vpc_security_group_ids = [aws_security_group.instance.id]
  subnet_id              = "subnet-bc9db7d4"

    tags = {
    Name = "ec2-tf-minecraft"
  }

  user_data = <<-EOF

#!/bin/bash

yum update -y && yum upgrade -y
yum install git wget "Development Tools" java-1.8.0-openjdk-headless git -y

mkdir -p /opt/minecraft/{backups,tools,server}
useradd -r -m -U -d /opt/minecraft -s /bin/bash minecraft
usermod -aG wheel minecraft

cd /opt/minecraft/tools && git clone https:/github.com/Tiiffi/mcrcon.git && cd /opt/minecraft/tools/mcrcon
gcc -std=gnu11 -pedantic -Wall -Wextra -O2 -s -o mcrcon mcrcon.c
./mcrcon -h

cd /opt/minecraft/server
wget https://launcher.mojang.com/v1/objects/4d1826eebac84847c71a77f9349cc22afd0cf0a1/server.jar

java -Xmx1024M -Xms512M -jar server.jar nogui
pkill -f '/usr/bin/java -Xmx1024M -Xms512M -jar server.jar nogui'
rm /opt/minecraft/server/eula.txt -f
echo "#By changing the setting below to TRUE you are indicating your agreement to our EULA (https:/account.mojang.com/documents/minecraft_eula)." >> /opt/minecraft/server/eula.txt
echo "#Sun May 19 23:41:45 PDT 2019" >> /opt/minecraft/server/eula.txt
echo "eula=true" >> /opt/minecraft/server/eula.txt
rm /opt/minecraft/server/server.properties -f

echo "#Minecraft server properties" >> /opt/minecraft/server/server.properties
echo "#Sat Dec 07 21:18:52 UTC 2019" >> /opt/minecraft/server/server.properties
echo "spawn-protection=16" >> /opt/minecraft/server/server.properties
echo "max-tick-time=60000" >> /opt/minecraft/server/server.properties
echo "query.port=25565" >> /opt/minecraft/server/server.properties
echo "generator-settings=" >> /opt/minecraft/server/server.properties
echo "force-gamemode=true" >> /opt/minecraft/server/server.properties
echo "allow-nether=true" >> /opt/minecraft/server/server.properties
echo "enforce-whitelist=false" >> /opt/minecraft/server/server.properties
echo "gamemode=creative" >> /opt/minecraft/server/server.properties
echo "broadcast-console-to-ops=true" >> /opt/minecraft/server/server.properties
echo "enable-query=false" >> /opt/minecraft/server/server.properties
echo "player-idle-timeout=0" >> /opt/minecraft/server/server.properties
echo "difficulty=easy" >> /opt/minecraft/server/server.properties
echo "spawn-monsters=true" >> /opt/minecraft/server/server.properties
echo "broadcast-rcon-to-ops=true" >> /opt/minecraft/server/server.properties
echo "op-permission-level=4" >> /opt/minecraft/server/server.properties
echo "pvp=true" >> /opt/minecraft/server/server.properties
echo "snooper-enabled=true" >> /opt/minecraft/server/server.properties
echo "level-type=default" >> /opt/minecraft/server/server.properties
echo "hardcore=false" >> /opt/minecraft/server/server.properties
echo "enable-command-block=false" >> /opt/minecraft/server/server.properties
echo "max-players=20" >> /opt/minecraft/server/server.properties
echo "network-compression-threshold=256" >> /opt/minecraft/server/server.properties
echo "resource-pack-sha1=" >> /opt/minecraft/server/server.properties
echo "max-world-size=29999984" >> /opt/minecraft/server/server.properties
echo "function-permission-level=2" >> /opt/minecraft/server/server.properties
echo "rcon.port=25575" >> /opt/minecraft/server/server.properties
echo "server-port=25565" >> /opt/minecraft/server/server.properties

ip_address=$(ifconfig | sed -En 's/127.0.0.1//;s/.*inet (addr:)?(([0-9]*\.){3}[0-9]*).*/\2/p')

echo "server-ip=$ip_address" >> /opt/minecraft/server/server.properties
echo "spawn-npcs=true" >> /opt/minecraft/server/server.properties
echo "allow-flight=false" >> /opt/minecraft/server/server.properties
echo "level-name=world" >> /opt/minecraft/server/server.properties
echo "view-distance=10" >> /opt/minecraft/server/server.properties
echo "resource-pack=" >> /opt/minecraft/server/server.properties
echo "spawn-animals=true" >> /opt/minecraft/server/server.properties
echo "white-list=false" >> /opt/minecraft/server/server.properties
echo "rcon.password=strong-password" >> /opt/minecraft/server/server.properties
echo "generate-structures=true" >> /opt/minecraft/server/server.properties
echo "max-build-height=256" >> /opt/minecraft/server/server.properties
echo "online-mode=true" >> /opt/minecraft/server/server.properties
echo "level-seed=" >> /opt/minecraft/server/server.properties
echo "use-native-transport=true" >> /opt/minecraft/server/server.properties
echo "prevent-proxy-connections=false" >> /opt/minecraft/server/server.properties
echo "enable-rcon=true" >> /opt/minecraft/server/server.properties
echo "motd=A Minecraft Server" >> /opt/minecraft/server/server.properties

echo "[Unit]" >> /etc/systemd/system/minecraft.service
echo "Description=Minecraft Server" >> /etc/systemd/system/minecraft.service
echo "After=network.target" >> /etc/systemd/system/minecraft.service
echo " " >> /etc/systemd/system/minecraft.service
echo "[Service]" >> /etc/systemd/system/minecraft.service
echo "User=minecraft" >> /etc/systemd/system/minecraft.service
echo "Nice=5" >> /etc/systemd/system/minecraft.service
echo "KillMode=none" >> /etc/systemd/system/minecraft.service
echo "SuccessExitStatus=0 1" >> /etc/systemd/system/minecraft.service
echo "InaccessibleDirectories=/root /sys /srv /media -/lost+found" >> /etc/systemd/system/minecraft.service
echo "NoNewPrivileges=true" >> /etc/systemd/system/minecraft.service
echo "WorkingDirectory=/opt/minecraft/server" >> /etc/systemd/system/minecraft.service
echo "ReadWriteDirectories=/opt/minecraft/server" >> /etc/systemd/system/minecraft.service
echo "ExecStart=/usr/bin/java -Xmx1024M -Xms1024M -jar server.jar nogui" >> /etc/systemd/system/minecraft.service
echo "ExecStop=/opt/minecraft/tools/mcrcon/mcrcon -H 127.0.0.1 -P 25575 -p strong-password stop" >> /etc/systemd/system/minecraft.service
echo " " >> /etc/systemd/system/minecraft.service
echo "[Install]" >> /etc/systemd/system/minecraft.service
echo "WantedBy=multi-user.target" >> /etc/systemd/system/minecraft.service

chown minecraft:minecraft /opt/minecraft -R
chmod 755 minecraft:minecraft /opt/minecraft -R

systemctl daemon-reload
systemctl start minecraft && systemctl enable minecraft

/opt/minecraft/tools/mcrcon/mcrcon -H 127.0.0.1 -P 25575 -p strong-password -t

              EOF

}
Posted by Mike R on January 04, 2020 at 04:44 PM MST #
Posted by Cristian on February 14, 2020 at 11:54 AM MST #
Posted by sharniff on April 03, 2020 at 04:59 PM MDT #
Posted by Glorious on June 18, 2020 at 05:16 PM MDT #