Matt RaibleMatt Raible is a writer with a passion for software. Connect with him on LinkedIn.

The Angular Mini-Book The Angular Mini-Book is a guide to getting started with Angular. You'll learn how to develop a bare-bones application, test it, and deploy it. Then you'll move on to adding Bootstrap, Angular Material, continuous integration, and authentication.

Spring Boot is a popular framework for building REST APIs. You'll learn how to integrate Angular with Spring Boot and use security best practices like HTTPS and a content security policy.

For book updates, follow @angular_book on Twitter.

The JHipster Mini-Book The JHipster Mini-Book is a guide to getting started with hip technologies today: Angular, Bootstrap, and Spring Boot. All of these frameworks are wrapped up in an easy-to-use project called JHipster.

This book shows you how to build an app with JHipster, and guides you through the plethora of tools, techniques and options you can use. Furthermore, it explains the UI and API building blocks so you understand the underpinnings of your great application.

For book updates, follow @jhipster-book on Twitter.

10+ YEARS


Over 10 years ago, I wrote my first blog post. Since then, I've authored books, had kids, traveled the world, found Trish and blogged about it all.
You searched this site for "eclipse". 283 entries found.

You can also try this same search on Google.

Java Web Application Security - Part I: Java EE 6 Login Demo

Back in February, I wrote about my upcoming conferences:

In addition to Vegas and Poland, there's a couple other events I might speak at in the next few months: the Utah Java Users Group (possibly in April), Jazoon and ÜberConf (if my proposals are accepted). For these events, I'm hoping to present the following talk:

Webapp Security: Develop. Penetrate. Protect. Relax.
In this session, you'll learn how to implement authentication in your Java web applications using Spring Security, Apache Shiro and good ol' Java EE Container Managed Authentication. You'll also learn how to secure your REST API with OAuth and lock it down with SSL.

After learning how to develop authentication, I'll introduce you to OWASP, the OWASP Top 10, its Testing Guide and its Code Review Guide. From there, I'll discuss using WebGoat to verify your app is secure and commercial tools like webapp firewalls and accelerators.

Fast forward a couple months and I'm happy to say that I've completed my talk at the Utah JUG and it's been accepted at Jazoon and Über Conf. For this talk, I created a presentation that primarily consists of demos implementing basic, form and Ajax authentication using Java EE 6, Spring Security and Apache Shiro. In the process of creating the demos, I learned (or re-educated myself) how to do a number of things in all 3 frameworks:

  • Implement Basic Authentication
  • Implement Form-based Authentication
  • Implement Ajax HTTP -> HTTPS Authentication (with programmatic APIs)
  • Force SSL for certain URLs
  • Implement a file-based store of users and passwords (in Jetty/Maven and Tomcat standalone)
  • Implement a database store of users and passwords (in Jetty/Maven and Tomcat standalone)
  • Encrypt Passwords
  • Secure methods with annotations

For the demos, I showed the audience how to do almost all of these, but skipped Tomcat standalone and securing methods in the interest of time. In July, when I do this talk at ÜberConf, I plan on adding 1) hacking the app (to show security holes) and 2) fixing it to protect it against vulnerabilities.

I told the audience at UJUG that I would post the presentation and was planning on recording screencasts of the various demos so the online version of the presentation would make more sense. Today, I've finished the first screencast showing how to implement security with Java EE 6. Below is the presentation (with the screencast embedded on slide 10) as well as a step-by-step tutorial.


Java EE 6 Login Tutorial

Download and Run the Application
To begin, download the application you'll be implementing security in. This app is a stripped-down version of the Ajax Login application I wrote for my article on Implementing Ajax Authentication using jQuery, Spring Security and HTTPS. You'll need Java 6 and Maven installed to run the app. Run it using mvn jetty:run and open http://localhost:8080 in your browser. You'll see it's a simple CRUD application for users and there's no login required to add or delete users.

Implement Basic Authentication
The first step is to protect the list screen so people have to login to view users. To do this, add the following to the bottom of src/main/webapp/WEB-INF/web.xml:

<security-constraint>
    <web-resource-collection>
        <web-resource-name>users</web-resource-name>
        <url-pattern>/users</url-pattern>
        <http-method>GET</http-method>
        <http-method>POST</http-method>
    </web-resource-collection>
    <auth-constraint>
        <role-name>ROLE_ADMIN</role-name>
    </auth-constraint>
</security-constraint>

<login-config>
    <auth-method>BASIC</auth-method>
    <realm-name>Java EE Login</realm-name>
</login-config>

<security-role>
    <role-name>ROLE_ADMIN</role-name>
</security-role>

At this point, if you restart Jetty (Ctrl+C and jetty:run again), you'll get an error about a missing LoginService. This happens because Jetty doesn't know where the "Java EE Login" realm is located. Add the following to pom.xml, just after </webAppConfig> in the Jetty plugin's configuration.

<loginServices>
    <loginService implementation="org.eclipse.jetty.security.HashLoginService">
        <name>Java EE Login</name>
        <config>${basedir}/src/test/resources/realm.properties</config>
    </loginService>
</loginServices>

The realm.properties file already exists in the project and contains user names and passwords. Start the app again using mvn jetty:run and you should be prompted to login when you click on the "Users" tab. Enter admin/admin to login.

After logging in, you can try to logout by clicking the "Logout" link in the top-right corner. This calls a LogoutController with the following code that logs the user out.

public void logout(HttpServletResponse response) throws ServletException, IOException {
    request.getSession().invalidate();
    response.sendRedirect(request.getContextPath());
}

You'll notice that clicking this link doesn't log you out, even though the session is invalidated. The only way to logout with basic authentication is to close the browser. In order to get the ability to logout, as well as to have more control over the look-and-feel of the login, you can implement form-based authentication.

Implement Form-based Authentication
To change from basic to form-based authentication, you simply have to replace the <login-config> in your web.xml with the following:

<login-config>
    <auth-method>FORM</auth-method>
    <form-login-config>
        <form-login-page>/login.jsp</form-login-page>
        <form-error-page>/login.jsp?error=true</form-error-page>
    </form-login-config>
</login-config>

The login.jsp page already exists in the project, in the src/main/webapp directory. This JSP has 3 important elements: 1) a form that submits to "${contextPath}/j_security_check", 2) an input element named "j_username" and 3) an input element named "j_password". If you restart Jetty, you'll now be prompted to login with this JSP instead of the basic authentication dialog.

Force SSL
Another thing you might want to implement to secure your application is forcing SSL for certain URLs. To do this on the same <security-constraint> you already have in web.xml, add the following after </auth-constraint>:

<user-data-constraint>
    <transport-guarantee>CONFIDENTIAL</transport-guarantee>
</user-data-constraint>

To configure Jetty to listen on an SSL port, add the following just after </loginServices> in your pom.xml:

<connectors>
    <connector implementation="org.eclipse.jetty.server.nio.SelectChannelConnector">
        <forwarded>true</forwarded>
        <port>8080</port>
    </connector>
    <connector implementation="org.eclipse.jetty.server.ssl.SslSelectChannelConnector">
        <forwarded>true</forwarded>
        <port>8443</port>
        <maxIdleTime>60000</maxIdleTime>
        <keystore>${project.build.directory}/ssl.keystore</keystore>
        <password>appfuse</password>
        <keyPassword>appfuse</keyPassword>
    </connector>
</connectors>

The keystore must be generated for Jetty to start successfully, so add the keytool-maven-plugin just above the jetty-maven-plugin in pom.xml.

<plugin>
    <groupId>org.codehaus.mojo</groupId>
    <artifactId>keytool-maven-plugin</artifactId>
    <version>1.0</version>
    <executions>
        <execution>
            <phase>generate-resources</phase>
            <id>clean</id>
            <goals>
                <goal>clean</goal>
            </goals>
        </execution>
        <execution>
            <phase>generate-resources</phase>
            <id>genkey</id>
            <goals>
                <goal>genkey</goal>
            </goals>
        </execution>
    </executions>
    <configuration>
        <keystore>${project.build.directory}/ssl.keystore</keystore>
        <dname>cn=localhost</dname>
        <keypass>appfuse</keypass>
        <storepass>appfuse</storepass>
        <alias>appfuse</alias>
        <keyalg>RSA</keyalg>
    </configuration>
</plugin>

Now if you restart Jetty, go to http://localhost:8080 and click on the "Users" tab, you'll get a 403. What the heck?! When this first happened to me, it took me a while to figure out. It turns out that Jetty doesn't redirect to HTTPS when using Java EE authentication, so you have to manually type in https://localhost:8443/ (or add a filter to redirect for you). If you deployed this same application on Tomcat (after enabling SSL), it would redirect for you.

Store Users in a Database
Finally, to store your users in a database instead of file, you'll need to change the <loginService> in the Jetty plugin's configuration. Replace the existing <loginService> element with the following:

<loginServices>
    <loginService implementation="org.eclipse.jetty.security.JDBCLoginService">
        <name>Java EE Login</name>
        <config>${basedir}/src/test/resources/jdbc-realm.properties</config>
    </loginService>
</loginServices>

The jdbc-realm.properties file already exists in the project and contains the database settings and table/column names for the user and role information.

jdbcdriver = com.mysql.jdbc.Driver
url = jdbc:mysql://localhost/appfuse
username = root
password =
usertable = app_user
usertablekey = id
usertableuserfield = username
usertablepasswordfield = password
roletable = role
roletablekey = id
roletablerolefield = name
userroletable = user_role
userroletableuserkey = user_id
userroletablerolekey = role_id
cachetime = 300

Of course, you'll need to install MySQL for this to work. After installing it, you should be able to create an "appfuse" database and populate it using the following commands:

mysql -u root -p -e 'create database appfuse'
curl https://gist.github.com/raw/958091/ceecb4a6ae31c31429d5639d0d1e6bfd93e2ea42/create-appfuse.sql > create-appfuse.sql
mysql -u root -p appfuse < create-appfuse.sql

Next you'll need to configure Jetty so it has MySQL's JDBC Driver in its classpath. To do this, add the following dependency just after the <configuration> element (before <executions>) in pom.xml:

<dependencies>
    <!-- MySQL for JDBC Realm -->
    <dependency>
        <groupId>mysql</groupId>
        <artifactId>mysql-connector-java</artifactId>
        <version>5.1.14</version>
    </dependency>
</dependencies>

Now run the jetty-password.sh file in the root directory of the project to generate a password of your choosing. For example:

$ sh jetty-password.sh javaeelogin
javaeelogin
OBF:1vuj1t2v1wum1u9d1ugo1t331uh21ua51wts1t3b1vur
MD5:53b176e6ce1b5183bc970ef1ebaffd44

The last two lines are obfuscated and MD5 versions of the password. Update the admin user's password to this new value. You can do this with the following SQL statement.

UPDATE app_user SET password='MD5:53b176e6ce1b5183bc970ef1ebaffd44' WHERE username = 'admin';

Now if you restart Jetty, you should be able to login with admin/javaeelogin and view the list of users.

Summary
In this tutorial, you learned how to implement authentication using standard Java EE 6. In addition to the basic XML configuration, there's also some new methods in HttpServletRequest for Java EE 6 and Servlet 3.0:

  • authenticate(response)
  • login(user, pass)
  • logout()

This tutorial doesn't show you how to use them, but I did play with them a bit as part of my UJUG demo when implementing Ajax authentication. I found that login() did work, but it didn't persist the authentication for the users session. I also found that after calling logout(), I still needed to invalidate the session to completely logout the user. There are some additional limitations I found with Java EE authentication, namely:

  • No error messages for failed logins
  • No Remember Me
  • No auto-redirect from HTTP to HTTPS
  • Container has to be configured
  • Doesn’t support regular expressions for URLs

Of course, no error messages indicating why login failed is probably a good thing (you don't want to tell users why their credentials failed). However, when you're trying to figure out if your container is configured properly, the lack of container logging can be a pain.

In the next couple weeks, I'll post Part II of this series, where I'll show you how to implement this same set of features using Spring Security. In the meantime, please let me know if you have any questions.

Posted in Java at May 05 2011, 04:58:00 PM MDT 9 Comments

AppFuse 2.1 Released!

The AppFuse Team is pleased to announce the release of AppFuse 2.1. This release includes upgrades to all dependencies to bring them up-to-date with their latest releases. Most notable are JPA 2, JSF 2, Tapestry 5 and Spring 3. In addition, we've migrated from XFire to CXF and enabled REST for web services. There's even a new appfuse-ws archetype that leverages Enunciate to generate web service endpoints, documentation and downloadable clients. This release fixes many issues with archetypes, improving startup time and allowing jetty:run to be used for quick turnaround while developing. For more details on specific changes see the release notes.

What is AppFuse?
AppFuse is an open source project and application that uses open source frameworks to help you develop Web applications with Java quickly and efficiently. It was originally developed to eliminate the ramp-up time when building new web applications. At its core, AppFuse is a project skeleton, similar to the one that's created by your IDE when you click through a wizard to create a new web project. If you use JRebel with IntelliJ, you can achieve zero-turnaround in your project and develop features without restarting the server.

Release Details
Archetypes now include all the source for the web modules so using jetty:run and your IDE will work much smoother now. The backend is still embedded in JARs, enabling you to choose with persistence framework (Hibernate, iBATIS or JPA) you'd like to use. If you want to modify the source for that, add the core classes to your project or run "appfuse:full-source".

AppFuse comes in a number of different flavors. It offers "light", "basic" and "modular" and archetypes. Light archetypes use an embedded H2 database and contain a simple CRUD example. Light archetypes allow code generation and full-source features, but do not currently support Stripes or Wicket. Basic archetypes have web services using CXF, authentication from Spring Security and features including signup, login, file upload and CSS theming. Modular archetypes are similar to basic archetypes, except they have multiple modules which allows you to separate your services from your web project.

AppFuse provides archetypes for JSF, Spring MVC, Struts 2 and Tapestry 5. The light archetypes are available for these frameworks, as well as for Spring MVC + FreeMarker, Stripes and Wicket. You can see demos of these archetypes at http://demo.appfuse.org.

For information on creating a new project, please see the QuickStart Guide.

If you have questions about AppFuse, please read the FAQ or join the user mailing list. If you find any issues, please report them on the mailing list or create an issue in JIRA.

Thanks to everyone for their help contributing patches, writing documentation and participating on the mailing lists.

We greatly appreciate the help from our sponsors, particularly Atlassian, Contegix and JetBrains. Atlassian and Contegix are especially awesome: Atlassian has donated licenses to all its products and Contegix has donated an entire server to the AppFuse project.

Posted in Java at Apr 04 2011, 09:38:05 AM MDT 5 Comments

Making Code Generation Smarter with Maven

As you might've read in my last entry, I recently started a new gig with Overstock.com. On my first day, I was quickly immersed into the development process by joining the Conversion Team. The Conversion Team is responsible for developing the checkout UI and handling payments from customers. I quickly discovered Overstock was mostly a Linux + Eclipse Shop and did my best to get my favorite Mac + IntelliJ + JRebel installed and configured. Thanks to my new Team Lead, I was able to get everything up and running the first day, as well as checkin my first contribution: making mvn jetty:run work so I didn't have to use my IDE to deploy to Tomcat.

In setting up my environment, I couldn't help but notice running jetty:run took quite a while to run each time. Specifically, the build process took 45 seconds to start executing the Jetty plugin, then another 23 seconds to startup after that. The first suspicious thing I noticed was that the UI templates were being re-generated and compiled on each execution. The UI Templating Framework at Overstock is Jamon, and is described as follows:

Jamon is a text template engine for Java, useful for generating dynamic HTML, XML, or any text-based content. In a typical Model-View-Controller architecture, Jamon clearly is aimed at the View (or presentation) layer.

Because it is compiled to non-reflective Java code, and statically type-checked, Jamon is ideally suited to support refactoring of template-based UI applications. Using mock objects -like functionality, Jamon also facilitates unit testing of the controller and view.

To generate .java files from .jamon templates, we use the Jamon Plugin for Maven. Remembering that the Maven Compiler Plugin has an incremental-compile feature, I turned to its source code to find out how to implement this in the Jamon plugin. I was pleasantly surprised to find the StaleSourceScanner. This class allows you to easily compare two files to see if the source needs to re-examined for generation or compilation.

I noticed the Jamon Plugin had the following code to figure out which files it should generate into .java files:

private List<File> accumulateSources(File p_templateSourceDir)
{
  final List<File> result = new ArrayList<File>();
  if (p_templateSourceDir == null)
  {
    return result;
  }
  for (File f : p_templateSourceDir.listFiles())
  {
    if (f.isDirectory())
    {
      result.addAll(accumulateSources(f));
    }
    else if (f.getName().toLowerCase(Locale.US).endsWith(".jamon"))
    {
      String filePath = f.getPath();
       // FIXME !?
      String basePath = templateSourceDir().getAbsoluteFile().toString();
      result.add(new File(filePath.substring(basePath.length() + 1)));
    }
  }
  return result;
}

I changed it to be smarter and only generate changed templates with the following code:

private List<File> accumulateSources(File p_templateSourceDir) throws MojoExecutionException
{
  final List<File> result = new ArrayList<File>();
  if (p_templateSourceDir == null)
  {
    return result;
  }
  SourceInclusionScanner scanner = getSourceInclusionScanner( staleMillis );
  SourceMapping mapping = new SuffixMapping( ".jamon", ".java");

  scanner.addSourceMapping( mapping );

  final Set<File> staleFiles = new LinkedHashSet<File>();

  for (File f : p_templateSourceDir.listFiles())
  {
    if (!f.isDirectory())
    {
      continue;
    }

    try
    {
      staleFiles.addAll( scanner.getIncludedSources(f.getParentFile(), templateOutputDir()));
    }
    catch ( InclusionScanException e )
    {
      throw new MojoExecutionException(
        "Error scanning source root: \'" + p_templateSourceDir.getPath()
          + "\' " + "for stale files to recompile.", e );
    }
  }

  // Trim root path from file paths
  for (File file : staleFiles) {
    String filePath = file.getPath();
    String basePath = templateSourceDir().getAbsoluteFile().toString();
    result.add(new File(filePath.substring(basePath.length() + 1)));
  }
}

This method references a getSourceInclusionScanner() method, which is implemented as follows:

protected SourceInclusionScanner getSourceInclusionScanner( int staleMillis )
{
  SourceInclusionScanner scanner;

  if ( includes.isEmpty() && excludes.isEmpty() )
  {
      scanner = new StaleSourceScanner( staleMillis );
  }
  else
  {
      if ( includes.isEmpty() )
      {
          includes.add( "**/*.jamon" );
      }
      scanner = new StaleSourceScanner( staleMillis, includes, excludes );
  }

  return scanner;
}

If you're using Jamon and its Maven Plugin, you can view my patch at SourceForge. If you're looking to include this functionality in your project, I invite you to look at the code I learned from in the Maven Compiler's AbstractCompilerMojo class.

After making this change, I was able to reduce the build execution time by over 50%. Now it takes 20 seconds to hit the Jetty plugin and 42 seconds to finishing starting. Of course, in an ideal world, I'd like to get this down to 20 seconds or less. Strangely enough, the easiest way to do this seems to be simple: use Linux.

On the Linux desktop they provided me, it takes 12 seconds to hit the Jetty plugin and 23 seconds to finish starting. I'd like to think this is a hardware thing, but it only get 20% faster on OS X when using an 8GB RAM + SSD machine (vs. a 4GB + 5400 drive). Since Overstock has provided me with a 4GB MacBook Pro, I'm considering installing Ubuntu on it, just to see what the difference is.

Sun over the Snowbird In related news, Overstock.com is looking to hire a whole bunch of Java Developers this year. The pictures of the new Provo office look pretty sweet. Of course, you can also work at HQ, which is a mere 25 minutes from some of the best skiing in the world. Personally, I think Colorado's powder is better, but I can't argue with the convenience of no traffic. In addition to full-time gigs, they've started hiring more remote contractors like myself, so they pretty much have something for everyone. So if you love Java, like to get some turns in before work, and aren't an asshole - you should and I'll try to hook you up.

Update: After writing this post, I received an email from Neil Hartner questioning these numbers. Basically, he was able to get his MacBook Pro to run just as fast as Linux. Turns out, the reason my Mac was so much slower was because JRebel was configured in my MAVEN_OPTS. JRebel's FAQ does state the following:

Does JRebel make the server start up slower?
JRebel needs to do more work on startup (search more places for classes and resources, instrument classes, etc), so some slowdown can be expected. If it's larger than 50% please contact [email protected].

Since it's right around 50% slower, I guess there's no reason to call them. My guess is the best thing to do is remove JRebel from MAVEN_OPTS, but have an alias that can enable it, or simply run it from your IDE.

Posted in Java at Jan 21 2011, 03:26:43 PM MST 7 Comments

How I Calculated Ratings for My JVM Web Frameworks Comparison

When I re-wrote my Comparing JVM Web Frameworks presentation from scratch, I decided to add a matrix that allows you to rate a framework based on 20 different criteria. The reason I did this was because I'd used this method when choosing an Ajax framework for Evite last year. The matrix seemed to work well for selecting the top 5 frameworks, but it also inspired a lot of discussion in the community that my ratings were wrong.

I expected this, as I certainly don't know every framework as well as I'd like. The mistake I made was asking for the community to provide feedback on my ratings without describing how I arrived at them. From Peter Thomas's blog:

What you are doing is adjusting ratings based on who in the community shouts the loudest. I can't help saying that this approach comes across as highly arrogant and condescending, you seem to expect framework developers and proponents to rush over and fawn over you to get better ratings, like waiters in a restaurant trying to impress a food-critic for Michelin stars.

I apologize for giving this impression. It certainly wasn't my intent. By having simple numbers (1.0 == framework does well, 0.5 == framework is OK and 0 == framework not good at criteria) with no rationalization, I can see how the matrix can be interpreted as useless (or to put it bluntly, as something you should wipe your ass with). I don't blame folks for getting angry.

For my Rich Web Experience presentation, I documented why I gave each framework the rating I did. Hopefully this will allow folks to critique my ratings more constructively and I can make the numbers more accurate. You can view this document below or on Google Docs.

In the end, what I was hoping to do with this matrix was to simply highlight a technique for choosing a web framework. Furthermore, I think adding a "weight" to each criteria is important because things like books often aren't as important as REST support. To show how this might be done, I added a second sheet to the matrix and made up some weighting numbers. I'd expect anyone that wants to use this to downloaded the matrix, verify the ratings are accurate for your beliefs and weight the criteria accordingly.

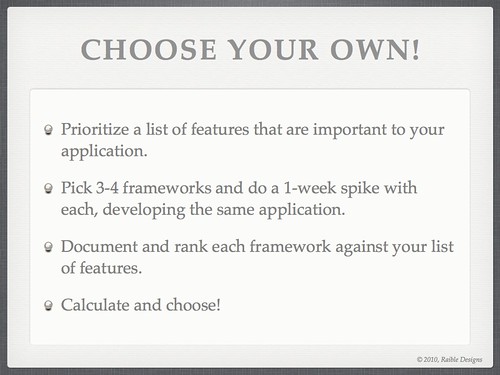
Of course, as I and many others have said, the best way to choose a web framework is to try them yourself. I emphasized this at the end of my presentation with the following two slides.

Slide #77 from Comparing JVM Web Frameworks Talk at RWX2010

Slide #76 from Comparing JVM Web Frameworks Talk at RWX2010

Posted in Java at Dec 06 2010, 11:55:18 AM MST 10 Comments

What's New in Spring 3.0

This morning, I attended Rod Johnson's What's New in Spring 3.0 keynote at TSSJS. Rod ditched his slides for the talk and mentioned that this might be risky. Especially since he was pretty jetlagged (flew in from Paris at 11pm last night). Below are my notes from his talk.

The most important thing for the future of Java is productivity and cloud computing. The focus at SpringSource is heavily on productivity and not just on improving the Spring codebase. If you look at the comparisons out there between Rails and Spring, it's not an apples-to-apples comparison. The philosophy with Spring has always been the developer is always right. However, if you look at something like Rails, you'll see it's far more prescriptive. That layer of opinionated frameworks is important in that it improves your productivity greatly.

SpringSource is putting a lot of emphasis on improving developer productivity with two opinionated frameworks: Grails and Spring Roo. To show how productive developers can be, Rod started to build a web app with Spring Roo. As part of this demo, he mentioned we'd see many of the new features of Spring 3: RestTemplate, @Value and Spring EL.

Rod used STS to write the application and built a Twitter client. After creating a new project using File -> New Roo Project, a Roo Shell tab shows up at the bottom. Typing "hint" tells you what you should do write away. The initial message is "Roo requires the installation of a JPA provider and associated database." The initial command is "persistence setup --provider HIBERNATE --database HYPERSONIC_IN_MEMORY". After running this, a bunch of log messages are shown on the console, most of them indicating that pom.xml has been modified.

The first file that Rod shows is src/main/resources/META-INF/spring/applicationContext.xml. It's the only XML file you'll need in your application and includes a PropertyPlaceHolderConfigurer, a context:component-scan for finding annotations and a transaction manager.

After typing "hint" again, Roo indicates that Rod should create entities. He does this by running "ent --class ~.domain.Term --testAutomatically". A Term class (with a bunch of annotations) is created, as well as a number of *.aj files and an integration test. Most of the files don't have anything in them but annotations. The integration test uses @RooIntegrationTest(entity=Term.class) on its class to fire up a Spring container in the test and do dependency injection (if necessary). From there, Rod demonstrated that he could easily modify the test to verify the database existed.

private SimpleJdbcTemplate jt;

@Autowired
public void init(DataSource ds) {
    this.jt = new SimpleJdbcTemplate(ds);
}

@Test 
public void testDb() {
    jt.queryForInt("SELECT COUNT(0) FROM TERM");
}

Interestingly, after running the test, you could see a whole bunch of tests being run, not just the one that was in the class itself. From there, he modified the Term class to add two new properties: name and searchTerms. He also used JSR 303's @NotNull annotation to make the fields required.

@Entity
@RooJavaBean
@RooToString
@RooEntity
public class Term {

    @NotNull
    private String name;

    @NotNull
    private String searchTerms;
}

Next, Rod added a new test and showed that the setters for these properties were automatically created and he never had to write getters and setters. This is done by aspects that are generated beside your Java files. Roo is smart enough that if you write toString() methods in your Java code, it will delete the aspect that normally generates the toString() method.

To add fields to an entity from the command lie, you can run commands like "field string --fieldName text --notNull" and "field number --type java.lang.Long --fieldName twitterId --notNull". The Roo Shell is also capable of establishing relationships between entities.

After successfully modifying his Entities, Rod started creating code to talk to Twitter's API. He used RestTemplate to do this and spent a good 5 minutes trying to get Eclipse to import the class properly. The best part of this demo was watching him do what most developers do: searching Google for RestTemplate to get the package name to import.

After awkward silence and some fumbling, he opened an existing project (that had the dependencies properly configured) and used Java Config to configure beans for the project. This was done with a @Configuration annotation on the class, @Value annotations on properties (that read from a properties file) and @Bean annotations for the beans to expose. The first time Rod tried to run the test it failed because a twitter.properties file didn't exist. After creating it, he successfully ran the test and successfully searched Twitter's API.

The nice thing about @Configuration is the classes are automatically picked up and you don't need to configure any XML to recognize them. Also, in your Java classes, you don't have to use @Autowired to get @Bean references injected.

After this, Rod attempted to show a web interface of the application. He started the built-in SpringSource tc Server and proceeded to show us Tomcat's 404 page. Unfortunately, Tomcat seemed to startup OK (no errors in the logs), but obviously something didn't work well. For the next few silent moments, we watched him try to delete web.xml from Eclipse. Unfortunately, this didn't work and we weren't able to see the scaffolding the entities that Rod created.

At this point, Rod opened a completed version of the app and was able to show it to us in a browser. You could hear the murmur of the crowd as everyone realized he was about to show the the Twitter search results for #tssjs. Most of the tweets displayed were from folks commenting about how some things didn't work in the demo.

In summary, there's some really cool things in Spring 3: @Configuration, @Value, task scheduling with @Scheduled and one-way methods with @Async.

Final points of SpringSource and VMWare: they're committed to Java and middleware. Their big focus is providing an integrated experience from productivity to cloud. There's other languages that are further along than Java and SpringSource is trying to fix that. One thing they're working on is a private Java cloud that companies can use and leverage as a VMWare appliance.

I think there's a lot of great things in Spring 3 and most users of Roo seem to be happy with it. It's unfortunate that the Demo Gods frowned upon Rod, but it was cool to see him do the "no presentation" approach.

Posted in Java at Mar 19 2010, 11:46:25 AM MDT 2 Comments

What's your preferred development infrastructure stack?

Over the years, I've used many different source control systems, wikis, bug trackers and continuous integration servers. On many projects, I've been responsible for recommending and helping to install these systems. For the most part, they've often been disparate, meaning there wasn't a whole lot of integration between the various applications. Here's a list of all the different systems I've used:

I believe all of these applications are useful in supporting an efficient development process. When clients have asked me to help them build this type of infrastructure, I've often asked if they wanted to pay for it or not. If not, I'd recommend Trac (since it has a wiki, source viewer and bug tracker all-in-one) and Hudson. If they were willing to pay, I'd recommend the Atlassian Suite (Confluence, JIRA and Bamboo).

These stacks all seem to work pretty well and the Atlassian Suite certainly works great for AppFuse and other open source projects. However, I recently had the pleasure of working at Chordiant Software where we used Chordiant Mesh to collaborate and develop software. Their Mesh system is powered by Jive Clearspace and provides a wealth of tools for each project, including a dashboard, discussions, documents, notifications and widgets providing status + links to JIRA and Bamboo.

Even though Clearspace's rich text editor caused me some early frustration, I really enjoyed the fact that a solid development infrastructure existed. It made it much easier to collaborate, document and execute our development process. I realize that it's difficult to build and maintain a custom development infrastructure stack. Chordiant had a whole team that developed, enhanced and supported their environment. But that doesn't mean it's impossible and not worth striving for.

I think there's a number of best-of-breed applications you can use to build a sweet development infrastructure stack.

  • Source Control: Git
  • Source Viewer: FishEye
  • Wiki: Jive SBS
  • Bug Tracker: JIRA
  • Continuous Integration: Hudson

I've only used Git for a few weeks, but I can easily tell it's better than Subversion. I don't think it's easy to convince companies to switch their source control system, so it's probably not worth arguing if you're already using Subversion. I can also envision using Confluence instead of Jive SBS, but then you lose forum support and have to use something like Mailman or Google Groups. JIRA Studio looks close to my dream stack, except it doesn't support Git or a forum + mailing list system.

What is your preferred development infrastructure stack? Why?

Posted in Java at Jan 12 2010, 09:54:46 PM MST 30 Comments

Consulting, SOFEA, Grails and GWT at next week's Denver JUG

Next Wednesday, I'll be at Denver's JUG meeting to talk about Independent Consulting and Building SOFEA Applications with Grails and GWT. The first talk will be a a panel discussion among local independent consultants, including James Goodwill, Matthew McCullough, Tim Berglund and myself.

This session explores the trials and tribulations of an independent consultant. How do you find contracts? Should you setup an LLC, an S-Corp or just be a sole proprietorship? What about health insurance and benefits? Are recruiters helpful or hurtful? Learn lots of tips and tricks to get your dream job and your ideal lifestyle.

The Grails and GWT talk is a preview of a talk I'll be doing at the Rich Web Experience in December. Below is a rewrite of the abstract in first-person.

Earlier this year, I participated in a major enhancement of a high-traffic well-known internet site. The company wanted us to quickly re-architect their site and use a modern Ajax framework to do it with. An Ajax Framework evaluation was done to help the team choose the best framework for their skillset. The application was built with a SOFEA architecture using GWT on the frontend and Grails/REST on the backend.

This talk will cover how Bryan Noll, Scott Nicholls, James Goodwill and I came to choose GWT and Grails, as well as stumbling blocks we encountered along the way. In addition, we'll explore many topics such as raw GWT vs. GXT/SmartGWT, the Maven GWT Plugin, modularizing your code, multiple EntryPoints, MVP, integration testing and JSON parsing with Overlay Types.

If you're in Denver next Wednesday night (November 11th), you should stop by the Denver JUG meeting. It'll be a fun night and there's sure to be a few beers afterward. ;-)

Posted in Java at Nov 05 2009, 10:52:37 PM MST 5 Comments

Running Hosted Mode in GWT Libraries (when using Maven)

Earlier this year, I wrote about Modularizing GWT Applications with GWT-Maven. Fast forward 8 months and I'm still working with GWT and using this same technique. However, this time I'm working with the Maven GWT Plugin from Codehaus. In my last post, I wrote:

The results of modularizing your application are beneficial (shared code) and detrimental (you have to mvn install gwt-core whenever you make changes in shared classes). If you know of a way to configure the gwt-maven plugin to read sources from both gwt-core and gwt-webapp in hosted mode, I'd love to hear about it.

The good news is I found a solution for this, using the Builder Helper Maven Plugin. The GWT Maven Plugin's Productivity tip for multi-project setup has more information on how to configure this (note: we use IntelliJ and Eclipse on my project and did not need to configure this in a profile).

All was fine and dandy with this configuration until I wanted to be able to run hosted mode to develop/test everything in my library before including it in my main project. Luckily, you can still run mvn gwt:run on a JAR project. However, when you configure your pom.xml so sources are included in your JAR, you run into an issue: your *.java files will be copied to war/WEB-INF/classes and hosted mode will use these files as source rather than the ones you're editing in src/main/java.

To solve this, I changed my pom.xml to do two things:

  • Only copy resources right before packaging (in the test phase).
  • When packaging is complete, delete the *.java files from war/WEB-INF/classes (using Ant).

Below is the XML I used to make this possible. Please let me know if you have a way to simplify this configuration.

<plugin>
    <artifactId>maven-resources-plugin</artifactId>
    <version>2.4.1</version>
    <executions>
        <execution>
            <phase>test</phase>
            <goals>
                <goal>copy-resources</goal>
            </goals>
            <configuration>
                <outputDirectory>${project.build.outputDirectory}</outputDirectory>
                <resources>
                    <resource>
                        <directory>src/main/java</directory>
                    </resource>
                    <resource>
                        <directory>src/main/resources</directory>
                    </resource>
                </resources>
            </configuration>
        </execution>
    </executions>
</plugin>
<plugin>
    <artifactId>maven-antrun-plugin</artifactId>
    <version>1.3</version>
    <executions>
        <execution>
            <phase>package</phase>
            <goals>
                <goal>run</goal>
            </goals>
            <configuration>
                <tasks>
                    <delete>
                        <fileset dir="${project.build.outputDirectory}" includes="**/*.java"/>
                    </delete>
                </tasks>
            </configuration>
        </execution>
    </executions>
</plugin>

This solution seems to work pretty well. As far as developing your library in hosted mode, you'll need to configure two *.gwt.xml files, one that doesn't have an <entry-point> defined and one that does. Configure the one with the entry point as the <module> in your gwt-maven-plugin configuration.

As a side note, I found a few issues with the 1.1 version of the Maven GWT Archetype. Below are the steps I used to fix these issues and upgrade to GWT 1.7.0 (I realize 1.7.1 is out, but gwt-dev-1.7.1-mac.jar doesn't exist in Maven central).

First, create a new project by running the following from the command line:

mvn archetype:generate \
  -DarchetypeGroupId=org.codehaus.mojo \
  -DarchetypeArtifactId=gwt-maven-plugin \
  -DarchetypeVersion=1.1 \
  -DgroupId=com.yourcompany \
  -DartifactId=gwt-project -Dversion=1.0-SNAPSHOT -B

After creating the project, you'll need to modify the pom.xml as follows:

  1. Change the gwt-maven-plugin's version to 1.1.
  2. Change the ${gwtVersion} property to 1.7.0.
  3. Add <runTarget>Application.html</runTarget> to the <configuration> element of the plugin.
  4. Move Application.html and web.xml so they're under the "war" directory.
  5. Update Application.html to prepend the GWT module name in the <script> tag.

I hope these instructions help you create modular GWT projects with Maven. This setup is working great on my current project.

Posted in Java at Nov 03 2009, 09:37:07 AM MST 3 Comments

How to use GWT 2.0 with Maven and Generate SOYC Reports

One of the most interesting features coming in GWT 2.0 is code splitting and the ability to use GWT.runAsync() to reduce the size of your application's initial download. This week, I learned how to use GWT 2.0 with my GWT 1.6/Maven project. Below are instructions on how to build and use the latest GWT with Maven.

  • Checkout GWT and setup GWT_TOOLS.
  • Set a GWT_VERSION environment variable to 2.0.0-SNAPSHOT (export GWT_VERSION=2.0.0-SNAPSHOT).
  • Build GWT with the ant command.
  • After building completes, install the GWT artifacts into your local Maven repository using the following commands:
    mvn install:install-file -DgroupId=com.google.gwt \
    -DartifactId=gwt-user -Dversion=2.0.0-SNAPSHOT \
    -Dpackaging=jar -Dfile=build/lib/gwt-user.jar
    
    mvn install:install-file -DgroupId=com.google.gwt \
    -DartifactId=gwt-servlet -Dversion=2.0.0-SNAPSHOT \
    -Dpackaging=jar -Dfile=build/lib/gwt-servlet.jar
    
    mvn install:install-file -DgroupId=com.google.gwt \
    -DartifactId=gwt-dev -Dversion=2.0.0-SNAPSHOT \
    -Dclassifier=mac -Dpackaging=jar -Dfile=build/lib/gwt-dev-mac.jar
    
    mkdir temp
    tar -zxf build/dist/gwt-mac-2.0.0-SNAPSHOT.tar.gz -C temp
    cd temp/gwt-mac-2.0.0-SNAPSHOT
    zip -0 gwt-mac-2.0.0-SNAPSHOT.zip lib*.jnilib
    cd ../..
    
    mvn install:install-file -DgroupId=com.google.gwt \
    -DartifactId=gwt-dev -Dversion=2.0.0-SNAPSHOT \
    -Dclassifier=mac-libs -Dpackaging=zip \
    -Dfile=temp/gwt-mac-2.0.0-SNAPSHOT/gwt-mac-2.0.0-SNAPSHOT.zip
    
    Thanks to Jason for his help with this script.
  • Modify the pom.xml of your GWT project to use the the gwt-maven-plugin from Codehaus. Of course, you'll need to modify the <runTarget> to fit your project.
    <plugin>
        <groupId>org.codehaus.mojo</groupId>
        <artifactId>gwt-maven-plugin</artifactId>
        <version>1.1</version>
        <configuration>
            <runTarget>org.appfuse.gwt.mvc.${entry.point}/${entry.point}.html</runTarget>
        </configuration>
        <executions>
            <execution>
                <goals>
                    <goal>compile</goal>
                    <goal>test</goal>
                </goals>
            </execution>
        </executions>
    </plugin>
    
  • Modify your dependencies to match the ones below. With the Codehaus plugin, dependencies are much more concise.
    <dependency>
        <groupId>com.google.gwt</groupId>
        <artifactId>gwt-servlet</artifactId>
        <version>${gwt.version}</version>
        <scope>compile</scope>
    </dependency>
    <dependency>
        <groupId>com.google.gwt</groupId>
        <artifactId>gwt-user</artifactId>
        <version>${gwt.version}</version>
        <scope>provided</scope>
    </dependency>
    
  • Add <gwt.version>2.0.0-SNAPSHOT</gwt.version> to the properties section of your pom.xml.
  • At this point, you should be able to compile your project with mvn gwt:compile and run it in hosted mode using mvn gwt:run.

Generate SOYC Reports
In Google's code splitting documentation, it mentions The Story of Your Compile (SOYC). From the documentation:

To obtain a SOYC report for your application, there are two steps necessary. First, add -soyc to the compilation options that are passed to the GWT compiler. This will cause the compiler to emit raw information about the compile to XML files in an -aux directory beside the rest of the compiled output. In that directory, you will see an XML file for each permutation and a manifest.xml file that describes the contents of all the others.

The second step is to convert that raw information into viewable HTML. This is done with the SoycDashboard tool.

The first step is not currently possible with the gwt-maven-plugin, so I created a patch for it.

If you patch the gwt-maven-plugin and install it locally, make sure and change the version in your pom.xml to 1.2-SNAPSHOT.

To use the SoycDashboard tool, you'll need to install the gwt-soyc-vis.jar.

mvn install:install-file -DgroupId=com.google.gwt \
-DartifactId=gwt-soyc-vis -Dversion=2.0.0-SNAPSHOT \
-Dpackaging=jar -Dfile=build/lib/gwt-soyc-vis.jar

Now you can generate SOYC reports with mvn gwt:compile -Dgwt.compiler.soyc=true. You can also add <soyc>true</soyc> to the <configuration> section of the gwt-maven-plugin.

The second step (converting the raw information into viewable HTML) is possible using java from the command-line, or by using the exec-maven-plugin. Here's the (lengthy) command-line version:

java -Xmx1024m -cp /Users/mraible/.m2/repository/com/google/gwt/gwt-soyc/2.0.0-SNAPSHOT/gwt-soyc-2.0.0-SNAPSHOT.jar:/Users/mraible/.m2/repository/com/google/gwt/gwt-dev/2.0.0-SNAPSHOT/gwt-dev-2.0.0-SNAPSHOT-mac.jar com.google.gwt.soyc.SoycDashboard -resources ~/.m2/repository/com/google/gwt/gwt-soyc/2.0.0-SNAPSHOT/gwt-soyc-2.0.0-SNAPSHOT.jar -out target/soyc-report target/extra/org.appfuse.gwt.mvc.MVC/soycReport/stories0.xml.gz target/extra/org.appfuse.gwt.mvc.MVC/soycReport/dependencies0.xml.gz target/extra/org.appfuse.gwt.mvc.MVC/soycReport/splitPoints0.xml.gz

In this example, I'm using the files from stories0.xml.gz, dependencies0.xml.gz, splitPoints0.xml.gz. In the soycReport output directory, there's 5 of each these files and I'm not sure what the difference between reports is. Hopefully someone on the GWT team can elaborate. The exec-maven-plugin version is as follows:

<plugin>
    <groupId>org.codehaus.mojo</groupId>
    <artifactId>exec-maven-plugin</artifactId>
    <version>1.1</version>
    <configuration>
        <executable>java</executable>
        <arguments>
            <argument>-cp</argument>
            <argument>
                ${settings.localRepository}/com/google/gwt/gwt-soyc/2.0.0-SNAPSHOT/gwt-soyc-2.0.0-SNAPSHOT.jar:${settings.localRepository}/com/google/gwt/gwt-dev/2.0.0-SNAPSHOT/gwt-dev-2.0.0-SNAPSHOT-${platform}.jar
            </argument>
            <argument>com.google.gwt.soyc.SoycDashboard</argument>
            <argument>-out</argument>
            <argument>target/soyc-report</argument>
            <argument>-resources</argument>
            <argument>
                ${settings.localRepository}/com/google/gwt/gwt-soyc/2.0.0-SNAPSHOT/gwt-soyc-2.0.0-SNAPSHOT.jar
            </argument>
            <argument>${project.build.directory}/extra/org.appfuse.gwt.mvc.MVC/soycReport/stories0.xml.gz</argument>
            <argument>${project.build.directory}/extra/org.appfuse.gwt.mvc.MVC/soycReport/dependencies0.xml.gz</argument>
            <argument>${project.build.directory}/extra/org.appfuse.gwt.mvc.MVC/soycReport/splitPoints0.xml.gz</argument>
        </arguments>
    </configuration>
</plugin>

After configuring this plugin in your project, you should be able to run mvn gwt:compile exec:exec and open the generated report (at target/soyc-report/SoycDashboard-index.html). Currently, there doesn't seem to be much documentation on SOYC. Fred Sauer's recent presentation talks a bit about SOYC and GWT.runAsync(), but that's about it.

To figure out how to use GWT 2.0 with Maven, I used my GWT MVC Example project. The first SOYC report I generated said the initial download was 108,967 KB. To integrate GWT.runAsync(), I modified all the project's controllers so their handleEvent() methods changed from this:

public void handleEvent(AppEvent event) {
    onViewHome(event);
}

To this:

public void handleEvent(final AppEvent event) {
    GWT.runAsync(new RunAsyncCallback() {
        public void onFailure(Throwable throwable) {
            Window.alert(throwable.getMessage());
        }

        public void onSuccess() {
            onViewHome(event);
        }
    });
}

When I generated a new SOYC report, the initial download size was reduced to 56,718 KB. Furthermore, I was able to see that my "Leftovers code" consisted of 63,175 KB. I'm sure there's better ways to split my project using GWT.runAsync(), but I'm happy to see I was able to reduce the initial download by 50%.

If you'd like to try GWT 2.0, you can can download my gwt-mvc example project. To build/run this project, you'll need to 1) build and install GWT, 2) patch gwt-maven-plugin and 3) run mvn gwt:compile exec:exec to generate the SOYC report. In an ideal world, the gwt-maven-plugin can be enhanced to generate the SOYC report (rather than using the exec-maven-plugin). In the meantime, I think it's pretty cool that you can try out GWT 2.0 features while they're still being developed.

Posted in Java at Jun 25 2009, 11:45:04 PM MDT 11 Comments

Implementing OAuth with GWT

I've heard about OAuth for quite some time, but never had an opportunity to implement it on a project. For a good explanation of what OAuth is, see its Introduction. Here's an excerpt:

...it allows you the User to grant access to your private resources on one site (which is called the Service Provider), to another site (called Consumer, not to be confused with you, the User). While OpenID is all about using a single identity to sign into many sites, OAuth is about giving access to your stuff without sharing your identity at all (or its secret parts).

The reason I needed OAuth was to interact with the Google Contacts API. I've always hated how sites make you import all your contacts from Gmail. I wanted to develop a system that'd let you simply read your contacts from Google in real-time.

Since the application I'm working on uses GWT, I chose to implement an OAuth client in GWT. After googling for "gwt oauth", I found two examples. Unfortunately, neither worked out-of-the-box.

The good news is I did manage to create a working solution. The bad news is it only seems to work at random. That's right folks, I created a solution that only works 50% of the time. I'm somewhat embarrassed to post it here, but I also realize the power of open source and community. By sharing, I hope we can find the flaws in my logic and come up with a solution for all GWT applications.

The best project for OAuth libraries seems to be oauth on Google Code. However, you'll notice that there is no JavaScript implementation listed on the homepage. I did look at the Java implementation, but quickly realized it wouldn't be usable in GWT. Therefore, I opted for the JavaScript implementation.

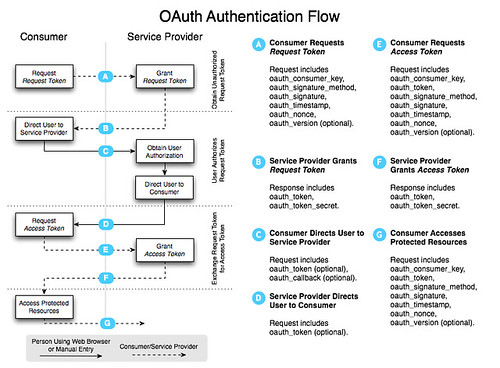
OAuth consists of several steps. The following diagram explains the authentication flow nicely.

OAuth Authentication Flow

In a nutshell, you have to complete the following steps:

  1. Get a token from the service provider.
  2. Redirect user to service provider to grant access and redirect back to application.
  3. Request access token to access protected resources.
  4. Access protected resources and pull/push data.

To access a service provider's OAuth service, you'll likely need to start by registering your application. For Google, OAuth Authentication for Web Applications is an excellent resource. Google's OAuth Playground is a great way to with the Google Data APIs after you've registered.

Now that you know how OAuth works, let's look at how I implemented it with GWT. I started by adding the necessary JavaScript references to my *.gwt.xml file.

<script src="//oauth.googlecode.com/svn/code/javascript/oauth.js"/>
<script src="//oauth.googlecode.com/svn/code/javascript/sha1.js"/>

Next, I needed a way to sign the request. I tried to use Sergi Mansilla's OAuth.java for this, but discovered issues with how the parameters were being written with GWT 1.6. I opted for Paul Donnelly's makeSignedRequest function instead. By adding this to my application's HTML page, I'm able to call it using the following JSNI method:

public native static String signRequest(String key, String secret, String tokenSecret, String url) /*-{
    return $wnd.makeSignedRequest(key, secret, tokenSecret, url);
}-*/;

After the URL is signed, it needs to be sent to the provider to get a request token. To do this, I used GWT's RequestBuilder and created a send() method:

protected void send(RequestCallback cb, String URL) {
    RequestBuilder builder = new RequestBuilder(RequestBuilder.GET, URL);
    builder.setTimeoutMillis(10000);
    builder.setCallback(cb);
    
    Request req = null;
    try {
        req = builder.send();
    } catch (RequestException e) {
        cb.onError(req, e);
    }
}

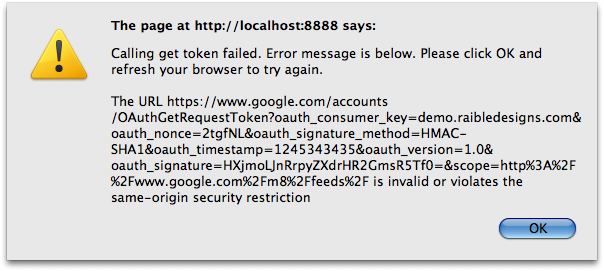
If you try this with Google's Request Token URL in GWT's hosted mode, nothing will happen. Compile/browse to Safari and you'll still see nothing. Try it in Firefox and you'll see the following.

SOP Error

To workaround browsers' Same Origin Policy, I added a proxy servlet to send the requests. I started with Jason Edwards's ProxyServlet and modified it to fit my needs. I then registered it in both *.gwt.xml and web.xml.

<servlet path="/google/" class="org.appfuse.gwt.servlet.AlternateHostProxyServlet"/>

Now, before calling the send() method, I replace the start of the URL so the request would be routed through the servlet.

public void getToken(RequestCallback cb) {
    String url = signRequest(provider.getConsumerKey(), 
                             provider.getConsumerSecret(), 
                             "", provider.getRequestTokenURL());
    url = url.replace("https://www.google.com/", "/google/");
    send(cb, url);
}

When the request returns, I create two cookies by calling a createOAuthCookies() method with the payload returned:

public static String[] createOAuthCookies(String data) {
    String oauth_token = data.substring(data.indexOf("oauth_token=") + 12);
    oauth_token = oauth_token.substring(0, oauth_token.indexOf("&"));

    String oauth_token_secret = data.substring(data.indexOf("oauth_token_secret=") + 19);

    Cookies.setCookie("oauth_token", URL.decode(oauth_token));
    Cookies.setCookie("oauth_token_secret", URL.decode(oauth_token_secret));
    return new String[]{oauth_token, oauth_token_secret};
}

The next step is to authorize the token. This is where things got tricky with my proxy servlet and I had to add some special logic for GWT. Google was sending back a 302 with a Location header, but it wasn't hitting the onResponseReceived() method in my callback. For this reason, I had to change it to a 200 status code and add the redirect location to the body. I also discovered that sometimes they'd return an HTML page with a <meta http-equiv="refresh" ...> tag. When using Twitter, I discovered the full HTML for the allow/deny page was returned. Below is the callback I'm using. WindowUtils is a class I got from Robert Hanson and the gwt-widget project.

public void onResponseReceived(Request request, Response response) {
    String text = response.getText();
    if (response.getStatusCode() == 200 && response.getText().startsWith("http")) {
        WindowUtils.changeLocation(response.getText());
    } else {
        // look for meta-tag that refreshes and grab its URL
        if (text.contains("";
            String url = text.substring(text.indexOf(tokenToStartWith) + tokenToStartWith.length());
            url = url.substring(0, url.indexOf(tokenToEndWith) + tokenToEndWith.length());
            WindowUtils.changeLocation(url);
        } else {
            // Twitter returns a full HTML page, so redirect to the authorize URL manually
            if (provider instanceof Twitter) {
                String url = provider.getAuthorizeTokenURL();
                url = url.replace("$1", OAuthRequest.getAuthToken());
                url = url.replace("$2", DefaultRequest.getCurrentLocation());
                WindowUtils.changeLocation(url);
            } else {
                onError(request, new RequestException(text));
            }
        }
    }
}

public void onError(Request request, Throwable caught) {
    Window.alert("Calling authorize token failed. " + OAuthPage.STANDARD_ERROR + "\n\n" + caught.getMessage());
}

The 3rd step is to get an access token. The most important thing to remember when you do this is to include the "oauth_token_secret" value when signing the request.

signRequest(provider.getConsumerKey(), provider.getConsumerSecret(), 
            getAuthTokenSecret(), url);

After this completes with a 200, I create the cookies again (since oauth_token and oauth_token_secret are returned in the body), then call the API to get a list of contacts. The ContactsRequests class is responsible for making the call. The DefaultRequest class contains the send() method as well as utility methods to get the cookie values of the oauth tokens.

public class ContactsRequest extends DefaultRequest {
    private static final String GOOGLE_CONTACTS_URL = 
        "http://www.google.com/m8/feeds/contacts/default/thin?oauth_token=$1";
    private OAuthProvider provider;

    public ContactsRequest(OAuthProvider provider) {
        this.provider = provider;
    }

    public void getContacts(RequestCallback cb) {
        String url = GOOGLE_CONTACTS_URL.replace("$1", getAuthToken());
        url = signRequest(provider.getConsumerKey(), provider.getConsumerSecret(), 
                          getAuthTokenSecret(), url);

        String proxiedURLPrefix = "/contacts/";
        // allow for deploying at /gwt-oauth context
        if (WindowUtils.getLocation().getPath().contains("gwt-oauth")) {
            proxiedURLPrefix = "/gwt-oauth" + proxiedURLPrefix;
        }

        url = url.replace("http://www.google.com/", proxiedURLPrefix);

        send(cb, url);
    }
}

If all goes well, the response contains the data you requested and it's used to populate a textarea (at least in this demo application). Of course, additional processing needs to occur to parse/format this data into something useful.

This all sounds pretty useful for GWT applications, right? I believe it does - but only if it works consistently. I sent a message to the OAuth Google Group explaining the issues I've had.

I'm trying to use the JavaScript API to authenticate with OAuth from a GWT application. I've got it working with both Google and Twitter's OAuth implementations. However, it seems to fail to sign the URL at random. In other words, it works 1 out of 3 times. ... Any idea why this could be happening?

I received a response with a cleaner makeSignedRequest() function. I tried it and, unfortunately, it seems to be equally unreliable. I suspect the problem is with the OAuth JavaScript implementation, GWT's interpretation of it, or that OAuth isn't as mature as it appears to be. I'd like to think one of the first two causes the problem.

To make it easier to create a robust example of GWT and OAuth, I created a gwt-oauth project you can download or view online. Please keep in mind the demo is likely to be flakey. If you're persistent and try enough times, it's likely to work. Firefox seems to succeed moreso than Safari or Chrome. If you have any suggestions for improving this example, please let me know.

Posted in Java at Jun 18 2009, 01:59:13 PM MDT 13 Comments