Matt RaibleMatt Raible is a writer with a passion for software. Connect with him on LinkedIn.

The Angular Mini-Book The Angular Mini-Book is a guide to getting started with Angular. You'll learn how to develop a bare-bones application, test it, and deploy it. Then you'll move on to adding Bootstrap, Angular Material, continuous integration, and authentication.

Spring Boot is a popular framework for building REST APIs. You'll learn how to integrate Angular with Spring Boot and use security best practices like HTTPS and a content security policy.

For book updates, follow @angular_book on Twitter.

The JHipster Mini-Book The JHipster Mini-Book is a guide to getting started with hip technologies today: Angular, Bootstrap, and Spring Boot. All of these frameworks are wrapped up in an easy-to-use project called JHipster.

This book shows you how to build an app with JHipster, and guides you through the plethora of tools, techniques and options you can use. Furthermore, it explains the UI and API building blocks so you understand the underpinnings of your great application.

For book updates, follow @jhipster-book on Twitter.

10+ YEARS


Over 10 years ago, I wrote my first blog post. Since then, I've authored books, had kids, traveled the world, found Trish and blogged about it all.
You searched this site for "maven". 270 entries found.

You can also try this same search on Google.

JavaScript and CSS Concatenation with wro4j

This past weekend, I decided it was about time to fix my YSlow score on this site. I did the easiest thing first by moving all my JavaScript files to the bottom of each page. Then I turned on GZip compression using Roller's built-in CompressionFilter. These changes helped, but the most glaring problem continued to be too many requests. To solve this, I turned to wro4j (as recommended on Twitter) to concatenate my JS and CSS files into one.

I have to say, I'm very happy with the results. I'm now sitting at a YSlow (V2) score of 75; 90 if I use the "Small Site or Blog" ruleset. I believe I can improve this by adding expires headers to my images, js and css. More than anything, I'm impressed with wro4j, its great support and easy setup. I was looking for a runtime solution (b/c I didn't want to have to rebuild Roller) and it seems to be perfect for the job. Furthermore, wro4j minifies everything on the fly and they'll have an expires header filter in the next release.

JAWR and the YUI Compressor are other alternatives to this filter, but I'm currently sold on wro4j. First of all, it passed the 10-minute test. Secondly, it didn't require me to modify Roller's build system.

At this point, if I'm going to implement JS/CSS concatenation and minification in AppFuse and Roller, wro4j seems like the best option. If you disagree, I'd love to hear your reasoning.

TIP: See Javascript Compression in Nexus for information on using YUI Compressor with Maven.

Posted in Roller at Nov 09 2009, 10:44:44 AM MST 16 Comments

Consulting, SOFEA, Grails and GWT at next week's Denver JUG

Next Wednesday, I'll be at Denver's JUG meeting to talk about Independent Consulting and Building SOFEA Applications with Grails and GWT. The first talk will be a a panel discussion among local independent consultants, including James Goodwill, Matthew McCullough, Tim Berglund and myself.

This session explores the trials and tribulations of an independent consultant. How do you find contracts? Should you setup an LLC, an S-Corp or just be a sole proprietorship? What about health insurance and benefits? Are recruiters helpful or hurtful? Learn lots of tips and tricks to get your dream job and your ideal lifestyle.

The Grails and GWT talk is a preview of a talk I'll be doing at the Rich Web Experience in December. Below is a rewrite of the abstract in first-person.

Earlier this year, I participated in a major enhancement of a high-traffic well-known internet site. The company wanted us to quickly re-architect their site and use a modern Ajax framework to do it with. An Ajax Framework evaluation was done to help the team choose the best framework for their skillset. The application was built with a SOFEA architecture using GWT on the frontend and Grails/REST on the backend.

This talk will cover how Bryan Noll, Scott Nicholls, James Goodwill and I came to choose GWT and Grails, as well as stumbling blocks we encountered along the way. In addition, we'll explore many topics such as raw GWT vs. GXT/SmartGWT, the Maven GWT Plugin, modularizing your code, multiple EntryPoints, MVP, integration testing and JSON parsing with Overlay Types.

If you're in Denver next Wednesday night (November 11th), you should stop by the Denver JUG meeting. It'll be a fun night and there's sure to be a few beers afterward. ;-)

Posted in Java at Nov 05 2009, 10:52:37 PM MST 5 Comments

Testing GWT Libraries with Selenium and Maven

On Tuesday, I wrote about Running Hosted Mode in GWT Libraries. Today I added an additional module to our project to run Selenium tests against our GWT library. In the process, I discovered some things I needed to modify in my GWT library's pom.xml. I'm writing this post so others can use this setup to write GWT libraries and package them for testing with Selenium.

First of all, I noticed that when you're using the GWT Maven Plugin with a JAR project, it doesn't automatically run gwt:compile or gwt:test in the compile and test phases. I had to explicitly configure the compile goal to run in the compile phase. I also had to add <webappDirectory> to the configuration to compile the JavaScript files into the war directory.

<plugin>
    <groupId>org.codehaus.mojo</groupId>
    <artifactId>gwt-maven-plugin</artifactId>
    <version>1.1</version>
    <configuration>
        <module>org.appfuse.gwt.core.CoreUI</module>
        <runTarget>index.html</runTarget>
        <webappDirectory>war</webappDirectory>
    </configuration>
    <executions>
        <execution>
            <phase>compile</phase>
            <goals>
                <goal>compile</goal>
            </goals>
        </execution>
    </executions>
</plugin>

To package the generated JavaScript and index.html in the JAR, I added the following <resources> section to the maven-resources-plugin configuration I mentioned in my previous post.

<resource>
    <directory>war</directory>
    <includes>
        <include>core.ui/**</include>
        <include>index.html</include>
    </includes>
</resource>

In addition, I discovered some javax.servlet.* classes in my JAR after running "mvn package". I believe this is caused by the GWT plugin sucking these in when it compiles my ProxyServlet. I excluded them by adding the maven-jar-plugin.

<plugin>
    <artifactId>maven-jar-plugin</artifactId>
    <configuration>
        <excludes>
            <exclude>javax/servlet/**</exclude>
        </excludes>
    </configuration>
</plugin>

After doing this, I was able to publish my JAR with all the contents I needed to run Selenium tests against it.

Testing the GWT Library with Selenium
The module that contains the Selenium tests is a WAR project that uses war overlays, Cargo and Selenium RC. You can read about the Maven setup I use for running Selenium tests in Packaging a SOFEA Application for Distribution.

The major difference when testing a JAR (vs. a WAR), is I had to use the maven-dependency-plugin to unpack the JAR so its contents would get included in the WAR for testing. Below is the configuration I used to accomplish this:

<plugin>
    <artifactId>maven-dependency-plugin</artifactId>
    <executions>
        <execution>
            <id>unpack</id>
            <phase>generate-sources</phase>
            <goals>
                <goal>unpack</goal>
            </goals>
            <configuration>
                <artifactItems>
                    <artifactItem>
                        <groupId>org.appfuse</groupId>
                        <artifactId>gwt-core</artifactId>
                        <version>1.0-SNAPSHOT</version>
                        <type>jar</type>
                        <overWrite>false</overWrite>
                        <excludes>META-INF/**,org/**,javax/**</excludes>
                    </artifactItem>
                </artifactItems>
                <outputDirectory>
                    ${project.build.directory}/${project.build.finalName}
                </outputDirectory>
            </configuration>
        </execution>
    </executions>
</plugin>

Hopefully this will help you develop GWT libraries and run Selenium tests against them. If you have any suggestions for simplifying this configuration, please let me know.

NOTE: I did considering a couple of other options for running Selenium tests against our GWT library:

  1. Add something to the existing project that 1) creates a WAR and 2) fires up Cargo/Selenium in a profile to test it.
  2. Create the tests in a GWT (war) project that includes widgets from the library.

I decided on the solution documented above because it seemed like the best option.

Posted in Java at Nov 04 2009, 10:09:27 PM MST 2 Comments

A Letter to the AppFuse Community

The last AppFuse release was way back in May 2008. Many folks have asked when the next release would be ever since. Often, I've said "sometimes this quarter", but obviously, that's never happened. For that, I apologize.

There are many reasons I haven't worked on AppFuse for the past 18 months, but it mostly comes down to the fact that I didn't make time for it. The good news is I'm working on it again and will have a release out sometime this month. Unfortunately, it probably won't be a 2.1 final release, but there's so many things that've changed, I feel like a milestone release is a good idea. Here's a brief summary of changes so far:

  • Changed archetypes to include all source and tests for the "webapp" portion of the application. No more warpath plugin, merging wars and IDE issues. Using "mvn jetty:run" should work as expected.
  • Moved from Spring XML to Annotations.
  • AppFuse Light converted to Maven modules and now depends on AppFuse's backend.
  • Published easier to use archetype selection form in the QuickStart Guide.
  • Published archetype selection form for AppFuse Light. I do plan on combining these forms as soon as I figure out the best UI and instructions for users to choose AppFuse or AppFuse Light.
  • Upgraded all libraries to latest released versions (Spring 3 hasn't had a final release yet).
  • Upgraded to Tapestry 5 thanks to Serge Eby. I still need to complete tests and code generation for tests.
  • Added Compass support thanks to a patch from Shay Banon.
  • Upgraded from XFire to CXF for Web Services.
  • Moved Maven repository to Sonatype's OSS Repository Hosting for snapshots and releasing to Maven Central. There are no longer any AppFuse-specific artifacts, all are available in central.

I realize there's many full-stack frameworks that do the same thing as AppFuse with less code. Examples include Ruby on Rails, Grails, Seam, Spring Roo and the Play framework. However, there seems to be quite a few folks that continue to use AppFuse and it stills serves the community as a nice example of how to integrate frameworks. Furthermore, it helps me keep up with the latest framework releases, their quirks and issues that happen when you try to integrate them. In short, working on it helps me stay up to speed with Java open source frameworks.

For those folks that like the 1.x, Ant-based version of AppFuse, there will not be a 1.9.5 release. I know I promised it for years, but it's simply something I will not use, so I'd rather not invest my time in it. I'm sorry for lying to those that expected it.

So what's the future of AppFuse? Will it continue to integrate web frameworks with Spring and popular persistence frameworks? Possibly, but it seems more logical to align it with the types of Ajax + REST applications I'm creating these days. I'm currently thinking AppFuse 3.0 would be nice as a RESTful backend with GWT and Flex UIs. I might create the backend with CXF, but it's possible I'd use one of the frameworks mentioned above and simply leverage it to create the default features AppFuse users have come to expect.

More than anything, I'm writing this letter to let you know that the AppFuse project is not dead and you can expect a release in the near future.

Thanks for your support,

Matt

Posted in Java at Nov 04 2009, 12:17:17 AM MST 44 Comments

Running Hosted Mode in GWT Libraries (when using Maven)

Earlier this year, I wrote about Modularizing GWT Applications with GWT-Maven. Fast forward 8 months and I'm still working with GWT and using this same technique. However, this time I'm working with the Maven GWT Plugin from Codehaus. In my last post, I wrote:

The results of modularizing your application are beneficial (shared code) and detrimental (you have to mvn install gwt-core whenever you make changes in shared classes). If you know of a way to configure the gwt-maven plugin to read sources from both gwt-core and gwt-webapp in hosted mode, I'd love to hear about it.

The good news is I found a solution for this, using the Builder Helper Maven Plugin. The GWT Maven Plugin's Productivity tip for multi-project setup has more information on how to configure this (note: we use IntelliJ and Eclipse on my project and did not need to configure this in a profile).

All was fine and dandy with this configuration until I wanted to be able to run hosted mode to develop/test everything in my library before including it in my main project. Luckily, you can still run mvn gwt:run on a JAR project. However, when you configure your pom.xml so sources are included in your JAR, you run into an issue: your *.java files will be copied to war/WEB-INF/classes and hosted mode will use these files as source rather than the ones you're editing in src/main/java.

To solve this, I changed my pom.xml to do two things:

  • Only copy resources right before packaging (in the test phase).
  • When packaging is complete, delete the *.java files from war/WEB-INF/classes (using Ant).

Below is the XML I used to make this possible. Please let me know if you have a way to simplify this configuration.

<plugin>
    <artifactId>maven-resources-plugin</artifactId>
    <version>2.4.1</version>
    <executions>
        <execution>
            <phase>test</phase>
            <goals>
                <goal>copy-resources</goal>
            </goals>
            <configuration>
                <outputDirectory>${project.build.outputDirectory}</outputDirectory>
                <resources>
                    <resource>
                        <directory>src/main/java</directory>
                    </resource>
                    <resource>
                        <directory>src/main/resources</directory>
                    </resource>
                </resources>
            </configuration>
        </execution>
    </executions>
</plugin>
<plugin>
    <artifactId>maven-antrun-plugin</artifactId>
    <version>1.3</version>
    <executions>
        <execution>
            <phase>package</phase>
            <goals>
                <goal>run</goal>
            </goals>
            <configuration>
                <tasks>
                    <delete>
                        <fileset dir="${project.build.outputDirectory}" includes="**/*.java"/>
                    </delete>
                </tasks>
            </configuration>
        </execution>
    </executions>
</plugin>

This solution seems to work pretty well. As far as developing your library in hosted mode, you'll need to configure two *.gwt.xml files, one that doesn't have an <entry-point> defined and one that does. Configure the one with the entry point as the <module> in your gwt-maven-plugin configuration.

As a side note, I found a few issues with the 1.1 version of the Maven GWT Archetype. Below are the steps I used to fix these issues and upgrade to GWT 1.7.0 (I realize 1.7.1 is out, but gwt-dev-1.7.1-mac.jar doesn't exist in Maven central).

First, create a new project by running the following from the command line:

mvn archetype:generate \
  -DarchetypeGroupId=org.codehaus.mojo \
  -DarchetypeArtifactId=gwt-maven-plugin \
  -DarchetypeVersion=1.1 \
  -DgroupId=com.yourcompany \
  -DartifactId=gwt-project -Dversion=1.0-SNAPSHOT -B

After creating the project, you'll need to modify the pom.xml as follows:

  1. Change the gwt-maven-plugin's version to 1.1.
  2. Change the ${gwtVersion} property to 1.7.0.
  3. Add <runTarget>Application.html</runTarget> to the <configuration> element of the plugin.
  4. Move Application.html and web.xml so they're under the "war" directory.
  5. Update Application.html to prepend the GWT module name in the <script> tag.

I hope these instructions help you create modular GWT projects with Maven. This setup is working great on my current project.

Posted in Java at Nov 03 2009, 09:37:07 AM MST 3 Comments

Packaging a SOFEA Application for Distribution

The project I'm working on is a bit different from those I'm used to. I'm used to working on web applications that are hosted on servers and customers access with their browser. SaaS if you will. My current client is different. They're a product company that sells applications and distributes them to customers via download and CD. Their customers install these applications on internal servers (supported servers include WebSphere, WebLogic and Tomcat).

The product I'm currently working on is structured as a SOFEA application and therefore consists of two separate modules - a backend and a frontend. Since it's installed in a servlet container, both modules are WARs and can be installed separately.

Building the backend and frontend as separate projects makes a lot of sense for two reasons:

  • In development, different teams can work on the frontend and backend projects.
  • Having them as separate projects allows them to be versioned separately.

However, having them as two separate projects does make it a bit more difficult for distribution. I'm writing this post to show you how I recently added support for distributing our application as 2 WARs or 1 WAR using the power of Maven, war overlays and the UrlRewriteFilter.

Project Setup
First of all, we have several different Maven modules, but the most important ones are as follows:

  • product-services
  • product-client
  • product-integration-tests

Of course, our modules aren't really named "product", but you get the point. The services project is really just a WAR project with Spring Security configured. It depends on other JAR modules that the services exist in. The client project is a GWT WAR that has a proxy servlet defined in its web.xml that makes it easier to develop. It also contains some UrlRewrite configuration that allows GWT Log's Remote Logging feature to work. The proxy servlet is something we don't want to ship with our product, so we have a separate web.xml for production vs. development. We do the substitution using the maven-war-plugin:

<plugin>
    <groupId>org.apache.maven.plugins</groupId>
    <artifactId>maven-war-plugin</artifactId>
    <version>2.0.2</version>
    <configuration>
        <!-- Production web.xml -->
        <webXml>src/main/resources/web.xml</webXml>
        <warSourceDirectory>war</warSourceDirectory>
        <!-- Exclude everything but urlrewrite JAR -->
        <warSourceExcludes>
            WEB-INF/lib/aop**,WEB-INF/lib/commons-**,WEB-INF/lib/gin-**,
            WEB-INF/lib/guice-**,WEB-INF/lib/gwt-**,WEB-INF/lib/gxt-**,
            WEB-INF/lib/junit-**
        </warSourceExcludes>
    </configuration>
</plugin>

I could exclude WEB-INF/lib/** and WEB-INF/classes/**, but in my particular project, we still want UrlRewrite in standalone mode, and we have some i18n properties files in WEB-INF/classes that are served up for Selenium tests.

With this configuration, we have a services WAR and a client WAR that can be installed and used by clients. To collapse them into one and make it possible to ship a single war, I turned to our product-integration-tests module. This module contains Selenium tests that test both types of distributions.

Merging 2 WARs into 1
The most important thing in the product-integration-tests module is that it creates a single WAR. First of all, it uses <packaging>war</packaging> to make this possible. The rest is done using the following 3 steps.

1. Its dependencies include the client and servlet WARs (and Selenium RC for testing).

<dependencies>
    <dependency>
        <groupId>com.company.app</groupId>
        <artifactId>product-services</artifactId>
        <version>1.0-SNAPSHOT</version>
        <type>war</type>
    </dependency>
    <dependency>
        <groupId>com.company.app</groupId>
        <artifactId>product-client</artifactId>
        <version>1.0-SNAPSHOT</version>
        <type>war</type>
    </dependency>
    <dependency>
        <groupId>org.seleniumhq.selenium.client-drivers</groupId>
        <artifactId>selenium-java-client-driver</artifactId>
        <version>1.0.1</version>
        <scope>test</scope>
    </dependency>
</dependencies>

2. The WAR created excludes the "integration-tests" part of the name:

<build>
    <finalName>product-${project.version}</finalName>
    ...
</build>

3. WAR overlays are configured so the everything in the client's WEB-INF directory is excluded from the merged WAR.

<plugin>
    <artifactId>maven-war-plugin</artifactId>
    <configuration>
        <!-- http://maven.apache.org/plugins/maven-war-plugin/overlays.html -->
        <overlays>
            <overlay>
                <groupId>com.company.app</groupId>
                <artifactId>product-services</artifactId>
                <excludes>
                    <!-- TODO: Rename to api.html (this is the Enunciate-generated documentation) -->
                    <exclude>index.html</exclude>
                </excludes>
            </overlay>
            <!-- No server needed in product-client -->
            <overlay>
                <groupId>com.company.app</groupId>
                <artifactId>product-client</artifactId>
                <excludes>
                    <exclude>WEB-INF/**</exclude>
                </excludes>
            </overlay>
            <!-- Only include META-INF/context.xml to set the ROOT path -->
            <overlay>
                <excludes>
                    <exclude>WEB-INF/**</exclude>
                </excludes>
            </overlay>
        </overlays>
    </configuration>
</plugin>

That's it! Using this configuration, it's possible to distribute a Maven-based SOFEA project as single or multiple WARs. However, there are some nuances.

One thing you might notice is the reference to META-INF/context.xml in the overlays configuration. This subtly highlights one issue I experienced when merging the WARs. In our GWT client, we're using URLs that point to our services at /product-services/*. This works in development (via a proxy servlet) and when the WARs are installed separately - as long as the services WAR is installed at /product-services. However, when they're merged, a little URL rewriting needs to happen. To do this, I added the UrlRewriteFilter to the product-services module and configured a simple rule.

<?xml version="1.0" encoding="UTF-8"?>
<!DOCENGINE urlrewrite PUBLIC "-//tuckey.org//DTD UrlRewrite 3.0//EN"
        "http://tuckey.org/res/dtds/urlrewrite3.0.dtd">

<urlrewrite use-query-string="true">
    <!-- Used when services are merged into WAR with GWT client -->
    <rule>
        <from>^/product-services/(.*)$</from>
        <to type="forward">/$1</to>
    </rule>
</urlrewrite>

Because the services URLs point to the root (/product-services), the merged WAR has to be installed as the ROOT application. When you're using Cargo with Tomcat and want to deploy to ROOT, you have to have a META-INF/context.xml with a path="" reference (ref: CARGO-516).

<Context path=""/>

It is possible to change the URLs in the client to be relative, but this gets seems to get messy when you're using separate WARs. When using relative URLs, I found I had to do solution using cross-context forwarding to get the results I wanted. Using a redirect instead of a forward worked, but resulted in the client talking to the server twice (once to get redirected, a second time for the actual call). Cross-context forwarding is supported by the UrlRewriteFilter and Tomcat, but I'm not sure WebSphere or WebLogic support it. The best solution is probably to change the URLs dynamically at runtime, possibly using some sort of deferred binding technique.

Testing with Cargo and Selenium
Once I had everything merged, I wanted to configure Cargo and Selenium to allow testing both distribution types. If I installed all 3 wars at the same time, the "product-services" WAR would be used by both the product-client.war and the product.war, so I had to use profiles to allow installing the single merged WAR or both WARs. Below is the profile I used for starting Cargo, deploying the merged WAR, starting Selenium RC and running Selenium tests.

<properties>
    <cargo.container>tomcat6x</cargo.container>
    <cargo.container.url>
        http://archive.apache.org/dist/tomcat/tomcat-6/v6.0.20/bin/apache-tomcat-6.0.20.zip
    </cargo.container.url>
    <cargo.host>localhost</cargo.host>
    <cargo.port>23433</cargo.port>
    <cargo.wait>false</cargo.wait>
    <cargo.version>1.0</cargo.version>

    <!-- *safari and *iexplore are additional options -->
    <selenium.browser>*firefox</selenium.browser>
</properties>
...
<profile>
    <id>itest-bamboo</id>
    <activation>
        <activeByDefault>false</activeByDefault>
    </activation>
    <build>
        <plugins>
            <plugin>
                <groupId>org.codehaus.cargo</groupId>
                <artifactId>cargo-maven2-plugin</artifactId>
                <version>${cargo.version}</version>
                <configuration>
                    <wait>${cargo.wait}</wait>
                    <container>
                        <containerId>${cargo.container}</containerId>
                        <log>${project.build.directory}/${cargo.container}/cargo.log</log>
                        <zipUrlInstaller>
                            <url>${cargo.container.url}</url>
                            <installDir>${installDir}</installDir>
                        </zipUrlInstaller>
                    </container>
                    <configuration>
                        <home>${project.build.directory}/${cargo.container}/container</home>
                        <properties>
                            <cargo.hostname>${cargo.host}</cargo.hostname>
                            <cargo.servlet.port>${cargo.port}</cargo.servlet.port>
                        </properties>
                        <!-- Deploy as ROOT since XHR requests are made to /product-services -->
                        <deployables>
                            <deployable>
                                <properties>
                                    <context>ROOT</context>
                                </properties>
                            </deployable>
                        </deployables>
                    </configuration>
                </configuration>
                <executions>
                    <execution>
                        <id>start-container</id>
                        <phase>pre-integration-test</phase>
                        <goals>
                            <goal>start</goal>
                        </goals>
                    </execution>
                    <execution>
                        <id>stop-container</id>
                        <phase>post-integration-test</phase>
                        <goals>
                            <goal>stop</goal>
                        </goals>
                    </execution>
                </executions>
            </plugin>
            <plugin>
                <groupId>org.codehaus.mojo</groupId>
                <artifactId>selenium-maven-plugin</artifactId>
                <version>1.0</version>
                <executions>
                    <execution>
                        <phase>pre-integration-test</phase>
                        <goals>
                            <goal>start-server</goal>
                        </goals>
                        <configuration>
                            <background>true</background>
                        </configuration>
                    </execution>
                </executions>
            </plugin>
            <plugin>
                <artifactId>maven-surefire-plugin</artifactId>
                <executions>
                    <execution>
                        <phase>integration-test</phase>
                        <goals>
                            <goal>test</goal>
                        </goals>
                        <configuration>
                            <excludes>
                                <exclude>none</exclude>
                            </excludes>
                            <includes>
                                <include>**/*SeleniumTest.java</include>
                            </includes>
                            <systemProperties>
                                <property>
                                    <name>selenium.browser</name>
                                    <value>${selenium.browser}</value>
                                </property>
                                <property>
                                    <name>cargo.port</name>
                                    <value>${cargo.port}</value>
                                </property>
                            </systemProperties>
                        </configuration>
                    </execution>
                </executions>
            </plugin>
        </plugins>
    </build>
</profile>

This profile is run by our Bamboo nightly tests with mvn install -Pitest-bamboo. The 2nd profile I added doesn't install the project's WAR, but instead installs the two separate WARs. Running mvn install -Pitest-bamboo,multiple-wars executes the Selenium tests against the multi-WAR distribution.

<profile>
    <id>multiple-wars</id>
    <activation>
        <activeByDefault>false</activeByDefault>
    </activation>
    <build>
        <plugins>
            <plugin>
                <groupId>org.codehaus.cargo</groupId>
                <artifactId>cargo-maven2-plugin</artifactId>
                <version>${cargo.version}</version>
                <configuration>
                    <configuration>
                        <home>${project.build.directory}/${cargo.container}/container</home>
                        <properties>
                            <cargo.hostname>${cargo.host}</cargo.hostname>
                            <cargo.servlet.port>${cargo.port}</cargo.servlet.port>
                        </properties>
                        <deployables>
                            <deployable>
                                <groupId>com.company.app</groupId>
                                <artifactId>product-client</artifactId>
                                <pingURL>http://${cargo.host}:${cargo.port}/product-client/index.html</pingURL>
                                <type>war</type>
                                <properties>
                                    <context>/product-client</context>
                                </properties>
                            </deployable>
                            <deployable>
                                <groupId>com.company.app</groupId>
                                <artifactId>product-services</artifactId>
                                <pingURL>
                                    http://${cargo.host}:${cargo.port}/project-services/index.jspx
                                </pingURL>
                                <type>war</type>
                                <properties>
                                    <context>/product-services</context>
                                </properties>
                            </deployable>
                        </deployables>
                    </configuration>
                </configuration>
            </plugin>
        </plugins>
    </build>
</profile>

I won't be including any information on authoring Selenium tests because there's already many good references. I encourage you to checkout the following if you're looking for Selenium testing techniques.

Summary
This article has shown you how I used Maven, war overlays and the UrlRewriteFilter to allow create different distributions of a SOFEA application. I'm still not sure which packaging (1 WAR vs. 2) mechanism is best, but it's nice to know there's options. If you package and distribute SOFEA applications, I'd love to hear about your experience in this area.

Posted in Java at Oct 06 2009, 01:17:38 AM MDT 2 Comments

How to use GWT 2.0 with Maven and Generate SOYC Reports

One of the most interesting features coming in GWT 2.0 is code splitting and the ability to use GWT.runAsync() to reduce the size of your application's initial download. This week, I learned how to use GWT 2.0 with my GWT 1.6/Maven project. Below are instructions on how to build and use the latest GWT with Maven.

  • Checkout GWT and setup GWT_TOOLS.
  • Set a GWT_VERSION environment variable to 2.0.0-SNAPSHOT (export GWT_VERSION=2.0.0-SNAPSHOT).
  • Build GWT with the ant command.
  • After building completes, install the GWT artifacts into your local Maven repository using the following commands:
    mvn install:install-file -DgroupId=com.google.gwt \
    -DartifactId=gwt-user -Dversion=2.0.0-SNAPSHOT \
    -Dpackaging=jar -Dfile=build/lib/gwt-user.jar
    
    mvn install:install-file -DgroupId=com.google.gwt \
    -DartifactId=gwt-servlet -Dversion=2.0.0-SNAPSHOT \
    -Dpackaging=jar -Dfile=build/lib/gwt-servlet.jar
    
    mvn install:install-file -DgroupId=com.google.gwt \
    -DartifactId=gwt-dev -Dversion=2.0.0-SNAPSHOT \
    -Dclassifier=mac -Dpackaging=jar -Dfile=build/lib/gwt-dev-mac.jar
    
    mkdir temp
    tar -zxf build/dist/gwt-mac-2.0.0-SNAPSHOT.tar.gz -C temp
    cd temp/gwt-mac-2.0.0-SNAPSHOT
    zip -0 gwt-mac-2.0.0-SNAPSHOT.zip lib*.jnilib
    cd ../..
    
    mvn install:install-file -DgroupId=com.google.gwt \
    -DartifactId=gwt-dev -Dversion=2.0.0-SNAPSHOT \
    -Dclassifier=mac-libs -Dpackaging=zip \
    -Dfile=temp/gwt-mac-2.0.0-SNAPSHOT/gwt-mac-2.0.0-SNAPSHOT.zip
    
    Thanks to Jason for his help with this script.
  • Modify the pom.xml of your GWT project to use the the gwt-maven-plugin from Codehaus. Of course, you'll need to modify the <runTarget> to fit your project.
    <plugin>
        <groupId>org.codehaus.mojo</groupId>
        <artifactId>gwt-maven-plugin</artifactId>
        <version>1.1</version>
        <configuration>
            <runTarget>org.appfuse.gwt.mvc.${entry.point}/${entry.point}.html</runTarget>
        </configuration>
        <executions>
            <execution>
                <goals>
                    <goal>compile</goal>
                    <goal>test</goal>
                </goals>
            </execution>
        </executions>
    </plugin>
    
  • Modify your dependencies to match the ones below. With the Codehaus plugin, dependencies are much more concise.
    <dependency>
        <groupId>com.google.gwt</groupId>
        <artifactId>gwt-servlet</artifactId>
        <version>${gwt.version}</version>
        <scope>compile</scope>
    </dependency>
    <dependency>
        <groupId>com.google.gwt</groupId>
        <artifactId>gwt-user</artifactId>
        <version>${gwt.version}</version>
        <scope>provided</scope>
    </dependency>
    
  • Add <gwt.version>2.0.0-SNAPSHOT</gwt.version> to the properties section of your pom.xml.
  • At this point, you should be able to compile your project with mvn gwt:compile and run it in hosted mode using mvn gwt:run.

Generate SOYC Reports
In Google's code splitting documentation, it mentions The Story of Your Compile (SOYC). From the documentation:

To obtain a SOYC report for your application, there are two steps necessary. First, add -soyc to the compilation options that are passed to the GWT compiler. This will cause the compiler to emit raw information about the compile to XML files in an -aux directory beside the rest of the compiled output. In that directory, you will see an XML file for each permutation and a manifest.xml file that describes the contents of all the others.

The second step is to convert that raw information into viewable HTML. This is done with the SoycDashboard tool.

The first step is not currently possible with the gwt-maven-plugin, so I created a patch for it.

If you patch the gwt-maven-plugin and install it locally, make sure and change the version in your pom.xml to 1.2-SNAPSHOT.

To use the SoycDashboard tool, you'll need to install the gwt-soyc-vis.jar.

mvn install:install-file -DgroupId=com.google.gwt \
-DartifactId=gwt-soyc-vis -Dversion=2.0.0-SNAPSHOT \
-Dpackaging=jar -Dfile=build/lib/gwt-soyc-vis.jar

Now you can generate SOYC reports with mvn gwt:compile -Dgwt.compiler.soyc=true. You can also add <soyc>true</soyc> to the <configuration> section of the gwt-maven-plugin.

The second step (converting the raw information into viewable HTML) is possible using java from the command-line, or by using the exec-maven-plugin. Here's the (lengthy) command-line version:

java -Xmx1024m -cp /Users/mraible/.m2/repository/com/google/gwt/gwt-soyc/2.0.0-SNAPSHOT/gwt-soyc-2.0.0-SNAPSHOT.jar:/Users/mraible/.m2/repository/com/google/gwt/gwt-dev/2.0.0-SNAPSHOT/gwt-dev-2.0.0-SNAPSHOT-mac.jar com.google.gwt.soyc.SoycDashboard -resources ~/.m2/repository/com/google/gwt/gwt-soyc/2.0.0-SNAPSHOT/gwt-soyc-2.0.0-SNAPSHOT.jar -out target/soyc-report target/extra/org.appfuse.gwt.mvc.MVC/soycReport/stories0.xml.gz target/extra/org.appfuse.gwt.mvc.MVC/soycReport/dependencies0.xml.gz target/extra/org.appfuse.gwt.mvc.MVC/soycReport/splitPoints0.xml.gz

In this example, I'm using the files from stories0.xml.gz, dependencies0.xml.gz, splitPoints0.xml.gz. In the soycReport output directory, there's 5 of each these files and I'm not sure what the difference between reports is. Hopefully someone on the GWT team can elaborate. The exec-maven-plugin version is as follows:

<plugin>
    <groupId>org.codehaus.mojo</groupId>
    <artifactId>exec-maven-plugin</artifactId>
    <version>1.1</version>
    <configuration>
        <executable>java</executable>
        <arguments>
            <argument>-cp</argument>
            <argument>
                ${settings.localRepository}/com/google/gwt/gwt-soyc/2.0.0-SNAPSHOT/gwt-soyc-2.0.0-SNAPSHOT.jar:${settings.localRepository}/com/google/gwt/gwt-dev/2.0.0-SNAPSHOT/gwt-dev-2.0.0-SNAPSHOT-${platform}.jar
            </argument>
            <argument>com.google.gwt.soyc.SoycDashboard</argument>
            <argument>-out</argument>
            <argument>target/soyc-report</argument>
            <argument>-resources</argument>
            <argument>
                ${settings.localRepository}/com/google/gwt/gwt-soyc/2.0.0-SNAPSHOT/gwt-soyc-2.0.0-SNAPSHOT.jar
            </argument>
            <argument>${project.build.directory}/extra/org.appfuse.gwt.mvc.MVC/soycReport/stories0.xml.gz</argument>
            <argument>${project.build.directory}/extra/org.appfuse.gwt.mvc.MVC/soycReport/dependencies0.xml.gz</argument>
            <argument>${project.build.directory}/extra/org.appfuse.gwt.mvc.MVC/soycReport/splitPoints0.xml.gz</argument>
        </arguments>
    </configuration>
</plugin>

After configuring this plugin in your project, you should be able to run mvn gwt:compile exec:exec and open the generated report (at target/soyc-report/SoycDashboard-index.html). Currently, there doesn't seem to be much documentation on SOYC. Fred Sauer's recent presentation talks a bit about SOYC and GWT.runAsync(), but that's about it.

To figure out how to use GWT 2.0 with Maven, I used my GWT MVC Example project. The first SOYC report I generated said the initial download was 108,967 KB. To integrate GWT.runAsync(), I modified all the project's controllers so their handleEvent() methods changed from this:

public void handleEvent(AppEvent event) {
    onViewHome(event);
}

To this:

public void handleEvent(final AppEvent event) {
    GWT.runAsync(new RunAsyncCallback() {
        public void onFailure(Throwable throwable) {
            Window.alert(throwable.getMessage());
        }

        public void onSuccess() {
            onViewHome(event);
        }
    });
}

When I generated a new SOYC report, the initial download size was reduced to 56,718 KB. Furthermore, I was able to see that my "Leftovers code" consisted of 63,175 KB. I'm sure there's better ways to split my project using GWT.runAsync(), but I'm happy to see I was able to reduce the initial download by 50%.

If you'd like to try GWT 2.0, you can can download my gwt-mvc example project. To build/run this project, you'll need to 1) build and install GWT, 2) patch gwt-maven-plugin and 3) run mvn gwt:compile exec:exec to generate the SOYC report. In an ideal world, the gwt-maven-plugin can be enhanced to generate the SOYC report (rather than using the exec-maven-plugin). In the meantime, I think it's pretty cool that you can try out GWT 2.0 features while they're still being developed.

Posted in Java at Jun 25 2009, 11:45:04 PM MDT 11 Comments

Implementing OAuth with GWT

I've heard about OAuth for quite some time, but never had an opportunity to implement it on a project. For a good explanation of what OAuth is, see its Introduction. Here's an excerpt:

...it allows you the User to grant access to your private resources on one site (which is called the Service Provider), to another site (called Consumer, not to be confused with you, the User). While OpenID is all about using a single identity to sign into many sites, OAuth is about giving access to your stuff without sharing your identity at all (or its secret parts).

The reason I needed OAuth was to interact with the Google Contacts API. I've always hated how sites make you import all your contacts from Gmail. I wanted to develop a system that'd let you simply read your contacts from Google in real-time.

Since the application I'm working on uses GWT, I chose to implement an OAuth client in GWT. After googling for "gwt oauth", I found two examples. Unfortunately, neither worked out-of-the-box.

The good news is I did manage to create a working solution. The bad news is it only seems to work at random. That's right folks, I created a solution that only works 50% of the time. I'm somewhat embarrassed to post it here, but I also realize the power of open source and community. By sharing, I hope we can find the flaws in my logic and come up with a solution for all GWT applications.

The best project for OAuth libraries seems to be oauth on Google Code. However, you'll notice that there is no JavaScript implementation listed on the homepage. I did look at the Java implementation, but quickly realized it wouldn't be usable in GWT. Therefore, I opted for the JavaScript implementation.

OAuth consists of several steps. The following diagram explains the authentication flow nicely.
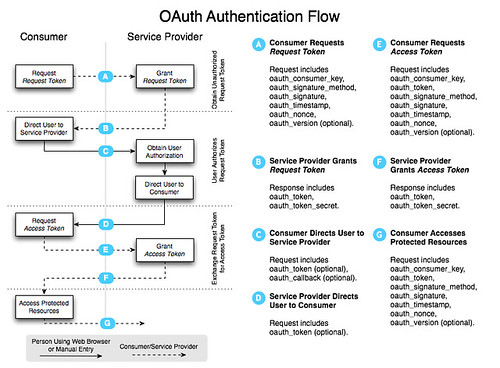
OAuth Authentication Flow

In a nutshell, you have to complete the following steps:

  1. Get a token from the service provider.
  2. Redirect user to service provider to grant access and redirect back to application.
  3. Request access token to access protected resources.
  4. Access protected resources and pull/push data.

To access a service provider's OAuth service, you'll likely need to start by registering your application. For Google, OAuth Authentication for Web Applications is an excellent resource. Google's OAuth Playground is a great way to with the Google Data APIs after you've registered.

Now that you know how OAuth works, let's look at how I implemented it with GWT. I started by adding the necessary JavaScript references to my *.gwt.xml file.

<script src="//oauth.googlecode.com/svn/code/javascript/oauth.js"/>
<script src="//oauth.googlecode.com/svn/code/javascript/sha1.js"/>

Next, I needed a way to sign the request. I tried to use Sergi Mansilla's OAuth.java for this, but discovered issues with how the parameters were being written with GWT 1.6. I opted for Paul Donnelly's makeSignedRequest function instead. By adding this to my application's HTML page, I'm able to call it using the following JSNI method:

public native static String signRequest(String key, String secret, String tokenSecret, String url) /*-{
    return $wnd.makeSignedRequest(key, secret, tokenSecret, url);
}-*/;

After the URL is signed, it needs to be sent to the provider to get a request token. To do this, I used GWT's RequestBuilder and created a send() method:

protected void send(RequestCallback cb, String URL) {
    RequestBuilder builder = new RequestBuilder(RequestBuilder.GET, URL);
    builder.setTimeoutMillis(10000);
    builder.setCallback(cb);
    
    Request req = null;
    try {
        req = builder.send();
    } catch (RequestException e) {
        cb.onError(req, e);
    }
}

If you try this with Google's Request Token URL in GWT's hosted mode, nothing will happen. Compile/browse to Safari and you'll still see nothing. Try it in Firefox and you'll see the following.
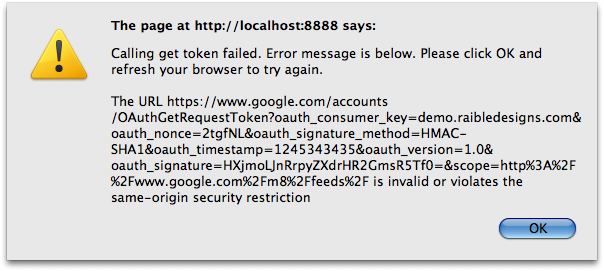
SOP Error

To workaround browsers' Same Origin Policy, I added a proxy servlet to send the requests. I started with Jason Edwards's ProxyServlet and modified it to fit my needs. I then registered it in both *.gwt.xml and web.xml.

<servlet path="/google/" class="org.appfuse.gwt.servlet.AlternateHostProxyServlet"/>

Now, before calling the send() method, I replace the start of the URL so the request would be routed through the servlet.

public void getToken(RequestCallback cb) {
    String url = signRequest(provider.getConsumerKey(), 
                             provider.getConsumerSecret(), 
                             "", provider.getRequestTokenURL());
    url = url.replace("https://www.google.com/", "/google/");
    send(cb, url);
}

When the request returns, I create two cookies by calling a createOAuthCookies() method with the payload returned:

public static String[] createOAuthCookies(String data) {
    String oauth_token = data.substring(data.indexOf("oauth_token=") + 12);
    oauth_token = oauth_token.substring(0, oauth_token.indexOf("&"));

    String oauth_token_secret = data.substring(data.indexOf("oauth_token_secret=") + 19);

    Cookies.setCookie("oauth_token", URL.decode(oauth_token));
    Cookies.setCookie("oauth_token_secret", URL.decode(oauth_token_secret));
    return new String[]{oauth_token, oauth_token_secret};
}

The next step is to authorize the token. This is where things got tricky with my proxy servlet and I had to add some special logic for GWT. Google was sending back a 302 with a Location header, but it wasn't hitting the onResponseReceived() method in my callback. For this reason, I had to change it to a 200 status code and add the redirect location to the body. I also discovered that sometimes they'd return an HTML page with a <meta http-equiv="refresh" ...> tag. When using Twitter, I discovered the full HTML for the allow/deny page was returned. Below is the callback I'm using. WindowUtils is a class I got from Robert Hanson and the gwt-widget project.

public void onResponseReceived(Request request, Response response) {
    String text = response.getText();
    if (response.getStatusCode() == 200 && response.getText().startsWith("http")) {
        WindowUtils.changeLocation(response.getText());
    } else {
        // look for meta-tag that refreshes and grab its URL
        if (text.contains("";
            String url = text.substring(text.indexOf(tokenToStartWith) + tokenToStartWith.length());
            url = url.substring(0, url.indexOf(tokenToEndWith) + tokenToEndWith.length());
            WindowUtils.changeLocation(url);
        } else {
            // Twitter returns a full HTML page, so redirect to the authorize URL manually
            if (provider instanceof Twitter) {
                String url = provider.getAuthorizeTokenURL();
                url = url.replace("$1", OAuthRequest.getAuthToken());
                url = url.replace("$2", DefaultRequest.getCurrentLocation());
                WindowUtils.changeLocation(url);
            } else {
                onError(request, new RequestException(text));
            }
        }
    }
}

public void onError(Request request, Throwable caught) {
    Window.alert("Calling authorize token failed. " + OAuthPage.STANDARD_ERROR + "\n\n" + caught.getMessage());
}

The 3rd step is to get an access token. The most important thing to remember when you do this is to include the "oauth_token_secret" value when signing the request.

signRequest(provider.getConsumerKey(), provider.getConsumerSecret(), 
            getAuthTokenSecret(), url);

After this completes with a 200, I create the cookies again (since oauth_token and oauth_token_secret are returned in the body), then call the API to get a list of contacts. The ContactsRequests class is responsible for making the call. The DefaultRequest class contains the send() method as well as utility methods to get the cookie values of the oauth tokens.

public class ContactsRequest extends DefaultRequest {
    private static final String GOOGLE_CONTACTS_URL = 
        "http://www.google.com/m8/feeds/contacts/default/thin?oauth_token=$1";
    private OAuthProvider provider;

    public ContactsRequest(OAuthProvider provider) {
        this.provider = provider;
    }

    public void getContacts(RequestCallback cb) {
        String url = GOOGLE_CONTACTS_URL.replace("$1", getAuthToken());
        url = signRequest(provider.getConsumerKey(), provider.getConsumerSecret(), 
                          getAuthTokenSecret(), url);

        String proxiedURLPrefix = "/contacts/";
        // allow for deploying at /gwt-oauth context
        if (WindowUtils.getLocation().getPath().contains("gwt-oauth")) {
            proxiedURLPrefix = "/gwt-oauth" + proxiedURLPrefix;
        }

        url = url.replace("http://www.google.com/", proxiedURLPrefix);

        send(cb, url);
    }
}

If all goes well, the response contains the data you requested and it's used to populate a textarea (at least in this demo application). Of course, additional processing needs to occur to parse/format this data into something useful.

This all sounds pretty useful for GWT applications, right? I believe it does - but only if it works consistently. I sent a message to the OAuth Google Group explaining the issues I've had.

I'm trying to use the JavaScript API to authenticate with OAuth from a GWT application. I've got it working with both Google and Twitter's OAuth implementations. However, it seems to fail to sign the URL at random. In other words, it works 1 out of 3 times. ... Any idea why this could be happening?

I received a response with a cleaner makeSignedRequest() function. I tried it and, unfortunately, it seems to be equally unreliable. I suspect the problem is with the OAuth JavaScript implementation, GWT's interpretation of it, or that OAuth isn't as mature as it appears to be. I'd like to think one of the first two causes the problem.

To make it easier to create a robust example of GWT and OAuth, I created a gwt-oauth project you can download or view online. Please keep in mind the demo is likely to be flakey. If you're persistent and try enough times, it's likely to work. Firefox seems to succeed moreso than Safari or Chrome. If you have any suggestions for improving this example, please let me know.
Posted in Java at Jun 18 2009, 01:59:13 PM MDT 13 Comments

Creating a Facebook-style Autocomplete with GWT

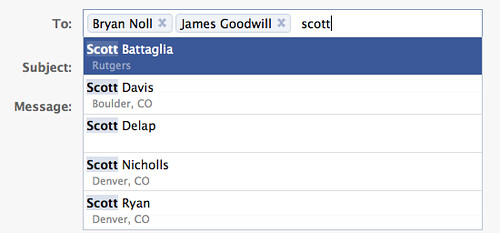
Have you used the "To:" widget on on Facebook or LinkedIn when composing a message? It's an autocompleter that looks up contact names and displays them as you type. It looks like a normal textbox (a.k.a. <input type="text">), but wraps the contact name to allow you to easily delete it. Here's a screenshot of what Facebook's widget looks like.

Facebook Autocomplete

Last week, I was asked to create a similar widget with GWT. After searching the web and not finding much, I decided to try writing my own. The best example I found on how to create this widget was from James Smith's Tokenizing Autocomplete jQuery Plugin. I used its demo to help me learn how the DOM changed after you selected a contact.

GWT's SelectBox allows you to easily create an autocompleter. However, it doesn't have support for multiple values (for example, a comma-delimited list). The good news is it's not difficult to add this functionality using Viktor Zaprudnev's HowTo. Another feature you might want in a SelectBox is to populate it with POJOs. GWT SuggestBox backed by DTO Model is a good blog post that shows how to do this.

Back to the Facebook Autocompleter. To demonstrate how to create this widget in GWT, I put together a simple application. You can view the demo or download it. The meat of this example is in an InputListWidget. After looking at the jQuery example, I learned the widget was a <div> with a unordered list (<ul>). It starts out looking like this:

<ul class="token-input-list-facebook">
    <li class="token-input-input-token-facebook">
        <input type="text" style="outline-color: -moz-use-text-color; outline-style: none; outline-width: medium;"/>
    </li>
</ul>

I did this in GWT using custom BulletList and ListItem widgets (contained in the download).

final BulletList list = new BulletList();
list.setStyleName("token-input-list-facebook");

final ListItem item = new ListItem();
item.setStyleName("token-input-input-token-facebook");

final TextBox itemBox = new TextBox();
itemBox.getElement().setAttribute("style", 
        "outline-color: -moz-use-text-color; outline-style: none; outline-width: medium;");

final SuggestBox box = new SuggestBox(getSuggestions(), itemBox);
box.getElement().setId("suggestion_box");

item.add(box);
list.add(item);

After tabbing off the input, I noticed that it was removed and replaced with a <p> around the value and a <span> to show the "x" to delete it. After adding a couple items, the HTML is as follows:

<ul class="token-input-list-facebook">
    <li class="token-input-token-facebook">
        <p>What's New Scooby-Doo?</p>
        <span class="token-input-delete-token-facebook">x</span>
    </li>
    <li class="token-input-token-facebook">
        <p>Fear Factor</p>
        <span class="token-input-delete-token-facebook">x</span>
     </li>
     <li class="token-input-input-token-facebook">
         <input type="text" style="outline-color: -moz-use-text-color; outline-style: none; outline-width: medium;"/>
     </li>
</ul>

To do this, I created a deselectItem() method that triggers the DOM transformation.

private void deselectItem(final TextBox itemBox, final BulletList list) {
    if (itemBox.getValue() != null && !"".equals(itemBox.getValue().trim())) {
        /** Change to the following structure:
         * <li class="token-input-token-facebook">
         * <p>What's New Scooby-Doo?</p>
         * <span class="token-input-delete-token-facebook">x</span>
         * </li>
         */

        final ListItem displayItem = new ListItem();
        displayItem.setStyleName("token-input-token-facebook");
        Paragraph p = new Paragraph(itemBox.getValue());

        displayItem.addClickHandler(new ClickHandler() {
            public void onClick(ClickEvent clickEvent) {
                displayItem.addStyleName("token-input-selected-token-facebook");
            }
        });

        Span span = new Span("x");
        span.addClickHandler(new ClickHandler() {
            public void onClick(ClickEvent clickEvent) {
                list.remove(displayItem);
            }
        });

        displayItem.add(p);
        displayItem.add(span);
        
        list.insert(displayItem, list.getWidgetCount() - 1);
        itemBox.setValue("");
        itemBox.setFocus(true);
    }
}

This method is called after selecting a new item from the SuggestBox:

box.addSelectionHandler(new SelectionHandler<SuggestOracle.Suggestion>() {
    public void onSelection(SelectionEvent selectionEvent) {
        deselectItem(itemBox, list);
    }
});

I also added the ability for you to type in an e-mail address manually and to delete the previous item when you backspace from the input field. Here's the handler that calls deselectItem() and allows deleting with backspace:

// this needs to be on the itemBox rather than box, or backspace will get executed twice
itemBox.addKeyDownHandler(new KeyDownHandler() {
    public void onKeyDown(KeyDownEvent event) {
        if (event.getNativeKeyCode() == KeyCodes.KEY_ENTER) {
            // only allow manual entries with @ signs (assumed email addresses)
            if (itemBox.getValue().contains("@"))
                deselectItem(itemBox, list);
        }
        // handle backspace
        if (event.getNativeKeyCode() == KeyCodes.KEY_BACKSPACE) {
            if ("".equals(itemBox.getValue().trim())) {
                ListItem li = (ListItem) list.getWidget(list.getWidgetCount() - 2);
                Paragraph p = (Paragraph) li.getWidget(0);

                list.remove(li);
                itemBox.setFocus(true);
            }
        }
    }
});

I'm happy with the results, and grateful for the jQuery plugin's CSS. However, it still has one issue that I haven't been able to solve: I'm unable to click on a list item (to select it) and then delete it (with the backspace key). I believe this is because I'm unable to give focus to the list item. Here's the code that highlights the item and you can see the commented-out code that doesn't work.

displayItem.addClickHandler(new ClickHandler() {
    public void onClick(ClickEvent clickEvent) {
        displayItem.addStyleName("token-input-selected-token-facebook");
    }
});

/** TODO: Figure out how to select item and allow deleting with backspace key
displayItem.addKeyDownHandler(new KeyDownHandler() {
    public void onKeyDown(KeyDownEvent event) {
        if (event.getNativeKeyCode() == KeyCodes.KEY_BACKSPACE) {
            list.remove(displayItem);
        }
    }
});
displayItem.addBlurHandler(new BlurHandler() {
    public void onBlur(BlurEvent blurEvent) {
        displayItem.removeStyleName("token-input-selected-token-facebook");
    }
});
*/

If you know of a solution to this issue, please let me know. Feel free to use this widget and improve it as you see fit. I'd love to see this as a native widget in GWT. In the meantime, here's the GWT Facebook-style Autocomplete demo and code.

Posted in Java at Jun 05 2009, 07:05:10 AM MDT 25 Comments

Optimizing a GWT Application with Multiple EntryPoints

Building a GWT application is an easy way for Java Developers to write Ajax applications. However, it can be difficult to release a GWT application to production before it's finished. One of the most important things I've learned in Software Development is to get a new application into production as soon as possible. Not only does getting it from dev → qa → prod verify your process works, it also can do a lot to test the viability of the new application.

One of the biggest issues with GWT applications is size. The project I'm working on compiles Java to JavaScript and creates ~570K *.cache.html files (one for each modern browser). These files end up being around 180K gzipped. I believe this is an OK size for an entire application. However, if you're going to release early, release often with GWT, chances are you'll just want to release one feature at a time.

When the first feature was completed on my project, the *.cache.html files were around 300K. Rather than using branches to release to QA and UAT, bug fixes and new features were developed on trunk. Unfortunately, the QA and UAT process took several weeks longer than expected so by the time the feature was ready to release, the *.cache.html files had grown to around ~570K. The reason the file had grown so much was because it included all of the other features.

Earlier this week, while running to a dentist appointment, I thought of a solution to this problem. The basic idea was to optimize the compilation process so only the to-be-released feature was included. Even better, the solution didn't require more modularization. The results:

Before: *.cache.html -> 569K, gzipped 175K
After: *.cache.html -> 314K, gzipped 100K

According to my calculations, that's a 56% reduction in size. How did I do it?

  1. Created a new FeatureName.java EntryPoint with only the to-be-released features imported.
  2. Created a new FeatureName.gwt.xml that references the new EntryPoint.
  3. Copied old (kitchen-sink) EntryPoint.html to FeatureName.html and changed the reference to the nocache.js file.
  4. Created a Maven profile that allows using -PFeatureName to build a FeatureName-only module.

One downside to doing things this way is it's possible to create a WAR that has the same name and different features. Surely the Maven Overlords would frown upon this. Since this is just a temporary solution to release features incrementally, I'm not too worried about it. A possible workaround is to create different WAR names when a feature's profile is activated. I believe the true "Maven way" would be to make the "kitchen sink" application into a JAR and have several WAR modules with the different EntryPoints. Seems a bit complicated to me.

Other than this Maven publishing issue, the only other issue I can foresee is keeping the two EntryPoints and HTML files in synch. Then again, the separate files allow a feature to be customized for the release and can be deleted when its no longer needed.

What do you think? Do you know of a better way to compile a GWT application so it only contains certain features?

Posted in Java at Mar 25 2009, 04:00:37 PM MDT 12 Comments