Matt RaibleMatt Raible is a Web Developer and Java Champion. Connect with him on LinkedIn.

The Angular Mini-Book The Angular Mini-Book is a guide to getting started with Angular. You'll learn how to develop a bare-bones application, test it, and deploy it. Then you'll move on to adding Bootstrap, Angular Material, continuous integration, and authentication.

Spring Boot is a popular framework for building REST APIs. You'll learn how to integrate Angular with Spring Boot and use security best practices like HTTPS and a content security policy.

For book updates, follow @angular_book on Twitter.

The JHipster Mini-Book The JHipster Mini-Book is a guide to getting started with hip technologies today: Angular, Bootstrap, and Spring Boot. All of these frameworks are wrapped up in an easy-to-use project called JHipster.

This book shows you how to build an app with JHipster, and guides you through the plethora of tools, techniques and options you can use. Furthermore, it explains the UI and API building blocks so you understand the underpinnings of your great application.

For book updates, follow @jhipster-book on Twitter.

10+ YEARS


Over 10 years ago, I wrote my first blog post. Since then, I've authored books, had kids, traveled the world, found Trish and blogged about it all.

Hyperproductive JSF 2.0 with Ed Burns at Jazoon

This morning, I attended Ed Burn's Talk on Hyperproductive JSF 2.0 at Jazoon. As you might know, I've been a critic of JSF for many years. However, it is one of the most used Java web frameworks, so I was hoping to learn how it's improved in the latest version. Below are my notes from Ed's presentation.

Ed's Plan for our Time Investment:

  1. Define a productive development environment
  2. JSF for greenfield and brownfield projects
  3. List the top 9 productivity killers with JSF projects and solutions

"I am always doing that which I cannot do, in order that I may learn how to do it." -- Pablo Picasso

Software is an executable representation of knowledge, a byproduct of learning how to solve a problem. Knowledge is something that changes as more information comes in. A productive environment makes it as easy as possible to learn how to solve a problem. Learning is an iterative process. Early iterations don't need to be optimal. Later iterations do ... and they need to be maintainable. First is the hardest. Fast iterations are they key. Spring Roo and Play are examples of frameworks that make the first iteration very fast.

You should use a tool to jumpstart JSF development: copy from an old project, use a Maven archetype or use your IDE. With greenfield development, you don't have to bother learning the byproduct of other people's learning. It's a great opportunity to pad your resume with the latest hot technologies. With brownfield development, it's vitally important to understand the existing solution and hidden assumptions. You're also much more constrained in your technology choices. If you want to change, you'll need to come up with a migration strategy, which can be difficult. JSF works well for both because it's not just a runtime framework, it's also a conceptual framework. You need to understand how your framework handles data conversion, validation, page flow, persistence integration, I18N, L10N, A11Y, Web standards and user friendliness.

Top 9 JSF Productivity Killers:

  1. Time wasting deployment step
  2. The perils of "there's more than one way to do it"
  3. Lengthy and painful developer on-boarding process
  4. Misused logging and misunderstood error messages
  5. Phantoms
  6. Under-utilized developer tools
  7. Premature optimization
  8. Difficulty in doing TDD
  9. Lack of an app framework

Time wasting deployment step
ZeroTurnaround solves this problem with JRebel, but there's other ways to do it. Some of the killers of flow state: 1) one large war file, 2) underutilizing dynamic language features, 3) complex server environment and 4) build process is redoing work unnecessarily. To stop the time wasting deployment step, the most important things you can do are as follows:

  • Configure your IDE correctly. In Eclipse, compile directly into WEB-INF/classes and use continuous compilation. With NetBeans, use GlassFish.
  • Don't do control-flow programming in XML.

Ed then showed a simple demo that showed how you can use Groovy to create a JSF UI Component. He also mentioned that Groovy can be used to author any JSF artifact. The benefit of this is you can simply edit and save a .groovy file without having to recompile or redeploy. Unfortunately, using Groovy didn't eliminate the XML syntax for pages or the XML for defining UI components.

The perils of "there's more than one way to do it"
JSF is very flexible, but flexibility is, more often than not, abused. There's a lack of convention for common things (e.g. master-detail, JSF concepts like converter, validator, etc.). The best way to fix this is to establish the norms for a project and stick with them. For example, Neil Griffin has a good blog entry for the different kind of managed beans you can create. Develop recommendations like Neil's and use them on all your projects.

Lengthy developer on-boarding process
Stick with standards when possible (at least have a common project description and build system across projects). Be committed to periodic cleanup cycles, including documenting for re-use. Pick one JSF component library and stick with it. Support for mixing and switching component libraries has improved with JSF 2, but it's still recommended you use only one.

Misused logging and misunderstood error messages
JSF is notorious for cryptic error messages and very long stack traces. It's still a problem, but the JSF Team is still working on improving them. Good tip: use the <ui:debug> tag. Its recordStateSize="true" attribute can be especially useful. If you're using PrimeFaces, add trace=true to request URLs.

Phantoms
Phantoms is when running code is not the same as the code you are modifying or wrong version of library gets picked up. You should have the capability to hit breakpoints anywhere in your entire software stack, including core Java sources. This is one of the most useful things about open source software. Solutions to phantoms: 1) put a timestamp on every redeploy and have the timestamp appear in the system log 2) write the running library stack to the system log (each library and version being used) and make it easy to compare one developer's runtime stack with another's 3) consider doing all work in tightly controlled VMs (checkout the VM at the beginning of the day, do your work, commit your changes and throw your VM away at the end of the day).

Under-utilizing developer tools
Make sure everyone has the fastest machines available and as much screen real estate as desired. Hardware is much cheaper than developer time. Another tip is to use Hudson as your butler. It's not just the team CI server. In other words, take advantage of automation wherever you can.

Premature Optimization
Keep in mind the trade-offs between readability and performance. When using frameworks such as JSF, don't try to outsmart the implementation. Rather, use the framework as intended and use open-source contributions to treat performance problems. Example, EL expressions got a lot faster between EE5 and EE6. If you spent time trying to optimize EL expressions, you might've been wasting your time.

Difficulty in doing TDD
Try to figure out why TDD is difficult in your company. For JSF, strongly consider JBoss's JSFUnit. Write your testcases to extend from Cactus ServletTestCase and leverage HtmlUnit (JSFUnit does this for you).

Lack of an app framework
Create common components: login panel, CRUD components, etc. If you don't have an app framework, build one over time.

Conclusion
This was an interesting talk by Ed. The dynamics of the room where a bit interesting. Jazoon is held in a movie theater, much like Devoxx. However, it appears there's a spotlight on the speaker that makes it very difficult to see the audience. I don't remember having this problem at Devoxx. Ed asked the audience quite a few questions, but it seemed he had a lot of difficulty in seeing if folks raised their hands. This made for some periods of awkward silence.

Personally, I was hoping to learn some new whizbang tips about JSF that I was not aware of. Unfortunately, I didn't learn anything new and wasn't that impressed with the Groovy demo.

I think Ed's tips about things outside of JSF were good, especially buying developers good hardware. I've seen many companies, including my current client, skimp on developer hardware and cause developer frustration because of it. I think it's great when companies provide developers top-of-the-line hardware and eliminate frustration over CPU and memory resources. LinkedIn and Time Warner Cable both provide their developers with Mac Pros and MacBook Pros as well as huge monitors. IMO, this is one of the best benefits you can provide your engineers.

Posted in Java at Jun 23 2011, 04:53:10 AM MDT 3 Comments

Java Web Application Security - Part V: Penetrating with Zed Attack Proxy

Web Application Security is an important part of developing applications. As developers, I think we often forget this, or simply ignore it. In my career, I've learned a lot about web application security. However, I only recently learned and became familiar with the rapidly growing "appsec" industry.

I found a disconnect between what appsec consultants were selling and what I was developing. It seemed like appsec consultants were selling me fear, mostly because I thought my apps were secure. So I set out on a mission to learn more about web application security and penetration testing to see if my apps really were secure. This article is part of that mission, as are the previous articles I've written in this series.

When I first decided I wanted to do a talk on Webapp Security, I knew it would be more interesting if I showed the audience how to hack and fix an application. That's why I wrote it into my original proposal:

Webapp Security: Develop. Penetrate. Protect. Relax.
In this session, you'll learn how to implement authentication in your Java web applications using Spring Security, Apache Shiro and good ol' Java EE Container Managed Authentication. You'll also learn how to secure your REST API with OAuth and lock it down with SSL.

After learning how to develop authentication, I'll introduce you to OWASP, the OWASP Top 10, its Testing Guide and its Code Review Guide. From there, I'll discuss using WebGoat to verify your app is secure and commercial tools like webapp firewalls and accelerators.

At the time, I hadn't done much webapp pentesting. You can tell this from the fact that I mentioned WebGoat as the pentesting tool. From WebGoat's Project page:

WebGoat is a deliberately insecure J2EE web application maintained by OWASP designed to teach web application security lessons. In each lesson, users must demonstrate their understanding of a security issue by exploiting a real vulnerability in the WebGoat application. For example, in one of the lessons the user must use SQL injection to steal fake credit card numbers. The application is a realistic teaching environment, providing users with hints and code to further explain the lesson.

What I really meant to say and use was Zed Attack Proxy, also known as OWASP ZAP. ZAP is a Java Desktop application that you setup as a proxy for your browser, then use to find vulnerabilities in your application. This article explains how you can use ZAP to pentest a web applications and fix its vulnerabilities.

The application I'll be using in this article is the Ajax Login application I've been using throughout this series. I think it's great that projects like Damn Vulnerable Web App and WebGoat exist, but I wanted to test one that I think is secure, rather than one I know is not secure. In this particular example, I'll be testing the Spring Security implementation, since that's the framework I most often use in my open source projects.

Zed Attack Proxy Tutorial

Download and Run the Application
To begin, download the application and expand it on your hard drive. This app is the completed version of the Ajax Login application referenced in Java Web Application Security - Part II: Spring Security Login Demo. You'll need Java 6 and Maven installed to run the app. Run it using mvn jetty:run and open http://localhost:8080 in your browser. You'll see it's a simple CRUD application for users and you need to login to do anything.

Install and Configure ZAP
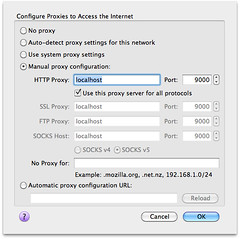
The Zed Attack Proxy (ZAP) is an easy to use integrated penetration testing tool for finding vulnerabilities in web applications. Download the latest version (I used 1.3.0) and install it on your system. After installing, launch the app and change the proxy port to 9000 (Tools > Options > Local Proxy). Next, configure your browser to proxy requests through port 9000 and allow localhost requests to be proxied. I used Firefox 4 (Preferences > Advanced > Network > Connection Settings). When finished, your proxy settings should look like the following screenshot:

Firefox Proxy Settings

Another option (instead of removing localhost) is to add an entry to your hosts file with your production domain name. This is what I've done for this demo.

127.0.0.1       demo.raibledesigns.com

I've also configured Apache to proxy requests to Jetty with the following mod_proxy settings in my httpd.conf:

<IfModule mod_proxy.c>
    ProxyRequests Off 
    ProxyPreserveHost Off 

    <VirtualHost *:80>
       ProxyPass  /  http://localhost:8080/
    </VirtualHost>

    <VirtualHost *:443>
        SSLEngine on
        SSLProxyEngine on
        SSLCertificateFile "/etc/apache2/ssl.key/server.crt"
        SSLCertificateKeyFile "/etc/apache2/ssl.key/server.key"

        ProxyPass  /  https://localhost:8443/
    </VirtualHost>
</IfModule>

Perform a Scan
Now you need to give ZAP some data to work with. Using Firefox, I navigated to http://demo.raibledesigns.com and browsed around a bit, listing users, added a new one and deleted an existing one. After doing this, I noticed a number of flags in the ZAP UI under Sites. I then right-clicked on each site (one for http and one for https) and selected Attack > Active Scan site. You should be able to do this from the "Active Scan" tab at the bottom of ZAP, but there's a bug when the URLs are the same. After doing this, I received a number of alerts, ranging from high (cross-site scripting) to low (password autocomplete). The screenshot below shows the various issues.

ZAP Alerts

Now let's take a look at how to fix them.

Fix Vulnerabilities
One of the things not mentioned by the scan, but #1 in Seven Security (Mis)Configurations in Java web.xml Files, is Custom Error Pages Not Configured. Custom error pages are configured in this app, but error.jsp contains the following code:

<% if (exception != null) { %>
    <% exception.printStackTrace(new java.io.PrintWriter(out)); %>
<% } else { %>
    Please check your log files for further information.
<% } %>

Stack traces can be really useful to an attacker, so it's important to start by removing the above code from src/main/webapp/error.jsp.

The rest of the issues have to do with XSS, autocomplete, and cookies. Let's start with the easy ones. Fixing autocomplete is easy enough; simply changed the HTML in login.jsp and userform.jsp to have autocomplete="off" as part of the <form> tag.

Then modify web.xml so http-only and secure cookies are used. While you're at it, add session-timeout and tracking-mode as recommended by the aforementioned web.xml misconfigurations article.

<session-config>
    <session-timeout>15</session-timeout>
    <cookie-config>
        <http-only>true</http-only>
        <secure>true</secure>
    </cookie-config>
    <tracking-mode>COOKIE</tracking-mode>
</session-config>

Next, modify Spring Security's Remember Me configuration so it uses secure cookies. To do this, add use-secure-cookies="true" to the <remember-me> element in security.xml.

<remember-me user-service-ref="userService" key="e37f4b31-0c45-11dd-bd0b-0800200c9a66"
             use-secure-cookie="true"/>

Unfortunately, Spring Security doesn't support HttpOnly cookies, but will in a future release.

The next issue to solve is disabling directory browsing. You can do this by copying Jetty's webdefault.xml (from the org.eclipse.jetty:jetty-webapp JAR) into src/test/resources and changing its "dirAllowed" <init-param> to false:

<servlet>
  <servlet-name>default</servlet-name>
  <servlet-class>org.mortbay.jetty.servlet.DefaultServlet</servlet-class>
  <init-param>
    <param-name>acceptRanges</param-name>
    <param-value>true</param-value>
  </init-param>
  <init-param>
    <param-name>dirAllowed</param-name>
    <param-value>false</param-value>
  </init-param>
  <init-param>

You'll also need to modify the plugin's configuration to point to this file by adding it to the <webAppConfig> section in pom.xml.

<configuration>
    <webAppConfig>
        <contextPath>/</contextPath>
        <defaultsDescriptor>src/test/resources/webdefault.xml</defaultsDescriptor>
    </webAppConfig>

Of course, if you're running in production you'll want to configure this in your server's settings rather than in your pom.xml file.

Next, I set out to fix secure page browser cache issues. I had the following settings in my SiteMesh decorator:

<meta http-equiv="Cache-Control" content="no-store"/>
<meta http-equiv="Pragma" content="no-cache"/>

However, according to ZAP, the first meta tag should have "no-cache" instead of "no-store", so I changed it to "no-cache".

After making all these changes, I created a new ZAP session and ran an active scan on both sites again. Below are the results:

Active Scan after Fixes

I believe the first issue (parameter tampering) is because I show the error page when a duplicate user exists. To fix this, I changed UserFormController so it catches a UserExistsException and sends the user back to the form.

try {
    userManager.saveUser(user);
} catch (UserExistsException uex) {
    result.addError(new ObjectError("user", uex.getMessage()));
    return "userform";
}

However, this still doesn't seem to cause the alert to go away. This is likely because I'm not filtering/escaping HTML when it's first submitted. I believe the best solution for this would be to use something like OWASP's ESAPI to filter parameter values. However, I was unable to find integration with Spring MVC's data binding, so I decided not to try and fix this vulnerability.

Finally, I tried to disable jsessionid in URLs using suggestions from Stack Overflow. The previous setting in web.xml (<tracking-mode>COOKIE</tracking-mode>) should do this, but it doesn't seem to work with Jetty 8. The other issues (secure page browser cache, HttpOnly cookies and secure cookies), I was unable to solve. The last two are issues caused by Spring Security as far as I can tell.

Summary
In this article, I've shown you how to pentest a web application using Firefox and OWASP's Zed Attack Proxy (ZAP). I found ZAP to be a nice tool for figuring out vulnerabilities, but it'd be nice if it had a "retest" feature to see if you fixed an issue for a particular URL. It does have a "resend" feature, but running it didn't seem to clear alerts after I'd fixed them.

The issues I wasn't able to solve seemed to be mostly related to frameworks (e.g. Spring Security and HttpOnly cookies) or servers (Jetty not using cookies for tracking). My suspicion is the Jetty issues are because it doesn't support Servlet 3 as well as it advertises. I believe this is fair; I am using a milestone release after all. I tried scanning http://demo.raibledesigns.com/ajax-login (which runs on Tomcat 7 at Contegix) and confirmed that no jsessionid exists.

Hopefully this article has helped you understand how to figure out security vulnerabilities in your web applications. I believe ZAP will continue to get more popular as developers become aware of it. If you feel ambitious and want to try and solve all of the issues in my Ajax Login application, feel free to fork it on GitHub.

If you're interested in talking more about Webapp Security, please leave a comment, meet me at Jazoon later this week or let's talk in July at Über Conf.

Posted in Java at Jun 21 2011, 07:45:41 AM MDT 4 Comments

Good Times on The Annual Father's Day Camping Trip

Four years ago, I started an annual tradition with my kids: The Father's Day Camping Trip. The last two, I've flown my Dad in and we've journeyed to the Great Sand Dunes National Park. This year, we decided to stay a little closer to home and head up to Lake Granby. Both my parents flew in again, the kids returned from a month in Florida, and Trish and I packed up her puppies for a wonderful weekend.

When we arrived, the weather wasn't great. We showed up an hour before sunset and had just enough time to setup our tents before the rain started. It proceeded to rain throughout the night, but our tent help up nicely and we never got wet.

Lake Grandby Sunset Kids on the Beach

Mom and Dad - Fishing Preparations Stillwater Campground Rocks!

On Saturday, we did some fishing, hiked along the East Shore Trail, rode our bikes, and had a great time relaxing and enjoying each other's company. It only rained for a bit in the afternoon, the rest of the time we sat back and enjoyed beautiful views.

Beautiful Colorado Abbie on the shores of Lake Grandby

Happy Jack Mama Moose and Babies in Rocky Mountain National Park

On Sunday, we drove back through Rocky Mountain National Park, saw a moose and her two calves and enjoyed a delicious lunch at The Stanley Hotel in Estes Park. I really enjoyed spending so much time with my family this weekend. The good news is we get to do it again when I meet them at The Cabin in Montana next week. In the meantime, Trish and I are off to Jazoon for a few days of fun in Switzerland.

If you'd like to see more pictures from our Father's Day Camping Adventure, please see my Father's Day at Lake Granby album on Flickr.

Posted in General at Jun 20 2011, 10:38:01 PM MDT Add a Comment

Java Web Application Security - Part IV: Programmatic Login APIs

Over the last month, I've posted a number of articles on implementing authentication with Java EE 6, Spring Security and Apache Shiro. One of the things I demonstrated in my live demos (at Utah's JUG Meetings) was programmatic authentication. I left this out of my screencasts and previous tutorials because I thought it'd fit better in a comparison article.

In this article, I'd like to show you how you can programmatically login to an application using the aforementioned security frameworks. To do this, I'll be using my ajax-login application that I wrote for Implementing Ajax Authentication using jQuery, Spring Security and HTTPS.

To begin, I implemented a LoginController as a Spring MVC Controller that returns JSON.

package org.appfuse.examples.webapp.security;

import org.springframework.beans.factory.annotation.Autowired;
import org.springframework.beans.factory.annotation.Qualifier;
import org.springframework.stereotype.Controller;
import org.springframework.web.bind.annotation.RequestMapping;
import org.springframework.web.bind.annotation.RequestMethod;
import org.springframework.web.bind.annotation.RequestParam;
import org.springframework.web.bind.annotation.ResponseBody;

@Controller
@RequestMapping("/api/login.json")
public class LoginController {

    @Autowired
    LoginService loginService;

    @RequestMapping(method = RequestMethod.GET)
    @ResponseBody
    public LoginStatus getStatus() {
        return loginService.getStatus();
    }

    @RequestMapping(method = RequestMethod.POST)
    @ResponseBody
    public LoginStatus login(@RequestParam("j_username") String username,
                             @RequestParam("j_password") String password) {

        return loginService.login(username, password);
    }
}

This controller delegates its logic to a LoginService interface.

package org.appfuse.examples.webapp.security;

public interface LoginService {

  LoginStatus getStatus();

  LoginStatus login(String username, String password);
}

The Client
The client for this controller is the same as mentioned in my previous article, but I'll post it again for your convenience. I used jQuery and jQuery UI to implement a dialog that opens the login page on the same page rather than redirecting to the login page. The "#demo" locator refers to a button in the page.

var dialog = $('<div></div>');

$(document).ready(function() {
    $.get('/login?ajax=true', function(data) {
        dialog.html(data);
        dialog.dialog({
            autoOpen: false,
	       title: 'Authentication Required'
        });
    });

    $('#demo').click(function() {
      dialog.dialog('open');
      // prevent the default action, e.g., following a link
      return false;
    });
});

The login page then has the following JavaScript to add a click handler to the "login" button that submits the request securely to the LoginController.

var getHost = function() {
    var port = (window.location.port == "8080") ? ":8443" : "";
    return ((secure) ? 'https://' : 'http://') + window.location.hostname + port;
};

var loginFailed = function(data, status) {
    $(".error").remove();
    $('#username-label').before('
Login failed, please try again.
'); }; $("#login").live('click', function(e) { e.preventDefault(); $.ajax({url: getHost() + "${ctx}/api/login.json", type: "POST", beforeSend: function(xhr) { xhr.withCredentials = true; }, data: $("#loginForm").serialize(), success: function(data, status) { if (data.loggedIn) { // success dialog.dialog('close'); location.href = getHost() + '${ctx}/users'; } else { loginFailed(data); } }, error: loginFailed }); });

The biggest secret to making this all work (the HTTP -> HTTPS communication, which is considered cross-domain), is the window.name Transport and the jQuery plugin that implements it. To make this plugin work with Firefox 3.6, I had to implement a Filter that adds Access-Control headers.

public class OptionsHeadersFilter implements Filter {

    public void doFilter(ServletRequest req, ServletResponse res, FilterChain chain)
            throws IOException, ServletException {
        HttpServletResponse response = (HttpServletResponse) res;

        response.setHeader("Access-Control-Allow-Origin", "http://" + req.getServerName());
        response.setHeader("Access-Control-Allow-Methods", "GET,POST");
        response.setHeader("Access-Control-Max-Age", "360");
        response.setHeader("Access-Control-Allow-Headers", "x-requested-with");
        response.setHeader("Access-Control-Allow-Credentials", "true");

        chain.doFilter(req, res);
    }

    public void init(FilterConfig filterConfig) {
    }

    public void destroy() {
    }
}

Java EE 6 LoginService
Java EE 6 has a few new methods in HttpServletRequest:

  • authenticate(response)
  • login(user, pass)
  • logout()

In this example, I'll use the new login(username, password) method. The hardest part about getting this working was finding the right Maven dependency. At first, I tried the one that seemed to make the most sense:

<dependency>
    <groupId>javax</groupId>
    <artifactId>javaee-web-api</artifactId>
    <version>6.0</version>
</dependency>

Unfortunately, this resulted in a strange error that means the dependency has the interfaces, but not the implementation classes. I ended up using GlassFish's dependency instead (thanks to Stack Overflow for the tip).

<dependency>
    <groupId>org.glassfish</groupId>
    <artifactId>javax.servlet</artifactId>
    <version>3.0</version>
    <scope>provided</scope>
</dependency>

Since Servlet 3.0 doesn't appear to be in Maven Central, I had to add the GlassFish Repository to my pom.xml's <repositories> element.

<repository>
    <id>glassfish-repo</id>
    <url>http://download.java.net/maven/glassfish</url>
</repository>

After that, it was easy to implement the LoginService interface with a JavaEELoginService class:

package org.appfuse.examples.webapp.security;

import org.apache.commons.logging.Log;
import org.apache.commons.logging.LogFactory;
import org.springframework.beans.factory.annotation.Autowired;
import org.springframework.stereotype.Service;

import javax.servlet.ServletException;
import javax.servlet.http.HttpServletRequest;

@Service("javaeeLoginService")
public class JavaEELoginService implements LoginService {
    private Log log = LogFactory.getLog(JavaEELoginService.class);

    @Autowired
    HttpServletRequest request;

    public LoginStatus getStatus() {
        if (request.getRemoteUser() != null) {
            return new LoginStatus(true, request.getRemoteUser());
        } else {
            return new LoginStatus(false, null);
        }
    }

    @Override
    public LoginStatus login(String username, String password) {
        try {
            if (request.getRemoteUser() == null) {
                request.login(username, password);
                log.debug("Login succeeded!");
            }
            return new LoginStatus(true, request.getRemoteUser());
        } catch (ServletException e) {
            e.printStackTrace();
            return new LoginStatus(false, null);
        }
    }
}

I tried to use this with "mvn jetty:run" (with version 8.0.0.M2 of the jetty-maven-plugin), but I got the following error:

javax.servlet.ServletException
        at org.eclipse.jetty.server.Request.login(Request.java:1927)
        at sun.reflect.NativeMethodAccessorImpl.invoke0(Native Method)
        at sun.reflect.NativeMethodAccessorImpl.invoke(NativeMethodAccessorImpl.java:39)
        at sun.reflect.DelegatingMethodAccessorImpl.invoke(DelegatingMethodAccessorImpl.java:25)
        at java.lang.reflect.Method.invoke(Method.java:597)
        at org.springframework.beans.factory.support.AutowireUtils$ObjectFactoryDelegatingInvocationHandler.invoke(AutowireUtils.java:178)
        at $Proxy52.login(Unknown Source)
        at org.appfuse.examples.webapp.security.JavaEELoginService.login(JavaEELoginService.java:30)

This lead me to believe that Servlet 3 is not quite implemented, so I tried it with Tomcat 7.0.8. To support SSL and container-managed authentication, I had to create a certificate keystore and uncomment the SSL Connector in $CATALINA_HOME/conf/server.xml. I also had to add an "admin" user with roles="ROLE_ADMIN" to $CATALINA_HOME/conf/tomcat-users.xml.

<user username="admin" password="admin" roles="ROLE_ADMIN"/>

With Tomcat 7, I was able to login successfully, proven by the following logging.

DEBUG - JavaEELoginService.login(31) | Login succeeded!

However, in the UI, I still got a "Login failed, please try again." message. Recalling that I had some issues with ports previous, I configured Apache to proxy the default http/https ports to 8080/8443 and tried again. This time it worked!

Spring Security LoginService
Spring Security offers a programmatic API and I was able to implement its LoginService as follows:

package org.appfuse.examples.webapp.security;

import org.apache.commons.logging.Log;
import org.apache.commons.logging.LogFactory;
import org.appfuse.model.User;
import org.springframework.beans.factory.annotation.Autowired;
import org.springframework.beans.factory.annotation.Qualifier;
import org.springframework.security.authentication.AuthenticationManager;
import org.springframework.security.authentication.BadCredentialsException;
import org.springframework.security.authentication.UsernamePasswordAuthenticationToken;
import org.springframework.security.core.Authentication;
import org.springframework.security.core.context.SecurityContextHolder;
import org.springframework.stereotype.Service;

@Service("springLoginService")
public class SpringSecurityLoginService implements LoginService {
    private Log log = LogFactory.getLog(SpringSecurityLoginService.class);

    @Autowired(required = false)
    @Qualifier("authenticationManager")
    AuthenticationManager authenticationManager;

    public LoginStatus getStatus() {
        Authentication auth = SecurityContextHolder.getContext().getAuthentication();
        if (auth != null && !auth.getName().equals("anonymousUser") && auth.isAuthenticated()) {
            return new LoginStatus(true, auth.getName());
        } else {
            return new LoginStatus(false, null);
        }
    }

    public LoginStatus login(String username, String password) {
        UsernamePasswordAuthenticationToken token = new UsernamePasswordAuthenticationToken(username, password);
        User details = new User(username);
        token.setDetails(details);

        try {
            Authentication auth = authenticationManager.authenticate(token);
            log.debug("Login succeeded!");
            SecurityContextHolder.getContext().setAuthentication(auth);
            return new LoginStatus(auth.isAuthenticated(), auth.getName());
        } catch (BadCredentialsException e) {
            return new LoginStatus(false, null);
        }
    }
}

I then modified the LoginService dependency in LoginController so this implementation would be used.

@Autowired
@Qualifier("springLoginService")
LoginService loginService;

Since Spring's API doesn't depend on Servlet 3, I tried it in Jetty using "mvn jetty:run". Of course, I modified my web.xml accordingly for Spring Security before doing so. Interestingly enough, I found that the my SpringSecurityLoginService seemed to work:

DEBUG - SpringSecurityLoginService.login(39) | Login succeeded!

But in the UI, the login failed with a "Login failed, please try again." message. Using the standard ports with Apache in front of Jetty solved this issue.

Apache Shiro LoginService
Apache Shiro is nice enough to offer a programmatic API as well. I was able to implement a ShiroLoginService as follows:

package org.appfuse.examples.webapp.security;

import org.apache.commons.logging.Log;
import org.apache.commons.logging.LogFactory;
import org.apache.shiro.SecurityUtils;
import org.apache.shiro.authc.AuthenticationException;
import org.apache.shiro.authc.UsernamePasswordToken;
import org.apache.shiro.subject.Subject;
import org.springframework.stereotype.Service;

@Service("shiroLoginService")
public class ShiroLoginService implements LoginService {
    private Log log = LogFactory.getLog(ShiroLoginService.class);

    public LoginStatus getStatus() {
        Subject currentUser = SecurityUtils.getSubject();
        if (currentUser.isAuthenticated()) {
            return new LoginStatus(true, currentUser.getPrincipal().toString());
        } else {
            return new LoginStatus(false, null);
        }
    }

    public LoginStatus login(String username, String password) {
        if (!getStatus().isLoggedIn()) {
            UsernamePasswordToken token = new UsernamePasswordToken(username, password);
            Subject currentUser = SecurityUtils.getSubject();
            try {
                currentUser.login(token);
                log.debug("Login succeeded!");
                return new LoginStatus(currentUser.isAuthenticated(),
                        currentUser.getPrincipal().toString());
            } catch (AuthenticationException e) {
                return new LoginStatus(false, null);
            }

        } else {
            return getStatus();
        }
    }
}

Then I modified the LoginService dependency in LoginController so this implementation would be used.

@Autowired
@Qualifier("shiroLoginService")
LoginService loginService;

Next, I modified my web.xml for Apache Shiro and tried "mvn jetty:run". Again, the login appeared to succeed (based on log messages) on the server, but failed in the UI. When using http://localhost instead of http://localhost:8080, everything worked fine.

Summary
This article has shown you how you can programmatically login using Java EE 6, Spring Security and Apache Shiro. Before Java EE 6 (and Servlet 3), there was no API to programmatically login, so this is a welcome addition. The fact that my Ajax login example didn't work when ports differed is because of browsers' same origin policy, which specifies the ports have to be the same. Specifying no ports (the defaults), seems to be the loophole.

On a related note, I've discovered some interesting articles recently from the AppSec Blog.

The 2nd article has an interesting paragraph:

... there's Apache Shiro (FKA JSecurity and then later as Apache Ki), another secure framework for Java apps. Although it looks simpler to use and understand than ESAPI and covers most of the main security bases (authentication, authorization, session management and encryption), it doesn't help take care of important functions like input validation and output encoding. And Spring users have Spring Security (Acegi) a comprehensive, but heavyweight authorization and authentication framework.

So according to this blog, the security frameworks discussed here aren't the best.

The most comprehensive, up-to-date choice for Java developers is OWASP's ESAPI Enterprise Security API especially now that the 2.0 release has just come out.

I haven't heard of many organizations adopting ESAPI over Java EE 6, Spring Security or Apache Shiro, but maybe I'm wrong. Is ESAPI something that's being used out there by companies?

Posted in Java at Jun 06 2011, 09:44:09 PM MDT 4 Comments

Music, Mountain Biking and Memories in Moab

Moab is one of my favorite place on Earth. It has been ever since I first journeyed there in college for a float trip down the Green River. Last year, I mountain biked in Moab for the first time and had a great time at Desert Rocks. This year, I made the trek again, but this time with the lovely Trish McGinity. The story of our drive out there last Friday is one of my favorites.

I've been a longtime fan of nice car stereos. You know, the ones you hate when you roll up to a stop light and their bass shakes your car. I, probably like you, don't enjoy someone else's nice stereo - but I've often enjoyed having one in my own car. It's been quite a few years since I've had a bass-tastic system in my car, but I still have the music on my iPhone.

So Trish and I are driving down I-70 in her Xterra and one of my old bass songs comes on. I say, "We can skip this one, it only sounds good on stereos with bass". She looks at me, cracks a half-smile and says "Oh, you don't think I have bass?" She then proceeds to turn some nobs and press some buttons and seconds later my seat is vibrating and the mirrors are shaking. I was appalled, overjoyed and super-impressed all at the same time. Turns out she has a Rockford Fosgate system with a subwoofer under the drivers seat and it sounded awesome. A wicked fun roadtrip ensued.

Shortly after my oh-my-god-you're-so-awesome-woman moment, we stopped in Fruita for a mountain bike ride on Horsethief Bench. This was a beautiful ride along the Colorado River with tons of flowers along the way.

Fruita Horsethief Bench in Fruita Hike-a-bike at Fruita

The purpose of our trip was 1) camping and enjoying the outdoors in Moab and 2) listening to great music at Desert Rocks. Our good friend, "The Professor", had driven out to Moab earlier in the week. He scored us a great camp site and we promptly set up our tent when we arrived. We installed some tikki torches, rolled out a small living room rug and settled into our camping chairs for cold beers. That evening, we saw several good bands and danced into the wee hours of the morning.

The rest of the weekend was spent 4x4ing, mountain biking, dancing and hiking in Arches National Park. We enjoyed tons of great music, with our favorites being Scenic Byway, Great American Taxi, JGB feat. Melvin Seals, MarchFourth Marching Band and Hot Buttered Rum.

One of the best way to describe good memories is with pictures. When you have a professional photographer with you, it only makes sense to end this post with some of Trish's best photos.

La Sal Mountains from Desert Rocks Scenic Byway

Bar-B or Killer B? Three Gossips and Tower of Babel

For more pictures, checkout my Moab and Desert Rocks 2011 Set on Flickr.

Posted in General at Jun 03 2011, 10:15:25 AM MDT 3 Comments

Upgraded to Roller 5.0 and added a Like Button

Apache Roller 4 was released in December 2007. After 3.5 years, Roller 5 has landed!

The major new feature in Roller 5.0 is Media Blogging, a set of enhancements to Roller's file upload and management capabilities. Also included in 5.0 are simple multi-site support, OpenID and OAuth support for Roller's AtomPub interface. All major dependencies have been updated and Roller now uses Maven for build and dependency management. You can find a summary of Roller 5.0's new features on the Roller wiki.

I upgraded to Roller 5.0, RC4 back in March and experienced a few issues. This morning, I upgraded to the final release and everything appears to working nice and smooth. To celebrate, I added a Facebook Like Button to each entry. Adding it was pretty straightforward. Below is the code I added to my _day.vm template:

<span id="fb-root"></span>
<script src="//connect.facebook.net/en_US/all.js#appId=226411374036019&xfbml=1"></script>
<fb:like href="$url.entry($entry.anchor)" send="false" show_faces="false" font="verdana"></fb:like>

I tried removing the <script> tag and putting it in my wro4j configuration file, but this caused the Like button to disappear. I also experimented with adding Twitter and LinkedIn buttons, but decided not to add them since it was difficult to get them all to align and look good together. However, if you'd like to add either of them to your Roller blog, you can do so with the following code:

<a href="http://twitter.com/share" class="twitter-share-button" 
    data-url="$url.entry($entry.anchor)" data-count="horizontal" data-via="mraible">Tweet</a>
<script type="text/javascript" src="//platform.twitter.com/widgets.js"></script>

<script type="text/javascript" src="//platform.linkedin.com/in.js"></script>
<script type="in/share" data-url="$url.entry($entry.anchor)" data-counter="right"></script>

Kudos to Dave for all his hard work on Roller throughout the years.

Posted in Roller at Jun 02 2011, 02:21:58 PM MDT Add a Comment

Java Web Application Security - Part III: Apache Shiro Login Demo

A couple weeks ago, I wrote a tutorial on how to implement security with Spring Security. The week prior, I wrote a similar tutorial for Java EE 6. This week, I'd like to show you how to implement the same features using Apache Shiro. As I mentioned in previous articles, I'm writing this because I told the audience at April's UJUG that I would publish screencasts of the demos.

Today, I've finished the third screencast showing how to implement security with Apache Shiro. Below is the presentation (with the screencast embedded on slide 22) as well as a step-by-step tutorial.


Apache Shiro Login Tutorial

Download and Run the Application
To begin, download the application you'll be implementing security in. This app is a stripped-down version of the Ajax Login application I wrote for my article on Implementing Ajax Authentication using jQuery, Spring Security and HTTPS. You'll need Java 6 and Maven installed to run the app. Run it using mvn jetty:run and open http://localhost:8080 in your browser. You'll see it's a simple CRUD application for users and there's no login required to add or delete users.

Implement Basic Authentication
The first step is to protect the list screen so people have to login to view users. To do this, you'll need to create a shiro.ini file Shiro's configuration. Create src/main/resources/shiro.ini and populate it with the contents below:

[main]

[users]
admin = admin, ROLE_ADMIN

[roles]
ROLE_ADMIN = *

[urls]
/app/users = authcBasic

You can see this file has four sections and is pretty simple to read and understand. For more information about what each section is for, check out Shiro's configuration documentation.

Next, open src/main/webapp/WEB-INF/web.xml and add Shiro's IniShiroFilter:

<filter>
    <filter-name>securityFilter</filter-name>
    <filter-class>org.apache.shiro.web.servlet.IniShiroFilter</filter-class>
    <!-- no init-param means load the INI config from classpath:shiro.ini -->
</filter>

And add its filter-mapping just after the rewriteFilter in the filter-mappings section (order is important!):

<filter-mapping>
    <filter-name>rewriteFilter</filter-name>
    <url-pattern>/*</url-pattern>
</filter-mapping>
<filter-mapping>
    <filter-name>securityFilter</filter-name>
    <url-pattern>/*</url-pattern>
    <dispatcher>REQUEST</dispatcher>
    <dispatcher>FORWARD</dispatcher>
    <dispatcher>INCLUDE</dispatcher>
</filter-mapping>

Then add Shiro's core and web dependencies to your pom.xml:

<dependency>
    <groupId>org.apache.shiro</groupId>
    <artifactId>shiro-core</artifactId>
    <version>1.1.0</version>
</dependency>
<dependency>
    <groupId>org.apache.shiro</groupId>
    <artifactId>shiro-web</artifactId>
    <version>1.1.0</version>
</dependency>

At this point, if you restart Jetty (Ctrl+C and jetty:run again), you should be prompted to login when you click on the "Users" tab. Enter admin/admin to login. Apache Shiro is easier to configure than Spring Security out-of-the-box, mostly because it doesn't require XML.

After logging in, you can try to logout by clicking the "Logout" link in the top-right corner. This calls a LogoutController with the following code that logs the user out.

public void logout(HttpServletResponse response) throws ServletException, IOException {
    request.getSession().invalidate();
    response.sendRedirect(request.getContextPath()); 
}

NOTE: Shiro doesn't currently have a way to logout with its API. However, it will be added in the 1.2 release.

You'll notice that clicking this link doesn't log you out, even though the session is invalidated. The only way to logout with basic authentication is to close the browser. In order to get the ability to logout, as well as to have more control over the look-and-feel of the login, you can implement form-based authentication. Before you implement form-based authentication, I'd like to show you how easy it is to force SSL with Apache Shiro.

Force SSL
Apache Shiro allows you to force SSL on a URL by simply adding "ssl[port]" to a URL in the [urls] section. If you don't specify the port, it will use the default port (443). I'm not sure if it allows you to switch back to http like Spring Security's requires-channel, but I don't think it does. Modify the URLs section of your shiro.ini to have the following:

[urls]
/app/users = ssl[8443],authc

In order for this to work, you have to configure Jetty to listen on an SSL port. Add the following just after the jetty-maven-plugin's </webAppConfig> element in your pom.xml:

<connectors>
    <connector implementation="org.eclipse.jetty.server.nio.SelectChannelConnector">
        <forwarded>true</forwarded>
        <port>8080</port>
    </connector>
    <connector implementation="org.eclipse.jetty.server.ssl.SslSelectChannelConnector">
        <forwarded>true</forwarded>
        <port>8443</port>
        <maxIdleTime>60000</maxIdleTime>
        <keystore>${project.build.directory}/ssl.keystore</keystore>
        <password>appfuse</password>
        <keyPassword>appfuse</keyPassword>
    </connector>
</connectors>

The keystore must be generated for Jetty to start successfully, so add the keytool-maven-plugin just above the jetty-maven-plugin in pom.xml.

<plugin>
    <groupId>org.codehaus.mojo</groupId>
    <artifactId>keytool-maven-plugin</artifactId>
    <version>1.0</version>
    <executions>
        <execution>
            <phase>generate-resources</phase>
            <id>clean</id>
            <goals>
                <goal>clean</goal>
            </goals>
        </execution>
        <execution>
            <phase>generate-resources</phase>
            <id>genkey</id>
            <goals>
                <goal>genkey</goal>
            </goals>
        </execution>
    </executions>
    <configuration>
        <keystore>${project.build.directory}/ssl.keystore</keystore>
        <dname>cn=localhost</dname>
        <keypass>appfuse</keypass>
        <storepass>appfuse</storepass>
        <alias>appfuse</alias>
        <keyalg>RSA</keyalg>
    </configuration>
</plugin>

Now if you restart Jetty, go to http://localhost:8080 and click on the "Users" tab, you'll be prompted to accept the Untrusted Certificate and then redirected to https://localhost:8443/users after logging in.

Now let's look at how to have more control over the look-and-feel of the login screen, as well as how to make logout work with form-based authentication.

Implement Form-based Authentication
To change from basic to form-based authentication, you simply have to add a few lines to shiro.ini. First of all, since I'd rather not change the name of the input elements in login.jsp, override the default names in the [main] section:

# name of request parameter with username; if not present filter assumes 'username'
authc.usernameParam = j_username
# name of request parameter with password; if not present filter assumes 'password'
authc.passwordParam = j_password
authc.failureKeyAttribute = shiroLoginFailure

Then change the [urls] section to filter on login.jsp and use "authc" instead of "authcBasic":

[urls]
# The /login.jsp is not restricted to authenticated users (otherwise no one could log in!), but
# the 'authc' filter must still be specified for it so it can process that url's
# login submissions. It is 'smart' enough to allow those requests through as specified by the
# shiro.loginUrl above.
/login.jsp = authc
/app/users = ssl[8443],authc

Then change login.jsp so the form's action is blank (causing it to submit to itself) instead of j_security_check:

<form action="" id="loginForm" method="post">

Now, restart Jetty and you should be prompted to login with this JSP instead of the basic authentication dialog.

Store Users in a Database
To store your users in a database instead of file, you'll need to add a few settings to shiro.ini to define your database and tables to use. Open src/main/resources/shiro.ini and add the following lines under the [main] section.

jdbcRealm=org.apache.shiro.realm.jdbc.JdbcRealm
#jdbcRealm.permissionsLookupEnabled=false
# If not filled, subclasses of JdbcRealm assume "select password from users where username = ?"
jdbcRealm.authenticationQuery = select user_pass from users where user_name = ?
# If not filled, subclasses of JdbcRealm assume "select role_name from user_roles where username = ?"
jdbcRealm.userRolesQuery = select role_name from users_roles where user_name = ?

ds = com.mysql.jdbc.jdbc2.optional.MysqlDataSource
ds.serverName = localhost
ds.user = root
ds.databaseName = appfuse
jdbcRealm.dataSource = $ds

This configuration is similar to what I did with the Java EE 6 tutorial where I'm pointing to a database other than the H2 instance that's used by the application. I believe Shiro can talk to a DAO like Spring Security, but I have yet to explore that option.

While you're at it, add the following lines to enable password encryption.

sha256Matcher = org.apache.shiro.authc.credential.Sha256CredentialsMatcher
jdbcRealm.credentialsMatcher = $sha256Matcher

You'll need to install MySQL for this to work. After installing it, you should be able to create an "appfuse" database using the following command:

mysql -u root -p -e 'create database appfuse'

Then create the tables necessary and populate it with an 'admin' user. Login using "mysql -u root -p appfuse" and execute the following SQL statements:

create table users (
  user_name         varchar(30) not null primary key,
  user_pass         varchar(100) not null
);

create table user_roles (
  user_name         varchar(30) not null,
  role_name         varchar(30) not null,
  primary key (user_name, role_name)
);

insert into users values ('admin', '22f256eca1f336a97eef2b260773cb0d81d900c208ff26e94410d292d605fed8');
insert into user_roles values ('admin', 'ROLE_ADMIN');

Now if you restart Jetty, you should be able to login with admin/adminjdbc and view the list of users.

Summary
In this tutorial, you learned how to implement authentication using Apache Shiro 1.1.0. I don't have a lot of experience with Apache Shiro, but I was able to get the basics working without too much effort. This tutorial doesn't show how to do Remember Me because I couldn't figure it out in 5 minutes, which means I have 5 more minutes before it fails the 10-minute test. ;)

Shiro was formerly named JSecurity and has been an Apache project for less than a year. It seems to be more targeted towards non-web use, so its certainly something to look at if you're more interested in cryptography or non-web apps. I think there's a good chance this project will continue to grow and be used more as more developers learn about it. The Apache brand certainly doesn't hurt.

I didn't include a slide about the limitations I found with Shiro, mostly because I haven't used it much. I've used Java EE and Spring Security for several years. The main limitation I found was the lack of documentation, but I've heard it's improving rapidly.

In the next couple weeks, I'll post a Part IV on implementing programmatic login using the APIs of Java EE 6, Spring Security and Apache Shiro. I'll be presenting this topic at Jazoon as well as the long-form version (with hacking) at ÜberConf. Hopefully I'll see you at one of those conferences.

Update: Thanks to help from Les Hazlewood, I've figured out how to implement Remember Me with Apache Shiro. In the [urls] section of shiro.ini, the second url (shown below) says to Shiro "In order to visit the /app/users URL, you must be connecting via SSL on port 8443 and you must also be authenticated."

/app/users = ssl[8443],authc

Remembered users are not authenticated because their identity hasn't been proven during the current session. What I want Shiro to say is "In order to visit the /app/users URL, you must be connecting via SSL on 8443 and you must also be a known user. If you're not, you should login first." Where a known user is someone who has a recognized identity and has either authenticated during the current session or is known via RememberMe from a previous session. The documentation gives a good example with Amazon.com for why Shiro makes this distinction. It allows more control (usually necessary), but you can relax the control as you see fit.

So, to relax my configuration a bit to match what I want (known users), I updated shiro.ini's [urls] section to be as follows:

/app/users = ssl[8443],user

The key is that the /app/users url is now protected with the more relaxed user filter instead of the authc filter. However, you would typically want an account profile page (or credit card information page, or similar) protected with the authc filter instead to guarantee proof of identity for those sensitive operations.

Posted in Java at May 26 2011, 04:43:22 PM MDT 10 Comments

Denver Yard Harvest Kick Off Party

When I first moved into my house, I was pumped to have fruit trees in my backyard. However, I quickly realized the downside:

I have the biggest apple tree I've ever seen and it drops apples like they're going out of style. I counted them in a 24-hour period last weekend and there was 100 new apples! I thought it was cool when I first moved in, but now it seems like a lot of work. However, it's such a good shade tree, it'd be a shame to do anything to it.

I've since grown to love my apple tree, plumb tree and grapes. They produce a lot of fruit, but I rarely pick and eat it.

Nice Deck, but lots of apples (daily) Plum Tree and Grapes too

Because I have so much fruit, I was pumped when my good friend Jason Barton moved back to Denver and started Yard Harvest. Their homepage explains their mission:

What We Do: Each fall, homeowners who register their trees with us call when those trees are dropping apples, cherries, peaches, and other food in their yards. Our volunteers harvest the fruit, leave as much as the homeowners would like, and deliver the rest to daycare centers, homes for the elderly, community kitchens, and other places that serve people around Denver who are at risk of going without fresh, healthy food.

Jason started a similar initiative in Vancouver, BC a few years ago and had great success. I'm writing this post to create awareness of Yard Harvest in Denver and invite you to the Kick Off Party. Below is a picture of the flyer that's being passed around and you can download the PDF if you want to print it out and help spread the word.

Denver Yard Harvest Kick Off Event

Hope to see you there!

Posted in General at May 25 2011, 09:37:53 AM MDT Add a Comment

Java Web Application Security - Part II: Spring Security Login Demo

Last week, I wrote a tutorial on how to implement Security in Java EE 6. This week, I'd like to show you how to implement the same features using Spring Security. Before I begin, I'd like to explain my reason for writing this article.

Last month, I presented a talk on Java Web Application Security at the Utah JUG (UJUG). As part of that presentation, I did a number of demos about how to implement security with Java EE 6, Spring Security and Apache Shiro. I told the audience that I would post the presentation and was planning on recording screencasts of the various demos so the online version of the presentation would make more sense.

Today, I've finished the second screencast showing how to implement security with Spring Security. Below is the presentation (with the screencast embedded on slide 16) as well as a step-by-step tutorial.


Spring Security Login Tutorial

Download and Run the Application
To begin, download the application you'll be implementing security in. This app is a stripped-down version of the Ajax Login application I wrote for my article on Implementing Ajax Authentication using jQuery, Spring Security and HTTPS. You'll need Java 6 and Maven installed to run the app. Run it using mvn jetty:run and open http://localhost:8080 in your browser. You'll see it's a simple CRUD application for users and there's no login required to add or delete users.

Implement Basic Authentication
The first step is to protect the list screen so people have to login to view users. To do this, you'll need to create a Spring context file that contains Spring Security's configuration. Create src/main/webapp/WEB-INF/security.xml and populate it with the contents below:

  <?xml version="1.0" encoding="UTF-8"?>
  <beans:beans xmlns="http://www.springframework.org/schema/security"
               xmlns:xsi="http://www.w3.org/2001/XMLSchema-instance"
               xmlns:beans="http://www.springframework.org/schema/beans"
               xsi:schemaLocation="http://www.springframework.org/schema/beans http://www.springframework.org/schema/beans/spring-beans-3.0.xsd
                http://www.springframework.org/schema/security http://www.springframework.org/schema/security/spring-security-3.0.xsd">

      <!-- New in Spring Security 3.1 -->
      <!-- <http pattern="/css/**" security="none"/> -->

      <http auto-config="true">
          <intercept-url pattern="/app/users" access="ROLE_USER,ROLE_ADMIN"/>
          <http-basic/>
      </http>

      <authentication-manager alias="authenticationManager">
          <authentication-provider>
              <password-encoder hash="sha"/>
              <user-service>
                  <user name="user" password="12dea96fec20593566ab75692c9949596833adc9" authorities="ROLE_USER"/>
                  <user name="admin" password="d033e22ae348aeb5660fc2140aec35850c4da997" authorities="ROLE_ADMIN"/>
              </user-service>
          </authentication-provider>
      </authentication-manager>

      <!-- Override userSecurityAdvice bean in appfuse-service to allow any role to update a user. -->
      <beans:bean id="userSecurityAdvice" class="org.appfuse.examples.webapp.security.UserSecurityAdvice"/>
  </beans:beans>

The last bean, userSecurityAdvice, is an aspect that's needed to override some behavior in AppFuse. You won't need this normally when implementing Spring Security.

Next, open src/main/webapp/WEB-INF/web.xml and add Spring's DelegatingFilterProxy:

<filter>
    <filter-name>securityFilter</filter-name>
    <filter-class>org.springframework.web.filter.DelegatingFilterProxy</filter-class>
    <init-param>
        <param-name>targetBeanName</param-name>
        <param-value>springSecurityFilterChain</param-value>
    </init-param>
</filter>

And add its filter-mapping just after the rewriteFilter in the filter-mappings section (order is important!):

<filter-mapping>
    <filter-name>rewriteFilter</filter-name>
    <url-pattern>/*</url-pattern>
</filter-mapping>
<filter-mapping>
    <filter-name>securityFilter</filter-name>
    <url-pattern>/*</url-pattern>
    <dispatcher>REQUEST</dispatcher>
    <dispatcher>FORWARD</dispatcher>
    <dispatcher>INCLUDE</dispatcher>
</filter-mapping>

You don't need to add any dependencies in your pom.xml is because this project depends on AppFuse, which already contains these dependencies.

At this point, if you restart Jetty (Ctrl+C and jetty:run again), you should be prompted to login when you click on the "Users" tab. Enter admin/admin to login. Spring Security is a bit easier to configure than Java EE 6 out-of-the-box, mostly because it doesn't require you to configure your container.

After logging in, you can try to logout by clicking the "Logout" link in the top-right corner. This calls a LogoutController with the following code that logs the user out.

public void logout(HttpServletResponse response) throws ServletException, IOException {
    request.getSession().invalidate();
    response.sendRedirect(request.getContextPath()); 
}

NOTE: Spring Security has a way to configure "logout" to match a URL and get rid of a class like LogoutController. Since it was already in the project, I don't cover that in this tutorial.

You'll notice that clicking this link doesn't log you out, even though the session is invalidated. The only way to logout with basic authentication is to close the browser. In order to get the ability to logout, as well as to have more control over the look-and-feel of the login, you can implement form-based authentication. Before you implement form-based authentication, I'd like to show you how easy it is to force SSL with Spring Security.

Force SSL
Spring Security allows you to switch between secure (https) and non-secure (http) protocols using a simple requires-channel attribute on the <intercept-url> element. Possible values are "http", "https" and "any". Add requires-channel="https" to your security.xml file:

<intercept-url pattern="/app/users" access="ROLE_USER,ROLE_ADMIN" requires-channel="https"/>

In order for this to work, you have to configure Jetty to listen on an SSL port. Add the following just after the jetty-maven-plugin's </webAppConfig> element in your pom.xml:

<connectors>
    <connector implementation="org.eclipse.jetty.server.nio.SelectChannelConnector">
        <forwarded>true</forwarded>
        <port>8080</port>
    </connector>
    <connector implementation="org.eclipse.jetty.server.ssl.SslSelectChannelConnector">
        <forwarded>true</forwarded>
        <port>8443</port>
        <maxIdleTime>60000</maxIdleTime>
        <keystore>${project.build.directory}/ssl.keystore</keystore>
        <password>appfuse</password>
        <keyPassword>appfuse</keyPassword>
    </connector>
</connectors>

The keystore must be generated for Jetty to start successfully, so add the keytool-maven-plugin just above the jetty-maven-plugin in pom.xml.

<plugin>
    <groupId>org.codehaus.mojo</groupId>
    <artifactId>keytool-maven-plugin</artifactId>
    <version>1.0</version>
    <executions>
        <execution>
            <phase>generate-resources</phase>
            <id>clean</id>
            <goals>
                <goal>clean</goal>
            </goals>
        </execution>
        <execution>
            <phase>generate-resources</phase>
            <id>genkey</id>
            <goals>
                <goal>genkey</goal>
            </goals>
        </execution>
    </executions>
    <configuration>
        <keystore>${project.build.directory}/ssl.keystore</keystore>
        <dname>cn=localhost</dname>
        <keypass>appfuse</keypass>
        <storepass>appfuse</storepass>
        <alias>appfuse</alias>
        <keyalg>RSA</keyalg>
    </configuration>
</plugin>

Now if you restart Jetty, go to http://localhost:8080 and click on the "Users" tab, you'll be prompted to accept the Untrusted Certificate and then redirected to https://localhost:8443/users after logging in. This is an improvement on Java EE's user-data-constraint for two reasons:

  • You can switch between http and https protocols. With Java EE, you can only force https. You have to write a custom filter to switch back to http.
  • Redirecting to https actually works. With Java EE (on Jetty at least), a 403 is returned instead of redirecting the request.

Now let's look at how to have more control over the look-and-feel of the login screen, as well as how to make logout work with form-based authentication.

Implement Form-based Authentication
To change from basic to form-based authentication, you simply have to add a <form-login> element in security.xml's <http> element:

<http auto-config="true">
    <intercept-url pattern="/app/users" access="ROLE_USER,ROLE_ADMIN" requires-channel="https"/>
    <form-login login-page="/login" authentication-failure-url="/login?error=true"
                login-processing-url="/j_security_check"/>
    <http-basic/>
</http>

You can leave the <http-basic> element since Spring Security is smart enough to serve up the form for browsers and use Basic Authentication for clients such as web services. The login.jsp page (that /login forwards to) already exists in the project, in the src/main/webapp directory. The forwarding is done by the UrlRewriteFilter with the following configuration in src/main/webapp/WEB-INF/urlrewrite.xml.

<rule>
    <from>/login</from>
    <to>/login.jsp</to>
</rule>

This JSP has 3 important elements: 1) a form that submits to "/j_security_check", 2) an input element named "j_username" and 3) an input element named "j_password". If you restart Jetty, you'll now be prompted to login with this JSP instead of the basic authentication dialog.

Add Remember Me
Remember Me is a feature you see in many web applications today. It's usually a checkbox on the login form that allows you to auto-login the next time you visit a site. This feature doesn't exist in Java EE security, but it does exist in Spring Security. To enable it, add the following just below <form-login> in security.xml:

<remember-me user-service-ref="userDao" key="e37f4b31-0c45-11dd-bd0b-0800200c9a66"/>

Next, open src/main/webapp/login.jsp and change the name of the "remember me" checkbox to be _spring_security_remember_me:

<input type="checkbox" name="_spring_security_remember_me" id="rememberMe"/>

After making these changes, you should be able to restart Jetty, go to http://localhost:8080/users, enter admin/adminjdbc, check the Remember Me checkbox and login. Then close your browser, and repeat the process. This time, you won't be prompted to login. For more information on this feature, see Spring Security's Remember Me documentation.

While storing usernames and passwords in a file is convenient for demos, it's not very real-world-ish. The next section shows you how to configure Spring Security to use a database for its user store.

Store Users in a Database
To store your users in a database instead of file, you'll need to add a user-service-ref attribute to the <authentication-provider> element. You can also delete the <user-service> element.

<authentication-manager alias="authenticationManager">
    <authentication-provider user-service-ref="userDao">
        <password-encoder hash="sha"/>
    </authentication-provider>
</authentication-manager>

The "userDao" bean is provided by AppFuse and its UserDaoHibernate.java class. This class implements Spring Security's UserDetailsService interface. With Java EE, I had to configure a database connection and make sure the JDBC Driver was in my container's classpath. With Spring Security, you can talk to the database you already have configured in your application.

Of course, you could do this with Java EE too. One thing I neglected to show in my last tutorial was that 1) the app uses H2 and 2) I had to configure Java EE's database to be MySQL. This was because when I tried to access my H2 instance, I got an error about two threads trying to access it at once.
2011-05-13 08:47:29.081:WARN::UserRealm Java EE Login could not connect to database; will try later
org.h2.jdbc.JdbcSQLException: Database may be already in use: "Locked by another process". 
        Possible solutions: close all other connection(s); use the server mode [90020-154]
	at org.h2.message.DbException.getJdbcSQLException(DbException.java:327)
	at org.h2.message.DbException.get(DbException.java:167)
	at org.h2.message.DbException.get(DbException.java:144)
	at org.h2.store.FileLock.getExceptionAlreadyInUse(FileLock.java:443)
	at org.h2.store.FileLock.lockFile(FileLock.java:338)
	at org.h2.store.FileLock.lock(FileLock.java:134)
	at org.h2.engine.Database.open(Database.java:535)
	at org.h2.engine.Database.openDatabase(Database.java:218)

The password for the "admin" user is configured in src/test/resources/sample-data.xml and it's loaded by DbUnit before the application starts. You can view your pom.xml and the dbunit-maven-plugin's configuration if you're interested in learning how this is done. The password is currently configured to "adminjdbc", but you can reset it by generating a new password and modifying sample-data.xml.

Now if you restart Jetty, you should be able to login with admin/adminjdbc and view the list of users.

Summary
In this tutorial, you learned how to implement authentication using Spring Security 3.0.5. In addition to the basic XML configuration, Spring Security also provides a AOP support and annotations you can use to secure methods. It also has many more features than standard Java EE Security. In my opinion, it's the most mature security framework we have in Java today. Currently, I think its reference documentation is the best place to learn more.

There are a few limitations I found with Spring Security:

  • The authentication mechanism (file, database, ldap, etc.) is contained in the WAR
  • Securing methods only works on Spring beans
  • Remember Me doesn't work in my screencast (because I forgot to rename the checkbox in login.jsp)

Of course, you can configure Spring to load its configuration from outside the WAR (e.g. a file or JNDI), but it's not as easy as including the configuration in your app.

In the next couple weeks, I'll post Part III of this series, where I'll show you how to implement this same set of features using Apache Shiro. In the meantime, please let me know if you have any questions.

I created the screencasts with Camtasia. For small screens, and embedding in the presentation, I created it at 50% and used the SmartFocus feature to zoom in and out during the demo. For larger screens, I published another screencast at 100%, in HD. If you have a preference for which screencast is better, I'd love to hear about it.

Posted in Java at May 13 2011, 09:20:51 AM MDT 10 Comments

The Basement Sauna Project

The Sauna under snow I grew up in a cabin in the backwoods of Montana. We had no electricity and no running water. We used an outhouse to do our business and bathed in a sauna. The Cabin was built by my great-grandpa Matti Hill, who had come to America by way of Finland and a Russian navy ship. Matti and his wife Ann received 120 acres from the Homesteading Act of 1862, and built a cabin and sauna on the property in 1917 and 1918, respectively.

When my sister and I started going to school, we started getting teased by the other kids because we smelled like goats. Since we had a whole bunch of goats, and they did smell, there's a good chance the kids were right. My sister and I told my parents, and they bumped the saunas up from once a week to twice a week.

I have many fond memories of the sauna in Montana. It has a huge 55-gallon stove; made from an oil barrel. A tub of water sits on the top of the stove and throughout my childhood, I developed the ability to make the water sing with a blazing fire. I've always loved that sauna, as well as most saunas. My parents built one in their basement in Oregon, but that went away last year when they my Mom retired and they moved back to Montana.

Basement Sauna in Salem Basement Sauna in Salem

I've always wanted to build a sauna in my own basement. When my parents visited for a few weeks this past February, I finally began the project. The prep work, installing a drain and getting 220-volt electricity installed, in the basement was the hardest part. Not from a "doing it" perspective, but from a "stomaching the cost" perspective.

Drain Installation Sump Pump New Drain Applewood Plumbing doing some nice work.

By the time my parents left at the end of February, the main infrastructure was completed. The framing was done, the stove was installed and the insulation was mostly finished.

Framing begins! Stove mounted Almost ready for Cedar Buying a bunch of Cedar

Over the next couple months, I spent a few hours here and there finishing the cedar walls, building benches and trimming to make it look good. We hired someone to do the tile work and build a custom cedar door. One of my favorite things we did was have a custom piece of glass made with the Montana Sauna's picture sandblasted in it.

Tile finished! Glad we hired someone to finish the tile. Looks great! Sauna door installed! The Dressing Room

I can't take credit for how good it looks in the end. That praise goes to Trish and her tile design, as well as her decorating of the dressing room. My favorite thing is the shower in the sauna. It's great for rinsing off after sweating the day's stresses away. When it gets up to 112°C (233°F), stress goes away pretty fast.

Benches I made from scratch Shower IN the sauna!

I'd like to thank my parents for raising me with a sauna and my Finnish ancestors for inventing the idea. I think Jack summed it up best when I asked him, "Isn't it great having a sauna in our basement?" His reply: "No Dad, it's not great ... it's AWESOME!". Well said son. :)

More Pictures » Flickr Set or Facebook Album.

Posted in General at May 12 2011, 09:35:00 AM MDT 6 Comments