Matt RaibleMatt Raible is a writer with a passion for software. Connect with him on LinkedIn.

The Angular Mini-Book The Angular Mini-Book is a guide to getting started with Angular. You'll learn how to develop a bare-bones application, test it, and deploy it. Then you'll move on to adding Bootstrap, Angular Material, continuous integration, and authentication.

Spring Boot is a popular framework for building REST APIs. You'll learn how to integrate Angular with Spring Boot and use security best practices like HTTPS and a content security policy.

For book updates, follow @angular_book on Twitter.

The JHipster Mini-Book The JHipster Mini-Book is a guide to getting started with hip technologies today: Angular, Bootstrap, and Spring Boot. All of these frameworks are wrapped up in an easy-to-use project called JHipster.

This book shows you how to build an app with JHipster, and guides you through the plethora of tools, techniques and options you can use. Furthermore, it explains the UI and API building blocks so you understand the underpinnings of your great application.

For book updates, follow @jhipster-book on Twitter.

10+ YEARS


Over 10 years ago, I wrote my first blog post. Since then, I've authored books, had kids, traveled the world, found Trish and blogged about it all.
You searched this site for "matt". 663 entries found.

You can also try this same search on Google.

Implementing OAuth with GWT

I've heard about OAuth for quite some time, but never had an opportunity to implement it on a project. For a good explanation of what OAuth is, see its Introduction. Here's an excerpt:

...it allows you the User to grant access to your private resources on one site (which is called the Service Provider), to another site (called Consumer, not to be confused with you, the User). While OpenID is all about using a single identity to sign into many sites, OAuth is about giving access to your stuff without sharing your identity at all (or its secret parts).

The reason I needed OAuth was to interact with the Google Contacts API. I've always hated how sites make you import all your contacts from Gmail. I wanted to develop a system that'd let you simply read your contacts from Google in real-time.

Since the application I'm working on uses GWT, I chose to implement an OAuth client in GWT. After googling for "gwt oauth", I found two examples. Unfortunately, neither worked out-of-the-box.

The good news is I did manage to create a working solution. The bad news is it only seems to work at random. That's right folks, I created a solution that only works 50% of the time. I'm somewhat embarrassed to post it here, but I also realize the power of open source and community. By sharing, I hope we can find the flaws in my logic and come up with a solution for all GWT applications.

The best project for OAuth libraries seems to be oauth on Google Code. However, you'll notice that there is no JavaScript implementation listed on the homepage. I did look at the Java implementation, but quickly realized it wouldn't be usable in GWT. Therefore, I opted for the JavaScript implementation.

OAuth consists of several steps. The following diagram explains the authentication flow nicely.

OAuth Authentication Flow

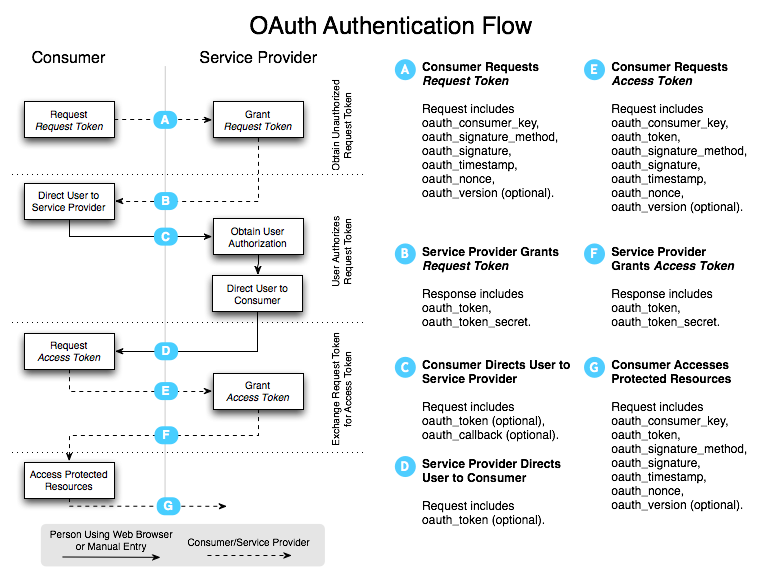
In a nutshell, you have to complete the following steps:

  1. Get a token from the service provider.
  2. Redirect user to service provider to grant access and redirect back to application.
  3. Request access token to access protected resources.
  4. Access protected resources and pull/push data.

To access a service provider's OAuth service, you'll likely need to start by registering your application. For Google, OAuth Authentication for Web Applications is an excellent resource. Google's OAuth Playground is a great way to with the Google Data APIs after you've registered.

Now that you know how OAuth works, let's look at how I implemented it with GWT. I started by adding the necessary JavaScript references to my *.gwt.xml file.

<script src="//oauth.googlecode.com/svn/code/javascript/oauth.js"/>
<script src="//oauth.googlecode.com/svn/code/javascript/sha1.js"/>

Next, I needed a way to sign the request. I tried to use Sergi Mansilla's OAuth.java for this, but discovered issues with how the parameters were being written with GWT 1.6. I opted for Paul Donnelly's makeSignedRequest function instead. By adding this to my application's HTML page, I'm able to call it using the following JSNI method:

public native static String signRequest(String key, String secret, String tokenSecret, String url) /*-{
    return $wnd.makeSignedRequest(key, secret, tokenSecret, url);
}-*/;

After the URL is signed, it needs to be sent to the provider to get a request token. To do this, I used GWT's RequestBuilder and created a send() method:

protected void send(RequestCallback cb, String URL) {
    RequestBuilder builder = new RequestBuilder(RequestBuilder.GET, URL);
    builder.setTimeoutMillis(10000);
    builder.setCallback(cb);
    
    Request req = null;
    try {
        req = builder.send();
    } catch (RequestException e) {
        cb.onError(req, e);
    }
}

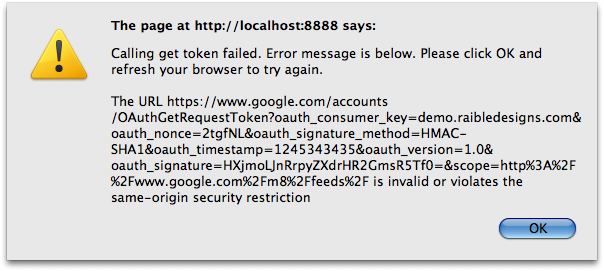
If you try this with Google's Request Token URL in GWT's hosted mode, nothing will happen. Compile/browse to Safari and you'll still see nothing. Try it in Firefox and you'll see the following.

SOP Error

To workaround browsers' Same Origin Policy, I added a proxy servlet to send the requests. I started with Jason Edwards's ProxyServlet and modified it to fit my needs. I then registered it in both *.gwt.xml and web.xml.

<servlet path="/google/" class="org.appfuse.gwt.servlet.AlternateHostProxyServlet"/>

Now, before calling the send() method, I replace the start of the URL so the request would be routed through the servlet.

public void getToken(RequestCallback cb) {
    String url = signRequest(provider.getConsumerKey(), 
                             provider.getConsumerSecret(), 
                             "", provider.getRequestTokenURL());
    url = url.replace("https://www.google.com/", "/google/");
    send(cb, url);
}

When the request returns, I create two cookies by calling a createOAuthCookies() method with the payload returned:

public static String[] createOAuthCookies(String data) {
    String oauth_token = data.substring(data.indexOf("oauth_token=") + 12);
    oauth_token = oauth_token.substring(0, oauth_token.indexOf("&"));

    String oauth_token_secret = data.substring(data.indexOf("oauth_token_secret=") + 19);

    Cookies.setCookie("oauth_token", URL.decode(oauth_token));
    Cookies.setCookie("oauth_token_secret", URL.decode(oauth_token_secret));
    return new String[]{oauth_token, oauth_token_secret};
}

The next step is to authorize the token. This is where things got tricky with my proxy servlet and I had to add some special logic for GWT. Google was sending back a 302 with a Location header, but it wasn't hitting the onResponseReceived() method in my callback. For this reason, I had to change it to a 200 status code and add the redirect location to the body. I also discovered that sometimes they'd return an HTML page with a <meta http-equiv="refresh" ...> tag. When using Twitter, I discovered the full HTML for the allow/deny page was returned. Below is the callback I'm using. WindowUtils is a class I got from Robert Hanson and the gwt-widget project.

public void onResponseReceived(Request request, Response response) {
    String text = response.getText();
    if (response.getStatusCode() == 200 && response.getText().startsWith("http")) {
        WindowUtils.changeLocation(response.getText());
    } else {
        // look for meta-tag that refreshes and grab its URL
        if (text.contains("";
            String url = text.substring(text.indexOf(tokenToStartWith) + tokenToStartWith.length());
            url = url.substring(0, url.indexOf(tokenToEndWith) + tokenToEndWith.length());
            WindowUtils.changeLocation(url);
        } else {
            // Twitter returns a full HTML page, so redirect to the authorize URL manually
            if (provider instanceof Twitter) {
                String url = provider.getAuthorizeTokenURL();
                url = url.replace("$1", OAuthRequest.getAuthToken());
                url = url.replace("$2", DefaultRequest.getCurrentLocation());
                WindowUtils.changeLocation(url);
            } else {
                onError(request, new RequestException(text));
            }
        }
    }
}

public void onError(Request request, Throwable caught) {
    Window.alert("Calling authorize token failed. " + OAuthPage.STANDARD_ERROR + "\n\n" + caught.getMessage());
}

The 3rd step is to get an access token. The most important thing to remember when you do this is to include the "oauth_token_secret" value when signing the request.

signRequest(provider.getConsumerKey(), provider.getConsumerSecret(), 
            getAuthTokenSecret(), url);

After this completes with a 200, I create the cookies again (since oauth_token and oauth_token_secret are returned in the body), then call the API to get a list of contacts. The ContactsRequests class is responsible for making the call. The DefaultRequest class contains the send() method as well as utility methods to get the cookie values of the oauth tokens.

public class ContactsRequest extends DefaultRequest {
    private static final String GOOGLE_CONTACTS_URL = 
        "http://www.google.com/m8/feeds/contacts/default/thin?oauth_token=$1";
    private OAuthProvider provider;

    public ContactsRequest(OAuthProvider provider) {
        this.provider = provider;
    }

    public void getContacts(RequestCallback cb) {
        String url = GOOGLE_CONTACTS_URL.replace("$1", getAuthToken());
        url = signRequest(provider.getConsumerKey(), provider.getConsumerSecret(), 
                          getAuthTokenSecret(), url);

        String proxiedURLPrefix = "/contacts/";
        // allow for deploying at /gwt-oauth context
        if (WindowUtils.getLocation().getPath().contains("gwt-oauth")) {
            proxiedURLPrefix = "/gwt-oauth" + proxiedURLPrefix;
        }

        url = url.replace("http://www.google.com/", proxiedURLPrefix);

        send(cb, url);
    }
}

If all goes well, the response contains the data you requested and it's used to populate a textarea (at least in this demo application). Of course, additional processing needs to occur to parse/format this data into something useful.

This all sounds pretty useful for GWT applications, right? I believe it does - but only if it works consistently. I sent a message to the OAuth Google Group explaining the issues I've had.

I'm trying to use the JavaScript API to authenticate with OAuth from a GWT application. I've got it working with both Google and Twitter's OAuth implementations. However, it seems to fail to sign the URL at random. In other words, it works 1 out of 3 times. ... Any idea why this could be happening?

I received a response with a cleaner makeSignedRequest() function. I tried it and, unfortunately, it seems to be equally unreliable. I suspect the problem is with the OAuth JavaScript implementation, GWT's interpretation of it, or that OAuth isn't as mature as it appears to be. I'd like to think one of the first two causes the problem.

To make it easier to create a robust example of GWT and OAuth, I created a gwt-oauth project you can download or view online. Please keep in mind the demo is likely to be flakey. If you're persistent and try enough times, it's likely to work. Firefox seems to succeed moreso than Safari or Chrome. If you have any suggestions for improving this example, please let me know.

Posted in Java at Jun 18 2009, 01:59:13 PM MDT 13 Comments

Creating a Facebook-style Autocomplete with GWT

Have you used the "To:" widget on on Facebook or LinkedIn when composing a message? It's an autocompleter that looks up contact names and displays them as you type. It looks like a normal textbox (a.k.a. <input type="text">), but wraps the contact name to allow you to easily delete it. Here's a screenshot of what Facebook's widget looks like.

Facebook Autocomplete

Last week, I was asked to create a similar widget with GWT. After searching the web and not finding much, I decided to try writing my own. The best example I found on how to create this widget was from James Smith's Tokenizing Autocomplete jQuery Plugin. I used its demo to help me learn how the DOM changed after you selected a contact.

GWT's SelectBox allows you to easily create an autocompleter. However, it doesn't have support for multiple values (for example, a comma-delimited list). The good news is it's not difficult to add this functionality using Viktor Zaprudnev's HowTo. Another feature you might want in a SelectBox is to populate it with POJOs. GWT SuggestBox backed by DTO Model is a good blog post that shows how to do this.

Back to the Facebook Autocompleter. To demonstrate how to create this widget in GWT, I put together a simple application. You can view the demo or download it. The meat of this example is in an InputListWidget. After looking at the jQuery example, I learned the widget was a <div> with a unordered list (<ul>). It starts out looking like this:

<ul class="token-input-list-facebook">
    <li class="token-input-input-token-facebook">
        <input type="text" style="outline-color: -moz-use-text-color; outline-style: none; outline-width: medium;"/>
    </li>
</ul>

I did this in GWT using custom BulletList and ListItem widgets (contained in the download).

final BulletList list = new BulletList();
list.setStyleName("token-input-list-facebook");

final ListItem item = new ListItem();
item.setStyleName("token-input-input-token-facebook");

final TextBox itemBox = new TextBox();
itemBox.getElement().setAttribute("style", 
        "outline-color: -moz-use-text-color; outline-style: none; outline-width: medium;");

final SuggestBox box = new SuggestBox(getSuggestions(), itemBox);
box.getElement().setId("suggestion_box");

item.add(box);
list.add(item);

After tabbing off the input, I noticed that it was removed and replaced with a <p> around the value and a <span> to show the "x" to delete it. After adding a couple items, the HTML is as follows:

<ul class="token-input-list-facebook">
    <li class="token-input-token-facebook">
        <p>What's New Scooby-Doo?</p>
        <span class="token-input-delete-token-facebook">x</span>
    </li>
    <li class="token-input-token-facebook">
        <p>Fear Factor</p>
        <span class="token-input-delete-token-facebook">x</span>
     </li>
     <li class="token-input-input-token-facebook">
         <input type="text" style="outline-color: -moz-use-text-color; outline-style: none; outline-width: medium;"/>
     </li>
</ul>

To do this, I created a deselectItem() method that triggers the DOM transformation.

private void deselectItem(final TextBox itemBox, final BulletList list) {
    if (itemBox.getValue() != null && !"".equals(itemBox.getValue().trim())) {
        /** Change to the following structure:
         * <li class="token-input-token-facebook">
         * <p>What's New Scooby-Doo?</p>
         * <span class="token-input-delete-token-facebook">x</span>
         * </li>
         */

        final ListItem displayItem = new ListItem();
        displayItem.setStyleName("token-input-token-facebook");
        Paragraph p = new Paragraph(itemBox.getValue());

        displayItem.addClickHandler(new ClickHandler() {
            public void onClick(ClickEvent clickEvent) {
                displayItem.addStyleName("token-input-selected-token-facebook");
            }
        });

        Span span = new Span("x");
        span.addClickHandler(new ClickHandler() {
            public void onClick(ClickEvent clickEvent) {
                list.remove(displayItem);
            }
        });

        displayItem.add(p);
        displayItem.add(span);
        
        list.insert(displayItem, list.getWidgetCount() - 1);
        itemBox.setValue("");
        itemBox.setFocus(true);
    }
}

This method is called after selecting a new item from the SuggestBox:

box.addSelectionHandler(new SelectionHandler<SuggestOracle.Suggestion>() {
    public void onSelection(SelectionEvent selectionEvent) {
        deselectItem(itemBox, list);
    }
});

I also added the ability for you to type in an e-mail address manually and to delete the previous item when you backspace from the input field. Here's the handler that calls deselectItem() and allows deleting with backspace:

// this needs to be on the itemBox rather than box, or backspace will get executed twice
itemBox.addKeyDownHandler(new KeyDownHandler() {
    public void onKeyDown(KeyDownEvent event) {
        if (event.getNativeKeyCode() == KeyCodes.KEY_ENTER) {
            // only allow manual entries with @ signs (assumed email addresses)
            if (itemBox.getValue().contains("@"))
                deselectItem(itemBox, list);
        }
        // handle backspace
        if (event.getNativeKeyCode() == KeyCodes.KEY_BACKSPACE) {
            if ("".equals(itemBox.getValue().trim())) {
                ListItem li = (ListItem) list.getWidget(list.getWidgetCount() - 2);
                Paragraph p = (Paragraph) li.getWidget(0);

                list.remove(li);
                itemBox.setFocus(true);
            }
        }
    }
});

I'm happy with the results, and grateful for the jQuery plugin's CSS. However, it still has one issue that I haven't been able to solve: I'm unable to click on a list item (to select it) and then delete it (with the backspace key). I believe this is because I'm unable to give focus to the list item. Here's the code that highlights the item and you can see the commented-out code that doesn't work.

displayItem.addClickHandler(new ClickHandler() {
    public void onClick(ClickEvent clickEvent) {
        displayItem.addStyleName("token-input-selected-token-facebook");
    }
});

/** TODO: Figure out how to select item and allow deleting with backspace key
displayItem.addKeyDownHandler(new KeyDownHandler() {
    public void onKeyDown(KeyDownEvent event) {
        if (event.getNativeKeyCode() == KeyCodes.KEY_BACKSPACE) {
            list.remove(displayItem);
        }
    }
});
displayItem.addBlurHandler(new BlurHandler() {
    public void onBlur(BlurEvent blurEvent) {
        displayItem.removeStyleName("token-input-selected-token-facebook");
    }
});
*/

If you know of a solution to this issue, please let me know. Feel free to use this widget and improve it as you see fit. I'd love to see this as a native widget in GWT. In the meantime, here's the GWT Facebook-style Autocomplete demo and code.

Posted in Java at Jun 05 2009, 07:05:10 AM MDT 25 Comments

Ajax Framework Analysis Results

Way back in January, I wrote about how my colleagues and I were evaluating Ajax frameworks to build a SOFEA-style architecture. To make our choice, we used the following process:

  1. Choose a short list of frameworks to prototype with.
  2. Create an application prototype with each framework.
  3. Document findings and create a matrix with important criteria.
  4. Create presentation to summarize document.
  5. Deliver document, presentation and recommendation.

When I wrote that entry, we had just finished step 2 and were starting step 3. I first wrote this blog post a week later, when we delivered step 5. Here is the comparison and conclusion sections of the analysis document we composed.

Framework Comparison
In order to evaluate the different frameworks against important criteria, we created a matrix with weights and ranks for each framework. This matrix shows how our weighting and rankings lead us to the winner for our project. You can view this matrix online or see below for a summary.

Note: Criteria whose values were identical across all candidates were weighted at zero. Charting capability was weighted at zero b/c we decided to use Flash for this.

This matrix indicates that GWT is the best candidate for our team to develop SOFEA-style applications with. In addition to the matrix, below are graphs that illustrate interesting (and possibly meaningless) statistics about each project.

Number of Committers

Books on Amazon

Conclusion
After working with the various frameworks, we believe that all the frameworks were very good and could be used to write applications with. If all weights are equal, these frameworks were almost even when compared against our evaluation criteria. The graph below illustrates this.

Ranking with equal criteria weights

Even after applying the weighted criteria, the evenness doesn't change a whole lot.

Ranking with weighted criteria

Without considering the even or weighted criteria, we believe the decision all comes down to what the developers on the project feel they will be most comfortable with. If you're developing with Dojo or YUI, chances are you're dressing up existing HTML and possibly using progressive enhancement to add more rich functionality. On the other hand, Ext JS and GWT are similar to Swing programming where you build the UI with code (JavaScript for Ext JS, Java for GWT).

The tools available for JavaScript development have gotten increasingly better in recent years. IntelliJ IDEA has a JavaScript Editor that provides many of the same features as its Java editor. Aptana Studio also has excellent support for authoring and debugging JavaScript. However, we believe the Java debugging and authoring support in IDEs is much better. Furthermore, we are more familiar with organizing code in Java projects and feel more comfortable in this development environment.

Based on this evaluation, we believe that GWT is the best framework for our team to develop SOFEA-style applications with.

Flash Forward to Today...
The core GWT library from Google doesn't have a whole lot of widgets, nor do they look good out-of-the-box. So early on, we experimented with two alternative implementations that continue to leverage GWT concepts and tools:

  • GXT: a GWT version of Ext JS
  • SmartGWT: a GWT version of SmartClient

Unfortunately, over the past few months, we've found that both of these implementations are too heavy for our requirements, mostly because of the file size of the generated JavaScript code. For example, a feature I wrote generated a 275K *.cache.html file using GXT. After determining that was too slow to give users the initial "pop", I re-wrote it without GXT. After a day, we had an application with *.cache.html files of 133K. Yes, that's over a 50% reduction in size!*

Because of these findings, we are proceeding with the core GWT library from Google and adding in new components as needed. It is cool to know you can make a UI "pop" with GWT, as long as you stick to the core - close-to-the-metal - components. For those applications that can afford an initial "loading..." state, I'd definitely recommend looking at GXT and SmartGWT.

* To make refactoring easier, I copied GXT MVC into our source tree and modified all imports.

Posted in Java at Apr 23 2009, 08:34:44 PM MDT 53 Comments

My Drunk on Software Interview

Back in February, I met up with James Ward and Jon Rose for a Drunk on Software interview. We enjoyed some good beer and had a great conversation about SOFEA, open source and RIA. See larger video here.

Posted in Java at Apr 05 2009, 10:23:57 PM MDT 8 Comments

Optimizing a GWT Application with Multiple EntryPoints

Building a GWT application is an easy way for Java Developers to write Ajax applications. However, it can be difficult to release a GWT application to production before it's finished. One of the most important things I've learned in Software Development is to get a new application into production as soon as possible. Not only does getting it from dev → qa → prod verify your process works, it also can do a lot to test the viability of the new application.

One of the biggest issues with GWT applications is size. The project I'm working on compiles Java to JavaScript and creates ~570K *.cache.html files (one for each modern browser). These files end up being around 180K gzipped. I believe this is an OK size for an entire application. However, if you're going to release early, release often with GWT, chances are you'll just want to release one feature at a time.

When the first feature was completed on my project, the *.cache.html files were around 300K. Rather than using branches to release to QA and UAT, bug fixes and new features were developed on trunk. Unfortunately, the QA and UAT process took several weeks longer than expected so by the time the feature was ready to release, the *.cache.html files had grown to around ~570K. The reason the file had grown so much was because it included all of the other features.

Earlier this week, while running to a dentist appointment, I thought of a solution to this problem. The basic idea was to optimize the compilation process so only the to-be-released feature was included. Even better, the solution didn't require more modularization. The results:

Before: *.cache.html -> 569K, gzipped 175K
After: *.cache.html -> 314K, gzipped 100K

According to my calculations, that's a 56% reduction in size. How did I do it?

  1. Created a new FeatureName.java EntryPoint with only the to-be-released features imported.
  2. Created a new FeatureName.gwt.xml that references the new EntryPoint.
  3. Copied old (kitchen-sink) EntryPoint.html to FeatureName.html and changed the reference to the nocache.js file.
  4. Created a Maven profile that allows using -PFeatureName to build a FeatureName-only module.

One downside to doing things this way is it's possible to create a WAR that has the same name and different features. Surely the Maven Overlords would frown upon this. Since this is just a temporary solution to release features incrementally, I'm not too worried about it. A possible workaround is to create different WAR names when a feature's profile is activated. I believe the true "Maven way" would be to make the "kitchen sink" application into a JAR and have several WAR modules with the different EntryPoints. Seems a bit complicated to me.

Other than this Maven publishing issue, the only other issue I can foresee is keeping the two EntryPoints and HTML files in synch. Then again, the separate files allow a feature to be customized for the release and can be deleted when its no longer needed.

What do you think? Do you know of a better way to compile a GWT application so it only contains certain features?

Posted in Java at Mar 25 2009, 04:00:37 PM MDT 12 Comments

Modularizing GWT Applications with GWT-Maven

Last week, I spent some time modularizing the GWT application I'm working on. By modularizing, I mean splitting the code from one GWT module into a "core" and "webapp" module. The reason for doing this was so the "core" module could be used by another GWT application. Creating GWT Modules is fairly straightforward, but it wasn't as intuitive as expected when using the gwt-maven-plugin.

The hardest part of moving the code was figuring out how to run tests in the new "core" module. After getting it all working, it seems easy enough. Hopefully this post will make it easy for others. Here's the steps I'd recommend:

  1. Convert your GWT project into a multi-module project where you have a top-level pom.xml and two sub-modules (e.g. gwt-core and gwt-webapp).
  2. Do the normal single-to-multi-project Maven stuff like declaring the <parent> element in the modules and moving plugins/dependencies to the top-level pom.xml.
  3. Refactor your gwt-webapp project to push down all shared classes (and their tests) to gwt-core.
  4. In the gwt-core project, include *.xml and *.java in your JAR so GWT can extract/compile the source code when building gwt-webapp.
    <resources>
        <resource>
            <directory>src/main/java</directory>
            <includes>
                <include>**/*.java</include>
                <include>**/*.xml</include>
            </includes>
        </resource>
    </resources>
    
  5. In gwt-core/src/main/java, create a Core.gwt.xml that references the modules you'd like to use in all your applications. For example:
    <module>
        <inherits name="com.google.gwt.user.User"/>
        <inherits name="com.google.gwt.i18n.I18N"/>
        <inherits name="com.extjs.gxt.ui.GXT"/>
        <inherits name="pl.rmalinowski.gwt2swf.GWT2SWF"/>
    </module>
    
  6. Now the tricky part begins, mostly because of how the gwt-maven plugin currently works. In src/test/java, create a NoOpEntryPoint.gwt.xml that inherits your Core module and defines an EntryPoint.
    <module>
        <inherits name="com.company.app.Core"/>
        <entry-point class="com.company.app.NoOpEntryPoint"/>
    </module>
    
  7. Create a NoOpEntryPoint.java class in the same directory as NoOpEntryPoint.gwt.xml.
    public class NoOpEntryPoint implements EntryPoint {
        
        public void onModuleLoad() {
            // do nothing
        }
    }
    
  8. In any class that extends GWTTestCase (I usually create a parent class for all tests), reference the NoOpEntryPoint in the getModuleName() method.
        @Override
        public String getModuleName() {
            return "com.company.app.NoOpEntryPoint";
        }
    
  9. Lastly, in the gwt-maven plugin's configuration (in gwt-core/pom.xml), reference the NoOpEntryPoint in <compileTargets>, a non-existent file in <runTarget> and only the "test" goal in the executions.
    <plugin>
        <groupId>com.totsp.gwt</groupId>
        <artifactId>maven-googlewebtoolkit2-plugin</artifactId>
        <version>2.0-beta26</version>
        <configuration>
            <compileTargets>
                <value>com.company.app.NoOpEntryPoint</value>
            </compileTargets>
            <runTarget>com.company.app.NoOpEntryPoint/doesntexist.html</runTarget>
            <logLevel>INFO</logLevel>
            <style>OBF</style>
            <noServer>false</noServer>
            <extraJvmArgs>-Xmx512m</extraJvmArgs>
            <gwtVersion>${gwtVersion}</gwtVersion>
            <testFilter>*GwtTestSuite.java</testFilter>
            <testSkip>${skipTests}</testSkip>
        </configuration>
        <executions>
            <execution>
                <goals>
                    <goal>test</goal>
                </goals>
            </execution>
        </executions>
    </plugin>
    

The results of modularizing your application are beneficial (shared code) and detrimental (you have to mvn install gwt-core whenever you make changes in shared classes). If you know of a way to configure the gwt-maven plugin to read sources from both gwt-core and gwt-webapp in hosted mode, I'd love to hear about it.

Posted in Java at Mar 23 2009, 10:36:08 AM MDT 11 Comments

GXT's MVC Framework

For the past couple of months, I've been developing a GWT application using a mix of plain ol' GWT and GXT widgets. When I first started developing it, I didn't know how to best organize my code and separate the logic. The solution I came up with was to adopt some sort of MVC framework. Since I was already using GXT, I opted for GXT's lightweight MVC implementation.

As mentioned in Testing GWT Applications, GXT's MVC doesn't have much documentation. The best reference documentation seems to be Christian's Getting started with Ext-GWT: The Mail reference application.

Page Transitioning with Dispatcher
After working with GXT MVC for a couple months, I'm still not sure I fully understand how navigation and event dispatching works. The biggest point of confusion for me is how to best use GXT's Dispatcher class.

The problem with Dispatcher is it has a two methods that seem to do the same thing.

  • forwardEvent (4 variations)
  • dispatch (3 variations)

In addition to these methods in Dispatcher, there's two fireEvent methods in GXT's View class. According to my calculations, that means there's 9 different options for transitioning from one view to the next. Which one is best to use?

From what I've learned, I think it's best to use fireEvent in Views and forwardEvent in Controllers and other widgets. IMO, dispatcher should never be used except in your HistoryListener's implementation onHistoryChanged method. The important thing to realize about this method is it should only work if the View's Controller is registered for the event.

  protected void fireEvent(AppEvent event) {
    Controller c = controller;
    while (c != null) {
      if (c.canHandle(event)) {
        c.handleEvent(event);
      }
      c = c.parent;
    }
  }

However, fireEvent seems to work even when the View's Controller isn't registered for that event. This is because onHistoryChanged gets called in the EntryPoint. For experienced GXT MVC users, does this navigation handling mesh with your findings?

The most important thing for navigation to work successfully is enabling History support. The next section talks about how to do this effectively.

Enabling History Support
To help explain things better, I created a simple GWT MVC Example application and used Maven to create an archetype with it. You can create a project from the archetype using the following command:

mvn archetype:create -DarchetypeGroupId=org.appfuse.archetypes \
-DarchetypeArtifactId=gwt-mvc -DarchetypeVersion=1.0-SNAPSHOT \
-DgroupId=com.mycompany.app -DartifactId=myproject \
-DremoteRepositories=http://oss.sonatype.org/content/repositories/appfuse-snapshots

To enable history support in this application, I implemented HistoryListener in my EntryPoint (Application.java) and added the following logic to initialize:

// If the application starts with no history token, redirect to 'home' state
String initToken = History.getToken();
if (initToken.length() == 0) {
    History.newItem(HistoryTokens.HOME);
}

// Add history listener
History.addHistoryListener(this);

// Now that we've setup our listener, fire the initial history state.
History.fireCurrentHistoryState();

In this example, HistoryTokens is a class that contains all the URLs of the "views" in the application.

public class HistoryTokens {
    public static final String HOME = "home";
    public static final String CALENDAR = "calendar";
    public static final String NOTES = "notes";
    public static final String SEARCH = "search";
}

In order to make URLs like http://localhost:8080/#calendar go to the calendar view, the following logic exists in the onHistoryChanged method.

        Dispatcher dispatcher = Dispatcher.get();

        if (historyToken != null) {
            if (historyToken.equals(HistoryTokens.HOME)) {
                dispatcher.dispatch(AppEvents.GoHome);
            } else if (historyToken.equals(HistoryTokens.CALENDAR)) {
                dispatcher.dispatch(AppEvents.Calendar);
            } else if (historyToken.equals(HistoryTokens.NOTES)) {
                dispatcher.dispatch(AppEvents.Notes);
            } else if (historyToken.equals(HistoryTokens.SEARCH)) {
                dispatcher.dispatch(AppEvents.Search);
            } else {
                GWT.log("HistoryToken '" + historyToken + "' not found!", null);
            }
        }

Controllers are registered in the EntryPoint as follows:

        final Dispatcher dispatcher = Dispatcher.get();
        dispatcher.addController(new CalendarController());
        dispatcher.addController(new HomeController());
        dispatcher.addController(new NotesController());
        dispatcher.addController(new SearchController());

Controllers respond to events they're registered for. This is done in their constructor:

    public CalendarController() {
        registerEventTypes(AppEvents.Calendar);
    }

In order for navigation to work, you have to create links with history tokens1. For example, here's a link from the HomeView class:

	Hyperlink notesLink = new Hyperlink("Notes", HistoryTokens.NOTES);
	notesLink.addClickListener(new ClickListener() {
	    public void onClick(Widget widget) {
	        Dispatcher.get().fireEvent(AppEvents.Notes);
	    }
	});

You'll notice in this example, I'm using Dispatcher's fireEvent method. If I wanted to pass some data with your event, you'll need to use forwardEvent. Here's an example from CalendarView:

    Button submit = new Button("Submit");

    submit.addSelectionListener(new SelectionListener<ButtonEvent>() {
        public void componentSelected(ButtonEvent ce) {
            AppEvent<Date> event = 
                new AppEvent<Date>(AppEvents.GoHome, date.getValue(), HistoryTokens.HOME);
            Dispatcher.forwardEvent(event);
        }
    });

In this example, you could also use Dispatcher.dispatcher(), but I believe this will cause the transition to happen twice because the onHistoryChanged method gets called too. This doesn't matter for the most part, except when you start to use DispatcherListeners.

Hopefully this article has helped you understand how GXT's MVC framework works. I'm interested in learning how other GWT MVC frameworks work. If you've used one, I'd love to hear about your experience.

Friday Fun Test
Here's a test for those interested in digging into the GXT MVC example. There's a bug in this application that prevents something from happening. I'll buy a drink for the person that finds the bug and I'll buy two drinks for the person that comes up with a solution. ;-)

1. If you use the default constructor on Hyperlink and use setText(), make sure to call setTargetHistoryToken() too. If you don't, a blank history token will be used and # causes the browser to scroll to the top before a page transition happens.

Posted in Java at Mar 13 2009, 11:48:41 AM MDT 25 Comments

Nexus is a kick-ass Repository Manager

I started my current gig at the end of last year. I've been enjoying the work and especially the project infrastructure we've been using. We're using the usual suspects: JIRA, Confluence, Hudson and Subversion. We're also using a couple new ones, namely sventon and Nexus. For building, we're using Maven and Ivy (as a Grails plugin).

Nexus I'm writing this post to talk about Nexus and how much I've enjoyed using it. I like Nexus for two reasons: it's aesthetically pleasing and it's well-documented. Another reason I really dig it is because I haven't had to touch it since I first configured it. Software that just keeps on humming is always fun to work with.

Initially, I remember having some issues setting up repositories. I also remember solving them after learning how groups work.

In addition to on-the-job, I've started to use Nexus more and more in my open source life. With the help of Jason van Zyl, I recently moved AppFuse's repository to Sonatype's oss.sonatype.org. I also noticed there's a Nexus instance for Apache projects. If that's not enough, you can get Nexus Pro free if you're an open source project.

Personally, the open source version of Nexus seems good enough for me. While the Staging Suite looks nice, I think it's possible to do a lot of similar things with good communication. After all, it's not going to free you from having to wrestle with the maven-release-plugin.

Next week, I'm helping to polish and document our entire release process (from dev → qa → production). If you have any advice on how to best perform releases with Maven, Grails and/or Nexus, I'd love to hear about it. My goal is extreme efficiency so releases can be done very quickly and with minimal effort.

Posted in Java at Mar 05 2009, 11:59:02 PM MST 13 Comments

GWT and AppFuse

Someone recently sent me the following e-mail asking about GWT integration in AppFuse.

I see from your blog that you're spending some time with GWT at the moment. What's your plan, are you going to integrate GWT as another UI Option for AppFuse?

The reason I'm asking is that I actually checked out all of the AppFuse code from the svn repository yesterday, with the intention of starting off adding some GWT stuff in there. My intention was to start by getting a basic Maven archetype together for GWT as an AppFuse UI.

However, if you're planning on doing this yourself in the near future, then there's no point in me starting doing it, I'd have to learn how to write archetype's for a start (not that it looks too difficult) but you'd obviously do it much quicker.

Being a good open-source developer, I moved the discussion to the developer mailing list and replied there:

It's likely I'll create a version of AppFuse Light with GWT, but I doubt I'll do it in the near future. I hope to release AppFuse 2.1 first (which will include "light" archetypes). I wouldn't get your hopes up in waiting for me to do the work. However, I'd be happy to assist you in doing it. AppFuse Light is now modular and uses the AppFuse backend.

http://raibledesigns.com/rd/entry/appfuse_light_converted_to_maven

Here's how I believe GWT should be integrated:

  1. Create an appfuse-ws archetype that serves up RESTful services (http://issues.appfuse.org/browse/APF-897).
  2. Create an appfuse-gwt archetype that consumes those services. This archetype would contain a proxy servlet that allows #1 to be on a separate host/port.

In addition to #1, I hope to convert the Struts 2 and Spring MVC archetypes to use those frameworks' REST support.

For #2, we could use SmartGWT or GXT. SmartGWT might be better since Sanjiv is a committer on this project. ;-)

I know I've been slacking on AppFuse development, but it is ski season and running to work seems to drain my late-night coding ambitions. With that being said, I'm committed to getting AppFuse 2.1 released by JavaOne (hopefully sooner). I figure it's a good week's worth of work and I'll probably have to do it late at night to find the time. That's OK though, I usually really start to enjoy it once I get into it.

Posted in Java at Mar 04 2009, 10:50:26 PM MST 5 Comments

GWTTestSuite makes builds faster, but requires JUnit 4.1

Earlier this week, I spent some time implementing GWTTestSuite to speed up my project's build process. In Hudson, the project was taking around 15 minutes to build, locally it was only taking 5 minutes for mvn test. In IDEA, I could run all the tests in under a minute. While 15 minutes isn't a long time for a build to execute, a co-worker expressed some concern:

Does Maven have to run GWT test and individual Java processes? (See target/gwtTest/*.sh) This arrangement and the overhead of JVM launches is another reason why builds take so long. As we add more GWT tests we are going to test that LinkedIn record for the slowest build ever.

After this comment, I started looking into GWTTestSuite using Olivier Modica's blog entry as a guide. It was very easy to get things working in IDEA. However, when I'd run mvn test, I'd get the following error:

Error: java.lang.ClassCastException

No line numbers. No class information. Zilch. After comparing my project's pom.xml with the one from the default gwt-maven archetype, I noticed the default used JUnit 4.1, while I had the latest-and-supposedly-greatest JUnit 4.4. Reverting to JUnit 4.1 fixed the problem. Now Hudson takes 3:15 to execute the build instead of 15 minutes.

The reason for this blog post is this doesn't seem to be documented anywhere. Hopefully other developers will find this entry when googling for this issue.

Related to making GWT faster, I also added the following line to my Application.gwt.xml file:

<set-property name="user.agent" value="safari" />

This dropped the gwt:compile time from 1 minute to 25 seconds. As explained in the documentation, you can use the "user.agent" setting to only generate one JS file for your app instead of 4. The strange thing about adding this setting was I pretty much forgot about it since everything seemed to work fine on both Safari and Firefox. When I started testing things in IE6, I started seeing a lot of JavaScript errors. After debugging for an hour or so, I realized this setting was there, removed it, and everything started working great in all browsers.

Now if I could just figure out how to use safari-only for development, but remove the line when building the WAR. Suggestions welcome.

Posted in Java at Feb 27 2009, 11:58:12 AM MST 6 Comments