Matt RaibleMatt Raible is a Web Developer and Java Champion. Connect with him on LinkedIn.

The Angular Mini-Book The Angular Mini-Book is a guide to getting started with Angular. You'll learn how to develop a bare-bones application, test it, and deploy it. Then you'll move on to adding Bootstrap, Angular Material, continuous integration, and authentication.

Spring Boot is a popular framework for building REST APIs. You'll learn how to integrate Angular with Spring Boot and use security best practices like HTTPS and a content security policy.

For book updates, follow @angular_book on Twitter.

The JHipster Mini-Book The JHipster Mini-Book is a guide to getting started with hip technologies today: Angular, Bootstrap, and Spring Boot. All of these frameworks are wrapped up in an easy-to-use project called JHipster.

This book shows you how to build an app with JHipster, and guides you through the plethora of tools, techniques and options you can use. Furthermore, it explains the UI and API building blocks so you understand the underpinnings of your great application.

For book updates, follow @jhipster-book on Twitter.

10+ YEARS


Over 10 years ago, I wrote my first blog post. Since then, I've authored books, had kids, traveled the world, found Trish and blogged about it all.
You searched this site for "appfuse". 771 entries found.

You can also try this same search on Google.

Why the bias against JSF?

In my last post about InfoQ's Top 20 Web Frameworks for the JVM, I received a thought-provoking comment from henk53:

There is one little thing that does bother me in those presentations, and that's your fairly obvious bias against JSF.
...
If you are presenting yourself as, more or less, an authority on comparing web frameworks, then having a fairly obvious biased against one of them is just peculiar. I, all of my team, and various clients distrust your ranking of JSF. We do look at your data if the choice is between other frameworks, but as soon as JSF comes into the picture we just look elsewhere.

I'm not really sure where this bias comes from. Yes, JSF 1.0 sucked and 1.2 was only marginally better, but 2.0 is really cool and productive and there are SUPERB component and utility libraries now like PrimeFaces and OmniFaces. As a researcher of this topic I think you should keep up the date and not stick to some old grudge.

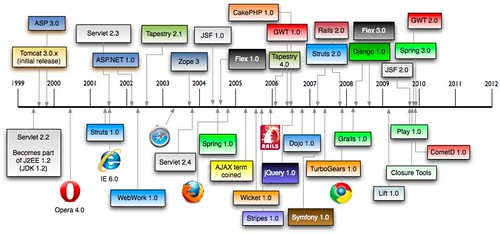
This is true, I am biased against JSF. It all started with my first JSF experience back in August 2004. If you remember correctly, 2004 was a big year: JSF 1.0, Spring 1.0 and Flex 1.0 were all released. The "AJAX" term was coined in early 2005.

History of Web Frameworks

By 2007 and 2008, JSF still hadn't gotten any better. In late 2009, JSF 2.0 was released and I upgraded in March 2011. As you can see from the aforementioned post, I ran into quite a few issues upgrading. JSF was also the hardest one to get working with extension-less URLs.

Most of my issues with JSF come from having maintained an application built with it since 2004. If I were to start a new application without any legacy migration issues, I imagine it wouldn't be as difficult. However, if you compare it to Struts 2 and Spring MVC, I've had little-to-no issues upgrading those applications over the years.

Also, I'm not just biased against JSF, but most component-based web frameworks. Just ask the Tapestry and Wicket folks. They've felt my criticisms over the years. My reason for preferring request-based frameworks like Struts 2/Spring MVC and Grails/Play has been because I've never seen the appeal in component-based frameworks. Often I've found that their components are just widgets that you can get from any decent JavaScript framework. And chances are that JavaScript framework can work with any web framework. Also, I've worked on a lot of high-traffic web applications that require statelessness for scalability.

I see the value in component-based frameworks, I just don't think components should be authored on the server-side. Most of the Java-based component frameworks require 2+ files for components (one for the component, one for the view, possibly one for the config). I love GWT's component concept in that you can just extract a class and re-use it. With JS frameworks, you can often just include a script. These days, when I think of good component-based frameworks, I think of jQuery UI and Twitter Bootstrap.

All that being said, there's a lot of folks praising JSF 2 (and PrimeFaces moreso). That's why I'll be integrating it (or merging your pull request) into the 2.3 release of AppFuse. Since PrimeFaces contains a Bootstrap theme, I hope this is a pleasant experience and my overall opinion of JSF improves.

In other component-based frameworks in AppFuse news, Tapestry 5 has gotten really fast in the last year. I imagine this is because we have a Tapestry expert, Serge Eby, working on it. And we're planning on adding Wicket in the 2.3 release.

So even though I prefer request-based frameworks with REST support and Bootstrap, that doesn't mean everyone does. I'll do my best to be less-biased in the future. However, please remember that my view on web frameworks is as a developer, not an analyst. And aren't developers supposed to be opinionated? ;)

Posted in Java at Nov 08 2012, 09:24:27 AM MST 11 Comments

InfoQ's Top 20 Web Frameworks for the JVM

Back in early October, InfoQ.com published a community research article titled Top 20 Web Frameworks for the JVM. Their goal seemed to be fairly simple:

Using the new community research tool, we at InfoQ want to get YOUR opinions on the relative importance and maturity of a variety of web frameworks that are targeted for the JVM. Please vote by dragging each practice across two dimensions – how important is the framework relative to the other frameworks, and how much is it actually used in real teams and projects.

When I first saw this article, I noticed some strange web frameworks listed. Namely, Netty, SiteMesh and Spark. I haven't heard of many folks using Netty for a web framework, but I'm sure it's possible. SiteMesh is certainly not a web framework and I've never even heard of Spark. And where is GWT and Vaadin? Regardless of the choices, I went ahead and voted.

Last week, InfoQ posted their top content for October on Facebook.

First of all, it's interesting to see that JVM Web Frameworks is still a hot topic for developers. Whenever I do my Comparing JVM Web Frameworks talk at conferences, I always see a few jabs about "he's still doing that talk!?" Yes, it seems strange that a talk I first did in 2004 is still in high demand.

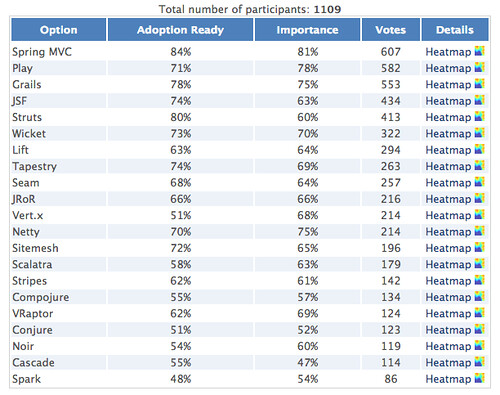
Secondly, I think InfoQ does good in showing how the frameworks ranked and showing their heatmaps. Below are their rankings from 1109 participants.

InfoQ's Top 20 Web Frameworks for the JVM

According to this research, the top 5 web frameworks for the JVM are Spring MVC, Play, Grails, JSF and Struts (I hope those surveyed meant Struts 2, not Struts 1).

In my research from last February (slide 21), I ranked them (with no particular weightings) as Grails, GWT, JRuby on Rails, Spring MVC and Vaadin. So I guess you could say I got 2 out of 5 right (Grails and Spring MVC). Not bad considering InfoQ didn't even consider GWT and Vaadin.

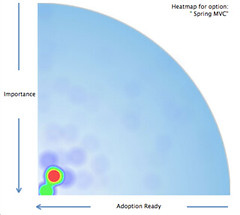
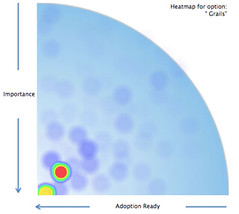
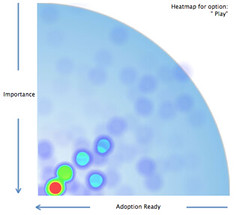
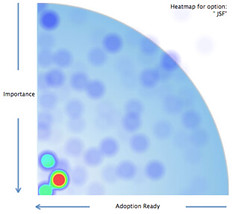
Another intriguing data point in this study is each frameworks' heatmap. For example, below are heatmaps for the top 4 frameworks.

Spring MVC Heatmap Grails Heatmap

Play Heatmap JSF Heatmap

Notice how Grails and Spring MVC are both hotter in the bottom right corner? It seems the community's overall opinions of these two frameworks are more aligned than JSF and Play, which a fair amount of folks rank as hyped and unimportant.

What I really like about this research is it's the community's opinions, visualized. It also confirms that some of my favorite frameworks are still on top. I don't know if JSF belongs as a top framework, however it seems a lot of folks do. I recently thought about removing it from AppFuse, but decided to keep it (at least for the next release). I hope InfoQ does more research projects like this, especially if they get their list of web frameworks right.

Posted in Java at Nov 06 2012, 12:04:28 PM MST 5 Comments

AppFuse News: GitHub, Hibernate Search and The Future

It's been a while since I've written anything about AppFuse, but since the project has had quite a bit of activity lately, now seems like a good time.

GitHub
First of all, we moved the source code from java.net to GitHub way back in June. Thanks to Serge for helping with this process and making it quick and painless. For some reason, shortly after moving, we started having quite a few build issues with Bamboo. I was able to diagnose the problem as not enough memory on our server. Thankfully, Contegix was able to add another 2GB of RAM to our box and get everything back up-to-snuff.

New Committer: J. Garcia
J. Garcia has been a regular voice on the users and developers mailing list for several months. He's recently started contributing a lot of patches in JIRA and seems genuinely interested in the success of AppFuse. That's why we voted and added him as a committer. To prove this was a smart move, he recently replaced Compass with Hibernate Search and upgraded to Hibernate 4. As part of this work, he removed iBATIS support, which brings me to my next point.

The Future
In mid-August, I sent an email to the community, asking them "Anyone using iBATIS?"

I'm thinking of replacing AppFuse's Data Tier with Spring Data, especially because it has NoSQL and REST support. There's a good intro on InfoQ today:

http://www.infoq.com/articles/spring-data-intro

Does anyone see an issue with this? The lack of iBATIS support could be an issue, but I doubt it since if we wanted to continue supporting it, we should move to MyBATIS.

Everyone agreed this was a good idea and it seemed like a logical time to remove iBATIS support. In addition, I posted a roadmap I jotted down in early May. Since we've missed all the dates so far, I've removed them from the listing below. We hope to get 1-2 releases done by the end of this year, with 2.2 in the next 2-3 weeks.

2.2
Hibernate 4
Hibernate Search
Bootstrap
H5BP

2.3
AMP for all light modules
Wicket
PrimeFaces

2.4
JSR 303 (might require removing or developing client-side support)
Mockito instead of jMock/EasyMock

2.5
AMP one-to-many
Spring Data
MyBatis (if there's interest in adding it back in)

2.6
wro4j for concatenation and minimizing JS and CSS
pjax - https://github.com/defunkt/jquery-pjax

2.7
Scala example
Gradle example
Article about examples

3.0
GWT

Maven Central Statistics
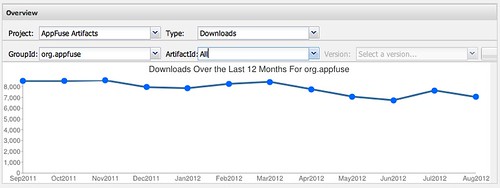
To prove there's still a fair amount of folks using AppFuse, here's some statistic from Sonatype's OSS Repository Hosting Service.

AppFuse Downloads

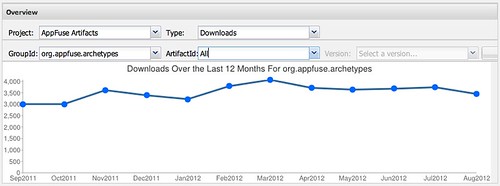
From this screenshot, you can see that AppFuse artifacts are downloaded around 7,000 times per month. The following graph is even more interesting. Apparently, around 3,000 new projects are created with AppFuse archetypes each month.

AppFuse Archetype Downloads

The AppFuse Name
Finally, I recently discovered that ShoreTel decided to name a new product AppFuse. I guess this signifies two things: 1) it's a good name for a product and 2) someone didn't do their research before naming it. At this point, I'm not too concerned, but it is an interesting development.

Posted in Java at Sep 25 2012, 10:42:14 AM MDT 5 Comments

Twitter's Open Source Summit: Bootstrap 2.0 Edition

Every few months, Twitter hosts an Open Source Summit to talk about tools they're using. Since I happened to be near San Fransisco, I happily attended their latest #ossummit to learn about Bootstrap 2.0. Below are my notes from last night's event.

95% of Twitter's infrastructure is powered by open source. They hope to contributing back to open source by doing 2-3 summits per year. Without open source, there would be no Twitter. You can find a bunch of Twitter's open source contributions at twitter.github.com. They're also big fans of Apache and commit to a wide variety of projects there.

Bootstrap
Bootstrap is developed by two main guys: @mdo and @fat. Mark (@mdo) has been a designer at Twitter for 2 years. He started on the Revenue Team with ads, but has been working on redesign for last 4 months. Has been doing HTML and CSS for about 11 years. He used Notepad on Windows to build his GeoCities site.

boot·strap: simple and flexible HTML, CSS, and JavaScript for popular user interface components and interactions.

Work on Bootstrap started about a 1.5 years ago. Internal tools didn't get the proper attention they needed. They figured out there was a lot of people that wanted good looking UIs and interactions. It became Twitter Blueprint and was mostly used internally. Jacob (@fat) started shortly after first release and decided to add some JavaScript on top of it. The JavaScript for Bootstrap was originally the "Twitter Internal Toolkit" or "TIT" and was built on Moo Tools. Jacob was like "we gotta open source this, it's gonna be huge!" (he was right).

The 1.0 release supported Chrome, Safari and Firefox (everyone at Twitter was on Macs). 1.3 added cross-browser support and JavaScript plugins.

Now there's Bootstrap 2 (just released!). They rewrote all the documentation and components and removed legacy code.

So, what's new? The biggest thing is the docs. Previously had live examples, now shows live examples and why you would do something, as well as additional options. The "topbar" has been renamed to "navbar", but it's still got all the hotness. It's responsive with CSS media queries for small devices, tablets, small desktops and large desktops. This means the layout breaks at certain points and stacks elements to fit on smaller screens.

CSS: smarter defaults, better classes. In 1.4, all forms were stacked. Now they can flow horizontally. Tables are now namespaced so Bootstrap's styles don't apply to all tables. The available table, form and navigation classes are as follows:

// Tables
.table { ... }
.table-striped { ... }
.table-bordered { ... }
.table-condensed { ... }

// Forms
.form-inline { ... }
.form-search { ... }
.form-horizontal { ... }

// Nav
.nav { ... }
.nav-tabs { ... }
.nav-pills { ... }

The goals with 2.0 are consistency, simplification and future-proofing styles. With 1.4, buttons used "btn primary" and it caused problems if you wanted to have a "primary" class in your project. With 2.0, buttons and all elements are namespaced to avoid collisions (now it's .btn-primary).

After Mark finished talking about the design of Bootstrap, Jacob (@fat) started talking about Bootstrap's JavaScript. Jacob works on The Platform Team at Twitter and claims he made a lot of mistakes with 1.x. However, thanks to semantic versioning, 2.0 is a new version and he got to start over!

The biggest change in 2.0 is the use of data attributes (a.k.a. data-*). They were using them in 1.x, but not to the full potential of what they can be and should be. The first class API for Bootstrap JavaScript is data attributes (or HTML), not JavaScript.

With 1.x, you could add an anchor to close modals and alerts.

// 1.x closing modal/alerts
<a class="close" href="#">×</a>

However, if you put your alerts in your modals, you close them all when you likely only wanted to close one. 2.0 uses a "data-dismiss" attribute.

<a class="close" data-dismiss="model">×</a>

This allows you to target what you want closed (modals or alerts, etc.). You know exactly what's going to happen just by reading the code. Another example is the "href" attribute of an anchor. Rather than using "href", you can now use "data-target".

// 1.x href = target
<a href="#myModal" data-toggle="modal">Launch</a>

// 2.x data-target = target
<a data-target=".fat" data-toggle="modal">Launch</a>

If you'd rather turn off the data attribute API, or just part of it, you can do so by using the following:

// Turn off all data-api
$('body').off('.data-api')

// Turn off alert data-api
$('body).off('.alert.data-api')

2.0's JavaScript API has the same stuff, but better. You can turn off the data-api and do everything with JavaScript. They copied jQuery UI in a lot of ways (defaults, constructors, etc.). Bootstrap's JavaScript has 12 plugins. New ones include collapse, carousel and typeahead.

Customize - a new tab that lets you customize and download Bootstrap. It's basically an alternative to customizing .less files and allows you to choose components, select jQuery plugins, customize variables (colors, font-sizes, backgrounds) and download.

What does the future hold? Internationalization, improving responsiveness, more new features and bug fixes.

After both Mark and Jacob gave their talks, they talked together about Community and how great it's been. Even if you're not into writing CSS and JavaScript, they mentioned they still wanted to hear from you. To give an example of great community contributions, one guy opened 50 issues in the last 2 days.

Someone in the audience asked why they used LESS over SASS. Jacob said the main reason they use LESS is because they're good friends with the guy who invented it (Alexis). SASS turns CSS into a programming language, but they wanted to maintain the approachability of CSS, which LESS does. There's no plans to do an official SASS port, but there is talk of doing one. One advantage of the current LESS compiler is they rewrote it to have better output so it's far more readable.

NASA
After Mark and Jacob finished, there was a 5 minute break to grab beers and snacks. Then Sean Herron (@seanherron) (a.k.a. "NASA Bro") talked about Bootstrap at NASA. He actually didn't talk about Bootstrap much, except that they used it for code.NASA. He talked about NASA and how it's playing a key role in the movement towards open data, open source and open standards in our federal government. He mentioned how data.NASA was launched last August and that they helped develop OpenStack. Finally, he mentioned open.NASA, which is a collaborative approach to open, direct and transparent communication about our space program.

Hogan.js
Next up, Rob Sayre (@sayrer) talked about Hogan.js. Rob has been at Twitter for a few months, before that he wrote JavaScript at other places. Hogan.js is a compiler for Mustache templates.

Why Mustache? Because it's similar to HTML and easy to edit. You can mock data as JSON files and programmers are not required.

At Twitter, designers can do the CSS and Mustache without connecting to the backend. It has cross-language support in Ruby, Java and JavaScript. However, client-side template compilation has performance problems, especially in IE7 on a Windows XP box with 4 viruses.

So they had a few choices: work on mustache.js, or use Dust.js or Handlebars.js. The compilers are very nice for Dust.js and Handlebars.js, but they're huge. Handlebar's parser is 4000 lines. The entire Hogan.js file is 500 lines. They decided they were too large to send to the browser's of their users, so they chose to write a better compiler for Mustache.

Hogan.js's main features:

  • Compile on the server
  • Parser API
  • Performance

Performance is much better with Hogan.js than Mustache.js. On IE7 - Hogan is 5x faster than Mustache. On an iPhone, it's about the same (and an iPhone's browser is faster than IE7 on a decent computer). With modern browsers (Chrome 17, Safari 5 and Firefox 10), it's more than 10x faster.

Hogan.js is currently used at Twitter for Tweet embedding, the Bootstrap build process and soon, Twitter.com.

It's been awhile since I got excited about an open source project. Bootstrap has helped me a lot recently, in my Play More! mobile app, on some client projects and I'm in the process of refreshing AppFuse's UI to use it. I love how you can add a class or two to an element and all of a sudden they pop with good looks. The main problem with Bootstrap at this point is that a lot of Bootstrapped apps look the same. There's talk of adding themes in a future release to help alleviate this problem. In the meantime, there's a lot to get excited about with 2.0.

Thanks to Twitter for hosting this event and kudos to Mark and Jacob (and the community!) for such a fantastic project.

Posted in The Web at Feb 01 2012, 11:28:40 AM MST Add a Comment

Refreshing AppFuse's UI with Twitter Bootstrap

The last time AppFuse had an update done to its look and feel was in way back in 2006. I've done a lot of consulting since then, which has included a fair bit of page speed optimization, HTML5 development and integrating smarter CSS. It was way back in '05 when we first started looking at adding a CSS Framework to AppFuse. It was Mike Stenhouse's CSS Framework that provided the inspiration and my CSS Framework Design Contest that provided its current themes (puzzlewithstyle, andreas01 and simplicity).

Since then, a lot of CSS Frameworks have been invented, including Blueprint in 2007 and Compass in 2008. However, neither has taken the world by storm like Twitter Bootstrap. From Building Twitter Bootstrap:

A year-and-a-half ago, a small group of Twitter employees set out to improve our team’s internal analytical and administrative tools. After some early meetings around this one product, we set out with a higher ambition to create a toolkit for anyone to use within Twitter, and beyond. Thus, we set out to build a system that would help folks like us build new projects on top of it, and Bootstrap was conceived.
...
Today, it has grown to include dozens of components and has become the most popular project on GitHub with more than 13,000 watchers and 2,000 forks.

The fact that Bootstrap has become the most popular project on GitHub says a lot. For AppFuse.next, I'd like to integrate a lot of my learnings over the past few years, as well as support HTML5 and modern browsers as best we can. This means page speed optimizations, getting rid of Prototype and Scriptaculous in favor of jQuery, adding wro4j for resource optimization and integrating HTML5 Boilerplate. I've used Twitter Bootstrap for my Play More! app, as well as some recent client projects. Its excellent documentation has made it easy to use and I love the way you can simply add classes to elements to make them transform into something beautiful.

Last week, I spent a couple late nights integrating Twitter Bootstrap 2.0 into the Struts 2 and Spring MVC versions of AppFuse. The layout was pretty straightforward thanks to Scaffolding. Creating the Struts Menu Velocity template to produce dropdowns wasn't too difficult. I added class="table table-condensed" to the list screen tables, class="well form-horizontal" to forms and class="btn primary" to buttons.

I also added validation errors with the "help-inline" class. This is also where things got tricky with Struts and Spring MVC. For the form elements in Bootstrap, they recommend you use a "control-group" element that contains your label and a "controls" element. The control contains the input/select/textarea and also the error message if there is one. Here's a sample element waiting for data:

<div class="control-group">
    <label for="name" class="control-label">Name</label>
    <div class="controls">
        <input type="text" id="name" name="name">
    </div>
</div>

Below is what that element should look like to display a validation error:

<div class="control-group error">
    <label for="name" class="control-label">Name</label>
    <div class="controls">
        <input type="text" id="name" name="name" value="">
        <span class="help-inline">Please enter your name.</span>
    </div>
</div>

You can see this markup is pretty easy, you just need to add an "error" class to control-group and span to show the error message. With Struts 2, this was pretty easy thanks to its customizable templates for its tags. All I had to do was create a "template/css_xhtml" directory in src/main/webapp and modify checkbox.ftl, controlfooter.ftl, controlheader-core.ftl and controlheader.ftl to match Bootstrap's conventions.

Spring MVC was a bit trickier. Since its tags don't have the concept of writing an entire control (label and field), I had to do a bit of finagling to get things to work. In the current implementation, Struts 2 forms have a single line for a control-group and its control-label and controls.

<s:textfield key="user.firstName" required="true"/>

With Spring MVC, it's a bit more complex:

<spring:bind path="user.firstName">
<fieldset class="control-group${(not empty status.errorMessage) ? ' error' : ''}">
</spring:bind>
    <appfuse:label styleClass="control-label" key="user.firstName"/>
    <div class="controls">
        <form:input path="firstName" id="firstName" maxlength="50"/>
        <form:errors path="firstName" cssClass="help-inline"/>
    </div>
</fieldset>

You could probably overcome this verbosity with Tag Files.

Figuring out if a control-group needed an error class before the input tag was rendered was probably the hardest part of this exercise. This was mostly due to Bootstrap's great documentation and useful examples (viewed by inspecting the markup). Below are some screenshots of the old screens and new ones.

Old UI - Login Old UI - Users Old UI - Edit Profile

New UI - Login New UI - Users New UI - Edit Profile

Check out the full set on Flickr if you'd like a closer look.

Even though I like the look of the old UI, I can't help but think a lot of the themes are designed for blogs and content sites, not webapps. The old Wufoo forms were a lot better looking though. And if you're going to develop kick-ass webapps, you need to make them look good. Bootstrap goes a long way in doing this, but it certainly doesn't replace a good UX Designer. Bootstap simply helps you get into HTML5-land, start using CSS3 and it takes the pain out of making things work cross-browser. Its fluid layouts and responsive web design seems to work great for business applications, which I'm guessing AppFuse is used for the most.

I can't thank the Bootstrap developers enough for helping me make this all look good. With Bootstrap 2 dropping this week, I can see myself using this more and more on projects. In the near future, I'll be helping integrate Bootstrap into AppFuse's Tapestry 5 and JSF versions.

What do you think of this CSS change? Do you change your CSS and layout a fair bit when starting with AppFuse archetypes? What can we do to make AppFuse apps look better out-of-the-box?

Update: I updated AppFuse to the final Bootstrap 2.0 release. Also, Johannes Geppert wrote a Struts 2 Bootstrap Plugin. I hope to integrate this into AppFuse in the near future.

Posted in Java at Jan 31 2012, 05:12:17 PM MST 10 Comments

2011 - A Year in Review

2010 was an awesome year, but 2011 rocked the house! At the end of last year, I kept my goals simple:

In 2011, I plan on doing two main things: keep rockin' it with Trish and finishing The Bus. Everything else is gravy.

As predicted, it was a spectacular year, but I only accomplished 50% of my goals. That is, Trish and I had a great time skiing (especially in Utah), moving in together, traveling the world and getting engaged in Versailles. I even satisfied some 5-year goals: building a sauna in my basement and getting a ski shack in the mountains.

However, I didn't get much done with The Bus. Or rather, the guys at MotorWorks Restorations didn't drain me for all I'm worth in 2011. We did make good progress with estimating the final cost and obtaining many hard-to-find parts though. I now have a Porsche 911 Engine (1983 3.0L 6 cylinder), a Porsche 901 5 speed transmission, Porsche "Turbo Twist" wheels and a Custom Air Ride Front Beam from Franklin's VW Works. The thing that slowed our progress the most was the custom beam, as it took almost 6 months from order to delivery. When it arrived in September, I decided to put things on hold. I didn't want to get my bus back in the midst of winter and not be able to drive it.

[Read More]

Posted in Roller at Jan 11 2012, 09:45:20 AM MST 2 Comments

Upgrading AppFuse to Spring Security 3.1 and Spring 3.1

Before the holiday break, I spent some time upgrading AppFuse to use the latest releases of Spring and Spring Security. I started with Spring Security in early December and quickly discovered its 3.1 XSD required some changes. After changing to the 3.1 XSD in my security.xml, I had to change its <http> element to use security="none" instead of filters="none". With Spring Security 3.0.5, I had:

<http auto-config="true" lowercase-comparisons="false">
    <intercept-url pattern="/images/**" filters="none"/>
    <intercept-url pattern="/styles/**" filters="none"/>
    <intercept-url pattern="/scripts/**" filters="none"/>
After upgrading to 3.1, I had to change this to:
<http pattern="/images/**" security="none"/>
<http pattern="/styles/**" security="none"/>
<http pattern="/scripts/**" security="none"/>

<http auto-config="true">

The next thing I had to change was UserSecurityAdvice.java. Instead of using Collection<GrantedAuthority> for Authentication's getAuthority() method, I had to change it to use Collection<? extends GrantedAuthority>.

Authentication auth = ctx.getAuthentication();
Collection<? extends GrantedAuthority> roles = auth.getAuthorities();

Lastly, I discovered that SPRING_SECURITY_CONTEXT_KEY moved to HttpSessionSecurityContextRepository. Click here to see the changelog for this upgrade in AppFuse's FishEye.

You can read more about what's new in Spring Security 3.1 on InfoQ. I'm especially pumped to see http-only cookie support for Servlet 3.0. I discovered Spring Security didn't support this when Pen-Testing with Zed Attack Proxy.

Upgrading to Spring Framework 3.1
Compared to the Spring Security upgrade, upgrading to Spring 3.1 was a breeze. The first thing I discovered after changing my pom.xml's version was that Spring Security required some additional exclusions in order to get the latest Spring versions. Of course, this was communicated to me through the following cryptic error.

-------------------------------------------------------------------------------
Test set: org.appfuse.dao.LookupDaoTest
-------------------------------------------------------------------------------
Tests run: 1, Failures: 0, Errors: 1, Skipped: 0, Time elapsed: 0.004 sec <<< FAILURE!
testGetRoles(org.appfuse.dao.LookupDaoTest)  Time elapsed: 0.001 sec  <<< ERROR!
java.lang.NoSuchMethodError: org.springframework.context.support.GenericApplicationContext.getEnvironment()Lorg/springframework/core/env/ConfigurableEnvironment;
	at org.springframework.test.context.support.AbstractGenericContextLoader.loadContext(AbstractGenericContextLoader.java:97)
	at org.springframework.test.context.support.AbstractGenericContextLoader.loadContext(AbstractGenericContextLoader.java:1)
	at org.springframework.test.context.support.DelegatingSmartContextLoader.loadContext(DelegatingSmartContextLoader.java:228)
	at org.springframework.test.context.TestContext.loadApplicationContext(TestContext.java:124)
	at org.springframework.test.context.TestContext.getApplicationContext(TestContext.java:148)
	at org.springframework.test.context.support.DependencyInjectionTestExecutionListener.injectDependencies(DependencyInjectionTestExecutionListener.java:109)

Without these additional exclusions, Spring Security pulled in Spring 3.0.6. I had to exclude spring-expression, spring-context and spring-web from spring-security-taglibs to get the 3.1.0.RELEASE version of Spring.

<dependency>
    <groupId>org.springframework.security</groupId>
    <artifactId>spring-security-taglibs</artifactId>
    <version>${spring.security.version}</version>
    <exclusions>
        <exclusion>
            <groupId>org.springframework</groupId>
            <artifactId>spring-expression</artifactId>
        </exclusion>
        <exclusion>
            <groupId>org.springframework</groupId>
            <artifactId>spring-context</artifactId>
        </exclusion>
        <exclusion>
            <groupId>org.springframework</groupId>
            <artifactId>spring-web</artifactId>
        </exclusion>
    </exclusions>
</dependency>

I also had to exclude spring-context from spring-security-config and spring-context and spring-expression from spring-security-core. Isn't Maven wonderful?

<dependency>
    <groupId>org.springframework.security</groupId>
    <artifactId>spring-security-core</artifactId>
    <version>${spring.security.version}</version>
    <exclusions>
        <exclusion>
            <groupId>org.springframework</groupId>
            <artifactId>spring-expression</artifactId>
        </exclusion>
        <exclusion>
            <groupId>org.springframework</groupId>
            <artifactId>spring-context</artifactId>
        </exclusion>
    </exclusions>
</dependency>
<dependency>
    <groupId>org.springframework.security</groupId>
    <artifactId>spring-security-config</artifactId>
    <version>${spring.security.version}</version>
    <exclusions>
        <exclusion>
            <groupId>org.springframework</groupId>
            <artifactId>spring-context</artifactId>
        </exclusion>
    </exclusions>
</dependency>

After making these changes, I got a bit further, but ended up being blocked by a bug in Tapestry 5's Spring support. Basically, after upgrading to Spring 3.1, I started seeing the following error:

java.lang.RuntimeException: Service id 'environment' has already been defined by 
org.apache.tapestry5.services.TapestryModule.buildEnvironment(PerthreadManager) 

Luckily, I was able to easily fix this with advice I found on Tapestry's mailing list. Unfortunately, even though I submitted a fix on December 15th, it didn't make it into Tapestry's 5.3.1 release on December 21st. As soon as Tapestry 5.3.2 is released, I hope to get the AppFuse's build passing again (it's currently failing).

I hope this article helps you upgrade your AppFuse-started applications to the latest versions of Spring and Spring Security. Over the next few weeks, I'll be exploring many of Spring 3.1's new features and implementing them as I see fit. Right now, I'm thinking environments/profiles, Servlet 3 / Java 7 support and Hibernate 4 support. These seem to be the best new features to learn about for my talk in a few weeks.

Posted in Java at Jan 05 2012, 08:58:21 AM MST 7 Comments

Installing OpenJDK 7 on OS X

Last week, I scanned an article and saw there was a Java 7 Webinar. At first, I thought Java 7 was released, but soon after realized it was a Developer Preview. Unfortunately, the download page doesn't have support for OS X. Since it took me a bit of work to figure out how to install OpenJDK 7 on OS X (I'm running Snow Leopard 10.6.7), I figured I'd write down how I did it.

I started off by downloading "OpenJDK 1.7 universal (32/64 bits) from Mac OS/X branch" from the openjdk-osx-build project's downloads (direct link). After downloading, I installed the dmg as normal.

Update Jan 27, 2012:
After installing the dmg, add the following to your ~/.profile and you should be good to go. Thanks to Mark Beaty for the tip.

function setjdk() { if [ $# -ne 0 ];then export JAVA_HOME=`/usr/libexec/java_home -v $@`; fi; java -version; }

Continue with the instructions below if you don't like this technique for some reason.

I don't use Java Preferences to set my JDK, instead I use David Blevin's handy setjdk script. To make this script work with JDK 7 on OS X, I had to make one minor change. On line 40, I added "Contents" to the path for JAVA_HOME:

export JAVA_HOME=$vmdir/$ver/Contents/Home

Update Jan 27, 2012: You no longer need to make this change.

From there, I had to setup some symlinks so everything would work as expected:

cd /System/Library/Java/JavaVirtualMachines/
sudo ln -s /Library/Java/JavaVirtualMachines/1.7.0.jdk

Update Jan 27, 2012: The latest version installs at a different location so the symlink command above should be changed to:

sudo ln -s /Library/Java/JavaVirtualMachines/1.7.0u.jdk 1.7.0.jdk

Lastly, I had my JAVA_HOME set to "/System/Library/Frameworks/JavaVM.framework/Home". I like the shorter (and seemingly more common) "/Library/Java/Home", so I set it back to that in my ~/.profile:

export JAVA_HOME=/Library/Java/Home

On my system, /Library/Java/Home had a symlink to /System/Library/Frameworks/JavaVM.framework/Home, so I changed it to the CurrentJDK that Java Preferences and setjdk use.

cd /Library/Java
rm Home
ln -s /System/Library/Frameworks/JavaVM.framework/Versions/CurrentJDK/Contents/Home

Then I had to add a symlink for 1.7 in the Versions directory.

cd /System/Library/Frameworks/JavaVM.framework/Versions
sudo ln -s /System/Library/Java/JavaVirtualMachines/1.7.0.jdk/Contents 1.7

After making these changes, I was able to switch to JDK 7 easily.

$ setjdk 1.7
Setting this terminal's JDK to 1.7 ... openjdk version "1.7.0-internal"
OpenJDK Runtime Environment (build 1.7.0-internal-b00)
OpenJDK 64-Bit Server VM (build 21.0-b17, mixed mode)

I was also able to switch back to JDK 6.

$ setjdk 1.6
Setting this terminal's JDK to 1.6 ... java version "1.6.0_26"
Java(TM) SE Runtime Environment (build 1.6.0_26-b03-384-10M3425)
Java HotSpot(TM) 64-Bit Server VM (build 20.1-b02-384, mixed mode)

Maven Issues
Next, I tried using JDK 7 to build AppFuse. I ran into two issues when I tried to do this. The first was caused by the native2ascii plugin, which has been known to cause issues on non-Mac platforms. Adding the following profile seemed to solve the problem.

<profile>
    <activation>
        <jdk>1.7</jdk>
    </activation>
    <build>
        <plugins>
            <plugin>
                <groupId>org.codehaus.mojo</groupId>
                <artifactId>native2ascii-maven-plugin</artifactId>
                <dependencies>
                    <dependency>
                      <groupId>com.sun</groupId>
                      <artifactId>tools</artifactId>
                      <version>1.7.0</version>
                      <scope>system</scope>
                      <systemPath>${java.home}/../lib/tools.jar</systemPath>
                    </dependency>
                </dependencies>
            </plugin>
        </plugins>
    </build>
</profile>

The next issue was with Enunciate and its maven-enunciate-cxf-plugin.

[INFO] ------------------------------------------------------------------------
[ERROR] FATAL ERROR
[INFO] ------------------------------------------------------------------------
[INFO] com/sun/mirror/apt/AnnotationProcessorFactory
com.sun.mirror.apt.AnnotationProcessorFactory
[INFO] ------------------------------------------------------------------------
[INFO] Trace
java.lang.NoClassDefFoundError: com/sun/mirror/apt/AnnotationProcessorFactory

It seemed like adding a profile that included tools.jar would solve this, but it doesn't. When I add the dependency directly to the plugin itself, I get the following error:

warning: The apt tool and its associated API are planned to be
removed in the next major JDK release.  These features have been
superseded by javac and the standardized annotation processing API,
javax.annotation.processing and javax.lang.model.  Users are
recommended to migrate to the annotation processing features of
javac; see the javac man page for more information.
[WARNING] Validation result has errors.
error: [core] java.lang.StackTraceElement: A TypeDefinition must have a public no-arg constructor or be annotated with a factory method.
1 error
[INFO] ------------------------------------------------------------------------
[ERROR] BUILD ERROR
[INFO] ------------------------------------------------------------------------

Hopefully this article helps you get started with Java 7 on OS X. If you have any additional tips, please leave a comment.

Posted in Java at Jul 12 2011, 02:11:44 PM MDT 9 Comments

Integrating OAuth with AppFuse and its REST API

One of the new features in AppFuse 2.1 is an appfuse-ws archetype. This archetype leverages Enunciate and CXF to create a project with a REST API and generated HTML documentation. Enunciate is a very useful tool, allowing you to develop web services with JAX-RS and JAX-WS annotations and have all types of client libraries generated. For me, it seems very useful for developing the backend of SOFEA (a.k.a. modern) applications.

Back in March, Ryan Heaton published a nice article on Securing Web Services in an Enunciate application. I decided to take his tutorial a step further and not only secure my web services, but also to integrate with OAuth 2. In this tutorial, I'll show you how to create a new application with AppFuse WS, secure it, add OAuth support, and then use a client app to authenticate and retrieve data.

Create a New AppFuse WS Project
To begin, I visited the Create AppFuse Archetypes page and created a new application using the "Web Services Only" option in the Web Framework dropdown. Below is the command I used to create the "appfuse-oauth" project.

mvn archetype:generate -B -DarchetypeGroupId=org.appfuse.archetypes \
-DarchetypeArtifactId=appfuse-ws-archetype -DarchetypeVersion=2.1.0 \
-DgroupId=org.appfuse.example -DartifactId=appfuse-oauth 

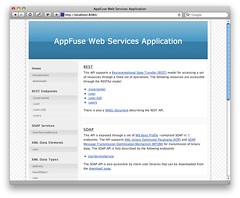
After doing this, I started the app using mvn jetty:run and confirmed it started OK. At this point, I was able to view the generated documentation for the application at http://localhost:8080. The screenshot below shows what the app looks like at this point.

AppFuse WS Homepage

NOTE: You might notice the REST endpoint of /{username}. This is a bug in AppFuse 2.1.0 and has been fixed in SVN. It does not affect this tutorial.

Integrate Spring Security and OAuth
I originally tried to integrate Spring Security with Enunciate's Securing Web Services Tutorial. However, it only secures endpoints and doesn't do enough filtering for OAuth support, so I ended up using a custom web.xml. I put this file in src/main/resources and loaded it in my enunciate.xml file. I also upgraded Spring Security and imported my security.xml file.

  <?xml version="1.0"?>
  <enunciate xmlns:xsi="http://www.w3.org/2001/XMLSchema-instance"
             xsi:noNamespaceSchemaLocation="http://enunciate.codehaus.org/schemas/enunciate-1.22.xsd">
      ...
      <webapp mergeWebXML="src/main/resources/web.xml"/>
      <modules>
      ...
          <spring-app disabled="false" springVersion="3.0.5.RELEASE">
              <springImport uri="classpath:/applicationContext-resources.xml"/>
              <springImport uri="classpath:/applicationContext-dao.xml"/>
              <springImport uri="classpath:/applicationContext-service.xml"/>
              <springImport uri="classpath:/applicationContext.xml"/>
              <springImport uri="classpath:/security.xml"/>
          </spring-app>
      </modules>
  </enunciate>

Then I created src/main/resources/web.xml with a filter for Spring Security and a DispatcherServlet for OAuth support.

<?xml version="1.0" encoding="UTF-8"?>
<web-app xmlns="http://java.sun.com/xml/ns/javaee"
         xmlns:xsi="http://www.w3.org/2001/XMLSchema-instance"
         xsi:schemaLocation="http://java.sun.com/xml/ns/javaee http://java.sun.com/xml/ns/javaee/web-app_3_0.xsd"
         version="3.0">

    <filter>
        <filter-name>securityFilter</filter-name>
        <filter-class>org.springframework.web.filter.DelegatingFilterProxy</filter-class>
        <init-param>
            <param-name>targetBeanName</param-name>
            <param-value>springSecurityFilterChain</param-value>
        </init-param>
    </filter>

    <filter-mapping>
        <filter-name>securityFilter</filter-name>
        <url-pattern>/*</url-pattern>
    </filter-mapping>

    <servlet>
        <servlet-name>appfuse-oauth</servlet-name>
        <servlet-class>org.springframework.web.servlet.DispatcherServlet</servlet-class>
        <load-on-startup>1</load-on-startup>
    </servlet>

    <servlet-mapping>
        <servlet-name>appfuse-oauth</servlet-name>
        <url-pattern>/oauth/*</url-pattern>
    </servlet-mapping>
</web-app>

Next, I created a src/main/resources/security.xml and used it to secure my API, specify a login page, supply the users and integrate OAuth (see the last 4 beans below).

<?xml version="1.0" encoding="UTF-8"?>
<beans:beans xmlns="http://www.springframework.org/schema/security"
             xmlns:xsi="http://www.w3.org/2001/XMLSchema-instance"
             xmlns:beans="http://www.springframework.org/schema/beans"
             xmlns:oauth="http://www.springframework.org/schema/security/oauth2"
             xsi:schemaLocation="http://www.springframework.org/schema/beans http://www.springframework.org/schema/beans/spring-beans.xsd
                           http://www.springframework.org/schema/security http://www.springframework.org/schema/security/spring-security.xsd
                           http://www.springframework.org/schema/security/oauth2 http://www.springframework.org/schema/security/spring-security-oauth2.xsd">

    <http auto-config="true">
        <intercept-url pattern="/api/**" access="ROLE_USER"/>
        <intercept-url pattern="/oauth/**" access="ROLE_USER"/>
        <intercept-url pattern="/**" access="IS_AUTHENTICATED_ANONYMOUSLY"/>
        <form-login login-page="/login.jsp" authentication-failure-url="/login.jsp?error=true"
                    login-processing-url="/j_security_check"/>
    </http>

    <authentication-manager>
        <authentication-provider>
            <user-service>
                <user name="admin" password="admin" authorities="ROLE_USER,ROLE_ADMIN"/>
                <user name="user" password="user" authorities="ROLE_USER"/>
            </user-service>
        </authentication-provider>
    </authentication-manager>

    <!--hook up the spring security filter chain-->
    <beans:alias name="springSecurityFilterChain" alias="securityFilter"/>

    <beans:bean id="tokenServices"
                class="org.springframework.security.oauth2.provider.token.InMemoryOAuth2ProviderTokenServices">
        <beans:property name="supportRefreshToken" value="true"/>
    </beans:bean>

    <oauth:provider client-details-service-ref="clientDetails" token-services-ref="tokenServices">
        <oauth:verification-code user-approval-page="/oauth/confirm_access"/>
    </oauth:provider>

    <oauth:client-details-service id="clientDetails">
        <!--<oauth:client clientId="my-trusted-client" authorizedGrantTypes="password,authorization_code,refresh_token"/>
        <oauth:client clientId="my-trusted-client-with-secret"
                      authorizedGrantTypes="password,authorization_code,refresh_token" secret="somesecret"/>
        <oauth:client clientId="my-less-trusted-client" authorizedGrantTypes="authorization_code"/>-->
        <oauth:client clientId="ajax-login" authorizedGrantTypes="authorization_code"/>
    </oauth:client-details-service>
</beans:beans>

I used the OAuth for Spring Security sample apps to figure this out. In this example, I used authorizedGrantTypes="authorization_code", but you can see from the commented <oauth:client> elements above that there's a few different options. You should also note that the clientId is hard-coded to "ajax-login", signifying I only want to allow a single application to authenticate.

At this point, I'd like to give a shoutout to Ryan Heaton for creating both Enunciate and Spring Security's OAuth support. Nice work Ryan!

At this point, I needed to do a number of additional tasks to finish integrating oauth. The first was to modify the Jetty Plugin's configuration to 1) run on port 9000, 2) load my custom files and 3) allow jetty:run to recognize Enunciate's generated files. Below is the final configuration in my pom.xml.

<plugin>
    <groupId>org.mortbay.jetty</groupId>
    <artifactId>maven-jetty-plugin</artifactId>
    <version>6.1.26</version>
    <configuration>
        <connectors>
            <connector implementation="org.mortbay.jetty.nio.SelectChannelConnector">
                <port>9000</port>
                <maxIdleTime>60000</maxIdleTime>
            </connector>
        </connectors>
        <webAppConfig>
            <baseResource implementation="org.mortbay.resource.ResourceCollection">
                <resourcesAsCSV>
                    ${basedir}/src/main/webapp,
                    ${project.build.directory}/${project.build.finalName}
                </resourcesAsCSV>
            </baseResource>
            <contextPath>/appfuse-oauth</contextPath>
        </webAppConfig>
        <webXml>${project.build.directory}/${project.build.finalName}/WEB-INF/web.xml</webXml>
    </configuration>
</plugin>

Next, I added the necessary OAuth dependencies for Spring Security to my pom.xml. Since the latest release is a milestone release, I had to add Spring's milestone repo too.

<repository>
    <id>spring-milestone</id>
    <url>http://s3.amazonaws.com/maven.springframework.org/milestone</url>
</repository>
...
<dependency>
    <groupId>org.springframework.security</groupId>
    <artifactId>spring-security-taglibs</artifactId>
    <version>${spring.version}</version>
    <exclusions>
        <exclusion>
            <groupId>org.springframework</groupId>
            <artifactId>spring-web</artifactId>
        </exclusion>
        <exclusion>
            <groupId>org.springframework</groupId>
            <artifactId>spring-support</artifactId>
        </exclusion>
    </exclusions>
</dependency>
<dependency>
    <groupId>org.springframework.security.oauth</groupId>
    <artifactId>spring-security-oauth</artifactId>
    <version>1.0.0.M3</version>
    <exclusions>
        <exclusion>
            <groupId>org.springframework</groupId>
            <artifactId>spring-beans</artifactId>
        </exclusion>
        <exclusion>
            <groupId>org.springframework</groupId>
            <artifactId>spring-context</artifactId>
        </exclusion>
        <exclusion>
            <groupId>org.springframework</groupId>
            <artifactId>spring-core</artifactId>
        </exclusion>
    </exclusions>
</dependency>
<dependency>
    <groupId>org.springframework</groupId>
    <artifactId>spring-webmvc</artifactId>
    <version>${spring.version}</version>
</dependency>
<dependency>
    <groupId>javax.servlet</groupId>
    <artifactId>servlet-api</artifactId>
    <version>2.5</version>
    <scope>provided</scope>
</dependency>
<dependency>
    <groupId>javax.servlet</groupId>
    <artifactId>jstl</artifactId>
    <version>1.1.2</version>
</dependency>
<dependency>
    <groupId>taglibs</groupId>
    <artifactId>standard</artifactId>
    <version>1.1.2</version>
</dependency>

Since I named my DispatcherServlet "appfuse-oauth" in web.xml, I created a src/main/webapp/WEB-INF/appfuse-oauth-servlet.xml to configure Spring MVC. I had to create the src/main/webapp/WEB-INF directory.

<?xml version="1.0" encoding="UTF-8"?>
<beans xmlns="http://www.springframework.org/schema/beans"
       xmlns:xsi="http://www.w3.org/2001/XMLSchema-instance"
       xmlns:context="http://www.springframework.org/schema/context"
       xmlns:mvc="http://www.springframework.org/schema/mvc"
       xsi:schemaLocation="http://www.springframework.org/schema/beans http://www.springframework.org/schema/beans/spring-beans-3.0.xsd
                http://www.springframework.org/schema/context http://www.springframework.org/schema/context/spring-context-3.0.xsd
                http://www.springframework.org/schema/mvc http://www.springframework.org/schema/mvc/spring-mvc-3.0.xsd">

    <!-- Scans the classpath of this application for @Components to deploy as beans -->
    <context:component-scan base-package="org.appfuse.examples.webapp"/>

    <!-- Configures the @Controller programming model -->
    <mvc:annotation-driven/>

    <!-- Resolves view names to protected .jsp resources within the /WEB-INF/views directory -->
    <bean class="org.springframework.web.servlet.view.InternalResourceViewResolver">
        <property name="viewClass" value="org.springframework.web.servlet.view.JstlView"/>
        <property name="prefix" value="/"/>
        <property name="suffix" value=".jsp"/>
    </bean>
</beans>

In order to show the OAuth confirmation page, I needed to create src/main/java/org/appfuse/examples/webapp/AccessConfirmationController.java and map it to /oauth/confirm_access. I copied this from one of the sample projects and modified to use Spring's annotations.

package org.appfuse.examples.webapp;

import org.springframework.beans.factory.annotation.Autowired;
import org.springframework.security.oauth2.provider.ClientAuthenticationToken;
import org.springframework.security.oauth2.provider.ClientDetails;
import org.springframework.security.oauth2.provider.ClientDetailsService;
import org.springframework.security.oauth2.provider.verification.ClientAuthenticationCache;
import org.springframework.security.oauth2.provider.verification.DefaultClientAuthenticationCache;
import org.springframework.stereotype.Controller;
import org.springframework.web.bind.annotation.RequestMapping;
import org.springframework.web.bind.annotation.RequestMethod;
import org.springframework.web.servlet.ModelAndView;

import javax.servlet.http.HttpServletRequest;
import javax.servlet.http.HttpServletResponse;
import java.util.TreeMap;

/**
 * Controller for retrieving the model for and displaying the confirmation page
 * for access to a protected resource.
 *
 * @author Ryan Heaton
 */
@Controller
@RequestMapping("/confirm_access")
public class AccessConfirmationController {

    private ClientAuthenticationCache authenticationCache = new DefaultClientAuthenticationCache();
    @Autowired
    private ClientDetailsService clientDetailsService;

    @RequestMapping(method = RequestMethod.GET)
    protected ModelAndView confirm(HttpServletRequest request, HttpServletResponse response) throws Exception {
        ClientAuthenticationToken clientAuth = authenticationCache.getAuthentication(request, response);
        if (clientAuth == null) {
            throw new IllegalStateException("No client authentication request to authorize.");
        }

        TreeMap<String, Object> model = new TreeMap<String, Object>();
        ClientDetails client = clientDetailsService.loadClientByClientId(clientAuth.getClientId());
        model.put("auth_request", clientAuth);
        model.put("client", client);

        return new ModelAndView("access_confirmation", model);
    }
}

This controller delegates to src/main/webapp/access_confirmation.jsp. I created this file and filled it with code to display Accept and Deny buttons.

<%@ page import="org.springframework.security.core.AuthenticationException" %>
<%@ page import="org.springframework.security.oauth2.common.exceptions.UnapprovedClientAuthenticationException" %>
<%@ page import="org.springframework.security.oauth2.provider.verification.BasicUserApprovalFilter" %>
<%@ page import="org.springframework.security.oauth2.provider.verification.VerificationCodeFilter" %>
<%@ page import="org.springframework.security.web.WebAttributes" %>
<%@ taglib prefix="authz" uri="http://www.springframework.org/security/tags" %>
<%@ taglib uri="http://java.sun.com/jsp/jstl/core" prefix="c" %>
<html>
<head>
    <title>Confirm Access</title>
    <link rel="stylesheet" type="text/css" media="all"
          href="http://demo.appfuse.org/appfuse-struts/styles/simplicity/theme.css"/>
    <style type="text/css">
        h1 {
            margin-left: -300px;
            margin-top: 50px
        }
    </style>
</head>

<body>

<h1>Confirm Access</h1>

<div id="content">

    <% if (session.getAttribute(WebAttributes.AUTHENTICATION_EXCEPTION) != null && 
                 !(session.getAttribute(WebAttributes.AUTHENTICATION_EXCEPTION) instanceof UnapprovedClientAuthenticationException)) { %>
    <div class="error">
        <h2>Woops!</h2>

        <p>Access could not be granted.
            (<%= ((AuthenticationException) session.getAttribute(WebAttributes.AUTHENTICATION_EXCEPTION)).getMessage() %>)</p>
    </div>
    <% } %>
    <c:remove scope="session" var="SPRING_SECURITY_LAST_EXCEPTION"/>

    <authz:authorize ifAnyGranted="ROLE_USER,ROLE_ADMIN">
        <h2>Please Confirm</h2>

        <p>You hereby authorize "<c:out value="${client.clientId}" escapeXml="true"/>" to access your protected resources.</p>

        <form id="confirmationForm" name="confirmationForm"
              action="<%=request.getContextPath() + VerificationCodeFilter.DEFAULT_PROCESSING_URL%>" method="POST">
            <input name="<%=BasicUserApprovalFilter.DEFAULT_APPROVAL_REQUEST_PARAMETER%>"
                   value="<%=BasicUserApprovalFilter.DEFAULT_APPROVAL_PARAMETER_VALUE%>" type="hidden"/>
            <label><input name="authorize" value="Authorize" type="submit"></label>
        </form>
        <form id="denialForm" name="denialForm"
              action="<%=request.getContextPath() + VerificationCodeFilter.DEFAULT_PROCESSING_URL%>" method="POST">
            <input name="<%=BasicUserApprovalFilter.DEFAULT_APPROVAL_REQUEST_PARAMETER%>"
                   value="not_<%=BasicUserApprovalFilter.DEFAULT_APPROVAL_PARAMETER_VALUE%>" type="hidden"/>
            <label><input name="deny" value="Deny" type="submit"></label>
        </form>
    </authz:authorize>
</div>
</body>
</html>

Finally, I needed to create src/main/webapp/login.jsp to allow users to login.

<%@ page language="java" pageEncoding="UTF-8" contentType="text/html;charset=utf-8" %>
<%@ taglib uri="http://java.sun.com/jsp/jstl/core" prefix="c" %>
<%@ taglib uri="http://java.sun.com/jsp/jstl/fmt" prefix="fmt" %>
<%@ taglib uri="http://java.sun.com/jsp/jstl/core" prefix="c" %>

<html>
<head>
    <title>Login</title>
    <link rel="stylesheet" type="text/css" media="all"
          href="http://demo.appfuse.org/appfuse-struts/styles/simplicity/theme.css"/>
    <style type="text/css">
        h1 {
            margin-left: -300px;
            margin-top: 50px
        }
    </style>
</head>
<body>
<h1>Login</h1>

<form method="post" id="loginForm" action="<c:url value='/j_security_check'/>">
    <fieldset style="padding-bottom: 0">
        <ul>
            <c:if test="${param.error != null}">
                <li class="error">
                    ${sessionScope.SPRING_SECURITY_LAST_EXCEPTION.message}
                </li>
            </c:if>
            <li>
                <label for="j_username" class="required desc">
                    Username <span class="req">*</span>
                </label>
                <input type="text" class="text medium" name="j_username"
                       id="j_username" tabindex="1"/>
            </li>

            <li>
                <label for="j_password" class="required desc">
                    Password <span class="req">*</span>
                </label>
                <input type="password" class="text medium" name="j_password"
                       id="j_password" tabindex="2"/>
            </li>
            <li>
                <input type="submit" class="button" name="login" value="Login"
                       tabindex="3"/>
            </li>
        </ul>
    </fieldset>
</form>
</body>
</html>

All the changes described in the above section are necessary to implement OAuth if you create a project with AppFuse WS 2.1. It may seem like a lot of code, but I was able to copy/paste and get it all working in an app in under 5 minutes. Hopefully you can do the same. I'm also considering adding it by default to the next version of AppFuse. Now let's look at integrating OAuth into a client to authenticate and retrieve data from this application.

Authenticate and Retrieve Data with Client
I originally thought my GWT OAuth application would provide a nice client. However, after 30 minutes of trying to get GWT 1.7.1 and the GWT Maven plugin (1.1) working with my 64-bit Java 6 JDK on OS X, I gave up. So I opted to use the Ajax Login application I've been using in my recent security tutorials.

In this example, I used OAuth2RestTemplate from Spring Security OAuth. While this works, and works well, I'd still like to get things working with GWT (or jQuery) to demonstrate how to do it from a pure client-side perspective.

To begin, I got the latest source of Ajax Login from GitHub (as of this morning) and made some changes. First of all, I added the Spring Security OAuth dependencies to pom.xml:

<repository>
    <id>spring-milestone</id>
    <url>http://s3.amazonaws.com/maven.springframework.org/milestone</url>
</repository>
...
<dependency>
    <groupId>org.springframework.security.oauth</groupId>
    <artifactId>spring-security-oauth</artifactId>
    <version>1.0.0.M3</version>
    <exclusions>
        <exclusion>
            <groupId>org.springframework</groupId>
            <artifactId>spring-beans</artifactId>
        </exclusion>
        <exclusion>
            <groupId>org.springframework</groupId>
            <artifactId>spring-context</artifactId>
        </exclusion>
        <exclusion>
            <groupId>org.springframework</groupId>
            <artifactId>spring-core</artifactId>
        </exclusion>
    </exclusions>
</dependency>

Then I modified src/main/webapp/WEB-INF/security.xml and added an OAuth Token Service and defined the location of the OAuth server.

<?xml version="1.0" encoding="UTF-8"?>
<beans:beans xmlns="http://www.springframework.org/schema/security"
             xmlns:xsi="http://www.w3.org/2001/XMLSchema-instance"
             xmlns:beans="http://www.springframework.org/schema/beans"
             xmlns:oauth="http://www.springframework.org/schema/security/oauth2"
             xsi:schemaLocation="http://www.springframework.org/schema/beans http://www.springframework.org/schema/beans/spring-beans-3.0.xsd
              http://www.springframework.org/schema/security http://www.springframework.org/schema/security/spring-security-3.0.xsd
              http://www.springframework.org/schema/security/oauth2 http://www.springframework.org/schema/security/spring-security-oauth2.xsd">

...
    <oauth:client token-services-ref="oauth2TokenServices"/>

    <beans:bean id="oauth2TokenServices"
                class="org.springframework.security.oauth2.consumer.token.InMemoryOAuth2ClientTokenServices"/>

    <oauth:resource id="appfuse" type="authorization_code" clientId="ajax-login"
                    accessTokenUri="http://localhost:9000/appfuse-oauth/oauth/authorize"
                    userAuthorizationUri="http://localhost:9000/appfuse-oauth/oauth/user/authorize"/>

Next, I created a Controller that uses OAuth2RestTemplate to make the request and get the data from the AppFuse OAuth application's API. I created src/main/java/org/appfuse/examples/webapp/oauth/UsersApiController.java and filled it with the following code:

package org.appfuse.examples.webapp.oauth;

import org.appfuse.model.User;
import org.springframework.beans.factory.annotation.Autowired;
import org.springframework.beans.factory.annotation.Qualifier;
import org.springframework.security.core.context.SecurityContextHolder;
import org.springframework.security.oauth2.common.exceptions.InvalidTokenException;
import org.springframework.security.oauth2.consumer.*;
import org.springframework.security.oauth2.consumer.token.OAuth2ClientTokenServices;
import org.springframework.stereotype.Controller;
import org.springframework.web.bind.annotation.RequestMapping;
import org.springframework.web.bind.annotation.RequestMethod;
import org.springframework.web.bind.annotation.ResponseBody;

import java.util.ArrayList;
import java.util.List;

@RequestMapping("/appfuse/users")
@Controller
public class UsersApiController {

    private OAuth2RestTemplate apiRestTemplate;
    @Autowired
    private OAuth2ClientTokenServices tokenServices;

    private static final String REMOTE_DATA_URL = "http://localhost:9000/appfuse-oauth/api/users";

    @Autowired
    public UsersApiController(OAuth2ProtectedResourceDetails resourceDetails) {
        this.apiRestTemplate = new OAuth2RestTemplate(resourceDetails);
    }

    @RequestMapping(method = RequestMethod.GET)
    @ResponseBody
    public List<User> getUsers() {
        try {
            List users = apiRestTemplate.getForObject(REMOTE_DATA_URL, List.class);
            return new ArrayList<User>(users);
        } catch (InvalidTokenException badToken) {
            //we've got a bad token, probably because it's expired.
            OAuth2ProtectedResourceDetails resource = apiRestTemplate.getResource();
            OAuth2SecurityContext context = OAuth2SecurityContextHolder.getContext();
            if (context != null) {
                // this one is kind of a hack for this application
                // the problem is that the sparklr photos page doesn't remove the 'code=' request parameter.
                ((OAuth2SecurityContextImpl) context).setVerificationCode(null);
            }
            //clear any stored access tokens...
            tokenServices.removeToken(SecurityContextHolder.getContext().getAuthentication(), resource);
            //go get a new access token...
            throw new OAuth2AccessTokenRequiredException(resource);
        }
    }
}

At this point, I thought everything would work and I spent quite some time banging my head against the wall when it didn't. As I was composing an email to the Enunciate users mailing list, I realized the issue. It appeared to be working, but from the server side, and the redirect back to the client was not happening. The Ajax Login app uses UrlRewriteFilter (for pretty URLs) to redirect from /app/* to /$1 and this redirect was losing the code parameter in the URL.

<rule>
    <from>/app/**</from>
    <to last="true" type="redirect">%{context-path}/$1</to>
</rule>

To fix this, I added use-query-string="true" to the root element in src/main/webapp/WEB-INF/urlrewrite.xml:

<urlrewrite default-match-type="wildcard" use-query-string="true">

After making all these changes, I ran mvn jetty:run on both apps and opened http://localhost:8080/appfuse/users in my browser. It all worked and a smile crept across my face. I've checked in the client changes into ajax-login on GitHub and the appfuse-oauth example into AppFuse Demos on Google Code. If you'd like to see this example in action, I'd encourage you to checkout both projects and let me know if you find any issues.

Posted in Java at Jul 05 2011, 10:56:48 AM MDT 4 Comments

Java Web Application Security - Part III: Apache Shiro Login Demo

A couple weeks ago, I wrote a tutorial on how to implement security with Spring Security. The week prior, I wrote a similar tutorial for Java EE 6. This week, I'd like to show you how to implement the same features using Apache Shiro. As I mentioned in previous articles, I'm writing this because I told the audience at April's UJUG that I would publish screencasts of the demos.

Today, I've finished the third screencast showing how to implement security with Apache Shiro. Below is the presentation (with the screencast embedded on slide 22) as well as a step-by-step tutorial.


Apache Shiro Login Tutorial

Download and Run the Application
To begin, download the application you'll be implementing security in. This app is a stripped-down version of the Ajax Login application I wrote for my article on Implementing Ajax Authentication using jQuery, Spring Security and HTTPS. You'll need Java 6 and Maven installed to run the app. Run it using mvn jetty:run and open http://localhost:8080 in your browser. You'll see it's a simple CRUD application for users and there's no login required to add or delete users.

Implement Basic Authentication
The first step is to protect the list screen so people have to login to view users. To do this, you'll need to create a shiro.ini file Shiro's configuration. Create src/main/resources/shiro.ini and populate it with the contents below:

[main]

[users]
admin = admin, ROLE_ADMIN

[roles]
ROLE_ADMIN = *

[urls]
/app/users = authcBasic

You can see this file has four sections and is pretty simple to read and understand. For more information about what each section is for, check out Shiro's configuration documentation.

Next, open src/main/webapp/WEB-INF/web.xml and add Shiro's IniShiroFilter:

<filter>
    <filter-name>securityFilter</filter-name>
    <filter-class>org.apache.shiro.web.servlet.IniShiroFilter</filter-class>
    <!-- no init-param means load the INI config from classpath:shiro.ini -->
</filter>

And add its filter-mapping just after the rewriteFilter in the filter-mappings section (order is important!):

<filter-mapping>
    <filter-name>rewriteFilter</filter-name>
    <url-pattern>/*</url-pattern>
</filter-mapping>
<filter-mapping>
    <filter-name>securityFilter</filter-name>
    <url-pattern>/*</url-pattern>
    <dispatcher>REQUEST</dispatcher>
    <dispatcher>FORWARD</dispatcher>
    <dispatcher>INCLUDE</dispatcher>
</filter-mapping>

Then add Shiro's core and web dependencies to your pom.xml:

<dependency>
    <groupId>org.apache.shiro</groupId>
    <artifactId>shiro-core</artifactId>
    <version>1.1.0</version>
</dependency>
<dependency>
    <groupId>org.apache.shiro</groupId>
    <artifactId>shiro-web</artifactId>
    <version>1.1.0</version>
</dependency>

At this point, if you restart Jetty (Ctrl+C and jetty:run again), you should be prompted to login when you click on the "Users" tab. Enter admin/admin to login. Apache Shiro is easier to configure than Spring Security out-of-the-box, mostly because it doesn't require XML.

After logging in, you can try to logout by clicking the "Logout" link in the top-right corner. This calls a LogoutController with the following code that logs the user out.

public void logout(HttpServletResponse response) throws ServletException, IOException {
    request.getSession().invalidate();
    response.sendRedirect(request.getContextPath()); 
}

NOTE: Shiro doesn't currently have a way to logout with its API. However, it will be added in the 1.2 release.

You'll notice that clicking this link doesn't log you out, even though the session is invalidated. The only way to logout with basic authentication is to close the browser. In order to get the ability to logout, as well as to have more control over the look-and-feel of the login, you can implement form-based authentication. Before you implement form-based authentication, I'd like to show you how easy it is to force SSL with Apache Shiro.

Force SSL
Apache Shiro allows you to force SSL on a URL by simply adding "ssl[port]" to a URL in the [urls] section. If you don't specify the port, it will use the default port (443). I'm not sure if it allows you to switch back to http like Spring Security's requires-channel, but I don't think it does. Modify the URLs section of your shiro.ini to have the following:

[urls]
/app/users = ssl[8443],authc

In order for this to work, you have to configure Jetty to listen on an SSL port. Add the following just after the jetty-maven-plugin's </webAppConfig> element in your pom.xml:

<connectors>
    <connector implementation="org.eclipse.jetty.server.nio.SelectChannelConnector">
        <forwarded>true</forwarded>
        <port>8080</port>
    </connector>
    <connector implementation="org.eclipse.jetty.server.ssl.SslSelectChannelConnector">
        <forwarded>true</forwarded>
        <port>8443</port>
        <maxIdleTime>60000</maxIdleTime>
        <keystore>${project.build.directory}/ssl.keystore</keystore>
        <password>appfuse</password>
        <keyPassword>appfuse</keyPassword>
    </connector>
</connectors>

The keystore must be generated for Jetty to start successfully, so add the keytool-maven-plugin just above the jetty-maven-plugin in pom.xml.

<plugin>
    <groupId>org.codehaus.mojo</groupId>
    <artifactId>keytool-maven-plugin</artifactId>
    <version>1.0</version>
    <executions>
        <execution>
            <phase>generate-resources</phase>
            <id>clean</id>
            <goals>
                <goal>clean</goal>
            </goals>
        </execution>
        <execution>
            <phase>generate-resources</phase>
            <id>genkey</id>
            <goals>
                <goal>genkey</goal>
            </goals>
        </execution>
    </executions>
    <configuration>
        <keystore>${project.build.directory}/ssl.keystore</keystore>
        <dname>cn=localhost</dname>
        <keypass>appfuse</keypass>
        <storepass>appfuse</storepass>
        <alias>appfuse</alias>
        <keyalg>RSA</keyalg>
    </configuration>
</plugin>

Now if you restart Jetty, go to http://localhost:8080 and click on the "Users" tab, you'll be prompted to accept the Untrusted Certificate and then redirected to https://localhost:8443/users after logging in.

Now let's look at how to have more control over the look-and-feel of the login screen, as well as how to make logout work with form-based authentication.

Implement Form-based Authentication
To change from basic to form-based authentication, you simply have to add a few lines to shiro.ini. First of all, since I'd rather not change the name of the input elements in login.jsp, override the default names in the [main] section:

# name of request parameter with username; if not present filter assumes 'username'
authc.usernameParam = j_username
# name of request parameter with password; if not present filter assumes 'password'
authc.passwordParam = j_password
authc.failureKeyAttribute = shiroLoginFailure

Then change the [urls] section to filter on login.jsp and use "authc" instead of "authcBasic":

[urls]
# The /login.jsp is not restricted to authenticated users (otherwise no one could log in!), but
# the 'authc' filter must still be specified for it so it can process that url's
# login submissions. It is 'smart' enough to allow those requests through as specified by the
# shiro.loginUrl above.
/login.jsp = authc
/app/users = ssl[8443],authc

Then change login.jsp so the form's action is blank (causing it to submit to itself) instead of j_security_check:

<form action="" id="loginForm" method="post">

Now, restart Jetty and you should be prompted to login with this JSP instead of the basic authentication dialog.

Store Users in a Database
To store your users in a database instead of file, you'll need to add a few settings to shiro.ini to define your database and tables to use. Open src/main/resources/shiro.ini and add the following lines under the [main] section.

jdbcRealm=org.apache.shiro.realm.jdbc.JdbcRealm
#jdbcRealm.permissionsLookupEnabled=false
# If not filled, subclasses of JdbcRealm assume "select password from users where username = ?"
jdbcRealm.authenticationQuery = select user_pass from users where user_name = ?
# If not filled, subclasses of JdbcRealm assume "select role_name from user_roles where username = ?"
jdbcRealm.userRolesQuery = select role_name from users_roles where user_name = ?

ds = com.mysql.jdbc.jdbc2.optional.MysqlDataSource
ds.serverName = localhost
ds.user = root
ds.databaseName = appfuse
jdbcRealm.dataSource = $ds

This configuration is similar to what I did with the Java EE 6 tutorial where I'm pointing to a database other than the H2 instance that's used by the application. I believe Shiro can talk to a DAO like Spring Security, but I have yet to explore that option.

While you're at it, add the following lines to enable password encryption.

sha256Matcher = org.apache.shiro.authc.credential.Sha256CredentialsMatcher
jdbcRealm.credentialsMatcher = $sha256Matcher

You'll need to install MySQL for this to work. After installing it, you should be able to create an "appfuse" database using the following command:

mysql -u root -p -e 'create database appfuse'

Then create the tables necessary and populate it with an 'admin' user. Login using "mysql -u root -p appfuse" and execute the following SQL statements:

create table users (
  user_name         varchar(30) not null primary key,
  user_pass         varchar(100) not null
);

create table user_roles (
  user_name         varchar(30) not null,
  role_name         varchar(30) not null,
  primary key (user_name, role_name)
);

insert into users values ('admin', '22f256eca1f336a97eef2b260773cb0d81d900c208ff26e94410d292d605fed8');
insert into user_roles values ('admin', 'ROLE_ADMIN');

Now if you restart Jetty, you should be able to login with admin/adminjdbc and view the list of users.

Summary
In this tutorial, you learned how to implement authentication using Apache Shiro 1.1.0. I don't have a lot of experience with Apache Shiro, but I was able to get the basics working without too much effort. This tutorial doesn't show how to do Remember Me because I couldn't figure it out in 5 minutes, which means I have 5 more minutes before it fails the 10-minute test. ;)

Shiro was formerly named JSecurity and has been an Apache project for less than a year. It seems to be more targeted towards non-web use, so its certainly something to look at if you're more interested in cryptography or non-web apps. I think there's a good chance this project will continue to grow and be used more as more developers learn about it. The Apache brand certainly doesn't hurt.

I didn't include a slide about the limitations I found with Shiro, mostly because I haven't used it much. I've used Java EE and Spring Security for several years. The main limitation I found was the lack of documentation, but I've heard it's improving rapidly.

In the next couple weeks, I'll post a Part IV on implementing programmatic login using the APIs of Java EE 6, Spring Security and Apache Shiro. I'll be presenting this topic at Jazoon as well as the long-form version (with hacking) at ÜberConf. Hopefully I'll see you at one of those conferences.

Update: Thanks to help from Les Hazlewood, I've figured out how to implement Remember Me with Apache Shiro. In the [urls] section of shiro.ini, the second url (shown below) says to Shiro "In order to visit the /app/users URL, you must be connecting via SSL on port 8443 and you must also be authenticated."

/app/users = ssl[8443],authc

Remembered users are not authenticated because their identity hasn't been proven during the current session. What I want Shiro to say is "In order to visit the /app/users URL, you must be connecting via SSL on 8443 and you must also be a known user. If you're not, you should login first." Where a known user is someone who has a recognized identity and has either authenticated during the current session or is known via RememberMe from a previous session. The documentation gives a good example with Amazon.com for why Shiro makes this distinction. It allows more control (usually necessary), but you can relax the control as you see fit.

So, to relax my configuration a bit to match what I want (known users), I updated shiro.ini's [urls] section to be as follows:

/app/users = ssl[8443],user

The key is that the /app/users url is now protected with the more relaxed user filter instead of the authc filter. However, you would typically want an account profile page (or credit card information page, or similar) protected with the authc filter instead to guarantee proof of identity for those sensitive operations.

Posted in Java at May 26 2011, 04:43:22 PM MDT 10 Comments