Matt RaibleMatt Raible is a Web Developer and Java Champion. Connect with him on LinkedIn.

The Angular Mini-Book The Angular Mini-Book is a guide to getting started with Angular. You'll learn how to develop a bare-bones application, test it, and deploy it. Then you'll move on to adding Bootstrap, Angular Material, continuous integration, and authentication.

Spring Boot is a popular framework for building REST APIs. You'll learn how to integrate Angular with Spring Boot and use security best practices like HTTPS and a content security policy.

For book updates, follow @angular_book on Twitter.

The JHipster Mini-Book The JHipster Mini-Book is a guide to getting started with hip technologies today: Angular, Bootstrap, and Spring Boot. All of these frameworks are wrapped up in an easy-to-use project called JHipster.

This book shows you how to build an app with JHipster, and guides you through the plethora of tools, techniques and options you can use. Furthermore, it explains the UI and API building blocks so you understand the underpinnings of your great application.

For book updates, follow @jhipster-book on Twitter.

10+ YEARS


Over 10 years ago, I wrote my first blog post. Since then, I've authored books, had kids, traveled the world, found Trish and blogged about it all.

Developing with AngularJS - Part I: The Basics

There's many, many different introductions to AngularJS available on the internet. This article is not another introduction, but rather a story about my learning experience. It all started way back in January of this year. I was working as a UI Architecture Consultant at Taleo/Oracle, my client for the last 21 months. My gig there ended last month, but they agreed to let me publish a series of articles about the knowledge I gained.

Project Background

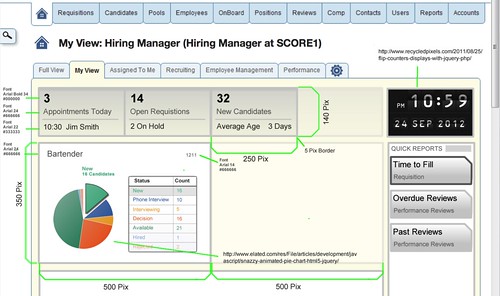
The Director of Product Management had been working on the concepts for a new project - codenamed "Visual MyView". Below is a mockup he created for our kickoff meeting on January 4th.

My Dashboard - Original Mockup

From his original email about the above mockup:

The intent here is that one of the columns has rows that have a similar width. The rows could be dragged and dropped into a different order – or potentially the two columns could also be reordered. The rows will basically be comprised of similar widgets. You can see in the mockup how the first two rows might look – and sample widgets. The widgets shown can be configured by the end user, as well as the order in which they are displayed. Other requirements given to us were the following.

  • Row 1 is comprised of 'summary' widgets that are 'todo' items. Reviews needing done – approvals required – etc.
  • Row 2 will be a graph row – having graphs and charts to display information – larger squares will build this row.
  • Row 3's content was not determined yet.

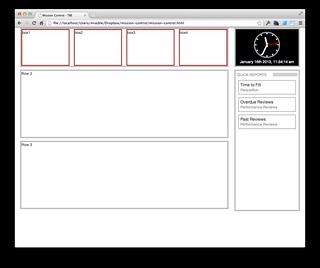
I started the initial layout with static HTML and CSS and had a wireframe to show by mid January.

Wireframe

By the end of January, we'd renamed the project to My Dashboard and had a working prototype using CoolClock and moment.js for the clock in the top right, AngularJS to display widget data, jQuery UI for drag-n-drop of rows and widgets, Bootstrap's Carousel for holding charts and Highcharts for rendering charts.

[Read More]

Posted in The Web at Jun 18 2013, 09:06:52 AM MDT 9 Comments

The HTML5 Roadshow Rocks!

Canyonland's Sunset Road by Trish of McGinity Photo

In early February, as I was creating my Modern Java Web Developer presentation, I came across a training event that was similarly named. Since I happened to know the instructor, I shot him off an email asking more about it. He promptly replied a week later with an intriguing description. The following sentence really stood out for me:

They are NOT beginning workshops -- newbie information is easily found online, in books, at UG meetings, etc. They are targeted at working professionals who want to take their game to the next level.

The other thing that really struck me about this training was it was à la carte; meaning you could pick and pay for just the days you wanted to attend. Scott gave me a two-for-one deal and I signed up for the following workshops:

Normally, attending a training course would have an opportunity cost for me. However, since I work remotely and it doesn't matter where I work, I decided to work from the class. It turned out to be a great idea because it had the same feel of a productive day at the coffeeshop, but it was a coffeeshop full of knowledge. Instead of looking up and doing some people watching or getting distracted by social media, I would look up and learn something new. I actually ended up getting more done in those two training classes than I normally do at my LoDo Office.

Advanced JavaScript
The Advanced JavaScript workshop was taught by Kyle Simpson. This was my first time meeting Kyle and I was immediately impressed by his resume, especially his worked on Firefox Developer Tools for 9 months credentials. He started out talking about good JavaScript documentation on sites such as MDN and Principles of Writing Consistent, Idiomatic JavaScript. Tip: append "mdn" to any searches for JavaScript topics and you're likely to get better results. Not only that, but MDN is a wiki so you can improve it too. From there, we moved onto DOM Events, event propagation (e.g. bubbling vs. capturing), event management, scopes, this, closures and design patterns. It was a very deep dive into JavaScript and I enjoyed every minute of it.

Airplane-Mode HTML5
The Airplane-Mode HTML5 workshop was taught by Scott Davis (his site is currently down, should be fixed next week). Scott talked about many things I was already familiar with, but I still managed to learn a bunch of new tips and tricks. He started by having us install Node, volo and creating projects. He showed how package.json is the JS project's equivalent of pom.xml.

Next, he plunged into viewports, orientation and how to use CSS3 media queries. I've always used min-device-width and max-device-width in my media queries, so orientation: portrait and orientation: landscape was a useful tip. He taught us about CSS3's pseudo-classes (esp. for validation) and pointed us to the Forward Thinking Form Validation article. We learned about using findmebyIP.com and how it can be a useful tool for finding your browser's capabilities, particularly when you're in a black box environment (e.g. a browser on a TV). I knew about Modernizr, but wasn't aware of has.js for JavaScript feature detection.

Scott talked about many more topics, from HTML5 forms and mobile links to geolocation and maps. He ended the day talking about local storage and application cache.

The Good
First of all, the price was perfect at around $250 per day. The best part for me was that I learned more than I expected to. Not only that, but I didn't have to endure any opportunity cost to attend these workshops. There were times I wish I didn't have to work, but it was cool to have "learning stuff" as a distraction rather than social media.

The Bad
The Location. I ride my bike to work year-round and only sit in traffic a few times per year. So I know I'm biased. The location was in Louisville and while it should be only a 30-minute commute, I spent 2 hours in the car each day. Once I got there, the facility was great, the internet was fast and the lunch choices were splendid.

To see if the HTML5 Roadshow is coming to your town, checkout ThirstyHead on Eventbrite or follow them on Twitter.

Posted in The Web at Mar 14 2013, 03:16:58 PM MDT Add a Comment

What have I been working on at Taleo?

2011 has been a year of great clients for me. I started working with O.co and very much enjoyed my time there, especially on powder days in Utah. The people were great, the contract was great (no end date), but the work was not my forte. I was on a project to modularize the main shopping site's codebase, which involved mostly refactoring. By refactoring, I mean creating new Maven projects, modifying lots of pom.xml files and literally moving files from one directory to another. IntelliJ made this easy, the hard part was refactoring tests, moving from EasyMock to Mockito and splitting classes into interfaces and implementations where appropriate. As a developer who likes developing UIs and visually seeing my accomplishments, the project wasn't that exciting. However, I knew that it was strategically important to O.co, so I didn't complain much.

In mid-May, I received a LinkedIn message from the Director of Software Engineering at Taleo.

This is OB, I am the Director of Software Engineering at Taleo. We are the 2nd largest Software as a Service company. I am building a new specialist UI team that will take the product to the next level. I am looking for someone to lead this initiative. If you are interested to have a chat about it, please let me know.

At that time, I'd never heard of Taleo and quickly recommended they not hire me.

This probably isn't the best position for me. While I am a good leader, I'm not willing to relocate from Denver. I've found that leaders usually do best when face-to-face with their developers.

This conversation continued back-and-forth where I explained how I wasn't willing to go full-time and I didn't want to leave Overstock. In the end, OB was persistent and explained how the position would entail lots of UI work and wouldn't require me to travel much. Our negotiations trailed off in June and resumed in July after I returned from vacation in Montana. Shortly after, we met each other's expectations, agreed on a start date and I started working at Taleo in early September.

When I started, there were three features they wanted to add to to Taleo Business Edition: Profile Pictures, Talent Cards and Org Charts. They knew the schedule was tight (8 weeks), but I was confident I could make it happen. At first, I groaned at the fact that they were using Ant to build the project. Then I smiled when I learned they'd standardized on IntelliJ and set things up so you could do everything from the IDE. After using Maven for many years, this setup has actually become refreshing and I rarely have to restart or long for something like JRebel. Of course, a new kick-ass laptop and awesome IDE make it so I rarely wait for anything to happen.

To give you a taste of how I implemented each of these new features in 8 weeks, I've broken them into sections below.

Profile Pictures
Adding profile pictures was a pretty simple concept, one you see on my social networking sites today. I needed to give users the ability to upload a JPEG or PNG and crop it so it looked good. The uploading was a pretty straightforward process and I used a lot of internal APIs to grab the file from the request and save it to disk. The more difficult part was scaling the image to certain dimensions on upload (to save space) and allowing users to crop it after.

Most of Taleo Business Edition (TBE) is written in good ol' servlets and JSPs, with lots of scriptlets in their JSPs. When I saw the amount of HTML produced from Java, I laughed out loud and cringed. Soon after, I breathed a sigh of relief when I learned that any new features could be written using FreeMarker templates, which IntelliJ has excellent support for.

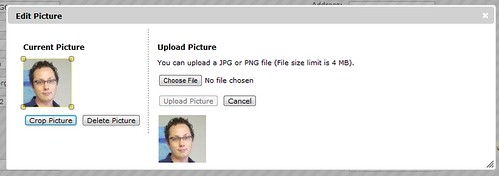
For image resizing on upload, I used Chris Campbell's Image.getScaledInstance() tutorial. For creating thumbnails, I used a combination of scaling, getSubimage() and the Java Image I/O API. I made sure to write to BufferedOutputStream for scalability. For cropping images client-side, I used jQuery UI's Dialog and Jcrop, the jQuery image cropping plugin. Below is a screenshot of what the cropping UI looks like:

Taleo's TBE: Profile Picture

Talent Cards
Talent Cards were a whole different beast. Not only did they need to display profile pictures, they also needed to contain contact information, work history and a number of other data points. Not just for employees, but for candidates as well. They also needed to be rendered with tabs at the bottom that allowed you to navigate between different data sections.

Taleo's TBE: Talent Card I'll admit, most of the hard work for this feature was done by the server-side developers (Harish and Vlad) on my team. Vlad built the tabbed interface and Harish built the administrative section that allows you to add/remove/sort fields, as well as show and hide certain tabs. I performed most of my magic with jQuery, its clueTip plugin and good ol' CSS. I was particularly thankful for CSS3 and its border-radius, box-shadow and Justin Maxwell's tutorial on CSS String Truncation with Ellipsis. I used DWR to fetch all the data from the server using Ajax.

Talent Cards are a slick feature in TBE 11.5 and I think they're a great way to see a lot of information about someone very quickly. If you enable them for your company, you'll be able to mouse over any employee or candidate's names and see their information.

Org Chart
The last feature I completed in this 8-week sprint was creating an organization chart. For this, I was given a rough prototype based on Caprica Software's JQuery/CSS Organisation Chart. When I received it, it had all kinds of cool CSS 3 transformations (like this one), but they only worked in Safari and Chrome. I ended up removing the transformations and adding the ability to navigate up and down the org tree with Ajax (we currently only show three levels at a time).

The Org Chart feature also allows you to see how many direct/indirect reports an employee has, as well as access their Talent Card by hovering over their name. It's one of my favorite features because it's so visual and because it builds upon all the other features we've built.

Taleo's TBE: Org Chart

Summary
As you might've guessed by now, I've been having a lot of fun doing UI development over the last few months. While I seem to have a knack for backend Java development, I enjoy developing UIs a lot more. The smile you see on people's faces during demos is priceless. I can't help but think this kind of thing contributes greatly to my developer happiness. All these features will be in next week's release of TBE and I couldn't be happier.

If you'd like to work on my team at Taleo (or even take over my current role as UI Architect), please drop me a line. If you live near their headquarters (Dublin, CA), it'd also be great to see you at the next Silicon Valley Spring User Group meetup. I'll be speaking about What's New in Spring 3.1 on February 1st.

Posted in Java at Dec 09 2011, 12:57:36 PM MST 1 Comment

PhoneGap for Hybrid App Development

This afternoon, I attended Brian LeRoux's talk on PhoneGap for Hybrid App Development at Devoxx. You might remember that I tried PhoneGap last week and really enjoyed my experience. Below are my notes from Brian's talk.

PhoneGap is a project for creating native applications using HTML, CSS and JavaScript. PhoneGap started out as a hack. In 2007, Apple shipped the iPhone and Steve Jobs told everyone they should develop webapps. PhoneGap started in 2008 as a lofty summertime hack and gained traction as a concept at Nitobi with Android and Blackberry implementations in the fall. In 2009, people started to pay attention when PhoneGap got rejected by Apple. They added Symbian and webOS support and Sony Ericsson started contributing to the project. They got rejected because all PhoneGap-developed apps were named "PhoneGap". This turned out to be good press for the project and Apple let them in shortly after.

In 2010, IBM began tag-teaming with Nitobi and added 5 developers to the project after meeting them at OSCON. In 2011, RIM started contributing as well as Microsoft. Then Adobe bought the company, so they're obviously contributing.

PhoneGaps Goals: the web is a first class platform, so let people create installable web apps. Their second goal is to cease to exist and get browsers to adopt their model.

PhoneGap is NOT a runtime or a compiler/transpiler. It's not an IDE or predefined framework or proprietary lockin. It's Apache, MIT and BSD licensed to guarantee it's as free as free software gets. You can do whatever you want to do with it. PhoneGap has recently been contributed to the Apache Software Foundation.

As far as Adobe vs. PhoneGap is concerned, the Nitobi team remains contributors to PhoneGap. Adobe is a software tools company and has Apache and WebKit contributors. PhoneGap/Build integration will be added to Creative Cloud.

The biggest issues with contributing PhoneGap to Apache is renaming the project and source control. I'm not sure why it needs to be renamed, but it's likely that Apache Callback is out. There seems to be some consensus on Apache Cordova. Apache likes SVN and the PhoneGap community currently uses Git. They're trying to find a medium road there, but would prefer to stay on Git.

The PhoneGap technique is colloquially called "the bridge". It's a 3 step process: they instantiate a WebView, then they call JavaScript from native code, then they call native code from JavaScript. Apparently, all device APIs are available via JavaScript in a WebView.

The primary platforms supported are iOS >= 3, Android >= 1.5 and BlackBerry >= 5.x. They also support webOS, Symbian, Samsung Bada and Windows Phone. No mobile dev platform supports as many deploy targets as PhoneGap. Primary contributors are Adobe, IBM, RIM and Microsoft.

Documentation for PhoneGap is available at http://docs.phonegap.com. Device APIs for PhoneGap 1.0 included sensors, data and outputs, which all devices have. Examples of sensors are geolocation and camera. Data examples are the filesystem, contacts and media. Outputs are screens, speakers and the speaker jack. All PhoneGap APIs are plugins, but any native API is permitted.

What about security? Brian recommends looking at the HTML5 Security Cheatsheet. PhoneGap has added a lot of security measures since they've found the native API pretty much opens up everything.

PhoneGap doesn't bundle a UI framework, but they support any JavaScript framework that works in the browser. PhoneGap is just a fancy browser, so your code run in less fancy web browsers too. This means you can develop and test your app in your desktop browser and only use PhoneGap to package and distribute your app.

Competition? PhoneGap has no competition.

PhoneGap/Build is for compiling your apps in the cloud and free for open source projects. The biggest reason they did this is because they couldn't redistribute all the SDKs and it was a pain for developers to download and install SDKs in training classes.

For mobile app development, you should have a singular goal. Do one thing really well if you want to be successful. Great UX happens iteratively. You know that the web works and has been widely successfully cross-platform. It's likely you've already invested in the web. Start by building a mobile web client and use PhoneGap as a progressive enhancement technique.

Shipping and unit testing should be a daily activity. Automate everything so you can have one-click builds (test/dev/release). For web client design, constraints are your ally in the battle against complexity and "clients who are not chill". Phones suck and consume a lot: cpu, ram, bandwidth, battery, network... everything! Start with a benchmark of app performance and monitor that benchmark. If you have tons and tons of features, consider splitting into multiple apps.

The mobile web is not WebKit! Opera is huge, Firefox is making strides and IE still happens. For layouts: use flex-box rules (anyone got a link to these?), css media queries and meta tags for viewport. You should try to develop your app without frameworks because they come with a ton of code and can effect the size of your app.

Looks can kill: aesthetics that can hurt performance: border-radius, box-shadow and gradients can slow down your apps. Chances are, you really don't need these features. Design your app for your brand, not for the device manufacturer. An app that looks like an iPhone app on Android doesn't give a positive impression.

For JavaScript libraries, start with your problem, not a generic solution like Sencha or jQuery Mobile. Zepto and its older brother XUI are all you need to start. Jo is a fantastic option. Backbone and Spine are worth watching.

For testing, QUnit and Jasmine are pretty popular. For deployment, concat, minify and obfuscate your JavaScript and CSS. Or you can inline everything into the markup to minimize HTTP chatter. Gmail inlines and comments all their JavaScript and then evals it.

From there, Brian recommended leveraging HTML5's AppCache and and using RESTful JSON endpoints for legacy systems. Next, he tried to show us a demo of a photo sharing application. Unfortunately, the Demo Gods were grumpy and Brian couldn't get his computer to recognize his Android phone. He did show us the client code and it's pretty impressive you can use 1 line of code to take a picture on a phone.

The last thing we looked at was debug.phonegap.com. This is an app that's powered by weinre. It lets you enter a line of JavaScript in your client and then remotely debug it in a tool that looks like Chrome's Web Inspector. Very cool stuff if you ask me.

Summary
I really enjoyed learning more about PhoneGap, particularly because Brain emphasized all my web development skills can be used. I don't have to learn Objective-C or Android to develop native apps and I don't even have to install an SDK if I use PhoneGap/Build. Of course, my mobile developer friends might disagree with this approach. In the meantime, I look forward to using PhoneGap to turn my mobile web clients into native apps and finding out if it's really as good as they say it is.

Posted in The Web at Nov 16 2011, 10:22:16 AM MST 2 Comments

Scaling Flash Movies to match Browser Zoom Levels

Recently I was tasked with figuring out how to scale the Flash assets in the web application I'm working on. In the app, there's two different Flash assets: a Spotlight (cycles through images) and a Video Player. Before I started working on the issue, our assets would stay the same fixed size no matter what the browser zoom level. You can see this issue in action by going to Hulu or Fancast and zooming in/out (Command +/- on Mac, Control +/- on Windows). The Flash assets don't scale with the browser's text.

I found a lot of references for how to trap and handle resizing in JavaScript, so that's the initial path I took. I ended up having issues trapping the resize event in IE, as well as persisting the appropriate zoom level on page reload. Because of this, I ended up using a pure ActionScript solution that works much better. This article shows how I implemented both solutions.

Regardless of implementation, the first change I had to make was to move the height and width from the Flash asset (object/embed/JS) to its surrounding tag (<section> in our app). Then I changed the height/width to 100% on the Flash asset.

JavaScript Implementation
To allow zooming in ActionScript, I modified our main class to expose a "zoom" method to JavaScript:

ExternalInterface.addCallback("zoom", _zoom);

...

private function _zoom(scale:Number):void {
    _view.scaleX = _view.scaleX * scale;
    _view.scaleY = _view.scaleY * scale;
}
In the code above, _view refers to the container that holds all the items in the player. To call this method in JavaScript, I added the following code:

var windowHeight;
var documentHeight;

$(document).ready(function() { 
    ...
    windowHeight = $(window).height();
    documentHeight = $(document).height();

    $(window).resize(resizeWindow);
}

// Resize Flash assets when page is zoomed
function resizeWindow() {
    var newWindowHeight = $(window).height();
    var newDocumentHeight = $(document).height();
    // if document height hasn't changed, it's a browser window resize
    // event instead of a text zoom - don't change anything
    if (newDocumentHeight === documentHeight) {
        return;
    } else {
        documentHeight = newDocumentHeight;
    }
    var scale = (windowHeight / newWindowHeight); 

    var player = getFlashMovie('playerId');
    if (player && player.zoom) {
        player.zoom(scale);
    }
    var spotlight = getFlashMovie('spotlightId');
    if (spotlight && spotlight.zoom) {
        spotlight.zoom(scale);
    }

    windowHeight = newWindowHeight;
}

This seemed to work well in Firefox, Safari and Opera, but not in IE. I found this explanation about why it might not work, but I was unsuccessful in getting IE to recognize a resize/zoom event.

To fix scaling in our Spotlight asset, I used a similar solution. However, since the Spotlight didn't have all its elements in a container (they were being added directly to the stage), I had to refactor the code to add a SpotlightView (extends Sprite) that contains the bulk of the code.

Browsers persist the zoom level you've set for a site. The problem with the solution used here is it only scales up and down properly if you start from scale = 1 and revert to scale = 1 before leaving the site. If you zoom in and close your browser, when you come back the flash movies will be scale = 1 while the rest of the site is zoomed in. To solve this problem, I attempted to save the scale value in a cookie. This worked, and I was able to read the cookie in the *.as files to scale the movie correctly. However, I experienced some issues with this approach and didn't like having to delete cookies when I wanted the Flash assets to scale correctly.

ActionScript Implementation
After discovering issues with the JavaScript implementation, I did some research to see if it was possible to listen for the browser resize event in ActionScript. The Flash Fluid Layouts and Stage Resize in AS3 tutorial clued me in that the stage could listen for a resize event.

stage.addEventListener(Event.RESIZE, resizeListener); 

After adding the above line in the initialization, I added a resizeListener function that scales based on the default dimensions. It also ensures no scaling happens in full screen mode.

private function resizeListener(e:Event):void {
    // don't scale if entering full screen mode
    if (stage.displayState == StageDisplayState.FULL_SCREEN)  {
        _view.scaleX = 1;
        _view.scaleY = 1;
    } else {
        _view.scaleX = stage.stageWidth / 964;
        _view.scaleY = stage.stageHeight / 586;
    }
}

For the Spotlight asset, there are a number of different layouts (home, featured and news). The main class has a resizeListener function that scales accordingly to which layout type is being used.

private function resizeListener(e:Event):void {
    var type:String = _view.getLayoutType();

    if (type == "featured") { 
        _view.scaleX = stage.stageWidth / 958;
       _view.scaleY = stage.stageHeight / 180;
   } else if (type == "home") { 
        _view.scaleX = stage.stageWidth / 964;
        _view.scaleY = stage.stageHeight / 428;
    } else if (type == "news") {
        _view.scaleX = stage.stageWidth / 964;
        _view.scaleY = stage.stageHeight / 189;
    }
}

Because the layout type isn't set until the XML is loaded, I listen for that event in my URLLoader.

xmlLoader.addEventListener(Event.COMPLETE, resizeListener);

With the pure ActionScript implementation, the zoom level is automatically persisted. The Event.RESIZE event is fired by the Flash plugin when the page first loads if the dimensions are not the default.

That's it! Special thanks to James Ward for clueing me into scaleX and scaleY. Hopefully Hulu and Comcast can use this tutorial to scale their video players too. ;-)

Posted in The Web at Jul 13 2010, 12:18:42 PM MDT 9 Comments

Introduction to Objective-J and Cappuccino with Tom Robinson

This morning, I attended Tom Robinson's talk on Objective-J and Cappuccino. Tom is one of the founders of 280 North and creators of the Cappuccino framework and Objective-J language, so I was very interested in hearing about Cappuccino from the source. The text below are my notes, but they're also mostly Tom's words, not mine. I've added a "Thoughts" section at the end that are my words.

Tom's Team was Cocoa programmers before they started building Cappuccino. They wanted to focus on building Desktop Class Web Applications (for example, Google Maps, Meebo and 280 Slides). Tom showed a demo of 280 Slides and how it can rotate and scale images very easily, something you don't often see in web applications.

To build desktop class web applications, you can use Flash or Silverlight, but they're controlled by Adobe and Microsoft. Also, they have no iPhone support and poor Mac and Linux performance. The other option is JavaScript + DOM. They're open standards, available almost everywhere (including mobile devices) and its a very rich ecosystem with lots of competition. The downside to JavaScript is standards bodies, many incompatibilities, technical limitations (e.g. can't access web cam) and the DOM is very document-centric.

The bottom line is we can't fix Flash, but we can fix JavaScript.

This is what 280 North is trying to do with Objective-J. It's a proper superset of JavaScript, has a few syntax additions, has a powerful runtime and is implemented in JavaScript. Objective-J is analogous to Objective-C. It adds to JavaScript like Objective-C adds to C.

One of the first things Objective-J adds is Dependency Management. You can import from search paths:

@import <Foundation/CPObject.j>

Or from relative paths:

@import "ApplicationController.j"

@import prevents duplicate loads has asynchronous downloading and synchronous execution. That means all files are downloaded before evaluation begins, but to the programmer, it seems to happen synchronously.

The thing that sets Cappuccino apart from other libraries is its inheritance model. It uses classical OO inheritance (using Objective-C syntax).

@implementation Person : CPObject {
    String firstName @accessors;
    String lastName @accessors;
}

- (String) fullName {
    return firstName + lastName;
}

@end

The type definitions (String) are ignored for now and primarily used for documentation. In the future, they plan to add optional static typing, hence the reason for having them. Tom is unsure if you can leave off the String type or if the compiler requires it.

@implementation has proper support for super and language syntax support. One of the reasons they chose Objective-C is because classical inheritance works great for UI Frameworks.

Objective-J uses "send a message" syntax instead of "call a method" syntax. In the code snippets below, the first line is JavaScript, the second is Objective-J:

object.method()
[object method]

object.methodWithFoot(arg1)
[object methodWithFoo:arg1]

object.methodWithFooBar(arg1, arg2)
[object methodWithFoo:arg1 bar:arg2]

Dynamic Dispatch is one of the most interesting parts of Objective-J. forwardInvocation in Objective-C is like method_missing in Ruby. Methods can be used as references, for example:

var action = @selector(someMethod:);

Runtime mutability is important for KeyValueCoding (KVC) and KeyValueObserving (KVO). KVC allows you to swap classes at runtime and KVO allows you to listen for when property values change. At runtime, a $KVO_ClassName is generated. This class notifies any registered observers when values are changed and then calls the original class to change the property.

Cappuccino
Cappuccino is an application framework, not a library. It uses the Hollywood Principle: "Don't call us, we'll call you".

The Framework handles document management (open, save, revert), content editing (undo, redo, copy, paste) and graphics manipulation. The DOM is designed for documents (same is true for HTML and CSS). Tom doesn't like the DOM as its not a good API for building applications. Proof is all the JavaScript libraries built to make the DOM better.

Cappuccino has an MVC framework and CPView is its View. It's analogous to a <div> and represents a rectangle on the screen. Everything visible is a CPView or one of its subclasses. It defines resizing and layout behavior. CoreGraphics is Cappuccino's canvas-like drawing API. It uses VML on IE, canvas on everything else.

Very little of the code in Cappuccino talks to the DOM (less than 2%). It's not just about providing widgets that work in all browsers, it's a way to write platform independent display code.

Events are done very differently than most JavaScript libraries. Browser's dispatching is not used. A single event listener is registered for each type of event on the window. These events are captured and sent to the objects that need to know about them. This allows for consistent events across all browsers, even keyboard events. It also allows for creating custom event flows and easily creating custom events. Cappuccino events allow you to get around a common problem with DOM Events where you can't click on overlapping rectangles.

Notifications can be registered and sent very easily. Both "scoped" and private notifications can be created.

Undo Management is included in Cappuccino. It manages a stack of undos for you. Redos are "free" and undo functionality is part of the document architecture. This makes it easy to integrate with auto-save functionality.

Run loops (also called event loops) are an advanced feature of Cappuccino. They allow you to perform actions on every run loop. This enables complex optimizations for DOM/Graphic operations and undo grouping.

The final part of Cappuccino is Keyed Archiving. Keyed Archiving stores a graph of Objective-J objects. It handles reference cycles, conditional inclusions, has an efficient data format and works on the client and server (Objective-J can be run on the server). The data format is similar like binary, but it's UTF-8. Keyed Archiving is used for archiving views and used heavily in 280 Slides for storing, retrieving, and exporting presentations.

Other applications implemented with Cappuccino include almost.at and Mockingbird. EnStore uses it too, but only for its admin interface.

An interesting extension for Rails developers is CPActiveRecord, a reimplementation of Rails' ActiveRecord in Cappuccino.

There are several tools included with Cappuccino:

  • objj: command line Objective-J
  • objcc: "compile" ahead of time
  • press: optimize code and resources
  • nib2cib: convert Mac OS X nibs
  • capp: project creation

All these tools are built on Narwhal (which conforms to the CommonJS standard).

CommonJS
CommonJS is an effort among server-side JavaScript projects to standardize non-browser JavaScript APIs. There's numerous API specifications (so far):

  • Binary, File, IO
  • stdin, stdout, stderr, args, env
  • Web server gateway (JSGI) - similar to WSGI and Rack for Python and Ruby

To learn more about CommonJS, see CommonJS effort sets JavaScript on path for world domination.

Narwhal is 280 North's implementation of CommonJS APIs. It works with multiple JavaScript engines, including Rhino, JavaScriptCore (SquirrelFish) and XUL Runner. According to Tom, Rhino is an order of magnitude slower than JavaScriptCore and V8. Of course, Narwhal supports Objective-J too.

Aristo
Aristo is the new default theme in Cappuccino and was created by the Sofa design firm. It includes windows, tabs and menus and is open source so you can modify.

Atlas
Atlas is an IDE for Cappuccino, focused on building user interfaces graphically. Atlas is a downloadable application for OS X. It's written almost entirely in Cappuccino. The desktop version bridges Cappuccino windows to native windows. Tom did a demo of Atlas and showed how its layout feature allows you pin, center and align very easily. It's all done with JavaScript because doing layouts with CSS is often very painful. After that, he showed us how can you Atlas to very easily build a Web Application and then export it as a native OS X application without changing a line of code. Atlas includes Mozilla's Bespin for code editing.

To learn more about Aristo and Atlas, you might want to checkout Ajaxian's Big News from Cappuccino: Aristo and Atlas from earlier this year.

Atlas has a $20 Beta Program if you're interested in trying it out.

My Thoughts
Cappuccino looks like a very cool web framework. It reminds me of GWT in that you have to learn a new language to use it. However, Atlas takes a lot of that pain away. I particularly like how it has document and undo/redo support built-in. On my current GWT project, this would be very useful as we've had to build this functionality by hand.

Posted in The Web at Dec 03 2009, 11:21:59 AM MST 2 Comments

JavaScript and CSS Concatenation with wro4j

This past weekend, I decided it was about time to fix my YSlow score on this site. I did the easiest thing first by moving all my JavaScript files to the bottom of each page. Then I turned on GZip compression using Roller's built-in CompressionFilter. These changes helped, but the most glaring problem continued to be too many requests. To solve this, I turned to wro4j (as recommended on Twitter) to concatenate my JS and CSS files into one.

I have to say, I'm very happy with the results. I'm now sitting at a YSlow (V2) score of 75; 90 if I use the "Small Site or Blog" ruleset. I believe I can improve this by adding expires headers to my images, js and css. More than anything, I'm impressed with wro4j, its great support and easy setup. I was looking for a runtime solution (b/c I didn't want to have to rebuild Roller) and it seems to be perfect for the job. Furthermore, wro4j minifies everything on the fly and they'll have an expires header filter in the next release.

JAWR and the YUI Compressor are other alternatives to this filter, but I'm currently sold on wro4j. First of all, it passed the 10-minute test. Secondly, it didn't require me to modify Roller's build system.

At this point, if I'm going to implement JS/CSS concatenation and minification in AppFuse and Roller, wro4j seems like the best option. If you disagree, I'd love to hear your reasoning.

TIP: See Javascript Compression in Nexus for information on using YUI Compressor with Maven.

Posted in Roller at Nov 09 2009, 10:44:44 AM MST 16 Comments

JSON Parsing with JavaScript Overlay Types in GWT

A reader recently asked:

I would love to see a snippet of how to eval the JSON coming from RequestBuilder into the OverlayTypes. What is the mapping like? I used OverlayTypes to read in static data that I render into the head section of the hosted page, which is pretty easy and fast, but I don't know how to do this "reading" dynamically at runtime.

If you're not familiar with GWT's Overlay Types (added in 1.5), see Getting to really know GWT, Part 2: JavaScript Overlay Types. In our project, we're using Overlay Types to simplify JSON parsing and make our application lean-and-mean as possible.

First of all, we have a JSOModel class that acts as our overlay type:

import java.util.HashSet;
import java.util.Set;

import com.google.gwt.core.client.JavaScriptObject;
import com.google.gwt.core.client.JsArray;
import com.google.gwt.core.client.JsArrayString;

/**
 * Java overlay of a JavaScriptObject.
 */
public abstract class JSOModel extends JavaScriptObject {

    // Overlay types always have protected, zero-arg constructors
    protected JSOModel() {
    }

    /**
     * Create an empty instance.
     * 
     * @return new Object
     */
    public static native JSOModel create() /*-{
        return new Object();
    }-*/;

    /**
     * Convert a JSON encoded string into a JSOModel instance.
     * <p/>
     * Expects a JSON string structured like '{"foo":"bar","number":123}'
     *
     * @return a populated JSOModel object
     */
    public static native JSOModel fromJson(String jsonString) /*-{
        return eval('(' + jsonString + ')');
    }-*/;

    /**
     * Convert a JSON encoded string into an array of JSOModel instance.
     * <p/>
     * Expects a JSON string structured like '[{"foo":"bar","number":123}, {...}]'
     *
     * @return a populated JsArray
     */
    public static native JsArray<JSOModel> arrayFromJson(String jsonString) /*-{
        return eval('(' + jsonString + ')');
    }-*/;

    public final native boolean hasKey(String key) /*-{
        return this[key] != undefined;
    }-*/;

    public final native JsArrayString keys() /*-{
        var a = new Array();
        for (var p in this) { a.push(p); }
        return a;
    }-*/;

    @Deprecated
    public final Set<String> keySet() {
        JsArrayString array = keys();
        Set<String> set = new HashSet<String>();
        for (int i = 0; i < array.length(); i++) {
            set.add(array.get(i));
        }
        return set;
    }

    public final native String get(String key) /*-{
        return "" + this[key];
    }-*/;

    public final native String get(String key, String defaultValue) /*-{
        return this[key] ? ("" + this[key]) : defaultValue;
    }-*/;

    public final native void set(String key, String value) /*-{
        this[key] = value;
    }-*/;

    public final int getInt(String key) {
        return Integer.parseInt(get(key));
    }

    public final boolean getBoolean(String key) {
        return Boolean.parseBoolean(get(key));
    }

    public final native JSOModel getObject(String key) /*-{
        return this[key];
    }-*/;

    public final native JsArray<JSOModel> getArray(String key) /*-{
        return this[key] ? this[key] : new Array();
    }-*/;
}

This class alone allows you to easily parse JSON returned in a callback. For example, here's an example of parsing Twitter's User Timeline in my OAuth with GWT application.

private class TwitterApiCallback implements RequestCallback {
    public void onResponseReceived(Request request, Response response) {
        if (response.getStatusCode() == 200) {
            JsArray<JSOModel> data = JSOModel.arrayFromJson(response.getText());
            List<JSOModel> statuses = new ArrayList<JSOModel>();
            for (int i = 0; i < data.length(); i++) {
                statuses.add(data.get(i));
            }

            // populate textarea with returned statuses
            for (JSOModel status : statuses) {
                payload.setValue(payload.getValue() + status.get("text") + "\n\n");
            }
            
            Label success = new Label("API call successful!");
            success.setStyleName("success");
            form.add(success);
        } else {
            onError(request, new RequestException(response.getText()));
        }
    }

    public void onError(Request request, Throwable throwable) {
        Window.alert("Calling API failed. " + OAuthPage.STANDARD_ERROR + "\n\n" + throwable.getMessage());
    }
}

To simply things even more, we created a BaseModel class that can be extended.

import java.util.Map;
import java.util.HashMap;

import com.google.gwt.core.client.JsArrayString;
import com.google.gwt.user.client.Element;
import com.google.gwt.user.client.DOM;

public abstract class BaseModel {

    protected JSOModel data;

    public BaseModel(JSOModel data) {
        this.data = data;
    }

    public String get(String field) {
        String val = this.data.get(field);
        if (val != null && "null".equals(val) || "undefined".equals(val)) {
            return null;
        } else {
            return escapeHtml(val);
        }
    }

    public Map<String, String> getFields() {
        Map<String, String> fieldMap = new HashMap<String, String>();

        if (data != null) {
            JsArrayString array = data.keys();

            for (int i = 0; i < array.length(); i++) {
                fieldMap.put(array.get(i), data.get(array.get(i)));
            }
        }
        return fieldMap;
    }

    private static String escapeHtml(String maybeHtml) {
        final Element div = DOM.createDiv();
        DOM.setInnerText(div, maybeHtml);
        return DOM.getInnerHTML(div);
    }
}

You can extend this class and create model objects that represent a more Java-like view of your data. For example, I could create a Status class with the following code:

public class Status extends BaseModel {
    
    public Status(JSOModel data) {
        super(data);
    }

    public String getText() {
        return get("text");
    }
}

Then I could change my JSON parsing in TwitterApiCallback to be:

    private class TwitterApiCallback implements RequestCallback {
    public void onResponseReceived(Request request, Response response) {
        if (response.getStatusCode() == 200) {
            JsArray<JSOModel> data = JSOModel.arrayFromJson(response.getText());
            List<Status> statuses = new ArrayList<Status>();
            for (int i = 0; i < data.length(); i++) {
                Status s = new Status(data.get(i));
                statuses.add(s);
            }

            // populate textarea with returned statuses
            for (Status status : statuses) {
                payload.setValue(payload.getValue() + status.getText() + "\n\n");
            }

            Label success = new Label("API call successful!");
            success.setStyleName("success");
            form.add(success);
        } else {
            onError(request, new RequestException(response.getText()));
        }
    }

    public void onError(Request request, Throwable throwable) {
        Window.alert("Calling API failed. " + OAuthPage.STANDARD_ERROR + "\n\n" + throwable.getMessage());
    }
}

That's how we're doing lightweight JSON parsing with GWT. I've updated my GWT with OAuth demo with this code. You can also download the source. Please let me know if you have any questions.

Update October 20, 2009: I recently had to enhance the JSOModel and BaseModel classes in my project to handle nested objects and arrays. In my project, I have a Conversation object that has a Channel and a List of Task objects. These objects are available in the JSOModel of my BaseModel, I just needed to grab them a bit differently.

public Channel getChannel() {
    return new Channel(data.getObject("channel"));
}

public List<Task> getTasks() {
    JsArray<JSOModel> array = data.getArray("tasks");
    List<Task> tasks = new ArrayList<Task>(array.length());

    for (int i = 0; i < array.length(); i++) {
        Task task = new Task(array.get(i));
        tasks.add(task);
    }
    
    return tasks;
}

To set a Channel, it's as simple as:

data.set("channel", channel.toJson().toString());

To allow setting Lists, I had to enhance JSOModel by adding the following two methods:

public final void set(String key, List<JSOModel> values) {
    JsArray<JSOModel> array = JavaScriptObject.createArray().cast();
    for (int i=0; i < values.size(); i++) {
        array.set(i, values.get(i));
    }
    setArray(key, array);
}

protected final native void setArray(String key, JsArray<JSOModel> values) /*-{
    this[key] = values;
}-*/;

After making this change, I was able to convert my List to List and set it on the underlying JSOModel.

public void setTasks(List<Task> tasks) {
    List<JSOModel> values = new ArrayList<JSOModel>();
    for (Task task : tasks) {
        values.add(task.getModel());
    }

    data.set("tasks", values);
}

To allow the task.getModel() method to work, I added a getter to BaseModel to allow retrieving the underlying JSOModel. Currently, I'm using a homegrown JSON.java class to produce JSON from my BaseModel objects. It all seems to work great and I'm pumped I can receive and send all my JSON using overlay types.

Posted in Java at Jun 24 2009, 09:52:49 AM MDT 10 Comments

Implementing OAuth with GWT

I've heard about OAuth for quite some time, but never had an opportunity to implement it on a project. For a good explanation of what OAuth is, see its Introduction. Here's an excerpt:

...it allows you the User to grant access to your private resources on one site (which is called the Service Provider), to another site (called Consumer, not to be confused with you, the User). While OpenID is all about using a single identity to sign into many sites, OAuth is about giving access to your stuff without sharing your identity at all (or its secret parts).

The reason I needed OAuth was to interact with the Google Contacts API. I've always hated how sites make you import all your contacts from Gmail. I wanted to develop a system that'd let you simply read your contacts from Google in real-time.

Since the application I'm working on uses GWT, I chose to implement an OAuth client in GWT. After googling for "gwt oauth", I found two examples. Unfortunately, neither worked out-of-the-box.

The good news is I did manage to create a working solution. The bad news is it only seems to work at random. That's right folks, I created a solution that only works 50% of the time. I'm somewhat embarrassed to post it here, but I also realize the power of open source and community. By sharing, I hope we can find the flaws in my logic and come up with a solution for all GWT applications.

The best project for OAuth libraries seems to be oauth on Google Code. However, you'll notice that there is no JavaScript implementation listed on the homepage. I did look at the Java implementation, but quickly realized it wouldn't be usable in GWT. Therefore, I opted for the JavaScript implementation.

OAuth consists of several steps. The following diagram explains the authentication flow nicely.
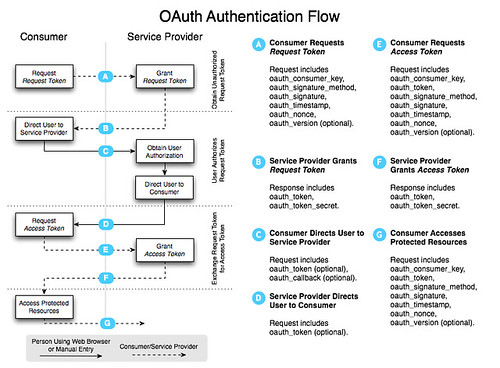
OAuth Authentication Flow

In a nutshell, you have to complete the following steps:

  1. Get a token from the service provider.
  2. Redirect user to service provider to grant access and redirect back to application.
  3. Request access token to access protected resources.
  4. Access protected resources and pull/push data.

To access a service provider's OAuth service, you'll likely need to start by registering your application. For Google, OAuth Authentication for Web Applications is an excellent resource. Google's OAuth Playground is a great way to with the Google Data APIs after you've registered.

Now that you know how OAuth works, let's look at how I implemented it with GWT. I started by adding the necessary JavaScript references to my *.gwt.xml file.

<script src="//oauth.googlecode.com/svn/code/javascript/oauth.js"/>
<script src="//oauth.googlecode.com/svn/code/javascript/sha1.js"/>

Next, I needed a way to sign the request. I tried to use Sergi Mansilla's OAuth.java for this, but discovered issues with how the parameters were being written with GWT 1.6. I opted for Paul Donnelly's makeSignedRequest function instead. By adding this to my application's HTML page, I'm able to call it using the following JSNI method:

public native static String signRequest(String key, String secret, String tokenSecret, String url) /*-{
    return $wnd.makeSignedRequest(key, secret, tokenSecret, url);
}-*/;

After the URL is signed, it needs to be sent to the provider to get a request token. To do this, I used GWT's RequestBuilder and created a send() method:

protected void send(RequestCallback cb, String URL) {
    RequestBuilder builder = new RequestBuilder(RequestBuilder.GET, URL);
    builder.setTimeoutMillis(10000);
    builder.setCallback(cb);
    
    Request req = null;
    try {
        req = builder.send();
    } catch (RequestException e) {
        cb.onError(req, e);
    }
}

If you try this with Google's Request Token URL in GWT's hosted mode, nothing will happen. Compile/browse to Safari and you'll still see nothing. Try it in Firefox and you'll see the following.
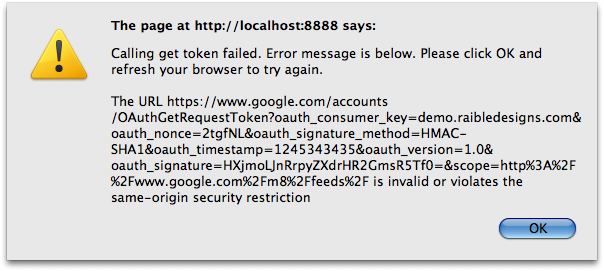
SOP Error

To workaround browsers' Same Origin Policy, I added a proxy servlet to send the requests. I started with Jason Edwards's ProxyServlet and modified it to fit my needs. I then registered it in both *.gwt.xml and web.xml.

<servlet path="/google/" class="org.appfuse.gwt.servlet.AlternateHostProxyServlet"/>

Now, before calling the send() method, I replace the start of the URL so the request would be routed through the servlet.

public void getToken(RequestCallback cb) {
    String url = signRequest(provider.getConsumerKey(), 
                             provider.getConsumerSecret(), 
                             "", provider.getRequestTokenURL());
    url = url.replace("https://www.google.com/", "/google/");
    send(cb, url);
}

When the request returns, I create two cookies by calling a createOAuthCookies() method with the payload returned:

public static String[] createOAuthCookies(String data) {
    String oauth_token = data.substring(data.indexOf("oauth_token=") + 12);
    oauth_token = oauth_token.substring(0, oauth_token.indexOf("&"));

    String oauth_token_secret = data.substring(data.indexOf("oauth_token_secret=") + 19);

    Cookies.setCookie("oauth_token", URL.decode(oauth_token));
    Cookies.setCookie("oauth_token_secret", URL.decode(oauth_token_secret));
    return new String[]{oauth_token, oauth_token_secret};
}

The next step is to authorize the token. This is where things got tricky with my proxy servlet and I had to add some special logic for GWT. Google was sending back a 302 with a Location header, but it wasn't hitting the onResponseReceived() method in my callback. For this reason, I had to change it to a 200 status code and add the redirect location to the body. I also discovered that sometimes they'd return an HTML page with a <meta http-equiv="refresh" ...> tag. When using Twitter, I discovered the full HTML for the allow/deny page was returned. Below is the callback I'm using. WindowUtils is a class I got from Robert Hanson and the gwt-widget project.

public void onResponseReceived(Request request, Response response) {
    String text = response.getText();
    if (response.getStatusCode() == 200 && response.getText().startsWith("http")) {
        WindowUtils.changeLocation(response.getText());
    } else {
        // look for meta-tag that refreshes and grab its URL
        if (text.contains("";
            String url = text.substring(text.indexOf(tokenToStartWith) + tokenToStartWith.length());
            url = url.substring(0, url.indexOf(tokenToEndWith) + tokenToEndWith.length());
            WindowUtils.changeLocation(url);
        } else {
            // Twitter returns a full HTML page, so redirect to the authorize URL manually
            if (provider instanceof Twitter) {
                String url = provider.getAuthorizeTokenURL();
                url = url.replace("$1", OAuthRequest.getAuthToken());
                url = url.replace("$2", DefaultRequest.getCurrentLocation());
                WindowUtils.changeLocation(url);
            } else {
                onError(request, new RequestException(text));
            }
        }
    }
}

public void onError(Request request, Throwable caught) {
    Window.alert("Calling authorize token failed. " + OAuthPage.STANDARD_ERROR + "\n\n" + caught.getMessage());
}

The 3rd step is to get an access token. The most important thing to remember when you do this is to include the "oauth_token_secret" value when signing the request.

signRequest(provider.getConsumerKey(), provider.getConsumerSecret(), 
            getAuthTokenSecret(), url);

After this completes with a 200, I create the cookies again (since oauth_token and oauth_token_secret are returned in the body), then call the API to get a list of contacts. The ContactsRequests class is responsible for making the call. The DefaultRequest class contains the send() method as well as utility methods to get the cookie values of the oauth tokens.

public class ContactsRequest extends DefaultRequest {
    private static final String GOOGLE_CONTACTS_URL = 
        "http://www.google.com/m8/feeds/contacts/default/thin?oauth_token=$1";
    private OAuthProvider provider;

    public ContactsRequest(OAuthProvider provider) {
        this.provider = provider;
    }

    public void getContacts(RequestCallback cb) {
        String url = GOOGLE_CONTACTS_URL.replace("$1", getAuthToken());
        url = signRequest(provider.getConsumerKey(), provider.getConsumerSecret(), 
                          getAuthTokenSecret(), url);

        String proxiedURLPrefix = "/contacts/";
        // allow for deploying at /gwt-oauth context
        if (WindowUtils.getLocation().getPath().contains("gwt-oauth")) {
            proxiedURLPrefix = "/gwt-oauth" + proxiedURLPrefix;
        }

        url = url.replace("http://www.google.com/", proxiedURLPrefix);

        send(cb, url);
    }
}

If all goes well, the response contains the data you requested and it's used to populate a textarea (at least in this demo application). Of course, additional processing needs to occur to parse/format this data into something useful.

This all sounds pretty useful for GWT applications, right? I believe it does - but only if it works consistently. I sent a message to the OAuth Google Group explaining the issues I've had.

I'm trying to use the JavaScript API to authenticate with OAuth from a GWT application. I've got it working with both Google and Twitter's OAuth implementations. However, it seems to fail to sign the URL at random. In other words, it works 1 out of 3 times. ... Any idea why this could be happening?

I received a response with a cleaner makeSignedRequest() function. I tried it and, unfortunately, it seems to be equally unreliable. I suspect the problem is with the OAuth JavaScript implementation, GWT's interpretation of it, or that OAuth isn't as mature as it appears to be. I'd like to think one of the first two causes the problem.

To make it easier to create a robust example of GWT and OAuth, I created a gwt-oauth project you can download or view online. Please keep in mind the demo is likely to be flakey. If you're persistent and try enough times, it's likely to work. Firefox seems to succeed moreso than Safari or Chrome. If you have any suggestions for improving this example, please let me know.

Posted in Java at Jun 18 2009, 01:59:13 PM MDT 13 Comments

Appcelerator with Matt Quinlan

This evening I attended the Denver Open Source User Group meeting where the Basic Concepts talk was on Appcelerator. Matt Quinlan (Twitter, Blog, LinkedIn) was the presenter. I arrived 10 minutes late, so I didn't hear any of the intro stuff. Below are my notes from the event.

The Appcelerator developers liked the "onclick" syntax, but found it was too limited to do everything they wanted. Rather than onclick, they use an on attribute. For example:

<div on="click then l:show.box">
Click me
<div>

"DOM Manipulation is JavaScript cruft."

Appcelerator allows you to implement the Observer pattern in the browser. In addition to allowing DOM elements to subscribe to messages, server-side objects (in any language) can subscribe as well. In Appcelerator syntax "l:" means local and "r:" means remote. The messages that are passed to the server are JSON and have payloads. JSON is more popular than XML because you can eval() it and create JavaScript objects from it. Appcelerator allows you to do Declarative Ajax. On the server-side, you can annotation Java and C# classes with @Service to subscribe to messages. In other languages (i.e. PHP), Javadoc-style comments are used.

Tagline: The seamless fusion of RIA and SOA.

Web Expression Language
Goal is to eliminate 90% of the JavaScript you write. Example syntax:

on="[condition] then [action]"

Conditions include DOM events (click, focus, blur, change, mouse events), key events (up, down, press), other (history, drag/drop, selected, resize, iPhone orient, sortXYZ), subscribe to custom message. Actions include Scriptaculous effects (show/hide, fade, move, drop, grow), set element value (static, dynamic, bind), set CSS class or attribute, execute custom JavaScript, publish custom message.

Now Matt is doing a demo on http://try.appcelerator.org. This site consists of a form that allows you to type in Appcelerator code and run it. 3 attributes can be added to any tag: draggable, droppable and resizeable.

Client-Side
Add simple tags to your HTML to inject RIA widgets. Add single property to existing HTML elements for dynamic behavior. Eclipse Plugin built on Aptana, but is generally targeted towards web developers moreso than business analysts (no drag and drop of widgets).

Server-Side
Server-side development done with your IDE of choices. Based on your server-side tehchnology platform. Easily create services using annotations.

App Command
The app command is similar to Rails' GEM command. Allows you to build scaffolding and deploy to cloud (AppEngine, Amazon S3). It also allows you to pulldown components from the main server and auto-updating.

Examples:

Appcelerator allows you to create prototypes easily by using a JavaScript file with mocks for the server-side objects. In the next version, you can "annotate" the UI and allow end-users to Ctrl+Click on elements and add feedback. For an example of this, see http://dev.appcelerator.com/pearson.

When starting with Appcelerator, you can start by crawling (including appcelerator.js for widgets) then move to walking (decouple server-side and client-side) and finally running (developing working prototypes with mocks for server-side).

"Let's face it, ASP, JSP, PHP and Ruby are just lipstick on CGI."

Posted in Open Source at Oct 07 2008, 07:08:19 PM MDT 5 Comments