

Getting Started with Angular 2
Click here to see an updated version of this tutorial that's been upgraded for Angular 2.0 RC1.
I was hired by one of my current clients in November to help them develop a project management application with AngularJS. I'm proud to say we've built the application, it looks great, and it's scheduled to be released next month. The team had lots of experience with ExtJS, but was new to AngularJS. While using AngularJS worked, they're keen on moving to Angular 2 shortly after it's released.
To help them learn Angular 2, I decided to write a couple tutorials similar to the AngularJS tutorials I wrote last year. In this tutorial, I did my best to keep the functionality and features similar to Getting Started with AngularJS so you can compare the code between the two.
What you'll build
You'll build a simple web application with Angular 2 and TypeScript. You'll add search and edit features with mock data.
What you'll need
- About 15-30 minutes.
- A favorite text editor or IDE. I recommend IntelliJ IDEA.
- Git installed.
- Node.js and npm installed. I recommend using nvm.
Create your project
Clone the angular2-seed repository using git:
git clone https://github.com/mgechev/angular2-seed.git angular2-tutorial
cd angular2-tutorial
NOTE: The angular2-seed project requires node v4.x.x or higher and npm 2.14.7. I used node v4.2.6 and npm 3.6.0.
Install ts-node for TypeScript:
npm install -g ts-node
Install the project's dependencies:
npm install
Run the application
The project is configured with a simple web server for development. To start it, run:
npm start
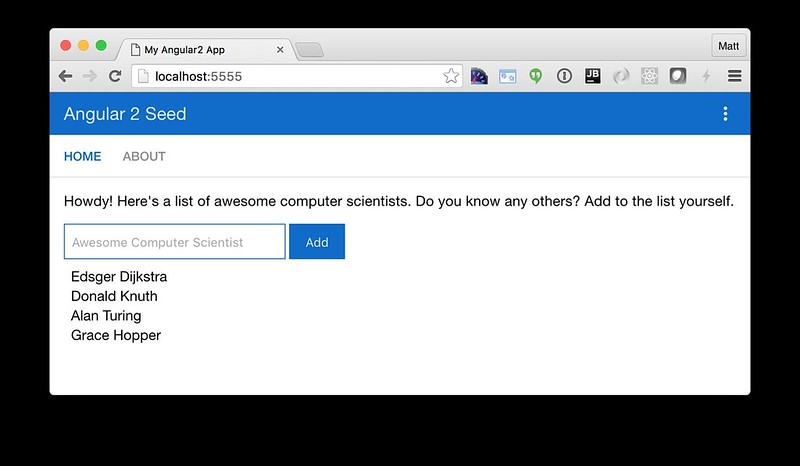
You should see a screen like the one below at http://localhost:5555.
You can see your new project's test coverage by running npm test:
=============================== Coverage summary ===============================
Statements : 86.11% ( 93/108 )
Branches : 48.28% ( 70/145 )
Functions : 100% ( 25/25 )
Lines : 94.32% ( 83/88 )
================================================================================
Add a search feature
To add a search feature, open the project in an IDE or your favorite text editor. For IntelliJ IDEA, use File > New Project > Static Web and point to the directory you cloned angular2-seed to.
The Basics
Create a file at src/search/components/search.component.html with the following HTML:
<h2>Search</h2>
<form>
  <input type="search" [(ngModel)]="query" (keyup.enter)="search()">
  <button type="button" (click)="search()">Search</button>
</form>
<div *ngIf="loading">loading...</div>
<pre>{{searchResults | json}}</pre>
Create src/search/components/search.component.ts to define the SearchComponent and point to this template.
import {Component} from 'angular2/core';
import {CORE_DIRECTIVES, FORM_DIRECTIVES} from 'angular2/common';
import {ROUTER_DIRECTIVES} from 'angular2/router';

@Component({
  selector: 'sd-search',
  moduleId: module.id,
  templateUrl: './search.component.html',
  directives: [FORM_DIRECTIVES, CORE_DIRECTIVES, ROUTER_DIRECTIVES]
})
export class SearchComponent {
  loading: boolean;
  query: string;
  searchResults: any;

  constructor() {
    console.log('initialized search component');
  }
}
Update src/app/components/app.component.ts to import this component and include its route.
import {SearchComponent} from '../../search/components/search.component';

@RouteConfig([
  { path: '/',      name: 'Home',  component: HomeComponent  },
  { path: '/about', name: 'About', component: AboutComponent },
  { path: '/search', name: 'Search', component: SearchComponent }
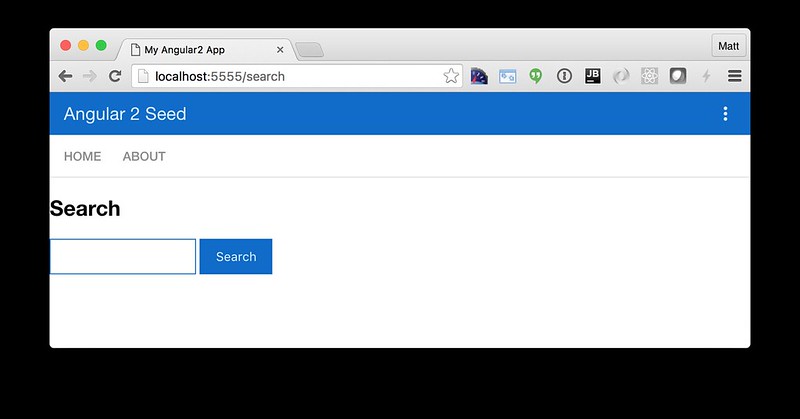
Your browser should refresh automatically, thanks to Browsersync. Navigate to http://localhost:5555/search and you should see the search component.
You can see it needs a bit of styling. Angular 2 allows you to provide styles specific for your component using a styleUrls
property on your component.
Add this property to search.component.ts you see below.
templateUrl: './search.component.html',
styleUrls: ['./search.component.css'],
directives: [FORM_DIRECTIVES, CORE_DIRECTIVES, ROUTER_DIRECTIVES]
Create src/search/components/search.component.css and add some CSS.
:host {
  display: block;
  padding: 0 16px;
}
There, that looks better!
Finally, update src/app/components/navbar.component.html to include a link to the search route.
<nav>
  <a [routerLink]="['Home']">HOME</a>
  <a [routerLink]="['About']">ABOUT</a>
  <a [routerLink]="['Search']">SEARCH</a>
</nav>
This section has shown you how to add a new component to a basic Angular 2 application.
The next section shows you how to create a use a JSON file and localStorage to create a fake API.
The Backend
To get search results, create a SearchService that makes HTTP requests to a JSON file. Start
by creating src/shared/data/people.json to hold your data.
[
  {
    "id": 1,
    "name": "Peyton Manning",
    "phone": "(303) 567-8910",
    "address": {
      "street": "1234 Main Street",
      "city": "Greenwood Village",
      "state": "CO",
      "zip": "80111"
    }
  },
  {
    "id": 2,
    "name": "Demaryius Thomas",
    "phone": "(720) 213-9876",
    "address": {
      "street": "5555 Marion Street",
      "city": "Denver",
      "state": "CO",
      "zip": "80202"
    }
  },
  {
    "id": 3,
    "name": "Von Miller",
    "phone": "(917) 323-2333",
    "address": {
      "street": "14 Mountain Way",
      "city": "Vail",
      "state": "CO",
      "zip": "81657"
    }
  }
]
Create src/shared/services/search.service.ts and provide Http as a dependency in its constructor.
In this same file, define the Address and Person classes that JSON will be marshalled to.
import {Injectable} from 'angular2/core';
import {Http, Response} from 'angular2/http';

@Injectable()
export class SearchService {
  constructor(private http:Http) {}

  getAll() {
    return this.http.get('shared/data/people.json').map((res:Response) => res.json());
  }
}

export class Address {
  street:string;
  city:string;
  state:string;
  zip:string;

  constructor(obj?:any) {
    this.street = obj && obj.street || null;
    this.city = obj && obj.city || null;
    this.state = obj && obj.state || null;
    this.zip = obj && obj.zip || null;
  }
}

export class Person {
  id:number;
  name:string;
  phone:string;
  address:Address;

  constructor(obj?:any) {
    this.id = obj && Number(obj.id) || null;
    this.name = obj && obj.name || null;
    this.phone = obj && obj.phone || null;
    this.address = obj && obj.address || null;
  }
}
In search.component.ts, add imports for these classes.
import {Person, SearchService} from '../../shared/services/search.service';
You can now add a type to the searchResults variable. While you're there, modify the constructor to inject the
SearchService.
searchResults: Array<Person>;

constructor(public searchService: SearchService) {}
Then implement the search() method to call the service's getAll() method.
search(): void {
  this.searchService.getAll().subscribe(
    data => {this.searchResults = data;},
    error => console.log(error)
  );
}
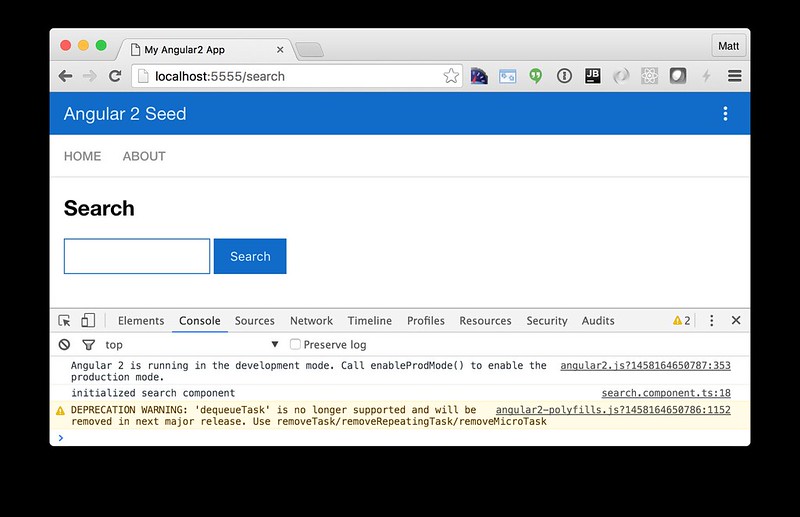
At this point, you'll likely see the following message in your browser's console.
EXCEPTION: No provider for SearchService! (SearchComponent -> SearchService)
This happens because the app hasn't provided this service to components. To fix this, modify
app.component.ts to import this component and add the service to the list of providers.
import {NameListService} from '../../shared/services/name-list.service';
import {SearchService} from '../../shared/services/search.service';

@Component({
  selector: 'sd-app',
  viewProviders: [NameListService, SearchService],
  moduleId: module.id,
Next, you'll likely get an error about the Http dependency in SearchService.
EXCEPTION: No provider for Http! (SearchComponent -> SearchService -> Http)
To solve this problem, modify src/main.ts to import the Http service and make it
available to the app.
import {HTTP_PROVIDERS} from 'angular2/http';

bootstrap(AppComponent, [
  HTTP_PROVIDERS, ROUTER_PROVIDERS,
  provide(APP_BASE_HREF, { useValue: '<%= APP_BASE %>' })
]);
Now the page will load without errors. However, when you click on the button, you'll see the following error.
ORIGINAL EXCEPTION: TypeError: this.http.get(...).map is not a function
I was stuck here for quite some time when I first encountered this issue. I was able to solve it
with a simple import in main.ts.
import 'rxjs/add/operator/map';
Now clicking the search button should work. To make the results look better,
remove the <pre> tag in search.component.html
and replace it with a <table>.
<table *ngIf="searchResults">
  <thead>
  <tr>
    <th>Name</th>
    <th>Phone</th>
    <th>Address</th>
  </tr>
  </thead>
  <tbody>
  <tr *ngFor="#person of searchResults; #i=index">
    <td>{{person.name}}</td>
    <td>{{person.phone}}</td>
    <td>{{person.address.street}}<br/>
      {{person.address.city}}, {{person.address.state}} {{person.address.zip}}
    </td>
  </tr>
  </tbody>
</table>
Then add some additional CSS for this component in search.component.css.
table {
  margin-top: 10px;
  border-collapse: collapse;
}

th {
  text-align: left;
  border-bottom: 2px solid #ddd;
  padding: 8px;
}

td {
  border-top: 1px solid #ddd;
  padding: 8px;
}
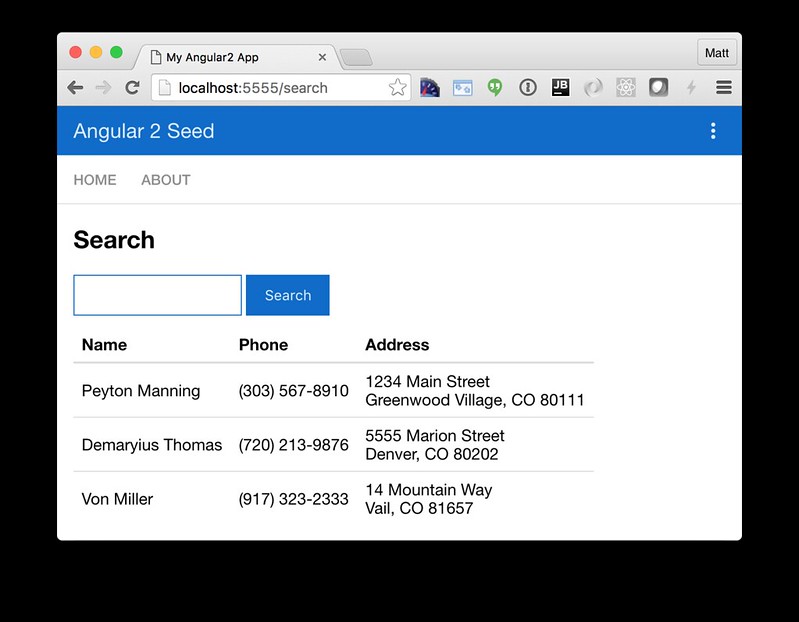
Now the search results look better.
But wait, we still don't have search functionality! To add a search feature, add a search() method to
search.service.ts.
search(q:string) {
  if (!q || q === '*') {
    q = '';
  } else {
    q = q.toLowerCase();
  }
  return this.getAll().map(data => {
    let results = [];
    data.map(item => {
      if (JSON.stringify(item).toLowerCase().includes(q)) {
        results.push(item);
      }
    });
    return results;
  });
}
Then refactor SearchComponent to call this method with its query variable.
search(): void {
  this.searchService.search(this.query).subscribe(
    data => {this.searchResults = data;},
    error => console.log(error)
  );
}
Now search results will be filtered by the query value you type in.
This section showed you how to fetch and display search results. The next section builds on this and shows how to edit and save a record.
Add an edit feature
Modify search.component.html to add a link for editing a person.
<td><a [routerLink]="['Edit', { id: person.id }]">{{person.name}}</a></td>
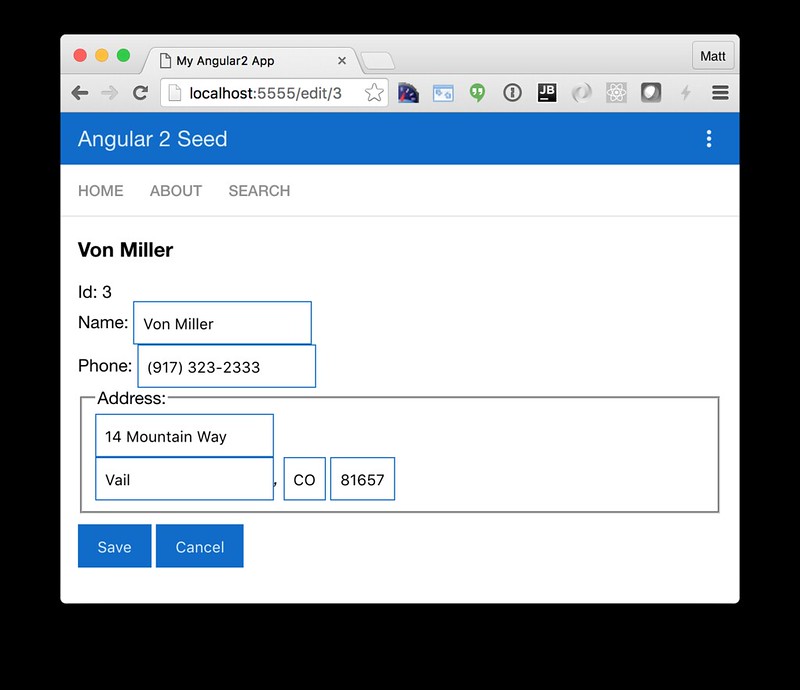
Create src/search/components/edit.component.html to display an editable form. You might notice I've added id
attributes to most elements. This is to
make things easier when writing integration tests with Protractor.
<div *ngIf="person">
  <h3>{{editName}}</h3>
  <div>
    <label>Id:</label>
    {{person.id}}
  </div>
  <div>
    <label>Name:</label>
    <input [(ngModel)]="editName" id="name" placeholder="name"/>
  </div>
  <div>
    <label>Phone:</label>
    <input [(ngModel)]="editPhone" id="phone" placeholder="Phone"/>
  </div>
  <fieldset>
    <legend>Address:</legend>
    <address>
      <input [(ngModel)]="editAddress.street" id="street"><br/>
      <input [(ngModel)]="editAddress.city" id="city">,
      <input [(ngModel)]="editAddress.state" id="state" size="2">
      <input [(ngModel)]="editAddress.zip" id="zip" size="5">
    </address>
  </fieldset>
  <button (click)="save()" id="save">Save</button>
  <button (click)="cancel()" id="cancel">Cancel</button>
</div>
Create an EditComponent in src/search/components/edit.component.ts that references this template and handles communication with the SearchService.
import {Component, OnInit} from 'angular2/core';
import {Person, Address, SearchService} from '../../shared/services/search.service';
import {RouteParams, Router} from 'angular2/router';
import {CanDeactivate, ComponentInstruction} from 'angular2/router';

@Component({
  selector: 'sd-edit',
  moduleId: module.id,
  templateUrl: './edit.component.html',
  styleUrls: ['./edit.component.css']
})
export class EditComponent implements OnInit, CanDeactivate {

  person: Person;
  editName: string;
  editPhone: string;
  editAddress: Address;

  constructor(
    private _service: SearchService,
    private _router: Router,
    private _routeParams: RouteParams
  ) { }

  ngOnInit() {
    let id = +this._routeParams.get('id');
    this._service.get(id).subscribe(person => {
      if (person) {
        this.editName = person.name;
        this.editPhone = person.phone;
        this.editAddress = person.address;
        this.person = person;
      } else {
        this.gotoList();
      }
    });
  }

  routerCanDeactivate(next: ComponentInstruction, prev: ComponentInstruction): any {
    if (!this.person || this.person.name === this.editName || this.person.phone === this.editPhone
      || this.person.address === this.editAddress) {
      return true;
    }

    return new Promise<boolean>((resolve, reject) => resolve(window.confirm('Discard changes?')));
  }

  cancel() {
    this._router.navigate(['Search']);
  }

  save() {
    this.person.name = this.editName;
    this.person.phone = this.editPhone;
    this.person.address = this.editAddress;
    this._service.save(this.person);
    this.gotoList();
  }

  gotoList() {
    if (this.person) {
      this._router.navigate(['Search', { term: this.person.name }]);
    } else {
      this._router.navigate(['Search']);
    }
  }
}
Modify SearchService to contain functions for finding a person by their id, and saving them. While you're in there, modify
the search() method to
be aware of updated objects in localStorage.
search(q:string) {
  if (!q || q === '*') {
    q = '';
  } else {
    q = q.toLowerCase();
  }
  return this.getAll().map(data => {
    let results = [];
    data.map(item => {
      // check for item in localStorage
      if (localStorage['person' + item.id]) {
        item = JSON.parse(localStorage['person' + item.id]);
      }
      if (JSON.stringify(item).toLowerCase().includes(q)) {
        results.push(item);
      }
    });
    return results;
  });
}

get(id: number) {
  return this.getAll().map(all => {
    if (localStorage['person' + id]) {
      return JSON.parse(localStorage['person' + id]);
    }
    return all.find(e => e.id === id);
  });
}

save(person: Person) {
  localStorage['person' + person.id] = JSON.stringify(person);
}
To make the app are of this new component, add an import and route configuration in app.component.ts.
import {EditComponent} from '../../search/components/edit.component';

@RouteConfig([
  { path: '/',      name: 'Home',  component: HomeComponent  },
  { path: '/about', name: 'About', component: AboutComponent },
  { path: '/search', name: 'Search', component: SearchComponent },
  { path: '/edit/:id', name: 'Edit', component: EditComponent }
])
Then create src/search/components/edit.component.css to make the form look a bit better.
:host {
  display: block;
  padding: 0 16px;
}

button {
  margin-top: 10px;
}
At this point, you should be able to search for a person and update their information.
The <form> in src/search/components/edit.component.html calls a save() function to update a person's
data. You already implemented this above.
The function calls a gotoList() function that appends the person's name to the URL when sending the user back to the
search screen.
gotoList() {
  if (this.person) {
    this._router.navigate(['Search', { term: this.person.name }]);
  } else {
    this._router.navigate(['Search']);
  }
}
Since the SearchComponent doesn't execute a search automatically when you execute this URL, add the following logic to do
so in its constructor.
constructor(public searchService: SearchService, params: RouteParams) {
  if (params.get('term')) {
    this.query = decodeURIComponent(params.get('term'));
    this.search();
  }
}
You'll need to import RouteParams in order for everything to compile.
import {ROUTER_DIRECTIVES, RouteParams} from 'angular2/router';
After making all these changes, you should be able to search/edit/update a person's information. If it works - nice job!
Source code
A completed project with this code in it is available on GitHub at https://github.com/mraible/angular2-tutorial. If you have ideas for improvements, please leave a comment or send a pull request.
I originally wrote this tutorial in Asciidoctor because it has a slick feature where you can include the source code from files rather than copying and pasting. Unfortunately, GitHub doesn't support includes. You can use DocGist to view this tutorial, but includes don't work there either.
If you'd like to see the Asciidoctor-generated version of this tutorial, you can install the gem, checkout the project from GitHub,
and then run asciidoctor README.adoc to produce a README.html file.
Summary
I hope you've enjoyed this quick-and-easy tutorial on how to get started with Angular 2. In a future tutorial, I'll show you how to write unit tests and integration tests for this application. I've also started looking into creating an ES6 version of this tutorial using Soós Gábor's angular2-es6-starter. If you know of a better starter for Angular 2 and ES6, please let me know.
Resources
I used a number of resources while creating this application. ng-book 2 was an invaluable resource
and I highly recommend it if you're learning Angular 2. I found Chariot Solution's article on
Angular2 Observables, Http, and
separating services and components
to be quite helpful. Finally, the angular-cli project was a big help, especially its
ng generate route <object> feature.
Kudos to all the pioneers in Angular 2 land that've been using it and writing about it on blogs and Stack Overflow. Getting started with Angular 2 would've been a real pain without your trailblazing.
Posted by Martijn van der Wijst on March 25, 2016 at 03:33 PM MDT #
Posted by Matt Raible on March 25, 2016 at 07:13 PM MDT #
Posted by Raible Designs on March 29, 2016 at 02:11 PM MDT #
Great tutorial. This is substantially more informative than Google's getting started tut. Keep up the excellent pioneering!
You've also sold me on typescript. Being able to type cast variables will be invaluable as the project grows.
Posted by Skyler Hamilton on April 04, 2016 at 09:39 PM MDT #
Posted by Raible Designs on June 03, 2016 at 01:23 PM MDT #
I have tried npm, python, local, cloud, etc.... and I keep getting
This site can’t be reached
localhost refused to connect.
I've been trying for days to get Angular to work, but it just won't. Please help!
Posted by Scott Lombardi on September 28, 2016 at 08:49 PM MDT #
Scott - what operating system are you using? I suspect you might not have "localhost" defined in your hosts file. I'm on a Mac and I have the following in /etc/hosts:
Posted by Matt Raible on September 28, 2016 at 09:08 PM MDT #