Matt RaibleMatt Raible is a writer with a passion for software. Connect with him on LinkedIn.

The Angular Mini-Book The Angular Mini-Book is a guide to getting started with Angular. You'll learn how to develop a bare-bones application, test it, and deploy it. Then you'll move on to adding Bootstrap, Angular Material, continuous integration, and authentication.

Spring Boot is a popular framework for building REST APIs. You'll learn how to integrate Angular with Spring Boot and use security best practices like HTTPS and a content security policy.

For book updates, follow @angular_book on Twitter.

The JHipster Mini-Book The JHipster Mini-Book is a guide to getting started with hip technologies today: Angular, Bootstrap, and Spring Boot. All of these frameworks are wrapped up in an easy-to-use project called JHipster.

This book shows you how to build an app with JHipster, and guides you through the plethora of tools, techniques and options you can use. Furthermore, it explains the UI and API building blocks so you understand the underpinnings of your great application.

For book updates, follow @jhipster-book on Twitter.

10+ YEARS


Over 10 years ago, I wrote my first blog post. Since then, I've authored books, had kids, traveled the world, found Trish and blogged about it all.
You searched this site for "plugin". 300 entries found.

You can also try this same search on Google.

How to use GWT 2.0 with Maven and Generate SOYC Reports

One of the most interesting features coming in GWT 2.0 is code splitting and the ability to use GWT.runAsync() to reduce the size of your application's initial download. This week, I learned how to use GWT 2.0 with my GWT 1.6/Maven project. Below are instructions on how to build and use the latest GWT with Maven.

  • Checkout GWT and setup GWT_TOOLS.
  • Set a GWT_VERSION environment variable to 2.0.0-SNAPSHOT (export GWT_VERSION=2.0.0-SNAPSHOT).
  • Build GWT with the ant command.
  • After building completes, install the GWT artifacts into your local Maven repository using the following commands:
    mvn install:install-file -DgroupId=com.google.gwt \
    -DartifactId=gwt-user -Dversion=2.0.0-SNAPSHOT \
    -Dpackaging=jar -Dfile=build/lib/gwt-user.jar
    
    mvn install:install-file -DgroupId=com.google.gwt \
    -DartifactId=gwt-servlet -Dversion=2.0.0-SNAPSHOT \
    -Dpackaging=jar -Dfile=build/lib/gwt-servlet.jar
    
    mvn install:install-file -DgroupId=com.google.gwt \
    -DartifactId=gwt-dev -Dversion=2.0.0-SNAPSHOT \
    -Dclassifier=mac -Dpackaging=jar -Dfile=build/lib/gwt-dev-mac.jar
    
    mkdir temp
    tar -zxf build/dist/gwt-mac-2.0.0-SNAPSHOT.tar.gz -C temp
    cd temp/gwt-mac-2.0.0-SNAPSHOT
    zip -0 gwt-mac-2.0.0-SNAPSHOT.zip lib*.jnilib
    cd ../..
    
    mvn install:install-file -DgroupId=com.google.gwt \
    -DartifactId=gwt-dev -Dversion=2.0.0-SNAPSHOT \
    -Dclassifier=mac-libs -Dpackaging=zip \
    -Dfile=temp/gwt-mac-2.0.0-SNAPSHOT/gwt-mac-2.0.0-SNAPSHOT.zip
    
    Thanks to Jason for his help with this script.
  • Modify the pom.xml of your GWT project to use the the gwt-maven-plugin from Codehaus. Of course, you'll need to modify the <runTarget> to fit your project.
    <plugin>
        <groupId>org.codehaus.mojo</groupId>
        <artifactId>gwt-maven-plugin</artifactId>
        <version>1.1</version>
        <configuration>
            <runTarget>org.appfuse.gwt.mvc.${entry.point}/${entry.point}.html</runTarget>
        </configuration>
        <executions>
            <execution>
                <goals>
                    <goal>compile</goal>
                    <goal>test</goal>
                </goals>
            </execution>
        </executions>
    </plugin>
    
  • Modify your dependencies to match the ones below. With the Codehaus plugin, dependencies are much more concise.
    <dependency>
        <groupId>com.google.gwt</groupId>
        <artifactId>gwt-servlet</artifactId>
        <version>${gwt.version}</version>
        <scope>compile</scope>
    </dependency>
    <dependency>
        <groupId>com.google.gwt</groupId>
        <artifactId>gwt-user</artifactId>
        <version>${gwt.version}</version>
        <scope>provided</scope>
    </dependency>
    
  • Add <gwt.version>2.0.0-SNAPSHOT</gwt.version> to the properties section of your pom.xml.
  • At this point, you should be able to compile your project with mvn gwt:compile and run it in hosted mode using mvn gwt:run.

Generate SOYC Reports
In Google's code splitting documentation, it mentions The Story of Your Compile (SOYC). From the documentation:

To obtain a SOYC report for your application, there are two steps necessary. First, add -soyc to the compilation options that are passed to the GWT compiler. This will cause the compiler to emit raw information about the compile to XML files in an -aux directory beside the rest of the compiled output. In that directory, you will see an XML file for each permutation and a manifest.xml file that describes the contents of all the others.

The second step is to convert that raw information into viewable HTML. This is done with the SoycDashboard tool.

The first step is not currently possible with the gwt-maven-plugin, so I created a patch for it.

If you patch the gwt-maven-plugin and install it locally, make sure and change the version in your pom.xml to 1.2-SNAPSHOT.

To use the SoycDashboard tool, you'll need to install the gwt-soyc-vis.jar.

mvn install:install-file -DgroupId=com.google.gwt \
-DartifactId=gwt-soyc-vis -Dversion=2.0.0-SNAPSHOT \
-Dpackaging=jar -Dfile=build/lib/gwt-soyc-vis.jar

Now you can generate SOYC reports with mvn gwt:compile -Dgwt.compiler.soyc=true. You can also add <soyc>true</soyc> to the <configuration> section of the gwt-maven-plugin.

The second step (converting the raw information into viewable HTML) is possible using java from the command-line, or by using the exec-maven-plugin. Here's the (lengthy) command-line version:

java -Xmx1024m -cp /Users/mraible/.m2/repository/com/google/gwt/gwt-soyc/2.0.0-SNAPSHOT/gwt-soyc-2.0.0-SNAPSHOT.jar:/Users/mraible/.m2/repository/com/google/gwt/gwt-dev/2.0.0-SNAPSHOT/gwt-dev-2.0.0-SNAPSHOT-mac.jar com.google.gwt.soyc.SoycDashboard -resources ~/.m2/repository/com/google/gwt/gwt-soyc/2.0.0-SNAPSHOT/gwt-soyc-2.0.0-SNAPSHOT.jar -out target/soyc-report target/extra/org.appfuse.gwt.mvc.MVC/soycReport/stories0.xml.gz target/extra/org.appfuse.gwt.mvc.MVC/soycReport/dependencies0.xml.gz target/extra/org.appfuse.gwt.mvc.MVC/soycReport/splitPoints0.xml.gz

In this example, I'm using the files from stories0.xml.gz, dependencies0.xml.gz, splitPoints0.xml.gz. In the soycReport output directory, there's 5 of each these files and I'm not sure what the difference between reports is. Hopefully someone on the GWT team can elaborate. The exec-maven-plugin version is as follows:

<plugin>
    <groupId>org.codehaus.mojo</groupId>
    <artifactId>exec-maven-plugin</artifactId>
    <version>1.1</version>
    <configuration>
        <executable>java</executable>
        <arguments>
            <argument>-cp</argument>
            <argument>
                ${settings.localRepository}/com/google/gwt/gwt-soyc/2.0.0-SNAPSHOT/gwt-soyc-2.0.0-SNAPSHOT.jar:${settings.localRepository}/com/google/gwt/gwt-dev/2.0.0-SNAPSHOT/gwt-dev-2.0.0-SNAPSHOT-${platform}.jar
            </argument>
            <argument>com.google.gwt.soyc.SoycDashboard</argument>
            <argument>-out</argument>
            <argument>target/soyc-report</argument>
            <argument>-resources</argument>
            <argument>
                ${settings.localRepository}/com/google/gwt/gwt-soyc/2.0.0-SNAPSHOT/gwt-soyc-2.0.0-SNAPSHOT.jar
            </argument>
            <argument>${project.build.directory}/extra/org.appfuse.gwt.mvc.MVC/soycReport/stories0.xml.gz</argument>
            <argument>${project.build.directory}/extra/org.appfuse.gwt.mvc.MVC/soycReport/dependencies0.xml.gz</argument>
            <argument>${project.build.directory}/extra/org.appfuse.gwt.mvc.MVC/soycReport/splitPoints0.xml.gz</argument>
        </arguments>
    </configuration>
</plugin>

After configuring this plugin in your project, you should be able to run mvn gwt:compile exec:exec and open the generated report (at target/soyc-report/SoycDashboard-index.html). Currently, there doesn't seem to be much documentation on SOYC. Fred Sauer's recent presentation talks a bit about SOYC and GWT.runAsync(), but that's about it.

To figure out how to use GWT 2.0 with Maven, I used my GWT MVC Example project. The first SOYC report I generated said the initial download was 108,967 KB. To integrate GWT.runAsync(), I modified all the project's controllers so their handleEvent() methods changed from this:

public void handleEvent(AppEvent event) {
    onViewHome(event);
}

To this:

public void handleEvent(final AppEvent event) {
    GWT.runAsync(new RunAsyncCallback() {
        public void onFailure(Throwable throwable) {
            Window.alert(throwable.getMessage());
        }

        public void onSuccess() {
            onViewHome(event);
        }
    });
}

When I generated a new SOYC report, the initial download size was reduced to 56,718 KB. Furthermore, I was able to see that my "Leftovers code" consisted of 63,175 KB. I'm sure there's better ways to split my project using GWT.runAsync(), but I'm happy to see I was able to reduce the initial download by 50%.

If you'd like to try GWT 2.0, you can can download my gwt-mvc example project. To build/run this project, you'll need to 1) build and install GWT, 2) patch gwt-maven-plugin and 3) run mvn gwt:compile exec:exec to generate the SOYC report. In an ideal world, the gwt-maven-plugin can be enhanced to generate the SOYC report (rather than using the exec-maven-plugin). In the meantime, I think it's pretty cool that you can try out GWT 2.0 features while they're still being developed.
Posted in Java at Jun 25 2009, 11:45:04 PM MDT 11 Comments

Implementing OAuth with GWT

I've heard about OAuth for quite some time, but never had an opportunity to implement it on a project. For a good explanation of what OAuth is, see its Introduction. Here's an excerpt:

...it allows you the User to grant access to your private resources on one site (which is called the Service Provider), to another site (called Consumer, not to be confused with you, the User). While OpenID is all about using a single identity to sign into many sites, OAuth is about giving access to your stuff without sharing your identity at all (or its secret parts).

The reason I needed OAuth was to interact with the Google Contacts API. I've always hated how sites make you import all your contacts from Gmail. I wanted to develop a system that'd let you simply read your contacts from Google in real-time.

Since the application I'm working on uses GWT, I chose to implement an OAuth client in GWT. After googling for "gwt oauth", I found two examples. Unfortunately, neither worked out-of-the-box.

The good news is I did manage to create a working solution. The bad news is it only seems to work at random. That's right folks, I created a solution that only works 50% of the time. I'm somewhat embarrassed to post it here, but I also realize the power of open source and community. By sharing, I hope we can find the flaws in my logic and come up with a solution for all GWT applications.

The best project for OAuth libraries seems to be oauth on Google Code. However, you'll notice that there is no JavaScript implementation listed on the homepage. I did look at the Java implementation, but quickly realized it wouldn't be usable in GWT. Therefore, I opted for the JavaScript implementation.

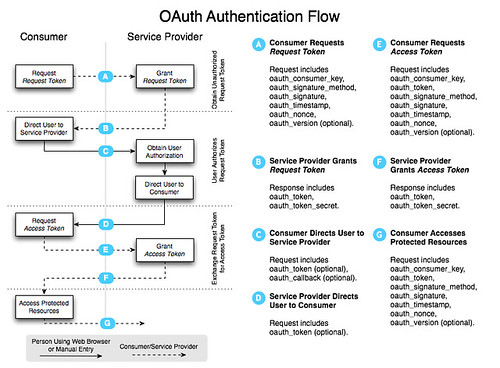
OAuth consists of several steps. The following diagram explains the authentication flow nicely.

OAuth Authentication Flow

In a nutshell, you have to complete the following steps:

  1. Get a token from the service provider.
  2. Redirect user to service provider to grant access and redirect back to application.
  3. Request access token to access protected resources.
  4. Access protected resources and pull/push data.

To access a service provider's OAuth service, you'll likely need to start by registering your application. For Google, OAuth Authentication for Web Applications is an excellent resource. Google's OAuth Playground is a great way to with the Google Data APIs after you've registered.

Now that you know how OAuth works, let's look at how I implemented it with GWT. I started by adding the necessary JavaScript references to my *.gwt.xml file.

<script src="//oauth.googlecode.com/svn/code/javascript/oauth.js"/>
<script src="//oauth.googlecode.com/svn/code/javascript/sha1.js"/>

Next, I needed a way to sign the request. I tried to use Sergi Mansilla's OAuth.java for this, but discovered issues with how the parameters were being written with GWT 1.6. I opted for Paul Donnelly's makeSignedRequest function instead. By adding this to my application's HTML page, I'm able to call it using the following JSNI method:

public native static String signRequest(String key, String secret, String tokenSecret, String url) /*-{
    return $wnd.makeSignedRequest(key, secret, tokenSecret, url);
}-*/;

After the URL is signed, it needs to be sent to the provider to get a request token. To do this, I used GWT's RequestBuilder and created a send() method:

protected void send(RequestCallback cb, String URL) {
    RequestBuilder builder = new RequestBuilder(RequestBuilder.GET, URL);
    builder.setTimeoutMillis(10000);
    builder.setCallback(cb);
    
    Request req = null;
    try {
        req = builder.send();
    } catch (RequestException e) {
        cb.onError(req, e);
    }
}

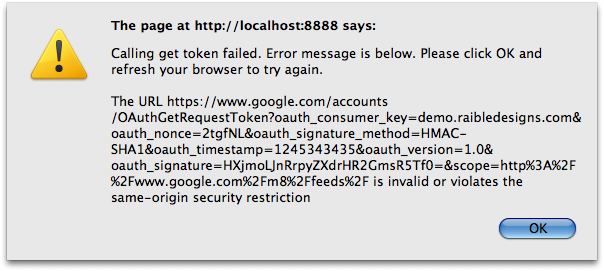
If you try this with Google's Request Token URL in GWT's hosted mode, nothing will happen. Compile/browse to Safari and you'll still see nothing. Try it in Firefox and you'll see the following.

SOP Error

To workaround browsers' Same Origin Policy, I added a proxy servlet to send the requests. I started with Jason Edwards's ProxyServlet and modified it to fit my needs. I then registered it in both *.gwt.xml and web.xml.

<servlet path="/google/" class="org.appfuse.gwt.servlet.AlternateHostProxyServlet"/>

Now, before calling the send() method, I replace the start of the URL so the request would be routed through the servlet.

public void getToken(RequestCallback cb) {
    String url = signRequest(provider.getConsumerKey(), 
                             provider.getConsumerSecret(), 
                             "", provider.getRequestTokenURL());
    url = url.replace("https://www.google.com/", "/google/");
    send(cb, url);
}

When the request returns, I create two cookies by calling a createOAuthCookies() method with the payload returned:

public static String[] createOAuthCookies(String data) {
    String oauth_token = data.substring(data.indexOf("oauth_token=") + 12);
    oauth_token = oauth_token.substring(0, oauth_token.indexOf("&"));

    String oauth_token_secret = data.substring(data.indexOf("oauth_token_secret=") + 19);

    Cookies.setCookie("oauth_token", URL.decode(oauth_token));
    Cookies.setCookie("oauth_token_secret", URL.decode(oauth_token_secret));
    return new String[]{oauth_token, oauth_token_secret};
}

The next step is to authorize the token. This is where things got tricky with my proxy servlet and I had to add some special logic for GWT. Google was sending back a 302 with a Location header, but it wasn't hitting the onResponseReceived() method in my callback. For this reason, I had to change it to a 200 status code and add the redirect location to the body. I also discovered that sometimes they'd return an HTML page with a <meta http-equiv="refresh" ...> tag. When using Twitter, I discovered the full HTML for the allow/deny page was returned. Below is the callback I'm using. WindowUtils is a class I got from Robert Hanson and the gwt-widget project.

public void onResponseReceived(Request request, Response response) {
    String text = response.getText();
    if (response.getStatusCode() == 200 && response.getText().startsWith("http")) {
        WindowUtils.changeLocation(response.getText());
    } else {
        // look for meta-tag that refreshes and grab its URL
        if (text.contains("";
            String url = text.substring(text.indexOf(tokenToStartWith) + tokenToStartWith.length());
            url = url.substring(0, url.indexOf(tokenToEndWith) + tokenToEndWith.length());
            WindowUtils.changeLocation(url);
        } else {
            // Twitter returns a full HTML page, so redirect to the authorize URL manually
            if (provider instanceof Twitter) {
                String url = provider.getAuthorizeTokenURL();
                url = url.replace("$1", OAuthRequest.getAuthToken());
                url = url.replace("$2", DefaultRequest.getCurrentLocation());
                WindowUtils.changeLocation(url);
            } else {
                onError(request, new RequestException(text));
            }
        }
    }
}

public void onError(Request request, Throwable caught) {
    Window.alert("Calling authorize token failed. " + OAuthPage.STANDARD_ERROR + "\n\n" + caught.getMessage());
}

The 3rd step is to get an access token. The most important thing to remember when you do this is to include the "oauth_token_secret" value when signing the request.

signRequest(provider.getConsumerKey(), provider.getConsumerSecret(), 
            getAuthTokenSecret(), url);

After this completes with a 200, I create the cookies again (since oauth_token and oauth_token_secret are returned in the body), then call the API to get a list of contacts. The ContactsRequests class is responsible for making the call. The DefaultRequest class contains the send() method as well as utility methods to get the cookie values of the oauth tokens.

public class ContactsRequest extends DefaultRequest {
    private static final String GOOGLE_CONTACTS_URL = 
        "http://www.google.com/m8/feeds/contacts/default/thin?oauth_token=$1";
    private OAuthProvider provider;

    public ContactsRequest(OAuthProvider provider) {
        this.provider = provider;
    }

    public void getContacts(RequestCallback cb) {
        String url = GOOGLE_CONTACTS_URL.replace("$1", getAuthToken());
        url = signRequest(provider.getConsumerKey(), provider.getConsumerSecret(), 
                          getAuthTokenSecret(), url);

        String proxiedURLPrefix = "/contacts/";
        // allow for deploying at /gwt-oauth context
        if (WindowUtils.getLocation().getPath().contains("gwt-oauth")) {
            proxiedURLPrefix = "/gwt-oauth" + proxiedURLPrefix;
        }

        url = url.replace("http://www.google.com/", proxiedURLPrefix);

        send(cb, url);
    }
}

If all goes well, the response contains the data you requested and it's used to populate a textarea (at least in this demo application). Of course, additional processing needs to occur to parse/format this data into something useful.

This all sounds pretty useful for GWT applications, right? I believe it does - but only if it works consistently. I sent a message to the OAuth Google Group explaining the issues I've had.

I'm trying to use the JavaScript API to authenticate with OAuth from a GWT application. I've got it working with both Google and Twitter's OAuth implementations. However, it seems to fail to sign the URL at random. In other words, it works 1 out of 3 times. ... Any idea why this could be happening?

I received a response with a cleaner makeSignedRequest() function. I tried it and, unfortunately, it seems to be equally unreliable. I suspect the problem is with the OAuth JavaScript implementation, GWT's interpretation of it, or that OAuth isn't as mature as it appears to be. I'd like to think one of the first two causes the problem.

To make it easier to create a robust example of GWT and OAuth, I created a gwt-oauth project you can download or view online. Please keep in mind the demo is likely to be flakey. If you're persistent and try enough times, it's likely to work. Firefox seems to succeed moreso than Safari or Chrome. If you have any suggestions for improving this example, please let me know.

Posted in Java at Jun 18 2009, 01:59:13 PM MDT 13 Comments

Enhancing Evite.com with GWT and Grails

Evite.com On my LinkedIn Profile, it says my current gig is a SOFEA consultant at a stealth-mode startup.

SOFEA Consultant, Stealth Mode Startup, Los Angeles, CA. December 2008 -- Present.

OK, I lied. It's not a startup, it's a well-known company that helps you plan parties. For the last 5+ months, my UI team from LinkedIn has been working with Evite.com to enhance portions of their site with a SOFEA architecture.

In January, we started evaluating Ajax Frameworks and came to the conclusion that GWT was right for us. After we chose the UI framework, other team members chose Grails and memcached to develop scalable RESTful services. The architecture we implemented involves using GWT's RequestBuilder to talk to Grails' services, which cache almost all their JSON output in memcached.

To see an example of a feature we developed with GWT, see Evite's Design Gallery. I personally worked on this feature and very much enjoyed becoming a GWT aficionado in the process. GWT's zero-turnaround feature made doing pure client-side work a lot of fun. It's definitely something I'd like to continuing doing at my next gig.

Everyone from Evite is very happy with what we've been able to do with GWT and Grails. We have a stateless architecture and are quickly able to develop both client-side and server-side features. We've learned to scale the client by using out-of-the-box GWT components. We've scaled Grails by caching as much as possible. We serve up Ads and Analytics using the same JavaScript mechanisms that traditional server-side frameworks use.

At the end of this month, my gig with Evite comes to an end. I'll be spending a few weeks at my family's cabin in Montana and then it's on to the next big thing. What's the next big thing? I'm not sure yet, hence the reason for writing this. If you're looking to develop a GWT application, introduce a SOFEA architecture at your company, or simply adopt some open source frameworks, I'd love to help out. Drop me a line and let's start a conversation.

Posted in Java at Jun 15 2009, 07:41:37 AM MDT 9 Comments

Creating a Facebook-style Autocomplete with GWT

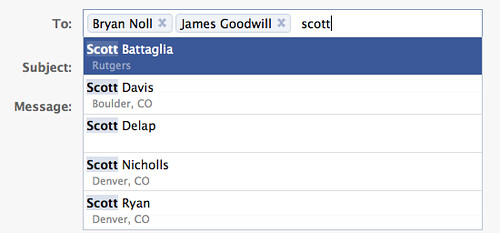
Have you used the "To:" widget on on Facebook or LinkedIn when composing a message? It's an autocompleter that looks up contact names and displays them as you type. It looks like a normal textbox (a.k.a. <input type="text">), but wraps the contact name to allow you to easily delete it. Here's a screenshot of what Facebook's widget looks like.

Facebook Autocomplete

Last week, I was asked to create a similar widget with GWT. After searching the web and not finding much, I decided to try writing my own. The best example I found on how to create this widget was from James Smith's Tokenizing Autocomplete jQuery Plugin. I used its demo to help me learn how the DOM changed after you selected a contact.

GWT's SelectBox allows you to easily create an autocompleter. However, it doesn't have support for multiple values (for example, a comma-delimited list). The good news is it's not difficult to add this functionality using Viktor Zaprudnev's HowTo. Another feature you might want in a SelectBox is to populate it with POJOs. GWT SuggestBox backed by DTO Model is a good blog post that shows how to do this.

Back to the Facebook Autocompleter. To demonstrate how to create this widget in GWT, I put together a simple application. You can view the demo or download it. The meat of this example is in an InputListWidget. After looking at the jQuery example, I learned the widget was a <div> with a unordered list (<ul>). It starts out looking like this:

<ul class="token-input-list-facebook">
    <li class="token-input-input-token-facebook">
        <input type="text" style="outline-color: -moz-use-text-color; outline-style: none; outline-width: medium;"/>
    </li>
</ul>

I did this in GWT using custom BulletList and ListItem widgets (contained in the download).

final BulletList list = new BulletList();
list.setStyleName("token-input-list-facebook");

final ListItem item = new ListItem();
item.setStyleName("token-input-input-token-facebook");

final TextBox itemBox = new TextBox();
itemBox.getElement().setAttribute("style", 
        "outline-color: -moz-use-text-color; outline-style: none; outline-width: medium;");

final SuggestBox box = new SuggestBox(getSuggestions(), itemBox);
box.getElement().setId("suggestion_box");

item.add(box);
list.add(item);

After tabbing off the input, I noticed that it was removed and replaced with a <p> around the value and a <span> to show the "x" to delete it. After adding a couple items, the HTML is as follows:

<ul class="token-input-list-facebook">
    <li class="token-input-token-facebook">
        <p>What's New Scooby-Doo?</p>
        <span class="token-input-delete-token-facebook">x</span>
    </li>
    <li class="token-input-token-facebook">
        <p>Fear Factor</p>
        <span class="token-input-delete-token-facebook">x</span>
     </li>
     <li class="token-input-input-token-facebook">
         <input type="text" style="outline-color: -moz-use-text-color; outline-style: none; outline-width: medium;"/>
     </li>
</ul>

To do this, I created a deselectItem() method that triggers the DOM transformation.

private void deselectItem(final TextBox itemBox, final BulletList list) {
    if (itemBox.getValue() != null && !"".equals(itemBox.getValue().trim())) {
        /** Change to the following structure:
         * <li class="token-input-token-facebook">
         * <p>What's New Scooby-Doo?</p>
         * <span class="token-input-delete-token-facebook">x</span>
         * </li>
         */

        final ListItem displayItem = new ListItem();
        displayItem.setStyleName("token-input-token-facebook");
        Paragraph p = new Paragraph(itemBox.getValue());

        displayItem.addClickHandler(new ClickHandler() {
            public void onClick(ClickEvent clickEvent) {
                displayItem.addStyleName("token-input-selected-token-facebook");
            }
        });

        Span span = new Span("x");
        span.addClickHandler(new ClickHandler() {
            public void onClick(ClickEvent clickEvent) {
                list.remove(displayItem);
            }
        });

        displayItem.add(p);
        displayItem.add(span);
        
        list.insert(displayItem, list.getWidgetCount() - 1);
        itemBox.setValue("");
        itemBox.setFocus(true);
    }
}

This method is called after selecting a new item from the SuggestBox:

box.addSelectionHandler(new SelectionHandler<SuggestOracle.Suggestion>() {
    public void onSelection(SelectionEvent selectionEvent) {
        deselectItem(itemBox, list);
    }
});

I also added the ability for you to type in an e-mail address manually and to delete the previous item when you backspace from the input field. Here's the handler that calls deselectItem() and allows deleting with backspace:

// this needs to be on the itemBox rather than box, or backspace will get executed twice
itemBox.addKeyDownHandler(new KeyDownHandler() {
    public void onKeyDown(KeyDownEvent event) {
        if (event.getNativeKeyCode() == KeyCodes.KEY_ENTER) {
            // only allow manual entries with @ signs (assumed email addresses)
            if (itemBox.getValue().contains("@"))
                deselectItem(itemBox, list);
        }
        // handle backspace
        if (event.getNativeKeyCode() == KeyCodes.KEY_BACKSPACE) {
            if ("".equals(itemBox.getValue().trim())) {
                ListItem li = (ListItem) list.getWidget(list.getWidgetCount() - 2);
                Paragraph p = (Paragraph) li.getWidget(0);

                list.remove(li);
                itemBox.setFocus(true);
            }
        }
    }
});

I'm happy with the results, and grateful for the jQuery plugin's CSS. However, it still has one issue that I haven't been able to solve: I'm unable to click on a list item (to select it) and then delete it (with the backspace key). I believe this is because I'm unable to give focus to the list item. Here's the code that highlights the item and you can see the commented-out code that doesn't work.

displayItem.addClickHandler(new ClickHandler() {
    public void onClick(ClickEvent clickEvent) {
        displayItem.addStyleName("token-input-selected-token-facebook");
    }
});

/** TODO: Figure out how to select item and allow deleting with backspace key
displayItem.addKeyDownHandler(new KeyDownHandler() {
    public void onKeyDown(KeyDownEvent event) {
        if (event.getNativeKeyCode() == KeyCodes.KEY_BACKSPACE) {
            list.remove(displayItem);
        }
    }
});
displayItem.addBlurHandler(new BlurHandler() {
    public void onBlur(BlurEvent blurEvent) {
        displayItem.removeStyleName("token-input-selected-token-facebook");
    }
});
*/

If you know of a solution to this issue, please let me know. Feel free to use this widget and improve it as you see fit. I'd love to see this as a native widget in GWT. In the meantime, here's the GWT Facebook-style Autocomplete demo and code.

Posted in Java at Jun 05 2009, 07:05:10 AM MDT 25 Comments

Modularizing GWT Applications with GWT-Maven

Last week, I spent some time modularizing the GWT application I'm working on. By modularizing, I mean splitting the code from one GWT module into a "core" and "webapp" module. The reason for doing this was so the "core" module could be used by another GWT application. Creating GWT Modules is fairly straightforward, but it wasn't as intuitive as expected when using the gwt-maven-plugin.

The hardest part of moving the code was figuring out how to run tests in the new "core" module. After getting it all working, it seems easy enough. Hopefully this post will make it easy for others. Here's the steps I'd recommend:

  1. Convert your GWT project into a multi-module project where you have a top-level pom.xml and two sub-modules (e.g. gwt-core and gwt-webapp).
  2. Do the normal single-to-multi-project Maven stuff like declaring the <parent> element in the modules and moving plugins/dependencies to the top-level pom.xml.
  3. Refactor your gwt-webapp project to push down all shared classes (and their tests) to gwt-core.
  4. In the gwt-core project, include *.xml and *.java in your JAR so GWT can extract/compile the source code when building gwt-webapp.
    <resources>
        <resource>
            <directory>src/main/java</directory>
            <includes>
                <include>**/*.java</include>
                <include>**/*.xml</include>
            </includes>
        </resource>
    </resources>
    
  5. In gwt-core/src/main/java, create a Core.gwt.xml that references the modules you'd like to use in all your applications. For example:
    <module>
        <inherits name="com.google.gwt.user.User"/>
        <inherits name="com.google.gwt.i18n.I18N"/>
        <inherits name="com.extjs.gxt.ui.GXT"/>
        <inherits name="pl.rmalinowski.gwt2swf.GWT2SWF"/>
    </module>
    
  6. Now the tricky part begins, mostly because of how the gwt-maven plugin currently works. In src/test/java, create a NoOpEntryPoint.gwt.xml that inherits your Core module and defines an EntryPoint.
    <module>
        <inherits name="com.company.app.Core"/>
        <entry-point class="com.company.app.NoOpEntryPoint"/>
    </module>
    
  7. Create a NoOpEntryPoint.java class in the same directory as NoOpEntryPoint.gwt.xml.
    public class NoOpEntryPoint implements EntryPoint {
        
        public void onModuleLoad() {
            // do nothing
        }
    }
    
  8. In any class that extends GWTTestCase (I usually create a parent class for all tests), reference the NoOpEntryPoint in the getModuleName() method.
        @Override
        public String getModuleName() {
            return "com.company.app.NoOpEntryPoint";
        }
    
  9. Lastly, in the gwt-maven plugin's configuration (in gwt-core/pom.xml), reference the NoOpEntryPoint in <compileTargets>, a non-existent file in <runTarget> and only the "test" goal in the executions.
    <plugin>
        <groupId>com.totsp.gwt</groupId>
        <artifactId>maven-googlewebtoolkit2-plugin</artifactId>
        <version>2.0-beta26</version>
        <configuration>
            <compileTargets>
                <value>com.company.app.NoOpEntryPoint</value>
            </compileTargets>
            <runTarget>com.company.app.NoOpEntryPoint/doesntexist.html</runTarget>
            <logLevel>INFO</logLevel>
            <style>OBF</style>
            <noServer>false</noServer>
            <extraJvmArgs>-Xmx512m</extraJvmArgs>
            <gwtVersion>${gwtVersion}</gwtVersion>
            <testFilter>*GwtTestSuite.java</testFilter>
            <testSkip>${skipTests}</testSkip>
        </configuration>
        <executions>
            <execution>
                <goals>
                    <goal>test</goal>
                </goals>
            </execution>
        </executions>
    </plugin>
    

The results of modularizing your application are beneficial (shared code) and detrimental (you have to mvn install gwt-core whenever you make changes in shared classes). If you know of a way to configure the gwt-maven plugin to read sources from both gwt-core and gwt-webapp in hosted mode, I'd love to hear about it.

Posted in Java at Mar 23 2009, 10:36:08 AM MDT 11 Comments

Nexus is a kick-ass Repository Manager

I started my current gig at the end of last year. I've been enjoying the work and especially the project infrastructure we've been using. We're using the usual suspects: JIRA, Confluence, Hudson and Subversion. We're also using a couple new ones, namely sventon and Nexus. For building, we're using Maven and Ivy (as a Grails plugin).

Nexus I'm writing this post to talk about Nexus and how much I've enjoyed using it. I like Nexus for two reasons: it's aesthetically pleasing and it's well-documented. Another reason I really dig it is because I haven't had to touch it since I first configured it. Software that just keeps on humming is always fun to work with.

Initially, I remember having some issues setting up repositories. I also remember solving them after learning how groups work.

In addition to on-the-job, I've started to use Nexus more and more in my open source life. With the help of Jason van Zyl, I recently moved AppFuse's repository to Sonatype's oss.sonatype.org. I also noticed there's a Nexus instance for Apache projects. If that's not enough, you can get Nexus Pro free if you're an open source project.

Personally, the open source version of Nexus seems good enough for me. While the Staging Suite looks nice, I think it's possible to do a lot of similar things with good communication. After all, it's not going to free you from having to wrestle with the maven-release-plugin.

Next week, I'm helping to polish and document our entire release process (from dev → qa → production). If you have any advice on how to best perform releases with Maven, Grails and/or Nexus, I'd love to hear about it. My goal is extreme efficiency so releases can be done very quickly and with minimal effort.

Posted in Java at Mar 05 2009, 11:59:02 PM MST 13 Comments

GWTTestSuite makes builds faster, but requires JUnit 4.1

Earlier this week, I spent some time implementing GWTTestSuite to speed up my project's build process. In Hudson, the project was taking around 15 minutes to build, locally it was only taking 5 minutes for mvn test. In IDEA, I could run all the tests in under a minute. While 15 minutes isn't a long time for a build to execute, a co-worker expressed some concern:

Does Maven have to run GWT test and individual Java processes? (See target/gwtTest/*.sh) This arrangement and the overhead of JVM launches is another reason why builds take so long. As we add more GWT tests we are going to test that LinkedIn record for the slowest build ever.

After this comment, I started looking into GWTTestSuite using Olivier Modica's blog entry as a guide. It was very easy to get things working in IDEA. However, when I'd run mvn test, I'd get the following error:

Error: java.lang.ClassCastException

No line numbers. No class information. Zilch. After comparing my project's pom.xml with the one from the default gwt-maven archetype, I noticed the default used JUnit 4.1, while I had the latest-and-supposedly-greatest JUnit 4.4. Reverting to JUnit 4.1 fixed the problem. Now Hudson takes 3:15 to execute the build instead of 15 minutes.

The reason for this blog post is this doesn't seem to be documented anywhere. Hopefully other developers will find this entry when googling for this issue.

Related to making GWT faster, I also added the following line to my Application.gwt.xml file:

<set-property name="user.agent" value="safari" />

This dropped the gwt:compile time from 1 minute to 25 seconds. As explained in the documentation, you can use the "user.agent" setting to only generate one JS file for your app instead of 4. The strange thing about adding this setting was I pretty much forgot about it since everything seemed to work fine on both Safari and Firefox. When I started testing things in IE6, I started seeing a lot of JavaScript errors. After debugging for an hour or so, I realized this setting was there, removed it, and everything started working great in all browsers.

Now if I could just figure out how to use safari-only for development, but remove the line when building the WAR. Suggestions welcome.

Posted in Java at Feb 27 2009, 11:58:12 AM MST 6 Comments

Enhancing your GWT Application with the UrlRewriteFilter

Last week, I spent some time trying to change the location of my cache/nocache HTML files in my GWT project. I started the project with the gwt-maven-plugin's archetype. The message I posted to the gwt-maven Google Group is below.

Rather than having my application's HTML file in src/main/java/com/mycompany/Application.html, I'd like to move it to src/main/webapp/index.html. I tried copying the HTML and adding the following to my index.html, but no dice:

<meta name="gwt:module" content="com.mycompany.Application"/>

Is this possible with the gwt-maven-plugin? I'd like to have my main HTML and CSS at the root of my application.

The good news is I figured out a solution using the UrlRewriteFilter that 1) allows hosted mode to work as usual and 2) allows your app to be served up from the root URL (/ instead of /com.company.Module/Application.html). Here's the urlrewrite.xml that makes it all possible.

<?xml version="1.0" encoding="UTF-8"?>
<!DOCENGINE urlrewrite PUBLIC "-//tuckey.org//DTD UrlRewrite 3.0//EN"
        "http://tuckey.org/res/dtds/urlrewrite3.0.dtd">

<urlrewrite>
    <rule>
        <from>^/$</from>
        <to type="forward" last="true">/com.mycompany.app.Application/Application.html</to>
    </rule>
    <rule>
        <from>/index.html</from>
        <to type="forward" last="true">/com.mycompany.app.Application/Application.html</to>
    </rule>
    <-- This last rule is necessary for JS and CSS files -->
    <rule>
        <from>^/(.*)\.(.*)$</from>
        <to type="forward">/com.mycompany.app.Application/$1.$2</to>
    </rule>
</urlrewrite>

If you're using the gwt-maven plugin, this file goes in src/main/webapp/WEB-INF. In addition, you'll need to add the following to your web.xml.

    <filter>
        <filter-name>rewriteFilter</filter-name>
        <filter-class>org.tuckey.web.filters.urlrewrite.UrlRewriteFilter</filter-class>
    </filter>

    <filter-mapping>
        <filter-name>rewriteFilter</filter-name>
        <url-pattern>/*</url-pattern>
    </filter-mapping>

Finally, add the UrlRewriteFilter dependency in your pom.xml:

    <dependency>
        <groupId>org.tuckey</groupId>
        <artifactId>urlrewritefilter</artifactId>
        <version>3.1.0</version>
    </dependency>

Please let me know if you have any questions.

Update: Jeff posted an alternative configuration that allows you to eliminate the last rule in urlrewrite.xml, as well as use the beloved mvn jetty:run command. To use cleaner WAR packaging and the Jetty plugin, add the following to your pom.xml:

<plugin>
    <groupId>org.apache.maven.plugins</groupId>
    <artifactId>maven-war-plugin</artifactId>
    <configuration>
        <webappDirectory>
            ${project.build.directory}/${project.build.finalName}/com.mycompany.app.Application
        </webappDirectory>
    </configuration>
</plugin>
<plugin>
    <groupId>org.mortbay.jetty</groupId>
    <artifactId>maven-jetty-plugin</artifactId>
    <version>6.1.14</version>
    <configuration>
        <webAppConfig>
            <contextPath>/</contextPath>
            <baseResource implementation="org.mortbay.resource.ResourceCollection">
                <resourcesAsCSV>
                    ${basedir}/src/main/webapp,
                    ${project.build.directory}/${project.build.finalName}/com.mycompany.app.Application
                </resourcesAsCSV>
            </baseResource>
        </webAppConfig>
        <scanIntervalSeconds>3</scanIntervalSeconds>
        <scanTargets>
            <scanTarget>${basedir}/src/main/resources</scanTarget>
            <scanTarget>${basedir}/src/main/webapp/WEB-INF</scanTarget>
            <scanTarget>
                ${project.build.directory}/${project.build.finalName}/com.mycompany.app.Application
            </scanTarget>
        </scanTargets>
    </configuration>
</plugin>

Then you can trim your urlrewrite.xml down to:

<urlrewrite>
    <rule>
        <from>^/$</from>
        <to type="forward" last="true">/Application.html</to>
    </rule>
    <rule>
        <from>/index.html</from>
        <to type="forward" last="true">/Application.html</to>
    </rule>
</urlrewrite>

Of course, you could also change the welcome-file in your web.xml or use index.html and the <meta http-equiv="REFRESH"> option. Personally, I have so much affection for the UrlRewriteFilter that I like having it in my project. I'm sure I'll need it someday.

Thanks Jeff!

Posted in Java at Feb 23 2009, 05:02:29 PM MST 13 Comments

Testing GWT Applications

Last week, I did some research on GWT, how to test it and code coverage options for tests that extend GWTTestCase. The reason I did this is because I've found that most of the GWT tests I write have to extend GWTTestCase and I'd like to have code coverage reports. Read below for more information on my findings for testing GWT classes.

There are quite a few articles about testing GWT applications. Here are a few samples:

The main gist of these articles is that you should structure your code to make the core functionality of your application testable without having to depend on GWTTestCase.

All of them also advocate using an MVC or MVP (Model View Presenter) pattern. Currently, I'm using GXT and its MVC Framework. Unfortunately, GXT's MVC doesn't have much documentation. The good news is there is a good article that explained enough that I was able to refactor my project to use it.

The unfortunate side of this refactoring was I discovered that classes that extend GXT's MVC Framework have to be tested with GWTTestCase. The downside to extending GWTTestCase is there is it's difficult to create code coverage reports.

GWT's issue 799 has some patches that should make code coverage possible. I tried to implement code coverage with Eclipse and EclEmma using this README, but failed. In the process, I discovered an issue with Eclipse 3.4 and JUnit on OS X. Reverting to Eclipse 3.3 solved this problem, but I was still unable to make EclEmma work with GWT.

After failing with Eclipse, I tried to use the emma-maven-plugin. I was also unable to get this to work, with my findings documented in this thread.

Finally, I did have some luck with getting IDEA's built-in code coverage feature working. However, after getting it to work once, it failed to work for the rest of the day and I haven't had success since.

Code Coverage and GWT
Because of these issues with GWT 1.5 and code coverage, I think I'll wait until GWT 1.6 to worry about it. The good news is 1.6 M1 was released last Friday. If continuing to use GWTTestCase becomes an issue, I may write my own MVC Framework that doesn't use classes that call native JavaScript. Hopefully GXT MVC's framework will provide a good example.

In addition to trying to get code coverage working, I used the internets to figure out how run GWT tests inside of Eclipse and IDEA. I don't remember the resources I used, but hopefully this up-to-date documentation will help others. The nice thing about using an IDE to run these tests is they typically execute much faster.

Running GWT Tests in Eclipse
You should be able to run most of your GWT tests from within Eclipse using the following steps.

  1. Right-click on a test that extends GWTTestCase and go to Run As > JUnit Test. It's likely you will see the error message below.
    Invalid launch configuration: -XstartOnFirstThread not specified.
    
    On Mac OS X, GWT requires that the Java virtual machine be invoked with the
    -XstartOnFirstThread VM argument.
    
    Example:
      java -XstartOnFirstThread -cp gwt-dev-mac.jar com.google.gwt.dev.GWTShell
    
  2. To fix this error, go to Run > Open Run Dialog. Click on the Arguments tab and add the following values. The 2nd value is to increase the amount of memory available to the test and avoid an OOM error.
    -XstartOnFirstThread -Xmx512M
  3. When you re-run the test, you will probably see the following error:
    com.google.gwt.junit.JUnitFatalLaunchException: The test class 'org.richresume.client.home.HomeControllerGwtTest' 
    was not found in module 'org.richresume.client.Application'; no compilation unit for that type was seen
      at com.google.gwt.junit.JUnitShell.checkTestClassInCurrentModule(JUnitShell.java:193)
      at com.google.gwt.junit.JUnitShell.runTestImpl(JUnitShell.java:628)
      at com.google.gwt.junit.JUnitShell.runTest(JUnitShell.java:150)
      at com.google.gwt.junit.client.GWTTestCase.runTest(GWTTestCase.java:219)
    
  4. To fix this, open the Run Dialog again, click on the Classpath tab and click on User Entries. Click on the Advanced button and select Add Folders. In the Folder Selection dialog, select your source and test directories (e.g. src/main/java and src/test/java).
  5. Run the test again and you should see a green bar in your JUnit tab.
  6. To create a JUnit configuration that runs all tests, duplicate the previously mentioned run configuration. Then change the name to "All Tests" and select the 2nd radio button to run all tests in the project.
  7. Click Run to execute all the tests in the project.

Running GWT Tests in IDEA
You should be able to run your GWT tests from within IDEA using the following steps.

  1. Right-click on a test that extends GWTTestCase and go to Run "TestNameGwtTes...". It's likely you will see the error message below.
    Invalid launch configuration: -XstartOnFirstThread not specified.
    
    On Mac OS X, GWT requires that the Java virtual machine be invoked with the
    -XstartOnFirstThread VM argument.
    
    Example:
      java -XstartOnFirstThread -cp gwt-dev-mac.jar com.google.gwt.dev.GWTShell
    
  2. If you get a compiler error instead, you may need to add the GWT Facet to your project. To do this, right-click on your project's top-most folder in the left pane. Select Module Settings > Facets and enable GWT for your module.
  3. To fix the -XstartOnFirstThread issue, go to Run > Edit Configurations. Add the following values to the VM Arguments field. The 2nd value is to increase the amount of memory available to the test and avoid an OOM error.
    -XstartOnFirstThread -Xmx512M
    NOTE: If you still get a compiler error, see this page for a possible solution.
  4. Run the test again and you should see a green bar in your Run tab.
  5. To create a JUnit configuration that runs all tests, duplicate the previously mentioned run configuration. Then change the name to "All Tests" and change the Test configuration to search for tests in the whole project.
  6. Run the new configuration to execute all the tests in the project.

Testing GWT applications isn't as straightforward as writing JUnit tests, but I do believe it's getting better. If you have any additional tips and tricks, please let me know.

Posted in Java at Feb 09 2009, 03:27:36 PM MST 6 Comments

Ajax: The State of the Art with Dion and Ben

This morning, I added Dion and Ben's talk titled Ajax: The State of the Art. Below are my notes from the event.

Ajax started out as a bunch of hacks. It showed that we could take our web interfaces and do a lot more with them. A hack isn't necessarily a bad thing. Often, they turn into something much more elegant over time. The new browsers have many amazing capabilities that we haven't taken advantage of yet. We've seen discussions on Ajax go from how to do XHR to frameworks and how rich and mature they are. Dojo is great for Enterprise Development (packing system, namespaces). jQuery is well-suited for lightweight developers (PHP). Prototype is fantastic for people who do a lot of JavaScript development and take it very seriously.

Today's Ajax landscape is mature, really rich, and really exciting. Today, Dion and Ben are going to talk about technologies they're really excited about for the future.

Canvas
The building blocks of the web are text, boxes and images. With canvas, it really makes a lot more things possible. You can do bitmap rendering and image manipulation. They're showing a slide with Doom and Mario Kart running. Canvas 3D does true 3D rendering. Firefox and Opera have done prototypes of this. Can you do canvas-type things today in a browser? Yes, if you use Flash or Curl. Dion and Ben are excited about canvas over plugins for the following reasons:

  • No start-up delay
  • Available on mobile devices today
  • Rendering fidelity with browser (especially important for typography)
  • No bridges necessary (no marshalling/unmarshalling)
  • Not a plug-in

The <canvas> tag originally came from Apple's Dashboard. Dashboard's programming model was in HTML and JavaScript. Dashboard is using WebKit under the covers. Today, canvas support exists in every major browser except for IE. The good news is there are Flash and Silverlight bridges to add support to IE. There's also an ActiveX component that wraps the Firefox implementation and allows it to run in IE.

SVG
Dion and Ben aren't that excited about SVG because it's such a huge spec. We've been struggling with the HTML standard for the last 10 years and the thought of another huge spec for the next 10 years isn't that appealing.

Fast JavaScript
Almost all major browsers have a Fast JavaScript implementation. Chrome has V8, Safari has SquirrelFish Extreme, Firefox has TraceMonkey and Opera has Carakan. This is exciting because of industry trends and how companies are trying to reduce computation cycles in data centers. The more computing that can be put on the client, the better. IE doesn't have anything, but Dion and Ben believe they are working on something.

Web Workers
Interface latency is awful for applications. Jakob Nielsen once said:

0.1 second is about the limit for having the user feel that the system is reacting instantaneously. 1.0 second is about the limit for the user's flow of thought to stay uninterrupted, even though the user will notice the delay.

Anything that takes longer than a tenth of a second should be pushed to a background thread. Unfortunately, there are no threads in the web. Maybe we can add threads to JavaScript? Brendan Eich has said that "Threads suck" and there's very little chance for threads getting into JavaScript. Gears brought Worker Pools and this is going into HTML 5 as Web Workers. You could also use Java applets to do this. With the latest Java Plugin, many of applets' long-standing issues have been solved.

Desktop Integration
The ability to build desktop apps as web apps is very exciting. There's a few technologies that demonstrate this: Fluid, Mozilla Prism, Adobe AIR, Appcelerator Titanium and Gears. The Palm Pre demonstrates the logical extension of this. The Palm Pre uses the web stack as its developer SDK. It's very cool that web developers don't have to learn anything new to become a Palm developer. Desktop integration is exciting especially if we can access desktop applications like email and address book.

The Ajax frameworks that are out there have done a lot to make web development simpler. However, there's still a lot of pain with CSS and cross-browser issues. What if you took canvas and combined it with a sophisticated grid-based layout in JavaScript?

There's a lot of platforms out there: Microsoft Silverlight, Adobe Flash, Apple Cocoa and Sun's JavaFX. The web often isn't considered a platform. Dion and Ben believe there should be an Open Web Platform. The problem right now is there is no central location to find out how to get stuff done. You have to search and find resources from many different locations. Mozilla is putting it's resources into creating an Open Web Platform. This site will consist of 4 different areas:

  • Home
  • Documentation (for different frameworks, browsers, quirks)
  • Dashboard (state of the open web)
  • Roadmap (what's going on)

This is not just Mozilla, it's very much a community effort. This is something that Ben and Dion have been working on. But there's something else they've been working on too. They've been talking about all these cool things, but what about an interesting application to test all these technologies?

Bespin
As they looked at code editors, most of them provide awful user experiences. Bespin is the Editor of Your Dreams and contains the following features:

  • Accessible from anywhere - any device in any location
  • Simple to use, like Textmate (not heavyweight like Eclipse) - an editor, not an IDE
  • Wicked Fast - performance, performance, performance
  • Rock-solid real-time collaboration, like SubEthaEdit - it just works
  • Integrated command-line, like vi - Fun like Quicksilver, social like Ubiquity
  • "Self-hosted" environment, like Emacs - For extreme extensibility, but with JavaScript!
Dion and Ben are showed a screen shot of Bespin and now they're doing a demo. The core editor has what you'd expect with syntax highlighting and line numbers. Canvas doesn't have text-selection by default, so they had to write it from scratch. The command line allows you to get help, run core command and also to subscribe to commands that others write. You can change your keybindings to emacs or vi as well as many other settings. Much of Bespin is event-driven, so you can easily plugin new behavior for different events.

For viewing files, they couldn't bring themselves to use a tree. Instead, they developed a file-browsing interface that looks very much like Apple's Finder. Personally, I like Finder, but wish it had Windows Explorer's path bar that allows you to simply type in the path without mouse clicks. Back to the command line. They've done a lot to make things more discoverable so users can easily find the power of the editor.

Bespin could be used to engage developers more with open source projects. Checking out projects, modifying code and creating patches can be a real pain. Bespin could be used to interface with open source projects in the cloud. You could login, modify code and easily patch/build with the click of a button. One other thing they want to do is to have the server do code-analysis as you're developing.

Is it OK to love a software tool? You must love your software tools. What we do as Software Developers is one of the most difficult jobs on the planet. Programmers, like poets, start with a blank slate and create something from nothing. If you don't love your tools, you'll start resenting what you do. If you don't love your tools, it shows in your work. -- Dave Thomas at RubyConf08

Thunderhead
A GUI Toolkit written with canvas and JavaScript. Allows you to do layouts with very little thought. It's a lab experiment that's in progress, stay tuned for more information.

All users care about is the user interface. Dion and Ben believe there's a key to creating compelling user experiences. It all has to do with managing expectations. It's not that different from how you manage relationships in your life. Expectations for movies and games have changes drastically over the years. What used to be the web (animated gifs and awful web pages) has also changed drastically (video of Apple's online store). What was cool with MapQuest got changed drastically with Google Maps. What we have today isn't the end of the game - expectations will continue to change. However, users have different expectations for software.

Alan Cooper has done some interesting work in this area. The software designer needs to focus in on a user's goals. There are basic things you can apply to all users, for instance "sex sells". An example of this is Delicious Library. This application allows you to keep track of things in your home such as books, movies, music and games. They made $500K in 3 months and made $54K the first day, with no advertising.

The quality of any software is determined by the interaction. If the interaction isn't good, it will poison the entire experience. Donald Norman has a good quote: "Attractive things work better". In society, this is often called "Dress for Success".

The Open Web is hear to stay because it has:

  • An Easy Programming Model
  • Easy Remoting
  • Extensive Customization Vectors (e.g. GreaseMonkey)
  • Easy Deployment
  • Great Widgets
  • Great Visual Effects
  • Great Mobile Story
  • Desktop Integration
  • State-of-the-Art Plug-ins

Bespin is a tech preview that they hope to release next week. Thunderhead will be released at the same time.

Conclusion
This was a great talk and easily the most inspiring of the conference. Dion and Ben always do a great job and the sexiness of their presentation made it all the more appealing.

Posted in The Web at Feb 05 2009, 11:03:10 AM MST 4 Comments