Matt RaibleMatt Raible is a Web Developer and Java Champion. Connect with him on LinkedIn.

The Angular Mini-Book The Angular Mini-Book is a guide to getting started with Angular. You'll learn how to develop a bare-bones application, test it, and deploy it. Then you'll move on to adding Bootstrap, Angular Material, continuous integration, and authentication.

Spring Boot is a popular framework for building REST APIs. You'll learn how to integrate Angular with Spring Boot and use security best practices like HTTPS and a content security policy.

For book updates, follow @angular_book on Twitter.

The JHipster Mini-Book The JHipster Mini-Book is a guide to getting started with hip technologies today: Angular, Bootstrap, and Spring Boot. All of these frameworks are wrapped up in an easy-to-use project called JHipster.

This book shows you how to build an app with JHipster, and guides you through the plethora of tools, techniques and options you can use. Furthermore, it explains the UI and API building blocks so you understand the underpinnings of your great application.

For book updates, follow @jhipster-book on Twitter.

10+ YEARS


Over 10 years ago, I wrote my first blog post. Since then, I've authored books, had kids, traveled the world, found Trish and blogged about it all.
You searched this site for "jQuery". 63 entries found.

You can also try this same search on Google.

Secure JSON Services with Play Scala and SecureSocial

AntwerpTownSquare Last November, I traveled to Antwerp to speak at Devoxx. After my talk on HTML5 with Play Scala, Mattias Karlsson approached me and we had a chat about doing the same talk at Jfokus in Stockholm. I agreed and we began talking details after Trish and I returned to the US.

Jfokus

I wrote this article on a plane between Denver and Seattle and will be hopping over the North Pole to Stockholm via Iceland tonight. For the past couple of weeks, I've been updating my Play More! HTML5/mobile app to add some new features. Most notably, I wanted to upgrade to Play 2.0, create JSON services and add authentication.

Upgrading to Play 2.0
My attempt to upgrade to Play 2.0 involved checking out the source from GitHub, building and installing the RC1 snapshot. As I tried to upgrade my app and started getting failed imports, I turned to the internet (specifically StackOverflow) to see if it was a good idea. The first answer for that question suggested I stay with 1.x.

If it's a critical project, to be finished before next March 2012, I would go with Play 1.x. If it's a less important project, which could be delayed, and that in any case won't be released before March 2012, try Play 2.0.

While I didn't plan on releasing Play More! before Jfokus, I decided upgrading didn't add a whole lot to the talk. Also, I couldn't find a Play Scala 0.9.1 to Play 2.0 upgrade guide and I didn't have enough time to create one. So I decided to stick with Play 1.2.4 and add some JSON services for my iPhone client.

JSON Servers
I found Manuel Bernhardt's Play! Scala and JSON. This led me to Jerkson, built by the now infamous @coda. I was able to easily get things working fairly quickly and wrote the following WorkoutService.scala:

package controllers.api

import play.mvc.Controller
import models._
import com.codahale.jerkson.Json._

object WorkoutService extends Controller {

  def workouts = {
    response.setContentTypeIfNotSet("application/json")
    generate(Workout.find().list())
  }
  def edit(id: Long) = {
    generate(Workout.byIdWithAthleteAndComments(id))
  }

  def create() = {
    var workout = params.get("workout", classOf[Workout])
    Workout.create(workout)
  }

  def save(id: Option[Long]) = {
    var workout = params.get("workout", classOf[Workout])
    Workout.update(workout)
  }

  def delete(id: Long) = {
    Workout.delete("id={id}").on("id" -> id).executeUpdate()
  }
}

Next, I added routes for my new API to conf/routes:

GET     /api/workouts               api.WorkoutService.workouts
GET     /api/workout/{id}           api.WorkoutService.edit
POST    /api/workout                api.WorkoutService.create
PUT     /api/workout/{id}           api.WorkoutService.save
DELETE  /api/workout/{id}           api.WorkoutService.delete

Then I created an ApiTest.scala class that verifies the first method works as expected.

import play.test.FunctionalTest
import play.test.FunctionalTest._
import org.junit._

class ApiTests extends FunctionalTest {
  
    @Test
    def testGetWorkouts() {
        var response = GET("/api/workouts");
        assertStatus(200, response);
        assertContentType("application/json", response)
        println(response.out)
    }
}

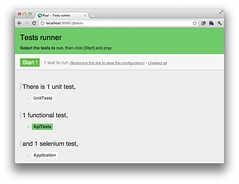
I ran "play test", opened my browser to http://localhost:9000/@tests and clicked ApiTests -> Start to verify it worked. All the green made me happy.

Play More API Tests

Finally, I wrote some CoffeeScript and jQuery to allow users to delete workouts and make sure delete functionality worked.

$('#delete').click ->
  $.ajax
    type: 'POST'
    url: $(this).attr('rel')
    error: ->
      alert('Delete failed, please try again.')
    success: (data) ->
      location.href = "/more"

I was very impressed with how easy Play made it to create JSON services and I smiled as my CoffeeScript skills got a refresher.

The Friday before we left for Devoxx, I saw the module registration request for SecureSocial.

SecureSocial with Play Scala
From SecureSocial's README:

SecureSocial allows you to add an authentication UI to your app that works with services based on OAuth1, OAuth2, OpenID and OpenID+OAuth hybrid protocols.

It also provides a Username and Password mechanism for users that do not wish to use existing accounts in other networks.

The following services are supported in this release:

  • Twitter (OAuth1)
  • Facebook (OAuth2)
  • Google (OpenID + OAuth Hybrid)
  • Yahoo (OpenID + OAuth Hybrid)
  • LinkedIn (OAuth1)
  • Foursquare (OAuth2)
  • MyOpenID (OpenID)
  • Wordpress (OpenID)
  • Username and Password

In other words, it sounded like a dream come true and I resolved to try it once I found the time. That time found me last Monday evening and I sent a direct message to @jaliss (the module's author) via Twitter.

Does Secure Social work with Play Scala? I'd like to use it in my Play More! project.

Jorge responded 16 minutes later saying that he hadn't used Play Scala and he'd need to do some research. At 8 o'clock that night (1.5 hours after my original DM), Jorge had a sample working and emailed it to me. 10 minutes later I was adding a Secure trait to my project.

package controllers

import play.mvc._
import controllers.securesocial.SecureSocial

/*
 * @author Jorge Aliss <[email protected]> of Secure Social fame.
 */
trait Secure {
  self: Controller =>

  @Before def checkAccess() {
    SecureSocial.DeadboltHelper.beforeRoleCheck()
  }

  def currentUser = {
    SecureSocial.getCurrentUser
  }
}

I configured Twitter and Username + Password as my providers by adding the following to conf/application.conf.

securesocial.providers=twitter,userpass

I also had to configure a number of securesocial.twitter.* properties. Next, I made sure my routes were aware of SecureSocial by adding the following to the top of conf/routes:

  *       /auth               module:securesocial

Then I specified it as a dependency in conf/dependencies.yml and ran "play deps".

    - play -> securesocial 0.2.4

After adding "with Secure" to my Profile.scala controller, I tried to access its route and was prompted to login. Right off the bat, I was shown an error about a missing jQuery 1.5.2 file in my "javascripts" folder, so I added it and rejoiced when I was presented with a login screen. I had to add the app on Twitter to use its OAuth servers, but I was pumped when both username/password authentication worked (complete with signup!) as well as Twitter.

The only issue I ran into with SecureSocial was that it didn't find the default implementation of SecureSocial's UserService.Service when running in prod mode. I was able to workaround this by adding a SecureService.scala implementation to my project and coding it to talk to my Athlete model. I didn't bother to hook in creating a new user when they logged in from Twitter, but that's something I'll want to do in the future. I was also pleased to find out customizing SecureSocial's views was a breeze. I simply copied them from the module into my app's views and voila!

package services

import play.db.anorm.NotAssigned
import play.libs.Codec
import collection.mutable.{SynchronizedMap, HashMap}
import models.Athlete
import securesocial.provider.{ProviderType, UserService, SocialUser, UserId}

class SecureService extends UserService.Service {
  val activations = new HashMap[String, SocialUser] with SynchronizedMap[String, SocialUser]

  def find(userId: UserId): SocialUser = {
    val user = Athlete.find("email={email}").on("email" -> userId.id).first()

    user match {
      case Some(user) => {
        val socialUser = new SocialUser
        socialUser.id = userId
        socialUser.displayName = user.firstName
        socialUser.email = user.email
        socialUser.isEmailVerified = true
        socialUser.password = user.password
        socialUser
      }
      case None => {
        if (!userId.provider.eq(ProviderType.userpass)) {
          var socialUser = new SocialUser
          socialUser.id = userId
          socialUser
        } else {
          null
        }
      }
    }
  }

  def save(user: SocialUser) {
    if (find(user.id) == null) {
      val firstName = user.displayName
      val lastName = user.displayName
      Athlete.create(Athlete(NotAssigned, user.email, user.password, firstName, lastName))
    }
  }

  def createActivation(user: SocialUser): String = {
    val uuid: String = Codec.UUID()
    activations.put(uuid, user)
    uuid
  }

  def activate(uuid: String): Boolean = {
    val user: SocialUser = activations.get(uuid).asInstanceOf[SocialUser]
    var result = false

    if (user != null) {
      user.isEmailVerified = true
      save(user)
      activations.remove(uuid)
      result = true
    }

    result
  }

  def deletePendingActivations() {
    activations.clear()
  }
}

Jorge was a great help in getting my authentication needs met and he even wrote a BasicAuth.scala trait to implement Basic Authentication on my JSON services.

package controllers

import _root_.securesocial.provider.{UserService, ProviderType, UserId}
import play._
import play.mvc._
import play.libs.Crypto

import controllers.securesocial.SecureSocial

/*
 * @author Jorge Aliss <[email protected]> of Secure Social fame.
 */
trait BasicAuth {
  self: Controller =>

  @Before def checkAccess = {
    if (currentUser != null) {
      // this allows SecureSocial.getCurrentUser() to work.
      renderArgs.put("user", currentUser)
      Continue
    }

    val realm =
      Play.configuration.getProperty("securesocial.basicAuth.realm", "Unauthorized")

    if (request.user == null || request.password == null) {
      Unauthorized(realm)
    } else {
      val userId = new UserId
      userId.id = request.user
      userId.provider = ProviderType.userpass
      val user = UserService.find(userId)

      if (user == null ||
        !Crypto.passwordHash(request.password).equals(user.password)) {
        Unauthorized(realm)
      } else {
        // this allows SecureSocial.getCurrentUser() to work.
        renderArgs.put("user", user)
        Continue
      }
    }
  }

  def currentUser = {
    SecureSocial.getCurrentUser()
  }
}

Summary
My latest pass at developing with Scala and leveraging Play to build my app was a lot of fun. While there were issues with class reloading every-so-often and Scala versions with Scalate, I was able to add the features I wanted. I wasn't able to upgrade to Play 2.0, but I didn't try that hard and figured it's best to wait until its upgrade guide has been published.

I'm excited to describe my latest experience to the developers at Jfokus this week. In addition, the conference has talks on Play 2.0, CoffeeScript, HTML5, Scala and Scalate. I hope to attend many of these and learn some new tricks to improve my skills and my app.

Update: The Delving developers have written an article on Migration to Play 2. While it doesn't provide specific details on what they needed to change, it does have good information on how long it took and things to watch for.
Posted in Java at Feb 12 2012, 04:02:43 PM MST 4 Comments

Twitter's Open Source Summit: Bootstrap 2.0 Edition

Every few months, Twitter hosts an Open Source Summit to talk about tools they're using. Since I happened to be near San Fransisco, I happily attended their latest #ossummit to learn about Bootstrap 2.0. Below are my notes from last night's event.

95% of Twitter's infrastructure is powered by open source. They hope to contributing back to open source by doing 2-3 summits per year. Without open source, there would be no Twitter. You can find a bunch of Twitter's open source contributions at twitter.github.com. They're also big fans of Apache and commit to a wide variety of projects there.

Bootstrap
Bootstrap is developed by two main guys: @mdo and @fat. Mark (@mdo) has been a designer at Twitter for 2 years. He started on the Revenue Team with ads, but has been working on redesign for last 4 months. Has been doing HTML and CSS for about 11 years. He used Notepad on Windows to build his GeoCities site.

boot·strap: simple and flexible HTML, CSS, and JavaScript for popular user interface components and interactions.

Work on Bootstrap started about a 1.5 years ago. Internal tools didn't get the proper attention they needed. They figured out there was a lot of people that wanted good looking UIs and interactions. It became Twitter Blueprint and was mostly used internally. Jacob (@fat) started shortly after first release and decided to add some JavaScript on top of it. The JavaScript for Bootstrap was originally the "Twitter Internal Toolkit" or "TIT" and was built on Moo Tools. Jacob was like "we gotta open source this, it's gonna be huge!" (he was right).

The 1.0 release supported Chrome, Safari and Firefox (everyone at Twitter was on Macs). 1.3 added cross-browser support and JavaScript plugins.

Now there's Bootstrap 2 (just released!). They rewrote all the documentation and components and removed legacy code.

So, what's new? The biggest thing is the docs. Previously had live examples, now shows live examples and why you would do something, as well as additional options. The "topbar" has been renamed to "navbar", but it's still got all the hotness. It's responsive with CSS media queries for small devices, tablets, small desktops and large desktops. This means the layout breaks at certain points and stacks elements to fit on smaller screens.

CSS: smarter defaults, better classes. In 1.4, all forms were stacked. Now they can flow horizontally. Tables are now namespaced so Bootstrap's styles don't apply to all tables. The available table, form and navigation classes are as follows:

// Tables
.table { ... }
.table-striped { ... }
.table-bordered { ... }
.table-condensed { ... }

// Forms
.form-inline { ... }
.form-search { ... }
.form-horizontal { ... }

// Nav
.nav { ... }
.nav-tabs { ... }
.nav-pills { ... }

The goals with 2.0 are consistency, simplification and future-proofing styles. With 1.4, buttons used "btn primary" and it caused problems if you wanted to have a "primary" class in your project. With 2.0, buttons and all elements are namespaced to avoid collisions (now it's .btn-primary).

After Mark finished talking about the design of Bootstrap, Jacob (@fat) started talking about Bootstrap's JavaScript. Jacob works on The Platform Team at Twitter and claims he made a lot of mistakes with 1.x. However, thanks to semantic versioning, 2.0 is a new version and he got to start over!

The biggest change in 2.0 is the use of data attributes (a.k.a. data-*). They were using them in 1.x, but not to the full potential of what they can be and should be. The first class API for Bootstrap JavaScript is data attributes (or HTML), not JavaScript.

With 1.x, you could add an anchor to close modals and alerts.

// 1.x closing modal/alerts
<a class="close" href="#">×</a>

However, if you put your alerts in your modals, you close them all when you likely only wanted to close one. 2.0 uses a "data-dismiss" attribute.

<a class="close" data-dismiss="model">×</a>

This allows you to target what you want closed (modals or alerts, etc.). You know exactly what's going to happen just by reading the code. Another example is the "href" attribute of an anchor. Rather than using "href", you can now use "data-target".

// 1.x href = target
<a href="#myModal" data-toggle="modal">Launch</a>

// 2.x data-target = target
<a data-target=".fat" data-toggle="modal">Launch</a>

If you'd rather turn off the data attribute API, or just part of it, you can do so by using the following:

// Turn off all data-api
$('body').off('.data-api')

// Turn off alert data-api
$('body).off('.alert.data-api')

2.0's JavaScript API has the same stuff, but better. You can turn off the data-api and do everything with JavaScript. They copied jQuery UI in a lot of ways (defaults, constructors, etc.). Bootstrap's JavaScript has 12 plugins. New ones include collapse, carousel and typeahead.

Customize - a new tab that lets you customize and download Bootstrap. It's basically an alternative to customizing .less files and allows you to choose components, select jQuery plugins, customize variables (colors, font-sizes, backgrounds) and download.

What does the future hold? Internationalization, improving responsiveness, more new features and bug fixes.

After both Mark and Jacob gave their talks, they talked together about Community and how great it's been. Even if you're not into writing CSS and JavaScript, they mentioned they still wanted to hear from you. To give an example of great community contributions, one guy opened 50 issues in the last 2 days.

Someone in the audience asked why they used LESS over SASS. Jacob said the main reason they use LESS is because they're good friends with the guy who invented it (Alexis). SASS turns CSS into a programming language, but they wanted to maintain the approachability of CSS, which LESS does. There's no plans to do an official SASS port, but there is talk of doing one. One advantage of the current LESS compiler is they rewrote it to have better output so it's far more readable.

NASA
After Mark and Jacob finished, there was a 5 minute break to grab beers and snacks. Then Sean Herron (@seanherron) (a.k.a. "NASA Bro") talked about Bootstrap at NASA. He actually didn't talk about Bootstrap much, except that they used it for code.NASA. He talked about NASA and how it's playing a key role in the movement towards open data, open source and open standards in our federal government. He mentioned how data.NASA was launched last August and that they helped develop OpenStack. Finally, he mentioned open.NASA, which is a collaborative approach to open, direct and transparent communication about our space program.

Hogan.js
Next up, Rob Sayre (@sayrer) talked about Hogan.js. Rob has been at Twitter for a few months, before that he wrote JavaScript at other places. Hogan.js is a compiler for Mustache templates.

Why Mustache? Because it's similar to HTML and easy to edit. You can mock data as JSON files and programmers are not required.

At Twitter, designers can do the CSS and Mustache without connecting to the backend. It has cross-language support in Ruby, Java and JavaScript. However, client-side template compilation has performance problems, especially in IE7 on a Windows XP box with 4 viruses.

So they had a few choices: work on mustache.js, or use Dust.js or Handlebars.js. The compilers are very nice for Dust.js and Handlebars.js, but they're huge. Handlebar's parser is 4000 lines. The entire Hogan.js file is 500 lines. They decided they were too large to send to the browser's of their users, so they chose to write a better compiler for Mustache.

Hogan.js's main features:

  • Compile on the server
  • Parser API
  • Performance

Performance is much better with Hogan.js than Mustache.js. On IE7 - Hogan is 5x faster than Mustache. On an iPhone, it's about the same (and an iPhone's browser is faster than IE7 on a decent computer). With modern browsers (Chrome 17, Safari 5 and Firefox 10), it's more than 10x faster.

Hogan.js is currently used at Twitter for Tweet embedding, the Bootstrap build process and soon, Twitter.com.

It's been awhile since I got excited about an open source project. Bootstrap has helped me a lot recently, in my Play More! mobile app, on some client projects and I'm in the process of refreshing AppFuse's UI to use it. I love how you can add a class or two to an element and all of a sudden they pop with good looks. The main problem with Bootstrap at this point is that a lot of Bootstrapped apps look the same. There's talk of adding themes in a future release to help alleviate this problem. In the meantime, there's a lot to get excited about with 2.0.

Thanks to Twitter for hosting this event and kudos to Mark and Jacob (and the community!) for such a fantastic project.

Posted in The Web at Feb 01 2012, 11:28:40 AM MST Add a Comment

Refreshing AppFuse's UI with Twitter Bootstrap

The last time AppFuse had an update done to its look and feel was in way back in 2006. I've done a lot of consulting since then, which has included a fair bit of page speed optimization, HTML5 development and integrating smarter CSS. It was way back in '05 when we first started looking at adding a CSS Framework to AppFuse. It was Mike Stenhouse's CSS Framework that provided the inspiration and my CSS Framework Design Contest that provided its current themes (puzzlewithstyle, andreas01 and simplicity).

Since then, a lot of CSS Frameworks have been invented, including Blueprint in 2007 and Compass in 2008. However, neither has taken the world by storm like Twitter Bootstrap. From Building Twitter Bootstrap:

A year-and-a-half ago, a small group of Twitter employees set out to improve our team’s internal analytical and administrative tools. After some early meetings around this one product, we set out with a higher ambition to create a toolkit for anyone to use within Twitter, and beyond. Thus, we set out to build a system that would help folks like us build new projects on top of it, and Bootstrap was conceived.
...
Today, it has grown to include dozens of components and has become the most popular project on GitHub with more than 13,000 watchers and 2,000 forks.

The fact that Bootstrap has become the most popular project on GitHub says a lot. For AppFuse.next, I'd like to integrate a lot of my learnings over the past few years, as well as support HTML5 and modern browsers as best we can. This means page speed optimizations, getting rid of Prototype and Scriptaculous in favor of jQuery, adding wro4j for resource optimization and integrating HTML5 Boilerplate. I've used Twitter Bootstrap for my Play More! app, as well as some recent client projects. Its excellent documentation has made it easy to use and I love the way you can simply add classes to elements to make them transform into something beautiful.

Last week, I spent a couple late nights integrating Twitter Bootstrap 2.0 into the Struts 2 and Spring MVC versions of AppFuse. The layout was pretty straightforward thanks to Scaffolding. Creating the Struts Menu Velocity template to produce dropdowns wasn't too difficult. I added class="table table-condensed" to the list screen tables, class="well form-horizontal" to forms and class="btn primary" to buttons.

I also added validation errors with the "help-inline" class. This is also where things got tricky with Struts and Spring MVC. For the form elements in Bootstrap, they recommend you use a "control-group" element that contains your label and a "controls" element. The control contains the input/select/textarea and also the error message if there is one. Here's a sample element waiting for data:

<div class="control-group">
    <label for="name" class="control-label">Name</label>
    <div class="controls">
        <input type="text" id="name" name="name">
    </div>
</div>

Below is what that element should look like to display a validation error:

<div class="control-group error">
    <label for="name" class="control-label">Name</label>
    <div class="controls">
        <input type="text" id="name" name="name" value="">
        <span class="help-inline">Please enter your name.</span>
    </div>
</div>

You can see this markup is pretty easy, you just need to add an "error" class to control-group and span to show the error message. With Struts 2, this was pretty easy thanks to its customizable templates for its tags. All I had to do was create a "template/css_xhtml" directory in src/main/webapp and modify checkbox.ftl, controlfooter.ftl, controlheader-core.ftl and controlheader.ftl to match Bootstrap's conventions.

Spring MVC was a bit trickier. Since its tags don't have the concept of writing an entire control (label and field), I had to do a bit of finagling to get things to work. In the current implementation, Struts 2 forms have a single line for a control-group and its control-label and controls.

<s:textfield key="user.firstName" required="true"/>

With Spring MVC, it's a bit more complex:

<spring:bind path="user.firstName">
<fieldset class="control-group${(not empty status.errorMessage) ? ' error' : ''}">
</spring:bind>
    <appfuse:label styleClass="control-label" key="user.firstName"/>
    <div class="controls">
        <form:input path="firstName" id="firstName" maxlength="50"/>
        <form:errors path="firstName" cssClass="help-inline"/>
    </div>
</fieldset>

You could probably overcome this verbosity with Tag Files.

Figuring out if a control-group needed an error class before the input tag was rendered was probably the hardest part of this exercise. This was mostly due to Bootstrap's great documentation and useful examples (viewed by inspecting the markup). Below are some screenshots of the old screens and new ones.

Old UI - Login Old UI - Users Old UI - Edit Profile

New UI - Login New UI - Users New UI - Edit Profile

Check out the full set on Flickr if you'd like a closer look.

Even though I like the look of the old UI, I can't help but think a lot of the themes are designed for blogs and content sites, not webapps. The old Wufoo forms were a lot better looking though. And if you're going to develop kick-ass webapps, you need to make them look good. Bootstrap goes a long way in doing this, but it certainly doesn't replace a good UX Designer. Bootstap simply helps you get into HTML5-land, start using CSS3 and it takes the pain out of making things work cross-browser. Its fluid layouts and responsive web design seems to work great for business applications, which I'm guessing AppFuse is used for the most.

I can't thank the Bootstrap developers enough for helping me make this all look good. With Bootstrap 2 dropping this week, I can see myself using this more and more on projects. In the near future, I'll be helping integrate Bootstrap into AppFuse's Tapestry 5 and JSF versions.

What do you think of this CSS change? Do you change your CSS and layout a fair bit when starting with AppFuse archetypes? What can we do to make AppFuse apps look better out-of-the-box?

Update: I updated AppFuse to the final Bootstrap 2.0 release. Also, Johannes Geppert wrote a Struts 2 Bootstrap Plugin. I hope to integrate this into AppFuse in the near future.

Posted in Java at Jan 31 2012, 05:12:17 PM MST 10 Comments

2011 - A Year in Review

2010 was an awesome year, but 2011 rocked the house! At the end of last year, I kept my goals simple:

In 2011, I plan on doing two main things: keep rockin' it with Trish and finishing The Bus. Everything else is gravy.

As predicted, it was a spectacular year, but I only accomplished 50% of my goals. That is, Trish and I had a great time skiing (especially in Utah), moving in together, traveling the world and getting engaged in Versailles. I even satisfied some 5-year goals: building a sauna in my basement and getting a ski shack in the mountains.

However, I didn't get much done with The Bus. Or rather, the guys at MotorWorks Restorations didn't drain me for all I'm worth in 2011. We did make good progress with estimating the final cost and obtaining many hard-to-find parts though. I now have a Porsche 911 Engine (1983 3.0L 6 cylinder), a Porsche 901 5 speed transmission, Porsche "Turbo Twist" wheels and a Custom Air Ride Front Beam from Franklin's VW Works. The thing that slowed our progress the most was the custom beam, as it took almost 6 months from order to delivery. When it arrived in September, I decided to put things on hold. I didn't want to get my bus back in the midst of winter and not be able to drive it.

[Read More]

Posted in Roller at Jan 11 2012, 09:45:20 AM MST 2 Comments

What have I been working on at Taleo?

2011 has been a year of great clients for me. I started working with O.co and very much enjoyed my time there, especially on powder days in Utah. The people were great, the contract was great (no end date), but the work was not my forte. I was on a project to modularize the main shopping site's codebase, which involved mostly refactoring. By refactoring, I mean creating new Maven projects, modifying lots of pom.xml files and literally moving files from one directory to another. IntelliJ made this easy, the hard part was refactoring tests, moving from EasyMock to Mockito and splitting classes into interfaces and implementations where appropriate. As a developer who likes developing UIs and visually seeing my accomplishments, the project wasn't that exciting. However, I knew that it was strategically important to O.co, so I didn't complain much.

In mid-May, I received a LinkedIn message from the Director of Software Engineering at Taleo.

This is OB, I am the Director of Software Engineering at Taleo. We are the 2nd largest Software as a Service company. I am building a new specialist UI team that will take the product to the next level. I am looking for someone to lead this initiative. If you are interested to have a chat about it, please let me know.

At that time, I'd never heard of Taleo and quickly recommended they not hire me.

This probably isn't the best position for me. While I am a good leader, I'm not willing to relocate from Denver. I've found that leaders usually do best when face-to-face with their developers.

This conversation continued back-and-forth where I explained how I wasn't willing to go full-time and I didn't want to leave Overstock. In the end, OB was persistent and explained how the position would entail lots of UI work and wouldn't require me to travel much. Our negotiations trailed off in June and resumed in July after I returned from vacation in Montana. Shortly after, we met each other's expectations, agreed on a start date and I started working at Taleo in early September.

When I started, there were three features they wanted to add to to Taleo Business Edition: Profile Pictures, Talent Cards and Org Charts. They knew the schedule was tight (8 weeks), but I was confident I could make it happen. At first, I groaned at the fact that they were using Ant to build the project. Then I smiled when I learned they'd standardized on IntelliJ and set things up so you could do everything from the IDE. After using Maven for many years, this setup has actually become refreshing and I rarely have to restart or long for something like JRebel. Of course, a new kick-ass laptop and awesome IDE make it so I rarely wait for anything to happen.

To give you a taste of how I implemented each of these new features in 8 weeks, I've broken them into sections below.

Profile Pictures
Adding profile pictures was a pretty simple concept, one you see on my social networking sites today. I needed to give users the ability to upload a JPEG or PNG and crop it so it looked good. The uploading was a pretty straightforward process and I used a lot of internal APIs to grab the file from the request and save it to disk. The more difficult part was scaling the image to certain dimensions on upload (to save space) and allowing users to crop it after.

Most of Taleo Business Edition (TBE) is written in good ol' servlets and JSPs, with lots of scriptlets in their JSPs. When I saw the amount of HTML produced from Java, I laughed out loud and cringed. Soon after, I breathed a sigh of relief when I learned that any new features could be written using FreeMarker templates, which IntelliJ has excellent support for.

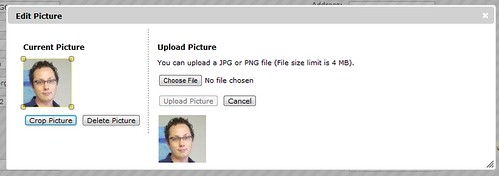
For image resizing on upload, I used Chris Campbell's Image.getScaledInstance() tutorial. For creating thumbnails, I used a combination of scaling, getSubimage() and the Java Image I/O API. I made sure to write to BufferedOutputStream for scalability. For cropping images client-side, I used jQuery UI's Dialog and Jcrop, the jQuery image cropping plugin. Below is a screenshot of what the cropping UI looks like:

Taleo's TBE: Profile Picture

Talent Cards
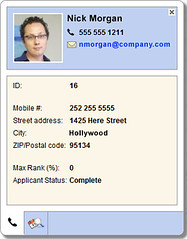
Talent Cards were a whole different beast. Not only did they need to display profile pictures, they also needed to contain contact information, work history and a number of other data points. Not just for employees, but for candidates as well. They also needed to be rendered with tabs at the bottom that allowed you to navigate between different data sections.

Taleo's TBE: Talent Card I'll admit, most of the hard work for this feature was done by the server-side developers (Harish and Vlad) on my team. Vlad built the tabbed interface and Harish built the administrative section that allows you to add/remove/sort fields, as well as show and hide certain tabs. I performed most of my magic with jQuery, its clueTip plugin and good ol' CSS. I was particularly thankful for CSS3 and its border-radius, box-shadow and Justin Maxwell's tutorial on CSS String Truncation with Ellipsis. I used DWR to fetch all the data from the server using Ajax.

Talent Cards are a slick feature in TBE 11.5 and I think they're a great way to see a lot of information about someone very quickly. If you enable them for your company, you'll be able to mouse over any employee or candidate's names and see their information.

Org Chart
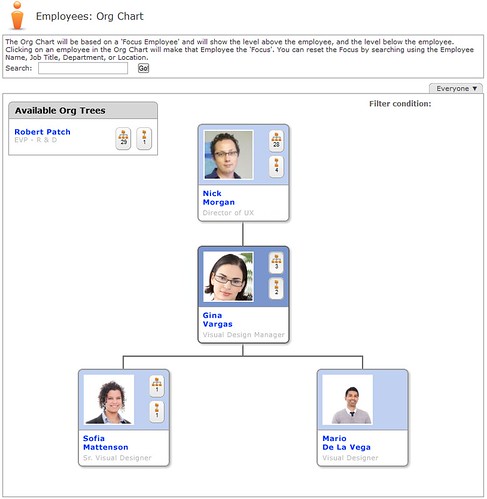
The last feature I completed in this 8-week sprint was creating an organization chart. For this, I was given a rough prototype based on Caprica Software's JQuery/CSS Organisation Chart. When I received it, it had all kinds of cool CSS 3 transformations (like this one), but they only worked in Safari and Chrome. I ended up removing the transformations and adding the ability to navigate up and down the org tree with Ajax (we currently only show three levels at a time).

The Org Chart feature also allows you to see how many direct/indirect reports an employee has, as well as access their Talent Card by hovering over their name. It's one of my favorite features because it's so visual and because it builds upon all the other features we've built.

Taleo's TBE: Org Chart

Summary
As you might've guessed by now, I've been having a lot of fun doing UI development over the last few months. While I seem to have a knack for backend Java development, I enjoy developing UIs a lot more. The smile you see on people's faces during demos is priceless. I can't help but think this kind of thing contributes greatly to my developer happiness. All these features will be in next week's release of TBE and I couldn't be happier.

If you'd like to work on my team at Taleo (or even take over my current role as UI Architect), please drop me a line. If you live near their headquarters (Dublin, CA), it'd also be great to see you at the next Silicon Valley Spring User Group meetup. I'll be speaking about What's New in Spring 3.1 on February 1st.

Posted in Java at Dec 09 2011, 12:57:36 PM MST 1 Comment

Deploying Java and Play Framework Apps to the Cloud with James Ward

Yesterday, I attended James Ward's presentation on Deploying Java & Play Framework Apps to the Cloud at Devoxx. I arrived a bit late, but still managed to get there in time to see a lot of demos and learn more about Heroku. Below are my notes from James's talk.

When I arrived, James was doing a demo using Spring Roo. He was using Roo's Petclinic sample app and showed us how you could use Git to create a local repository of the new project and install Heroku's command line tool. From there, he ran the following command to create a new application on Heroku.

heroku create -s cedar

The Cedar Stack is what supports Java, Scala and Play Framework. It's the 3rd generation stack for Heroku. The command above created two endpoints, one for HTTP and one for Git. It picks from a list of randomly generated names, which all seem to have some humor in them. James ended up with "electric-sword-8877" for this demo.

From there, he ran git push heroku master to deploy the project to Heroku. Unfortunately, this resulted in a login error and there was an akward moment where we all thought the Demo Gods were angry. However, James was able to resolve this by using Heroku's sharing feature with the following command.

heroku sharing:add [email protected]

For Java projects, Heroku looks for a pom.xml file in the root directory and runs a Maven build on project. All the dependencies get downloaded on the cloud rather than put them into a WAR and requiring you to upload a large WAR file. You don't have to upload your source code to Heroku; James did it for the sake of the demo because it was faster.

After the build finishes, it creates a slug file. This file contains everything Heroku needs to run your application.

Next, James showed a demo of the running application and added a new Pet through its UI. Then he scaled it to two servers using the following command:

heroku scale web=2

He proved this was working by running heroku ps, which showed there were two running processes. He showed the app again, but noted that the record he added was missing. This is because when it started up a new dyno, Hibernate created the schema again and deleted all records. To fix, James changed Hibernate to only update the schema instead of create a new one. If you're a Hibernate user, you know this is as simple as changing:

hibernate.hbm2ddl.auto=create

to:

hibernate.hbm2ddl.auto=update

After committing this change, James redeployed using Git.

git push heroku master

The slug file got built again and Heroku deployed the new slug onto both dynos, automatically load balancing the app across two servers. James then ran heroku logs to see the logs of his dynos and prove that a request to his app's HTTP endpoint made requests to both dynos. The logging is powered by Logplex and you can read about how it works in the article Heroku Gets Sweet Logging.

James mentioned that Roo has a Heroku plugin, but after watching his talk and searching a bit on the internet, it seems it's just the jetty-runner setup as described in Getting Started with Spring MVC Hibernate on Heroku/Cedar.

What about autoscaling? There are some 3rd party tools that do this. Heroku's Management infrastructure has APIs that these tools talk too. Heroku hasn't built autoscaling into the platform because they don't know where the bottlenecks are in your application.

Heroku = Polyglot + PaaS + Cloud Components. It supports Ruby, node.js, Java, Clojure, Play and Scala and they're working on native Grails and Gradle support. There's currently 534,374 apps running on Heroku.

Heroku is a cloud application platform and there's 5 different components.

  1. Instant deployment
  2. HTTP Routing / Load Balancing
  3. Elastic Polyglot Runtime
  4. Management & Logging
  5. Component as a Service Ecosystem

For instant deployment, it's a pretty simple process:

  • You add files to a git repo
  • You provision the app on Heroku (heroku create)
  • You upload the files to Heroku (git push heroku master)
  • Heroku runs the build and assembles a "slug" file
  • Heroku starts a "dyno"
  • Heroku copies the "slug" to the "dyno"
  • Heroku starts the web application

Most apps will contain a Procfile that contains information about how to run the web process. For Spring Roo, it has:

web: java $JAVA_OPTS -jar target/dependency/jetty-runner.jar --port $PORT target/*.war

So how does Heroku decide what application server to use? It doesn't, you do. You need to get your application server into the slug file. The easiest way to do this is to specify your application server as a dependency in your pom.xml. In the Roo example, James uses the maven-dependency-plugin to get the jetty-runner dependency and copy it to the target directory. On Heroku, you bring your application server with you.

Heroku gives you 750 free dyno hours per app, per month. For developers, it's very easy to get started and use. Once you extend past one dyno, it's $.05 per dyno hour, which works out to around $30/month. It's only when you want to scale beyond one dyno where you get charged by Heroku, no matter how much data you transfer. Scalatest is running on Heroku. It has one dyno and is doing fine with that. Bill Venners doesn't have to pay anything for it.

java.herokuapp.com is a site James created that allows you to clone example apps and get started quickly with Heroku's Cedar Stack.

For HTTP Routing, Heroku uses an Erlang-based routing system to route all the HTTP requests across your dynos. Heroku doesn't support sticky sessions. Distributed session management does not work well, because it does not scale well. Heroku recommends you use a stateless web architecture or move your state into something like memcached. Jetty has (in the latest version) the ability to automatically serialize your session into a Mongo system. This works fine on Heroku. The problem with this is if you have 2 dynos running, each request can hit a different dyno and get different session state. Hence the recommendation for an external storage mechanism that can synchronize between dynos.

You can also run non-web applications on Heroku. You can have one web process, but as many non-web processes as you want.

Heroku has native support for the Play framework. To detect Play applications, it look for a conf/application.conf file. You don't need to have a Procfile in your root directory because Heroku knows how to start a Play application.

At this point, James created a new Play application, created a new Heroku app (he got "young-night-7104" this time) and pushed it to Heroku. He created a simple model object, a controller to allow adding new data and then wrote some jQuery to show new records via Ajax and JSON. He also showed how to configure the application to talk to Heroku's PostgreSQL database using the DATABASE_URL environment variable. He explained how you can use the heroku config command to see your environment variables.

The reason they use environment variables is so Heroku can update DATABASE_URL (and other variables) without having to call up all their customers and have them change them in their source code.

Play on Heroku supports Scala if you create your app with Scala. Play 2.0 uses Scala, Akka and SBT. Heroku added support for SBT a couple month ago, so everything will work just fine.

Heroku also supports Scala, detecting it by looking for the build.sbt file in the root directory. Heroku supports SBT 0.11.0 and it builds the 'stage' task. It currently does not support Lift because Lift uses an older version of SBT and because it's a very stateful framework that would require sticky sessions. Use Play, BlueEyes or Scalatra if you want Scala on Heroku.

Heroku has addons for adding functionality to your application, including Custom DNS, HTTPS, Amazon RDS, NoSQL and many more. They're also working on making their add-on and management APIs available via Java, so you'll (hopefully) be able to use them from your IDE in the future.

From there, James showed us how Heroku keeps slug files around so you can do rollbacks with heroku rollback. He also showed how you can use:

heroku run "your bash command"
to run any Bash command on the cloud.

Summary
I attended James's talk because he's a good friend, but also because I've been using Heroku to host my latest adventures with Play, Scala, CoffeeScript and Jade. I'm glad I attended because I learned some good tips and tricks and more about how Heroku works.

Heroku seems like a great development tool to me. In my experience, it's been really nice to have instant deployments using Git. In fact, I've created a 'push' alias so I can push to my project's repo and heroku at the same time.

alias push='git push origin master && git push heroku master'

I'd like to see more organizations embrace something like Heroku for developers. It'd be great if everyone had their own sandbox that business owners and product managers could see. I can't help but think this would be awesome for demos, prototyping, etc.

There were some other talks I wanted to attend at the same time, particularly Martin Odersky's What's in store for Scala? and WWW: World Wide Wait? A Performance Comparison of Java Web Frameworks. The WWW talk has posted their presentation but I'm sure it'd be more fun to watch.

It's pretty awesome that all the talks from Devoxx 2011 will be up on Parleys.com soon.

Update: James has posted his slides from this talk.

Posted in Java at Nov 18 2011, 08:14:45 AM MST 2 Comments

PhoneGap for Hybrid App Development

This afternoon, I attended Brian LeRoux's talk on PhoneGap for Hybrid App Development at Devoxx. You might remember that I tried PhoneGap last week and really enjoyed my experience. Below are my notes from Brian's talk.

PhoneGap is a project for creating native applications using HTML, CSS and JavaScript. PhoneGap started out as a hack. In 2007, Apple shipped the iPhone and Steve Jobs told everyone they should develop webapps. PhoneGap started in 2008 as a lofty summertime hack and gained traction as a concept at Nitobi with Android and Blackberry implementations in the fall. In 2009, people started to pay attention when PhoneGap got rejected by Apple. They added Symbian and webOS support and Sony Ericsson started contributing to the project. They got rejected because all PhoneGap-developed apps were named "PhoneGap". This turned out to be good press for the project and Apple let them in shortly after.

In 2010, IBM began tag-teaming with Nitobi and added 5 developers to the project after meeting them at OSCON. In 2011, RIM started contributing as well as Microsoft. Then Adobe bought the company, so they're obviously contributing.

PhoneGaps Goals: the web is a first class platform, so let people create installable web apps. Their second goal is to cease to exist and get browsers to adopt their model.

PhoneGap is NOT a runtime or a compiler/transpiler. It's not an IDE or predefined framework or proprietary lockin. It's Apache, MIT and BSD licensed to guarantee it's as free as free software gets. You can do whatever you want to do with it. PhoneGap has recently been contributed to the Apache Software Foundation.

As far as Adobe vs. PhoneGap is concerned, the Nitobi team remains contributors to PhoneGap. Adobe is a software tools company and has Apache and WebKit contributors. PhoneGap/Build integration will be added to Creative Cloud.

The biggest issues with contributing PhoneGap to Apache is renaming the project and source control. I'm not sure why it needs to be renamed, but it's likely that Apache Callback is out. There seems to be some consensus on Apache Cordova. Apache likes SVN and the PhoneGap community currently uses Git. They're trying to find a medium road there, but would prefer to stay on Git.

The PhoneGap technique is colloquially called "the bridge". It's a 3 step process: they instantiate a WebView, then they call JavaScript from native code, then they call native code from JavaScript. Apparently, all device APIs are available via JavaScript in a WebView.

The primary platforms supported are iOS >= 3, Android >= 1.5 and BlackBerry >= 5.x. They also support webOS, Symbian, Samsung Bada and Windows Phone. No mobile dev platform supports as many deploy targets as PhoneGap. Primary contributors are Adobe, IBM, RIM and Microsoft.

Documentation for PhoneGap is available at http://docs.phonegap.com. Device APIs for PhoneGap 1.0 included sensors, data and outputs, which all devices have. Examples of sensors are geolocation and camera. Data examples are the filesystem, contacts and media. Outputs are screens, speakers and the speaker jack. All PhoneGap APIs are plugins, but any native API is permitted.

What about security? Brian recommends looking at the HTML5 Security Cheatsheet. PhoneGap has added a lot of security measures since they've found the native API pretty much opens up everything.

PhoneGap doesn't bundle a UI framework, but they support any JavaScript framework that works in the browser. PhoneGap is just a fancy browser, so your code run in less fancy web browsers too. This means you can develop and test your app in your desktop browser and only use PhoneGap to package and distribute your app.

Competition? PhoneGap has no competition.

PhoneGap/Build is for compiling your apps in the cloud and free for open source projects. The biggest reason they did this is because they couldn't redistribute all the SDKs and it was a pain for developers to download and install SDKs in training classes.

For mobile app development, you should have a singular goal. Do one thing really well if you want to be successful. Great UX happens iteratively. You know that the web works and has been widely successfully cross-platform. It's likely you've already invested in the web. Start by building a mobile web client and use PhoneGap as a progressive enhancement technique.

Shipping and unit testing should be a daily activity. Automate everything so you can have one-click builds (test/dev/release). For web client design, constraints are your ally in the battle against complexity and "clients who are not chill". Phones suck and consume a lot: cpu, ram, bandwidth, battery, network... everything! Start with a benchmark of app performance and monitor that benchmark. If you have tons and tons of features, consider splitting into multiple apps.

The mobile web is not WebKit! Opera is huge, Firefox is making strides and IE still happens. For layouts: use flex-box rules (anyone got a link to these?), css media queries and meta tags for viewport. You should try to develop your app without frameworks because they come with a ton of code and can effect the size of your app.

Looks can kill: aesthetics that can hurt performance: border-radius, box-shadow and gradients can slow down your apps. Chances are, you really don't need these features. Design your app for your brand, not for the device manufacturer. An app that looks like an iPhone app on Android doesn't give a positive impression.

For JavaScript libraries, start with your problem, not a generic solution like Sencha or jQuery Mobile. Zepto and its older brother XUI are all you need to start. Jo is a fantastic option. Backbone and Spine are worth watching.

For testing, QUnit and Jasmine are pretty popular. For deployment, concat, minify and obfuscate your JavaScript and CSS. Or you can inline everything into the markup to minimize HTTP chatter. Gmail inlines and comments all their JavaScript and then evals it.

From there, Brian recommended leveraging HTML5's AppCache and and using RESTful JSON endpoints for legacy systems. Next, he tried to show us a demo of a photo sharing application. Unfortunately, the Demo Gods were grumpy and Brian couldn't get his computer to recognize his Android phone. He did show us the client code and it's pretty impressive you can use 1 line of code to take a picture on a phone.

The last thing we looked at was debug.phonegap.com. This is an app that's powered by weinre. It lets you enter a line of JavaScript in your client and then remotely debug it in a tool that looks like Chrome's Web Inspector. Very cool stuff if you ask me.

Summary
I really enjoyed learning more about PhoneGap, particularly because Brain emphasized all my web development skills can be used. I don't have to learn Objective-C or Android to develop native apps and I don't even have to install an SDK if I use PhoneGap/Build. Of course, my mobile developer friends might disagree with this approach. In the meantime, I look forward to using PhoneGap to turn my mobile web clients into native apps and finding out if it's really as good as they say it is.

Posted in The Web at Nov 16 2011, 10:22:16 AM MST 2 Comments

Play 2.0, A web framework for a new era

This week, I'm in Antwerp, Belgium for the annual Devoxx conference. After traveling 21 hours door-to-door yesterday, I woke up and came to the conference to attend some talks on Play and PhoneGap. I just got out of the session on Play 2.0, which was presented by Sadek Drobi and Guillaume Bort. Below are my notes from this presentation.

The Play 2.0 beta is out! You can read more about this release on the mailing list. This beta includes native support for both Scala and Java, meaning you can use both in the same project. The release also bundles Akka and SBT by default.

In other news, Play 2.0 is now part of the Typesafe Stack. Typesafe is the Scala company, started by the founder of Scala (Martin Odersky) and the founder of Akka (Jonas Bonér). Guillaume is also joining the Typesafe Advisory Board.

Sadek and Guillaume both work at zenexity, where Play is the secret weapon for the web applications they've built for the last decade. Play was born in the real world. They kept listening to the market to see what they should add to the project. At some point, they realized they couldn't keep adding to the old model and they needed to create something new.

The web has evolved from static pages to dynamic pages (ASP, PHP). From there, we moved to structured web applications with frameworks and MVC. Then the web moved to Ajax and long-polling to more real-time, live features. And this changes everything.

Now we need to adapt our tools. We need to handle tremendous flows of data. Need to improve expressiveness for concurrent code. We need to pick the appropriate datastore for the problem (not only SQL). We need to integrate with rapidly-evolving client side technologies like JavaScript, CoffeeScript, and Dart. We need to use elastic deployment that allows scaling up and scaling down.

zenexity wanted to integrated all of these modern web needs into Play 2.0. But they also wanted to keep Play approachable. They wanted to maintain fast turnaround so you can change your code and hit reload to see the changes. They wanted to keep it as a full stack framework with support for JSON, XML, Web Services, Jobs, etc. And they wanted to continue to use and conventions over configuration.

At this point, Guillaume did a Play 2.0 Beta demo, show us how it uses SBT and has a console so everything so it runs really fast. You can have both Scala and Java files in the same project. Play 2.0 templates are based on Scala, but you don't need to know Scala to use them. You might have to learn how to write a for loop in Scala, but it's just a subset of Scala for templates and views. SBT is used for the build system, but you don't have to learn or know SBT. All the old play commands still work, they're just powered by a different system.

After the demo, Sadek took over and started discussing the key features of Play 2.0.

To handle tremendous amounts of data, you need to do chunking of data and be able to process a stream of data, not just wait until it's finished. Java's InputStream is outdated and too low level. Its read() method reads the next byte of data from the input and this method can block until input data is available.

To solve this, Play includes a reactive programming feature, which they borrowed from Haskell. It uses Iteratee/Enumerator IO and leverages inversion of control (not like dependency injection, but more like not micro-managing). The feature allows you to have control when you need it so you don't have to wait for the input stream to complete. The Enumerator is the component that sends data and the Iteratee is the component that receives data. The Iteratee does incremental processing and can tell the Enumerator when it's done. The Iteratee can also send back a continuation, where it tells the Enumerator it wants more data and how to give it. With this paradigm, you can do a lot of cool stuff without consuming resources and blocking data flow.

Akka is an actor system that is a great model for doing concurrent code. An Actor could be both an Enumerator and an Iteratee. This vastly improves the expressiveness for concurrent code. For example, here's how you'd use Akka in Play:

def search(keyword: String) = Action {
  AsyncResult {
    // do something with result
  }
}

Play does not try to abstract data access because datastores are different now. You don't want to think of everything as objects if you're using something like MongoDB or navigating a Social Graph. Play 2.0 will provide some default modules for the different datastores, but they also expect a lot of contributed modules. Anorm will be the default SQL implementation for Play Scala and Ebean will be the default ORM implementation for Play Java. The reason they've moved away from Hibernate is because they needed something that was more stateless.

On the client side, there's so many technologies (LESS, CoffeeScript, DART, Backbone.js, jQuery, SASS), they didn't want to bundle any because they move too fast. Instead, there's plugins you can add that help you leverage these technologies. There's a lot of richness you can take advantage of on the client side and you need to have the tools for that.

Lastly, there's a new type of deployment: container-less deployment to the cloud. Akka allows you to distribute your jobs across many servers and Heroku is an implementation of elastic deployment that has built-in support for Play.

They've explained what they tried to design and the results of this new, clean architecture have been suprising. Side effects include: type-safety everywhere for rock-solid applications. There's an awesome performance boost from Scala. There's easier integration with existing projects via SBT. And it only takes 10 lines of code to develop an HTTP Server that responds to web requests.

The memory consumption is amazing: only 2MB of heap is used when a Play 2.0 app is started. Tests on Guillaume's laptop have shown that it can handle up to 40,000 requests per second, without any optimization of the JVM. Not only that, but after the requests subside, garbage collection cleans up everything and reduces the memory consumption back to 2MB.

At this point, Guillaume did another demo, showing how everything is type-safe in 2.0, including the routes file. If you mistype (or comment one out) any routes, the compiler will find it and notify you. Play 2.0 also contains a compiled assets feature. This allows you to use Google's Closure Compiler, CoffeeScript and LESS. If you put your LESS files in app/assets/stylesheets, compilation errors will show up in your browser. If you put JavaScript files in app/assets/javascripts, the Closure compiler will be used and compilation errors will show up in your browser.

Play 2.0 ships with 3 different sample applications, all implemented in both Java and Scala. HelloWorld is more than just text in a browser, it includes a form that shows how validation works. Another app is computer-database. When Guillaume started it, we saw how evolutions were used to create the database schema from the browser. The Play Team has done their best to make the development process a browser-based experience rather than having to look in your console. The computer-database is a nice example of how to do CRUD and leverages Twitter's Bootstrap for its look and feel.

The last sample application is zentasks. It uses Ajax and implements security so you can see how to create a login form. It uses LESS for CSS and CoffeeScript and contains features like in-place editing. If you'd like to see any of these applications in action, you can stop by the Typesafe booth this week at Devoxx.

Unfortunately, there will be no migrating path for Play 1.x applications. The API seems very similar, but there are subtle changes that make this difficult. The biggest thing is how templating has changed from Groovy to Scala. To migrate from 1.2.x would be mostly a copy/paste, modify process. There are folks working on getting Groovy templates working in 2.0. The good news is zenexity has hundreds of 1.x applications in production, so 1.x will likely be maintained for many years.

Summary
This was a great talk on what's new in Play 2.0. I especially like the native support for LESS and CoffeeScript and the emphasis on trying to keep developers using two tools: their editor and the browser. The sample apps look great, but the documentation look sparse. I doubt I'll get a chance to migrate my Play 1.2.3 app to 2.0 this month, but I hope to try migrating sometime before the end of the year.

Posted in Java at Nov 16 2011, 05:58:09 AM MST 11 Comments

Developing with HTML5, CoffeeScript and Twitter's Bootstrap

HTML5 Logo This article is the fourth in a series about my adventures developing a Fitness Tracking application with HTML5, Play Scala, CoffeeScript and Jade. Previous articles can be found at:

  1. Integrating Scalate and Jade with Play 1.2.3
  2. Trying to make CoffeeScript work with Scalate and Play
  3. Integrating HTML5 Boilerplate with Scalate and Play

Developing Features
After getting my desired infrastructure setup, I started coding like a madman. The first feature I needed was a stopwatch to track the duration of a workout, so I started writing one with CoffeeScript. After spending 20 minutes playing with dates and setTimeout, I searched and found a stopwatch jQuery plug-in. I added this to my app, deployed it to Heroku, brought up the app on my iPhone 3G, clicked Start and started riding my bike to work.

When I arrived, I unlocked my phone and discovered that the time had stopped. At first, I thought this was a major setback. My disappointed disappeared when I found a Super Neat JavaScript Stopwatch and Kåre Byberg's version that worked just fine. This stopwatch used setTimeout, so by keeping the start time, the app on the phone would catch up as soon as you unlocked it. I ported Kåre's script to CoffeeScript and rejoiced in my working stopwatch.

# Created by Kåre Byberg © 21.01.2005. Please acknowledge if used 
# on other domains than http://www.timpelen.com.
# Ported to CoffeeScript by Matt Raible. Also added hours support.
flagClock = 0
flagStop = 0
stopTime = 0
refresh = null
clock = null

start = (button, display) ->
  clock = display
  startDate = new Date()
  startTime = startDate.getTime()
  if flagClock == 0
    $(button).html("Stop")
    flagClock = 1
    counter startTime, display
  else
    $(button).html("Start")
    flagClock = 0
    flagStop = 1

counter = (startTime) ->
  currentTime = new Date()
  timeDiff = currentTime.getTime() - startTime
  timeDiff = timeDiff + stopTime  if flagStop == 1
  if flagClock == 1
    $(clock).val formatTime timeDiff, ""
    callback = -> counter startTime
    refresh = setTimeout callback, 10
  else
    window.clearTimeout refresh
    stopTime = timeDiff

formatTime = (rawTime, roundType) ->
  if roundType == "round"
    ds = Math.round(rawTime / 100) + ""
  else
    ds = Math.floor(rawTime / 100) + ""
  sec = Math.floor(rawTime / 1000)
  min = Math.floor(rawTime / 60000)
  hour = Math.floor(rawTime / 3600000)
  ds = ds.charAt(ds.length - 1)
  start() if hour >= 24
  sec = sec - 60 * min + ""
  sec = prependZeroCheck sec
  min = min - 60 * hour + ""
  min = prependZeroCheck min
  hour = prependZeroCheck hour
  hour + ":" + min + ":" + sec + "." + ds

prependZeroCheck = (time) ->
  time = time + "" # convert from int to string
  unless time.charAt(time.length - 2) == ""
    time = time.charAt(time.length - 2) + time.charAt(time.length - 1)
  else
    time = 0 + time.charAt(time.length - 1)

reset = ->
  flagStop = 0
  stopTime = 0
  window.clearTimeout refresh
  if flagClock == 1
    resetDate = new Date()
    resetTime = resetDate.getTime()
    counter resetTime
  else
    $(clock).val "00:00:00.0"

@StopWatch = {
  start: start
  reset: reset
}

The Scalate/Jade template to render this stopwatch looks as follows:

script(type="text/javascript" src={uri("/public/javascripts/stopwatch.coffee")})

#display
  input(id="clock" class="xlarge" type="text" value="00:00:00.0" readonly="readonly")
#controls
  button(id="start" type="button" class="btn primary") Start
  button(id="reset" type="button" class="btn :disabled") Reset

:plain
  <script type="text/coffeescript">
    $(document).ready ->
      $('#start').click ->
        StopWatch.start this, $('#clock')

      $('#reset').click ->
        StopWatch.reset()
  </script>

Next, I wanted to create a map that would show your location. For this, I used Merge Design's HTML 5 Geolocation Demo as a guide. The HTML5 Geo API is pretty simple, containing only three methods:

// Gets the users current position
navigator.geolocation.getCurrentPosition(successCallback,
                                         errorCallback,
                                         options);
// Request repeated updates of position
watchId = navigator.geolocation.watchPosition(successCallback, errorCallback);

// Cancel the updates
navigator.geolocation.clearWatch(watchId);

After rewriting the geolocation example in CoffeeScript, I ended up with the following code in my map.coffee script. You'll notice it uses Google Maps JavaScript API to show an actual map with a marker.

# Geolocation with HTML 5 and Google Maps API based on example from maxheapsize: 
# http://maxheapsize.com/2009/04/11/getting-the-browsers-geolocation-with-html-5/
# This script is by Merge Database and Design, http://merged.ca/ -- if you use some, 
# all, or any of this code, please offer a return link.

map = null
mapCenter = null
geocoder = null
latlng = null
timeoutId = null

initialize = ->
  if Modernizr.geolocation
    navigator.geolocation.getCurrentPosition showMap

showMap = (position) ->
  latitude = position.coords.latitude
  longitude = position.coords.longitude
  mapOptions = {
    zoom: 15,
    mapTypeId: google.maps.MapTypeId.ROADMAP
  }
  map = new google.maps.Map(document.getElementById("map"), mapOptions)
  latlng = new google.maps.LatLng(latitude, longitude)
  map.setCenter(latlng)

  geocoder = new google.maps.Geocoder()
  geocoder.geocode({'latLng': latlng}, addAddressToMap)

addAddressToMap = (results, status) ->
  if (status == google.maps.GeocoderStatus.OK) 
    if (results[1]) 
      marker = new google.maps.Marker({
          position: latlng,
          map: map
      })
      $('#location').html('Your location: ' + results[0].formatted_address)
  else 
    alert "Sorry, we were unable to geocode that address."

start = ->
  timeoutId = setTimeout initialize, 500

reset = ->
  if (timeoutId)
    clearTimeout timeoutId

@Map = {
  start: start
  reset: reset
}

The template to show the map is a mere 20 lines of Jade:

script(type="text/javascript" src="//www.google.com/jsapi")
script(type="text/javascript" src="//maps.googleapis.com/maps/api/js?sensor=false")

:css
  .demo-map {
    border: 1px solid silver;
    height: 200px;
    margin: 10px auto;
    width: 280px;
  }

#map(class="demo-map")

p(id="location")
  span(class="label success") New
  | Fetching your location with HTML 5 geolocation...

script(type="text/javascript" src={uri("/public/javascripts/map.coffee")})
:javascript
    Map.start();

The last two features I wanted were 1) distance traveled and 2) drawing the route taken on the map. For this I learned from A Simple Trip Meter using the Geolocation API. As I was beginning to port the JS to CoffeeScript, I thought, "there's got to be a better way." I searched and found Js2coffee to do most of the conversion for me. If you know JavaScript and you're learning CoffeeScript, this is an invaluable tool.

I tried out the trip meter that evening on a bike ride and noticed it said I'd traveled 3 miles when I'd really gone 6. I quickly figured out it was only calculating start point to end point and not taking into account all the turns in between. To view what was happening, I integrated my odometer.coffee with my map using Google Maps Polylines. Upon finishing the integration, I discovered two things, 1) HTML5 geolocation was highly inaccurate and 2) geolocation doesn't run in the background.

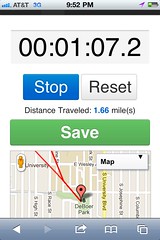
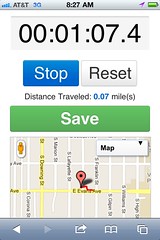
I was able to solve the first problem by passing in {enableHighAccuracy: true} to navigator.geolocation.watchPosition(). Below are two screenshots showing before high accuracy and after. Both screenshots are from the same two-block walk.

Without {enableHighAccuracy: true} With {enableHighAccuracy: true}

The second issue is a slight show-stopper. PhoneGap might be able to solve the problem, but I'm currently using a workaround → turning off auto-lock and keeping Safari in the foreground.

Making it look good
After I got all my desired features developed, I moved onto making the app look good. I started by using SASS for my CSS and installed Play's SASS module. I then switched to LESS when I discovered and added Twitter's Bootstrap to my project. At first I used Play's LESS module (version 0.3), but ran into compilation issues. I then tried Play's GreenScript module, but gave up on it when I found it was incompatible with the CoffeeScript module. Switching back to the LESS module and using the "0.3.compatibility" version solved all remaining issues.

You might remember that I integrated HTML5 Boilerplate and wondering why I have both Bootstrap and Boilerplate in my project. At this point, I don't think Boilerplate is needed, but I've kept it just in case it's doing something for HTML5 cross-browser compatibility. I've renamed its style.css to style.less and added the following so it has access to Bootstrap's variables.

/* Variables from Bootstrap */
@import "libs/variables.less";

Then I made my app look a lot better with layouts, stylish forms, a fixed topbar and alerts. For example, here's the CoffeeScript I wrote to display geolocation errors:

geolocationError = (error) ->
  msg = 'Unable to locate position. '
  switch error.code
    when error.TIMEOUT then msg += 'Timeout.'
    when error.POSITION_UNAVAILABLE then msg += 'Position unavailable.'
    when error.PERMISSION_DENIED then msg += 'Please turn on location services.'
    when error.UNKNOWN_ERROR then msg += error.code
  $('.alert-message').remove()
  alert = $('<div class="alert-message error fade in" data-alert="alert">')
  alert.html('<a class="close" href="#">×</a>' + msg);
  alert.insertBefore($('.span10'))

Then I set about styling up the app so it looked good on a smartphone with CSS3 Media Queries. Below is the LESS code I used to hide elements and squish the widths for smaller devices.

@media all and (max-device-width: 480px) {
  /* hide scrollbar on mobile */
  html { overflow-y:hidden }
  /* hide sidebar on mobile */
  .home .span4, .home .page-header, .topbar form {
    display: none
  }
  .home .container {
    width: 320px;
  } 
  .about {
    .container, .span10 {
      width: 280px;
    }
    .span10 {
      padding-top: 0px;
    }
  }

Tools
In the process of developing a stopwatch, odometer, displaying routes and making everything look good, I used a number of tools. I started out primarily with TextMate and its bundles for LESS, CoffeeScript and Jade. When I started writing more Scala, I installed the Scala TextMate Bundle. When I needed some debugging, I switched to IntelliJ and installed its Scala plugin. CoffeeScript, LESS and HAML plugins (for Jade) were already installed by default. I also used James Ward's Setup Play Framework with Scala in IntelliJ.

Issues
I think it's obvious that my biggest issue so far is the fact that a webapp can't multitask in the background like a native app can. Beyond that, there's accuracy issues with HTML5's geolocation that I haven't seen in native apps.

I also ran into a caching issue when calling getCurrentPosition(). It only worked the first time and I had to refresh my browser to get it to work again. Strangely enough, this only happened on my desktop (in Safari and Firefox) and worked fine on my iPhone. Unfortunately, it looks like PhoneGap has issues similar to this.

My workaround for no webapp multitasking is turning off auto-lock and leaving the browser in the foreground while I exercise. The downside to this is it really drains the battery quickly (~ 3 hours). I constantly have to charge my phone if I'm testing it throughout the day. The testing is a real pain too. I have to deploy to Heroku (which is easy enough), then go on a walk or bike ride. If something's broke, I have to return home, tweak some things, redeploy and go again. Also, there's been a few times where Safari crashes halfway through and I lose all the tracking data. This happens with native apps too, but seemingly not as often.

If you'd like to try the app on your mobile phone and see if you experience these issues, checkout play-more.com.

Summary
Going forward, there's still more HTML5 features I'd like to use. In particular, I'd like to play music while the fitness tracker is running. I'd love it if cloud music services (e.g. Pandora or Spotify) had an API I could use to play music in a webapp. Soundcloud might be an option, but I've also thought of just uploading some MP3s and playing them with the <audio> tag.

I've really enjoyed developing with all these technologies and haven't experienced much frustration so far. The majority has come from integrating Scalate into Play, but I've resolved most problems. Next, I'll talk about how I've improved Play's Scalate support and my experience working with Anorm.

Posted in Java at Oct 20 2011, 02:47:36 PM MDT 3 Comments

Integrating HTML5 Boilerplate with Scalate and Play

HTML5 Boilerplate is a project that provides a number of basic files to help you build an HTML5 application. At its core, it's an HTML template that puts CSS at the top, JavaScript at the bottom, installs Chrome Frame for IE6 users and leverages Modernizr for legacy browser support. It also includes jQuery with the download. One of the major benefits of HTML5 Boilerplate is it ships with a build system (powered by Ant) that concatenates and minimizes CSS and JS for maximum performance. From html5boilerplate.com:

Boilerplate is not a framework, nor does it prescribe any philosophy of development, it's just got some tricks to get your project off the ground quickly and right-footed.

I like the idea of its build system to minify and gzip, but I'd probably only use it if I was working on a project that uses Ant. Since I'm using it in a Play project, the whole Ant build system doesn't help me. Besides, I prefer something like wro4j. Wro4j allows you to specify a group of files and then it compiles, minimizes and gzips them all on-the-fly. As far as I know, Play doesn't have any support for Servlet Filters, so using wro4j in Play is not trivial.

The good news is Play has a GreenScript module that contains much of the wro4j functionality. However, since I'm using Scalate in my project, this goodness is unavailable to me. In the future, the Scalate Team is considering adding better wro4j, JavaScript and CSS integration. In the meantime, I'm going to pretend I don't care about concatenation and minimization and trundle along without this feature.

To add HTML5 Boilerplate to my Play project, I performed the following steps:

  • Downloaded the 2.0 Zipball.
  • Copied all the static files to my project. Below are the commands I used (where $boilerplate-download is the expanded download directory and ~/dev/play-more is my project):
    cd $boilerplate-download
    cp 404.html ~/dev/play-more/app/views/errors/404.html
    cp *.png ~/dev/play-more/public/.
    cp crossdomain.xml ~/dev/play-more/public/.
    cp -r css ~/dev/play-more/public/stylesheets/.
    cp favicon.ico ~/dev/play-more/public/.
    cp humans.txt ~/dev/play-more/public/.
    cp -r js/libs ~/dev/play-more/public/javascripts/.
    cp robots.txt ~/dev/play-more/public/.
    
  • Copied the index.html to ~/dev/play-more/app/templates/layouts/default.jade and modified it to use Jade syntax. Since I downloaded the comments-heavy version, I modified many of them to be hidden in the final output.
    -@ val body: String 
    -@ var title: String = "Play More"
    -@ var header: String = ""
    -@ var footer: String = ""
    !!! 5
    / paulirish.com/2008/conditional-stylesheets-vs-css-hacks-answer-neither/ 
    <!--[if lt IE 7]> <html class="no-js ie6 oldie" lang="en"> <![endif]-->
    <!--[if IE 7]>    <html class="no-js ie7 oldie" lang="en"> <![endif]-->
    <!--[if IE 8]>    <html class="no-js ie8 oldie" lang="en"> <![endif]-->
    -# Consider adding an manifest.appcache: h5bp.com/d/Offline 
    <!--[if gt IE 8]><!--> <html class="no-js" lang="en"> <!--<![endif]-->
    head
      meta(charset="utf-8")
    
      -# Use the .htaccess and remove these lines to avoid edge case issues. More info: h5bp.com/b/378 
      meta(http-equiv="X-UA-Compatible" content="IE=edge,chrome=1")
    
      title=title
      meta(name="description" content="")
      meta(name="author" content="Matt Raible ~ [email protected]")
    
      -# Mobile viewport optimized: j.mp/bplateviewport 
      meta(name="viewport" content="width=device-width,initial-scale=1")
    
      -# Place favicon.ico and apple-touch-icon.png in the root directory: mathiasbynens.be/notes/touch-icons
    
      -# CSS: implied media=all
      link(rel="stylesheet" href={uri("/public/stylesheets/style.css")})
      -# end CSS
    
      -# More ideas for your <head> here: h5bp.com/d/head-Tips 
      -#
        All JavaScript at the bottom, except for Modernizr / Respond.
        Modernizr enables HTML5 elements & feature detects; Respond is a polyfill for min/max-width CSS3 Media Queries
        For optimal performance, use a custom Modernizr build: www.modernizr.com/download/ 
    
      script(type="text/javascript" src={uri("/public/javascripts/libs/modernizr-2.0.6.min.js")})
    body
      #container
        header = header
        #main(role="main")
          != body
        footer = footer
    
      -# JavaScript at the bottom for fast page loading 
      
      / Grab Google CDN's jQuery, with a protocol relative URL; fall back to local if offline 
      script(type="text/javascript" src="//ajax.googleapis.com/ajax/libs/jquery/1.6.2/jquery.min.js")
      :javascript
        window.jQuery || document.write('<script src={uri("/public/javascripts/libs/jquery-1.6.2.min.js")}><\/script>')
    
      -# Change UA-XXXXX-X to be your site's ID 
      :javascript
        window._gaq = [['_setAccount','UA-25859875-1'],['_trackPageview'],['_trackPageLoadTime']];
        Modernizr.load({
          load: ('https:' == location.protocol ? '//ssl' : '//www') + '.google-analytics.com/ga.js'
        });
    
      -# Prompt IE 6 users to install Chrome Frame. Remove this if you want to support IE 6. 
      -# http://chromium.org/developers/how-tos/chrome-frame-getting-started 
      /[if lt IE 7]
        script(src="//ajax.googleapis.com/ajax/libs/chrome-frame/1.0.3/CFInstall.min.js")
        :javascript
          window.attachEvent('onload',function(){CFInstall.check({mode:'overlay'})})
            
    != "</html>"
    
  • Next, I had to add support for layouts to my homegrown Scalate support. I did this by specifying a layoutStrategy when initializing the TemplateEngine. From play-more/app/controllers/ScalateTemplate.scala:
    engine.classLoader = Play.classloader
    engine.layoutStrategy = new DefaultLayoutStrategy(engine, 
      Play.getFile("/app/templates/layouts/default" + scalateType).getAbsolutePath)
    engine
    

That's it! Now I have HTML5 Boilerplate integrated into my Play/Scalate/Jade application. To set the title and header in my index.jade, I simply added the following lines at the top:

- attributes("title") = "Counting"
- attributes("header") = "HTML5 Rocks!"

CoffeeScript Tip
Yesterday, I mentioned that I was having issues getting CoffeeScript to work with Scalate and that I was going to try and get the in-browser compiler working. First of all, reverting to Scalate 1.4.1 didn't work because there is no CoffeeScript support in 1.4.1. So I stayed with 1.5.2 and used PandaWood's Running CoffeeScript In-Browser Tutorial. I copied coffee-script.js to ~/dev/play-more/public/javascripts/libs and added a reference to it in my default.jade layout:

-# JavaScript at the bottom for fast page loading 
script(type="text/javascript" src={uri("/public/javascripts/libs/coffee-script.js")})

Then I was able to write CoffeeScript in a .jade template using the following syntax:

:plain
  <script type="text/coffeescript">
    alert "hello world"
  </script>

Summary
If you've integrated HTML5 Boilerplate into your Play application, I'd love to hear about it. Now that I have all the infrastructure in place (Jade, CoffeeScript, HTML5 Boilerplate), I'm looking forward to getting some development done. Who knows, maybe I'll even come up with my own Play Un-Features That Really Irk My Inner Geek.

Posted in Java at Sep 28 2011, 08:49:35 AM MDT 2 Comments